KOPFJAGER KJ86002 User manual

Reaper Rail
Picatinny/Arca Swiss
KJ86002 - KJ86003
USER MANUAL

KOPFJÄGER REAPER RAIL USER MANUAL
Thank you for choosing Kopfjäger, the world’s best, most versatile tripod-mounted gun rest systems.
Every ounce of product knowledge you need to become a Kopfjäger Reaper Rail expert is contained in
these few pages—the rest is just trigger time. Welcome to our ranks.
1. Control Arm
2. Mounting Base
3. Hinge Block
4. Saddle Clamp
5. Drag Adjustment Knob
6. Rail Adjustment Knob
7. Locking Pin
8. Direct Mount Plate
9. Rail Clamp
10. Cant Swivel
11. Cant Adjustment Knob
12. Dowel Pin Cover (only remove to clean)
DIAGRAM
11
2
1
7
ASSEMBLY
Your Reaper Rail comes in a slightly disassembled form. To assemble, simply screw the control arm
into the saddle clamp. The control arm is reverse threaded. Do not overtighten. Locking the Reaper Rail
into position takes minimal torque. Overtightening the control arm may damage your Reaper Rail. Your
Reaper Rail is now assembled and ready to attach to a tripod or other mounting xture like the Kopfjäger
Ambush. Your Reaper Rail is equipped with a 3/8”-16 threaded hole on the underside of the mounting
base. If your tripod or mounting xture requires 1/4”-20 threading, your Reaper Rail includes an adapter.
Once you ensure your thread patterns match, you are ready to mount the Reaper Rail.
6
ATTATCHING TO TRIPOD OR OTHER MOUNTING FIXTURES
When in the locked position, the locking pin prevents rotation
of the base when attaching or removing the Reaper Rail from a
tripod or other mounting xture. To mount the Reaper Rail to the
tripod, you rst need to ensure the locking pin is engaged and
in the locked position. To do this, rotate the hinge block while
holding onto the base plate. You should hear an audible click
when the locking pin engages in one of the four stops. These
stops are located in 90-degree increments. You should now be
able to independently twist the base plate from the hinge block.
After locking the base plate, you can now tighten the Reaper Rail
to the tripod. Once you have rmly mounted the Reaper Rail to
the tripod, disengage the locking pin by pulling the knob out and
slightly rotating it in either direction.
UNLOCKED
LOCKED
12
3
8
9
4
10
5

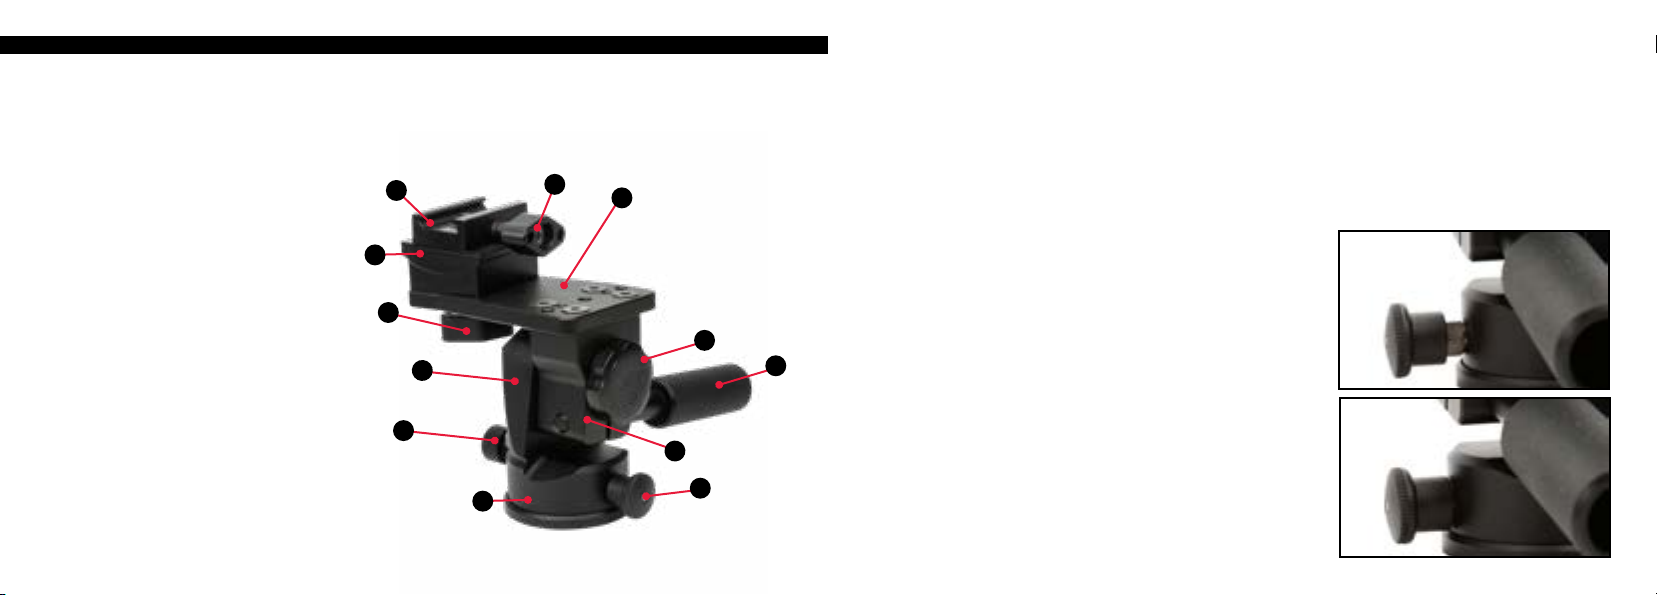
DRAG ADJUSTMENT (PANNING)
Opposite the locking pin, you will nd the Drag Adjustment Knob. The Reaper Rail is designed to
enhance engagements with stationary targets as well as tracking moving targets. As such, the horizontal
pan was not designed to completely lock down. The drag adjustment knob is constructed of a nylon tip to
create a smooth horizontal pan that can increase or decrease the resistance of the horizontal motion. Do
not overtighten the drag knob. By doing so, it could damage your Reaper Rail.
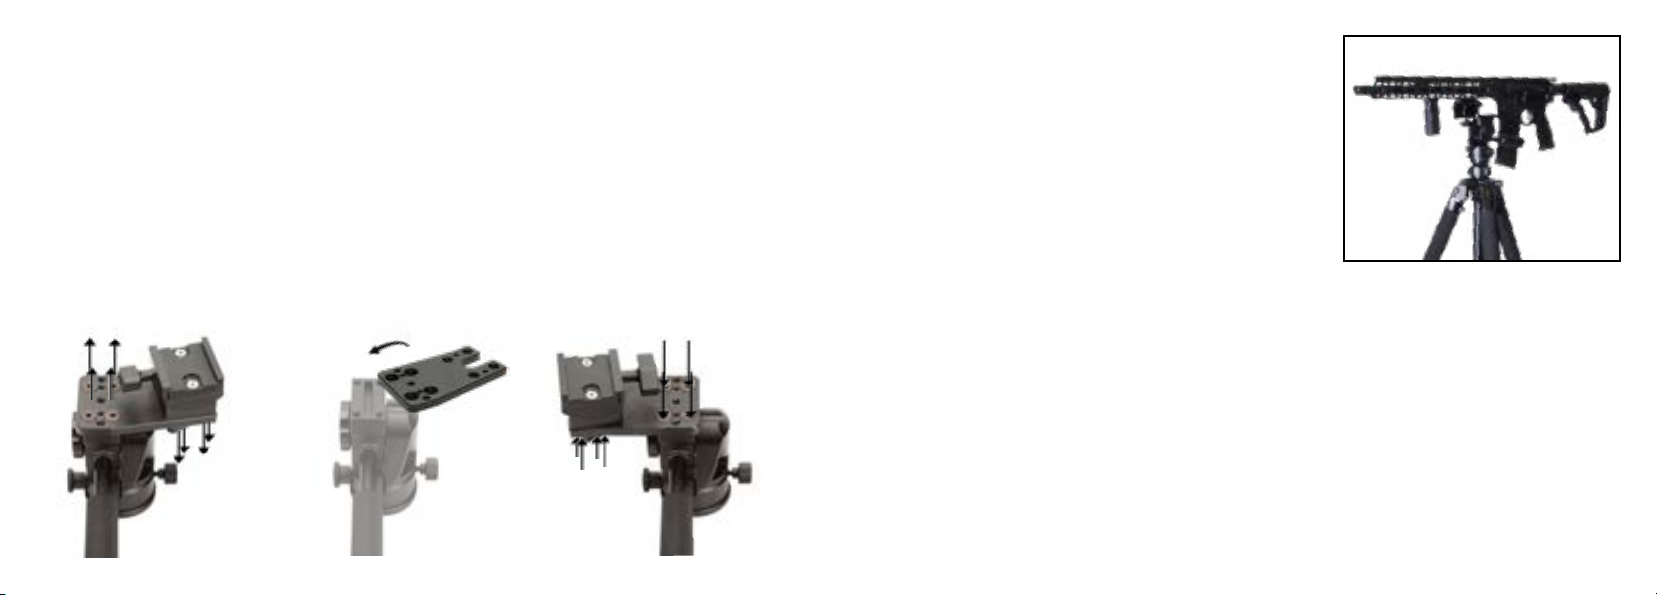
REVERSE HANDING FOR LEFT HANDED SHOOTERS
The Reaper Rail is shipped in a right-handed shooter orientation. For left-handed shooters, simply
remove the 4 allen screws from the grip’s control handle assembly by using a 5/32” allen wrench. Next
remove the 4 screws that secure the Rail Clamp to the Direct Mount Plate. Flip the mount plate upside
down and transfer it to the left side of the Saddle Clamp and reinstall the screws and allen screws.
SECURING A STOCK OR CHASSIS IN THE RAIL
To secure a stock or chassis in the Reaper Rail, set the rearm’s
Arca Swiss or Picatinny rail section into the rail clamp and tighten
the tension knob located on the side of the clamp until the rearm
is secure.
CANT ADJUSTMENT
The Reaper Rail includes cant adjustment. In long-range shooting
cant affects point-of-impact (POI); in fact, more extreme angles
of cant, as well as longer distance shooting, especially extreme
distances, produces signicant POI shift—just 1° of cant may result
in a 6” POI shift at 1,000 yards. For this reason, the Reaper Rail includes 22° of cant adjustment (11°
in each direction). For proper cant adjustment, you should have a cant indicator (most often a bubble
level attachment) correctly attached to your stock, optic mount or the optic itself.
To adjust cant, loosen the cant adjustment knob. Rotate your rearm clockwise (right) or
counterclockwise (left) on the cant swivel until your cant indicator bubble is centered. Holding the rie
steady, tighten the cant adjustment knob. Check for cant again and adjust if necessary. You may also
choose to shoot with the cant adjustment knob slightly loosened to allow for on-the-y cant adjustments.
WARNING
Before handling the Reaper Grip, read and understand the contents of your bipod’s manual, and the
Kopfjäger Reaper Grip manual. Follow all standard safety precautions and procedures during use.

GENERAL DESCRIPTION
Brand Name Kopfjäger
Model Name Reaper Rail System - Picatinny
Category Name Shooting Rests
SKU Number KJ86002
UPC Number 812495026126
TECHNICAL SPECIFICATIONS
Dimensions, in/mm 6 x 5.5 x 6.5 / 152 x 139 x 165
Material Aluminum
Rail Tilt +- 11°
Pan rotation angle 360°
Vertical Rotation Angle 87° Down , 21° Up
Mounting 3/8” - 16 Threaded Hole
Weight, lbs/g 1.97 / 892
INCLUDED ACCESSORIES
Camera Thread Adapter
FEATURES
Smooth Pan/Tilt
Mounts Directly to Picatinny Rail
Locking Cant Adjustment
Assembled in the USA
SPECIFICATION: PICATINNY
WARNING - CONTINUED
• Never leave a loaded rearm in the rest without having positive physical control over the shooting
system.
• Do not exceed the tripod’s maximum load capacity.
• Ensure the Reaper Grip is fastened.
• Always remove camera, spotting scopes and other accessories during setup or transport.
• Please use standard lubricant or grease when necessary.
MAINTENANCE
To clean the Reaper Rail’s stainless steel dowel pin, use a 5/32” Allen wrench to remove the four
Allen-head screws located at the top of the direct mount plate that secures the plate to the top of the
saddle clamp. Next, remove the dowel pin cover and loosen or remove the control arm. Pull the saddle
clamp (away from the hinge block) off of the dowel pin. Wipe away debris from the dowel pin. Re-install
the saddle clamp on the dowel pin. Re-install the dowel pin cover. Re-install the control arm. Re-attach the
direct mount plate to the top of the saddle clamp.
• Do not use lubricants or grease on the stainless steel dowel pin
• Use standard lubricant or grease on the control arm threads as necessary
Please visit www.kjrests.com for warrenty details and information

GENERAL DESCRIPTION
Brand Name Kopfjäger
Model Name Reaper Rail System - Arca Swiss
Category Name Shooting Rests
SKU Number KJ86003
UPC Number 812495026133
TECHNICAL SPECIFICATIONS
Dimensions, in/mm 6 x 5.5 x 6.5 / 152 x 139 x 165
Material Aluminum
Rail Tilt +- 11°
Pan rotation angle 360°
Vertical Rotation Angle 87° Down , 21° Up
Mounting 3/8” - 16 Threaded Hole
Weight, lbs/g 1.99 / 904
INCLUDED ACCESSORIES
Camera Thread Adapter
FEATURES
Smooth Pan/Tilt
Mounts Directly to Arca Swiss Rail
Locking Cant Adjustment
Assembled in the USA
SPECIFICATION: ACRA SWISS
This manual suits for next models
1
Table of contents
Other KOPFJAGER Camera Accessories manuals
Popular Camera Accessories manuals by other brands

Exide
Exide ABSOLYTE GX and Installation and operating guide

Moog Videolarm
Moog Videolarm FusionDome FDW75C2N Specifications

VORTEX OPTICS
VORTEX OPTICS SKYLINE quick start guide

WOODCOMP
WOODCOMP EXTRALITE G2 Series owner's manual

Kodak
Kodak EASTMAN PLUS-X 5231 Technical data

Data Video
Data Video TP-100 instruction manual