Korec Trimble R Series Instruction Manual

Guide May 2023
Bluetooth Connection Guide
Trimble R –Series GNSS and a Mala Easy Locator Core
Index

Guide May 2023
Contents
Index...........................................................................................................................................1
Introduction ...............................................................................................................................3
Required Instruments ................................................................................................................3
Setting NMEA output using the Web Interface.........................................................................4
Configure the Receiver for automated connection to the internet and VRS correction
service, upon power on. ........................................................................................................6
Configure the NMEA output ..................................................................................................9
MALA Controller App...............................................................................................................13

Guide May 2023
Introduction
In the world of capturing Utilities, it’s common to require a connection from a GNSS receiver
to a GPR unit, working in RTK (real time kinematic), that provides accurate positional
information to the GPR unit.
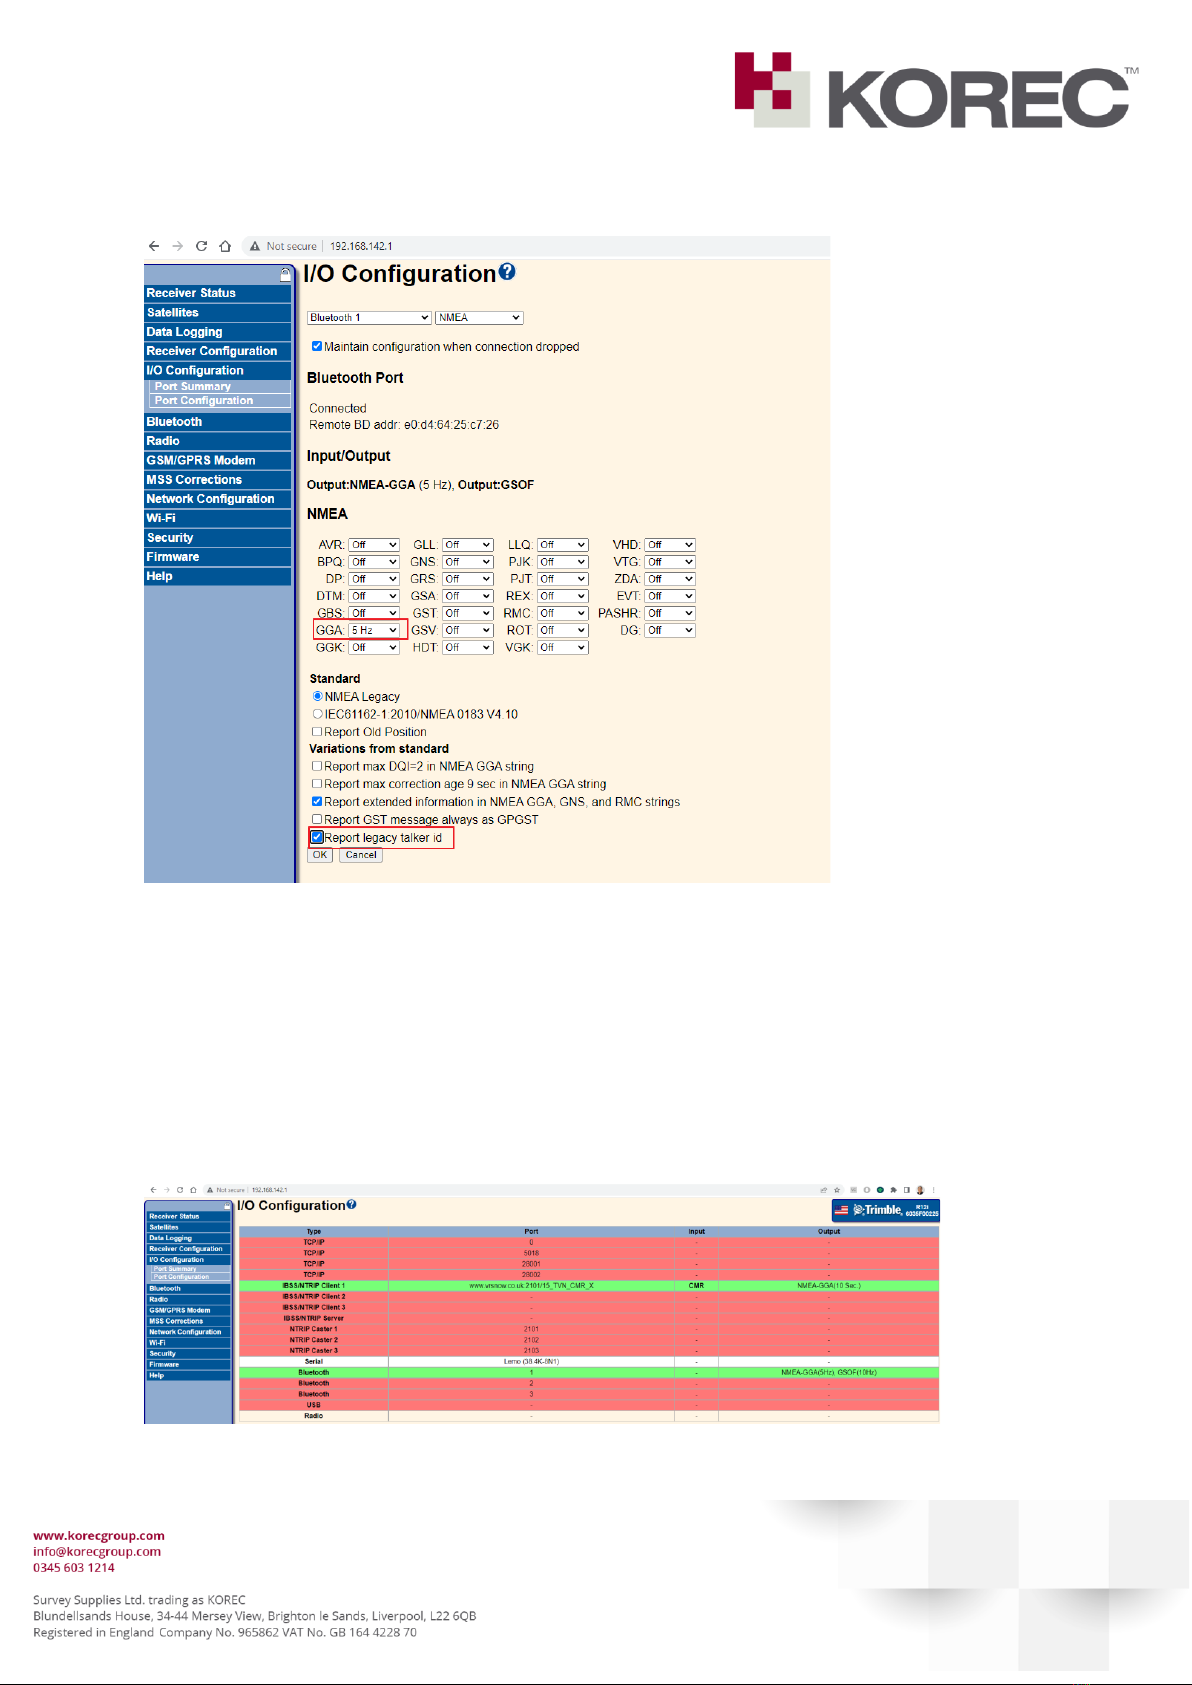
This guide will explain how to connect a Trimble R1x –Series GNSS Receiver to a MALA Easy
Locator Core, via Bluetooth
•By using the Receivers Web Interface
Required Instruments
1. MALA GPR running with MALÅ Controller App for Android
2. Trimble R12i with NMEA option included. If not included, contact your sales
representative for an upgrade to your receiver.
a. This guide will also be applicable to an R10 and R12 Receivers. Just no tilt
functionality in those units is supported.
3. SIM card inside the receiver
NOTE: The NMEA output is an optional license for a Trimble GNSS. Please check with your sales
representative or technical support to see if your unit has this option, or if an upgrade is required.
NOTE: This applies only to the MALA unit with the Android Tablet

Guide May 2023
Setting NMEA output using the Web Interface
The Trimble Receivers R10, R12 and R12i all have built-in a Web Interface, which can be
accessed by Wi-Fi. Henceforth in this guide all of them will be referred to as the receiver
only.
•Turn on your receiver.
•Find your receiver under the Wi-Fi list of devices and connect –no wifi password is
required.
•Open a web browser (Chrome, Firefox, Edge, Safari or similar)
•Type in the address http://192.168.142.1.
The following webpage should open:
By default, the user name and password are:
User Name: admin
Password: password

Guide May 2023
You will be prompted to change the current password to something else:
Type in the old password and select a New Password.
Make a note in a safe place for yourself on what the new password will be.
Click “Update”
NOTE: If the user forgets the password, you’ll need to reset the receiver, and will need to redo
these settings.
To reset the receiver, have the receiver turned off initially. Then Press and hold for 30 Seconds
The Radio, Wi-Fi, and Satellite LEDs turn off after 2 seconds. After 15 seconds, the Satellite LED
comes on and stays on for 15 seconds, then turns off to indicate that it is time to release the
Power button. The receiver then restarts.
From there you can re-log in to the web page, and change the password again, before changing
the NMEA settings.

Guide May 2023
Click Save on the next screen, as below:
Configure the Receiver for automated connection to the internet and VRS correction
service, upon power on.
There is no requirement to use a field controller with this setup.
A SIM with mobile internet allowance must be placed inside the receiver head.
Under GSM\GPRS Modem - Configuration type in your SIM provider APN details:
Press “Save”
NOTE: The details below are for the KOREC issued Roaming SIM.
APN: internet.m2mportal.de
User: m2m
Password: sim
Please consult with your mobile service provider for the relevant APN settings for your SIM, if
using a different one.

Guide May 2023
Under IO Configuration, select the IBSS/NTRIP Client 1 option.

Guide May 2023
Populate the fields as follows:
NOTE: Username and password in this screen are your VRS assigned details. Please
confirm with KOREC these details if required.

Guide May 2023
Configure the NMEA output
Select the “IO Configuration” menu on the left.
Trimble receivers have 3 Bluetooth ports available.
Port 1 is usually reserved for the Field Controller, but in the case of the MALA controller app,
we have to set this port to stream NMEA.
Select Bluetooth Port 1:

Guide May 2023
Please configure the screen as shown below:
•Select from the drop down list NMEA
•Click on the box to “maintain configuration if connection is dropped”
•Under the GGA dropdown list, select 5Hz (which correlates to 0.2s).
•Click “Report legacy talker Id”
•Click OK.
This is what the interface looks like once connected and streaming.

Guide May 2023
•Next we need to make this changes permanent.
On your left menu select Receiver Configuration, and then, Application Files.
Under the Operation dropdown list, select Store Current File.
Type in the Filename “CURRENT”. Press OK. The receiver will prompt you to overwrite the
existing one, accept this.

Guide May 2023
•Repeat “Store Current File”
•Under Filename now type in “power_up”. Press OK. The Receiver will now transmit
NMEA through Bluetooth Port 1, GGA at 5Hz every time it’s turned on.
•Whenever you start\Power on your GNSS Receiver , it will automatically connect to
the internet, and stream NMEA from Bluetooth Port 1 for the Mala controller App.

Guide May 2023
MALA Controller App
Figure 1 - Pair your receiver via Bluetooth to the tablet
Figure 2 - If a code is required, it will be 0000
Figure 3 - Start a new Project in Mala Controller
Figure 4 - Select Settings

Guide May 2023
Figure 5 - Click Connect - External GPS
Figure 6 - Select your paired receiver
Figure 7 - Check if "RTK" is now displaying in the bottom of
the screen
Figure 8 - Clicking on RTK reports the current coordinates
and Fix Level
Table of contents