KOREL KMA1-12GRC User manual

PORTABLE AIR CONDITIONER
INSTALLATION &OPERATIONS MANUAL
FOR FUTURE REFERENCE
KMA1-12GRC
KOREL
AIR CONDITIONING

Wiring diagram
HEATER ONLYTHE UNIT WITH
HEATING MODE HAS HEATER
Cooling
Heating
12

Causes Solutions
The Wind Blowing Out, But The Cooling Effect Is Bad
Mistakes in temperature setting.
The air filteris blocked bydust.
The air inletor outlet ofmachine is
blocked.
Turn the air conditioner on in very
hot room.
Cooling capacityis insufficient .
The doors or windows are open.
Set a proper temperature, setting
temperature should belower than
ambient temperature.
Clean the airfilter.
Remove the obstruction.
Allow additional time to remove
stored heat from walls ,ceiling,
floor and furniture.
Reconfirm the required cooling
capacity with yourdealer.
Close the doors and windows.
Causes Solutions
Noise or vibration
The ground isnot level ornot flat
enough.
Place the unit on a flat, level ground
if possible.
11
CONTENTS
Brief Introduction .......................................................
Technical Specifications.............................................
Parts Description ........................................................
Accessories.................................................................
Control Panel...............................................................
Operation.....................................................................
Installation ..................................................................
Maintenance ...............................................................
Troubleshooting .........................................................
Wiring diagram ...........................................................
1
2
3
4
5
7
9
10
12
5

Brief Introduction
This mobile air conditioner is a new generation airconditioner which is
ideal for using in bedroom, study room, lobby, office, meeting room,ware-
house, attics, sports hall and other entertainment room. Its flexibility chara-
cteristic enable easy adjustment to desirable room temperature and humidity.
Besides, the built-in filter can remove floating dust, purify air to create a
healthy working environment.
It is designed under novelty, practically and convenience principlesto
satisfy the needs for convenient, efficient and mobile small-sized air con-
ditioner. It features easy using, no need for complicated installation and
convenient maintenance. Besides, the double control system (remote control
/manual control optional ) eases its operation.
The unit is highly competitive to other cooling capableproducts.
With tidy structure, multiple functions, auto-drain function andreasonable
ventilation design, the unit minimizes noise and power consumption.
Aiming at harmonious human life, our company adopts human factors into
design, produced this high efficiency mobile air conditioner.
To save the cost of a servicecall, please try the suggestions below to see if
you can solve your problem without outside help.
Causes Solutions
The power switch is released.
Power supply failure.
The fuse isburnt.
It doesn't reach the set time for start
up.
Switch on thepower.
Wait for the recovery of power supply.
Replace the fuse.
Wait or eliminate the original setting.
Causes Solutions
Unit Doesn't Start When Pressing ON/OFF Button
It is not three minutes after switch off.
Room temperature is lower than the
setting temperature.
Wait three minutes.
Reset the temperature.
Troubleshooting
Air Condition Will Not Operate
2.Wipe the unit with dry cloth .
3.If the unit is very dirty, please wipe with
wet cloth dipped by cold water .
Never use hot water over 40 (104 )to clean the air filter.
Do not use gasoline ,benzene ,thinner or any other chemicals, or any liquid
insecticide on the air conditioner, as these substances may cause flaking off of
the paint ,cracking or deformation of plastic parts .
Never attempt to clean the unit by pouring water directly over any of the
surface areas, as this will cause deterioration of electrical components and
wiring insulation.
1 10
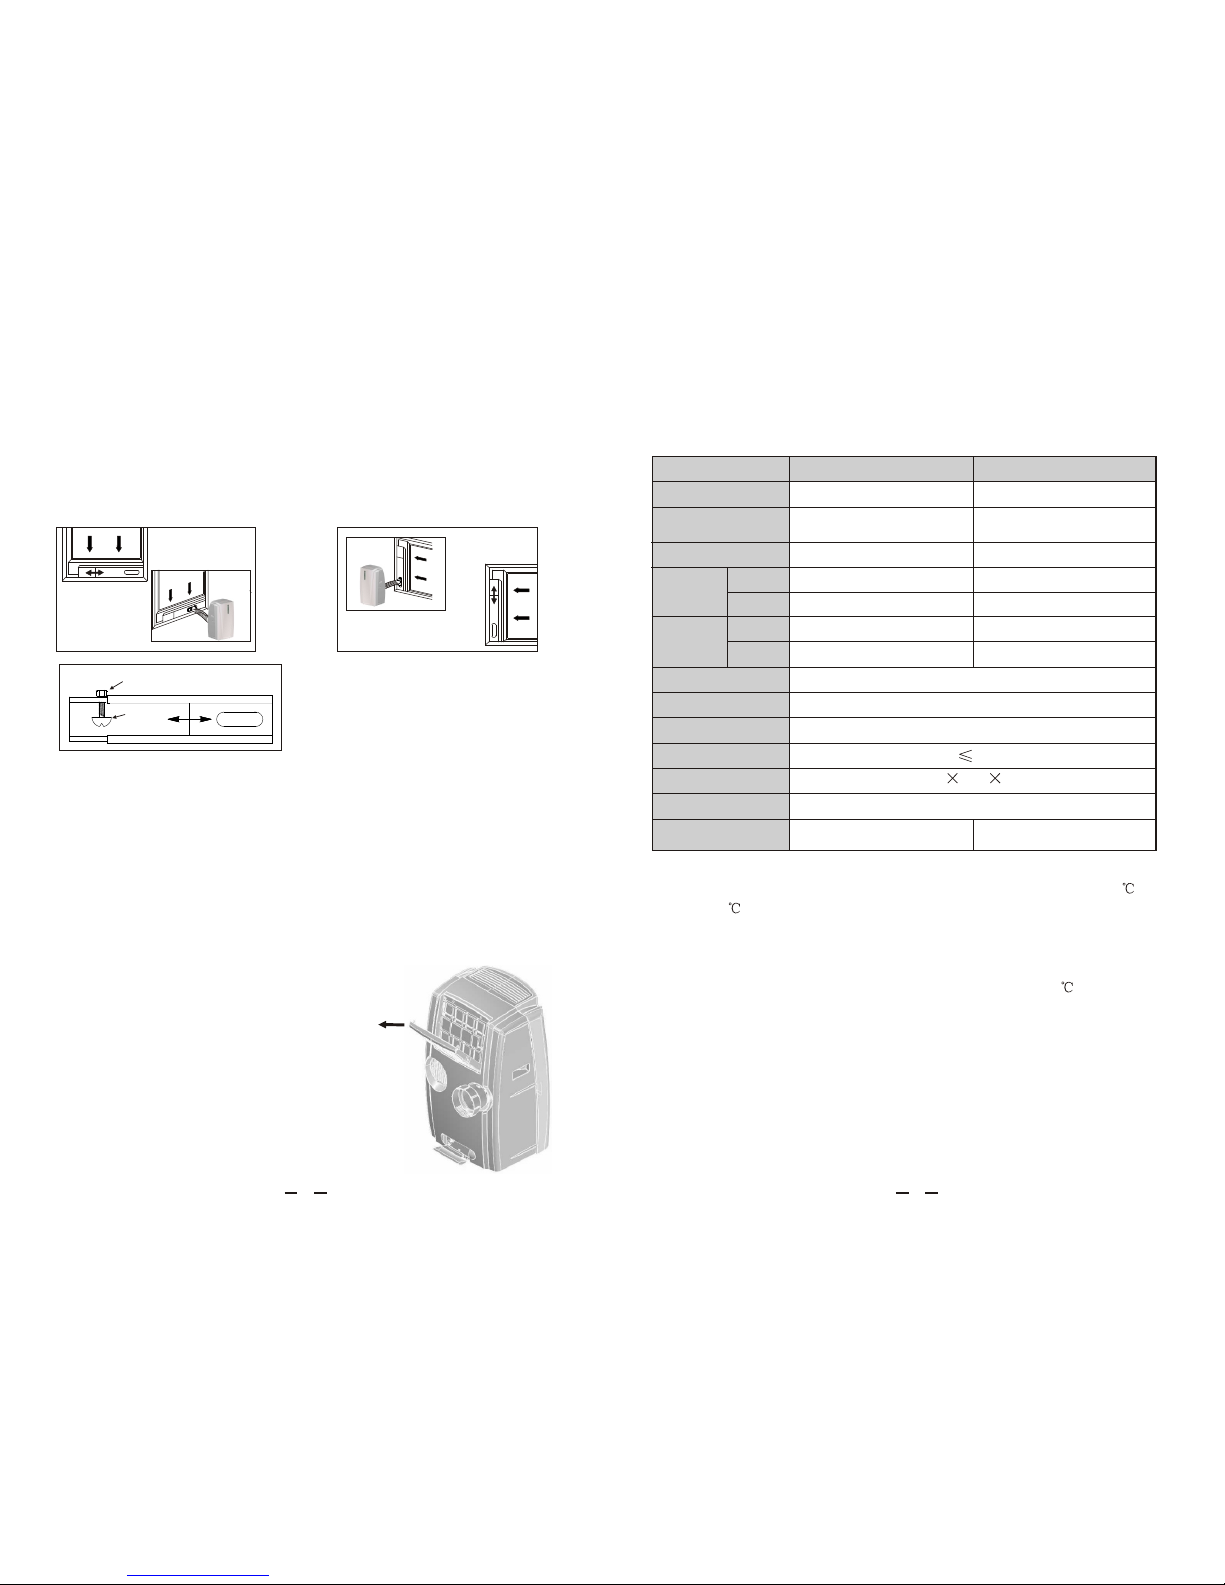
Note: if you dont use theunit for along time,
please pull outthe rubber plugto drain
the inside waterout referring toright figure.
,
Cleaning The Unit
1.For the purpose of safety, please turn off the
air conditioner and cut off the power supply .

Note:
1.The above cooling capacity are calculated at ambient temperature DB 30 ,
WB 25.4 .
2.Our company has quick technical improvement. There will be no prior
notice for any change of technical data. Please read the nameplate on the
air conditioner.
3. The working temperature range of the air conditioner is 18~35 .
Cleaning Air Filter
If the air filter is covered by dust, the cooling effect will be decreased.
Please clean the air filter every two weeks.
1. Turn off the air conditioner and cut off the power supply.
2. Pull out the filter cover and remove the
filter from cover.
3. Wash air filter in warm soap water.
Do not put air filter in the dishwasher or
use any chemical cleaners.And dry filter
completely before replacing.
4. Attach the air filter to thefilter cover
using the attachment hooks on the inner
surface of the cover. Put the filter cover
back to its place.
Maintenance
Your new air conditioner is designed to give you many years of dependable service.
This section tells you how to clean and care for your air conditioner properly.
.
Window kit installation
Your window kit has been design to fit most standard vertical and horizontal
window applications. However, it may be necessary for you to improvise or
modify some aspects of the installation procedure for certain types of window.
Please refer to fig. A&fig. B for minimum and maximum window openings.
Vertical
window
Window slide kit
minimum:67.5cm
maximum:125cm
Horizontal window
Window slide kit
minimum:67.5cm
maximum:125cm
Fig. A Fig. B
92
Fig. C
Note:The bolt and nut are used to fix window fixing board.
Nut
Bolt
Technical Specifications
Model
Cooling capacity (Btu/h) 9000
AM-H09A4/BR
3
Air flow (m /h)
Rated input
current (A)
Rated input
power(W)
Power supply
Refrigerant
Weight (kg)
Noise dB(A)
Dimension(mm)
2
Suitable room area (m )
330
4.5
220-240V~/50Hz
R407c
37
52
10-15
829 491 420
F3.15AL (250V 3.15A)
Type of the fuse
Electric heating (W)
Cooling
Heating
12000
KMA1-12GRC
330
4.5
14-20
Cooling
Heating
1050 1050
2000 3000
7.957.95
1750 1750

Parts Description
Note: 1.The duct canbe compressed to450mm minimum andextended to
1800mm maximum. Itis better tokeep the ductlength to aminimum.
2.Stretching or bending the duct excessively will affectthe cooling
efficiency.
38
Do not!
1. Put one side of duct to the
exhaust air outletof mobile air
conditioner,According fix it
with unit correspondingly, then
turn right, Push it downwards,
make sure thatit is fixed
thoroughly.
2. Put theother side ofthe duct
to adaptor.
3. Put the adapor
to a nearby window.
Adaptor
Duct mount instruction
(As the following fig. Show)
Front panel
Control panel
Air outlet
Truckle
Handle recess
FRONT VIEW
Remote controller
REAR VIEW
Down drain outlet Up drain outlet
Air intake(condenser) Exhaust air outlet
Air inlet
Rear panel
Air filter (inside)
Filter cover
Drain cover board
1
2
Yes!

Installation
1.Install the mobileair conditioner ina flat
and spacious locationwhere the airoutlets
will not be obstructed.
2.A minimum clearance of50cm from walls
or other obstaclesshould be kept.
Note: 1.The air conditioner shall not be
used in the laundry.
2.The plug shallbe accessible after
the unit is positioned.
Accessories
Parts Parts name Quantity
Duct
Adaptor
Windows installation board
Alkaline batteries
Remote controller
1
1
2
1
The customer shouldhave a qualifiedpower supply coincidentwith that
printed on the tag of the air conditioner. Its voltage should be in the range
of 90%-110% of its rated voltage.
Must use specialcircuit and efficient grounding outlet matching with
the plug ofthe air conditioner.
If the supplycord is damaged,it must bereplaced by themanufacturer,
its service agent or similarly qualified persons in order to avoid a hazard.
74
More than50cm
1
Deal with water condensate
When the insidewater tank isfull, the water
full display is lighted.
1. Open the drain cover and extract it upwards.
2.put one containeror drain coverunder the drain
pipe, take off the plug on the drain pipe and let
out the condensingwater.
3.after let out all the condensing water, putthe
plug back ontothe drainage outlet,then cover
the drain cover.
IMPORTANT: This water is not suitable for
drinking.
Select a best location
Guide of customer
bolt 1
nut 1
Down drain outlet
More than 50cm
NOTE:
This remote control is the general type, so some functionssuch as SWING,
HEALTH,HUMIDITY,and FEELING are not avaiable for this unit.

1.ON/OFF button
Press this button to make the unit run or stop.
2. +or -button
Press + or - button to set the room setting
temperature increase ordecrease.
3.MODE button
Each time youpress this button,a mode isselected in a
sequence that goes from cool, dry and fan.
4.TIME button
Press this buttonto initiate theauto-on or auto-off time
sequence .
5.FAN button
This button isused for settingfan speed inthe sequence
that goes from Low Med , to High , then
back to Low .
Circulation operation mode
1. Press MODE button in a sequence until the fan display is lighted.
2. Press the FAN button to select the fan speed.
3. Press the ON/OFF button to start the unit and press it again to stop.
Timer operation
1. Press the TIME button .
2. Press the +and -button to adjust your timer time.
Note :1. Sleep functionand Auto fan speed canbe selected byremote
controller not bycontrol panel.
2. Other functions on control panel are as same as remote controller's.
Drying operation mode
1. Press the MODE button in a sequence until the dry display is lighted.
2. The fan will run at a fixed speed at this operation mode.
3. Close windows and doors for the best dehumidifying effect.
4. Press ON/OFF button to start the unit and press it again to stop.
56
Operation
Failure to follow the below precaution could result in electrical shock,
fire or personal injury.
1.The plug must be plugged into an outlet that is properly installed and
grounded.
2.Do not use an extension cord or plug adaptor with this unit.
Before starting the unit
1) Select a suitable location, make sure the unit is near to an electrical outlet.
2) Install the flexible exhaust hose and the adjustable window slider kit.
3) Plug the unit into a right outlet.
4) Plug one end of drain pipe into the water full auto-drain outlet and plug the
other end plug into the windows installation board .
5) Turn the unit on.
Cooling operation mode
1. Press the MODE button in a sequence until the cool display is lighted.
2. Press the +and -button to set your desired set temperature.
3. Press FAN button to select the fan speed.
4. Press ON/OFF button to start the unit and press it again to stop.
Note: Time off is effective only when the air-conditioner is running.
Time on is effective only when the air-conditioner is stopping.
WARNING
1
2
3
4
5
a
b
c
d
e
f
g
h
i
j
k
Control Panel
Function buttons
Function display
a-Signal receiver windows
c-Running indicator
e-Dry display
g-Cool display
I-Med speed display
k-TEMP. Display
Electric heating(cold wind type unit with out
this )
m-
display
b-Water full indicator
d-Time display
f-Circulation display
h-Low speed display
j-High speed display
m
Table of contents
Other KOREL Air Conditioner manuals
Popular Air Conditioner manuals by other brands

Seifert
Seifert 87622082USL user manual

Mitsubishi Electric
Mitsubishi Electric MSC-GE20VB operating instructions

Frigicoll
Frigicoll MKD-V300 Installation & owner's manual

EIC Solutions
EIC Solutions AAC-145A-4XT Series Installation and operation manual

Whirlpool
Whirlpool BHAC1000XS0 Use & care guide

Ravanson
Ravanson KR-8000 user manual

Lennox
Lennox FLEXY FX 025 Application guide

ALPATEC
ALPATEC AC 12 FIT user manual

Daikin
Daikin FFQ12LVJU Operation manual

Mitsubishi Electric
Mitsubishi Electric City Multi Series Technical & service manual

Mitsubishi
Mitsubishi Mr.Slim PKA-A-GA installation manual

Hitachi
Hitachi RAC-08CH8 installation manual