Korno GT-1000 SERIES User manual

ShenZhen Korno Import&Export Co.,Ltd http://szkorno.en.made-in-china.com
1
GT-1000 SERIES MULTIFUNCTIONAL GAS AND DUST DETECTOR
USER MANUAL
深圳市科尔诺进出口贸易有限公司
ShenZhen Korno Import&Export Co.,Ltd

ShenZhen Korno Import&Export Co.,Ltd http://szkorno.en.made-in-china.com
2
WARNING
Read and understand this instruction manual before operating instrument.
Improper use of the gas monitor could result in bodily harm or death.
Periodic calibration and maintenance of the gas monitor is essential for proper
operation and correct readings.Please calibrate and maintain this instrument
regularly!Frequency of calibration depends upon the type of use you have and the
sensor types.Typical calibration frequencies for most applications are between 1
and 3 months,but can be required more than or less often based on your usage.

ShenZhen Korno Import&Export Co.,Ltd http://szkorno.en.made-in-china.com
3
Catalog
Notice.............................................................................................................................................................................................................................................................. 4
1.Product Brief Introduction.........................................................................................................................................................................................................................7
2.Key Feature.................................................................................................................................................................................................................................................8
3.Technical Parameters............................................................................................................................................................................................................................... 9
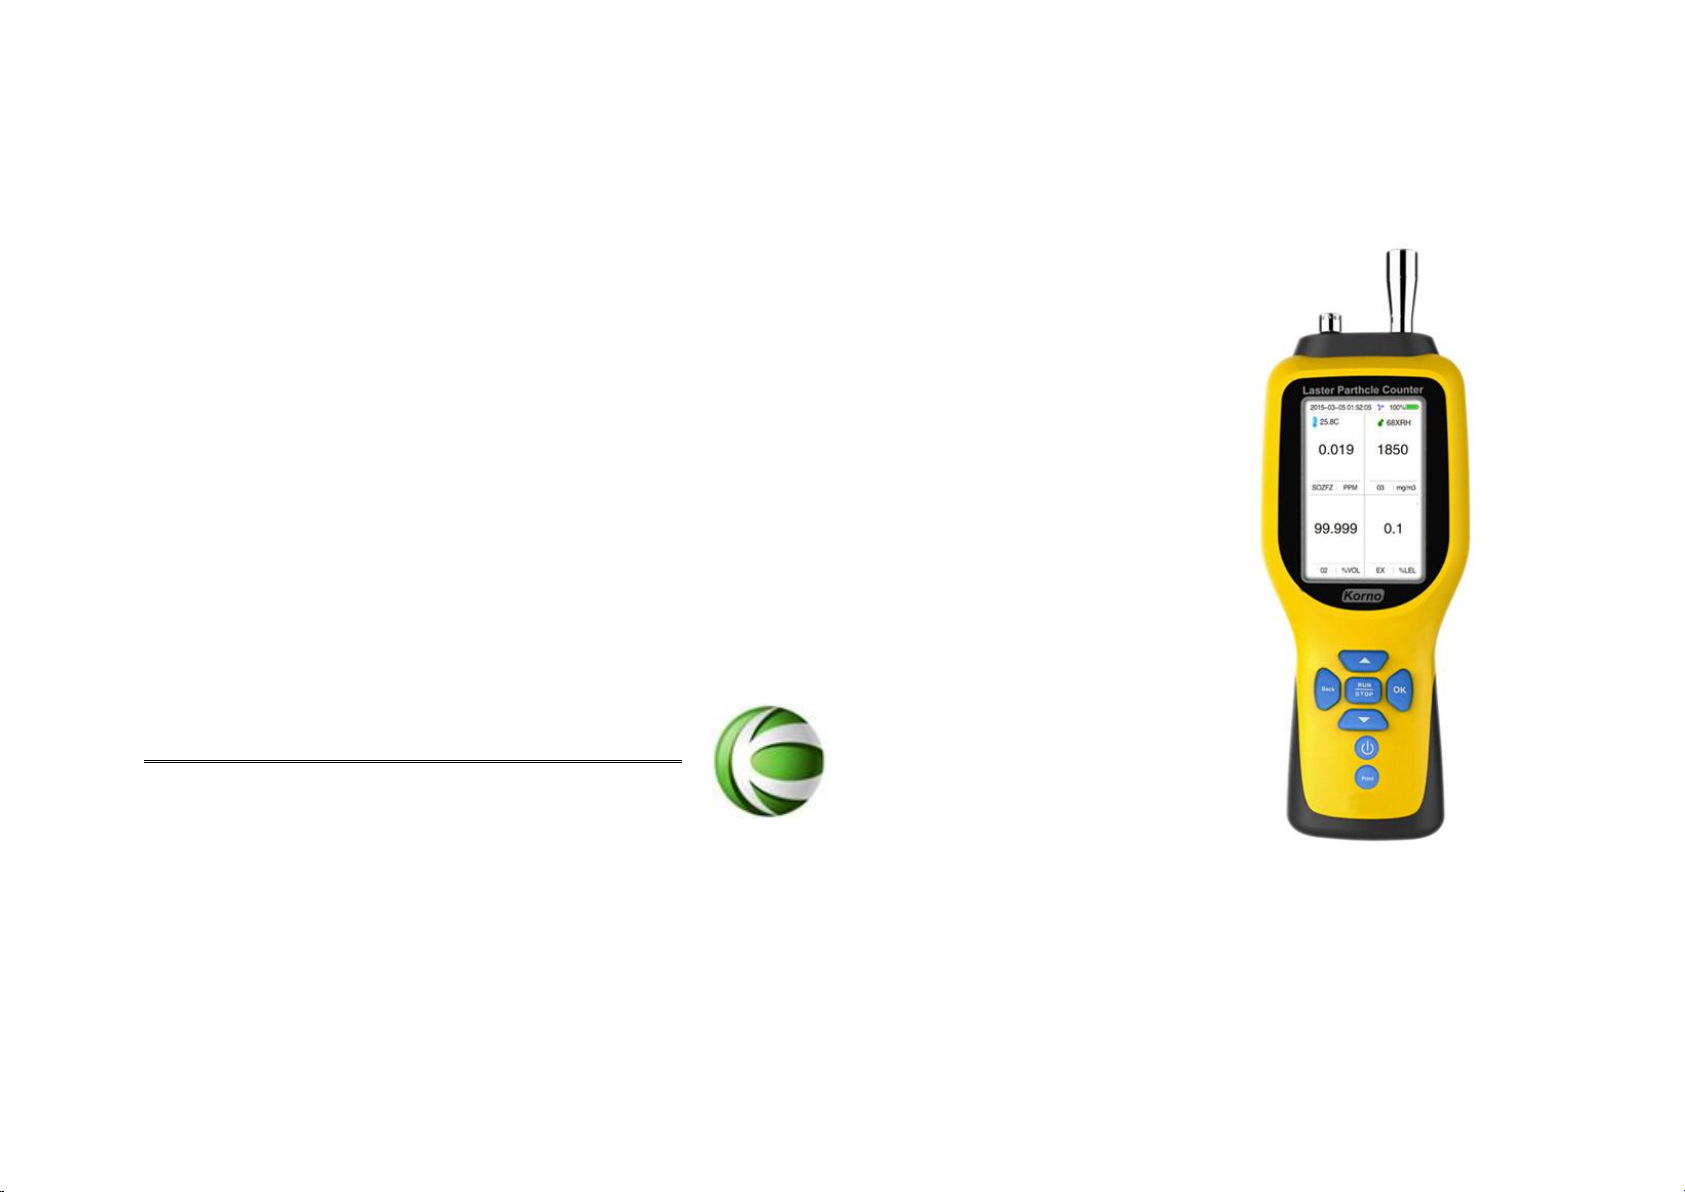
4.Product Structure..................................................................................................................................................................................................................................... 11
5.Operation Instruction............................................................................................................................................................................................................................... 12
5.1Button Description......................................................................................................................................................................................................................... 12
5.2Power On........................................................................................................................................................................................................................................ 13
5.3Power Off........................................................................................................................................................................................................................................ 14
6.Operation Interface..................................................................................................................................................................................................................................14
6.1 Gas Detection Interface...............................................................................................................................................................................................................14
6.2 Function Menu Instruction...........................................................................................................................................................................................................15
6.2.1 Basic Setting...................................................................................................................................................................................................................... 15
6.2.2 History Data Log................................................................................................................................................................................................................16
6.2.3 RealTime Curve................................................................................................................................................................................................................ 17
6.2.4 Zero Calibration.................................................................................................................................................................................................................18
6.2.5 Target Calibration(Do Not Calibrate Unless You Are Professional)........................................................................................................................ 18
6.2.6 Alarm Settings................................................................................................................................................................................................................... 19
6.2.7 Measure Mode............................................................................................................................................................................................20
6.2.8Store Setting....................................................................................................................................................................................................................... 20
6.2.9 Pringt Setting.............................................................................................................................................................................................. 20
6.2.10 Time Setting.....................................................................................................................................................................................................................20
6.2.11 Factory Setting................................................................................................................................................................................................................ 21
7. Common Faults and Exclusions...........................................................................................................................................................................................................22
8.Concentration Datalog Output Instruction........................................................................................................................................................................................... 24

ShenZhen Korno Import&Export Co.,Ltd http://szkorno.en.made-in-china.com
4
Notice
①Button description
There are seven buttons beneath the display screen: Up,Down,Back,Ok,run/stop, Power,Print
Three operation interfaces:Detector interface,menu,parameter setting.
The following form is description for the seven buttons. The table below illustrates the function of seven buttons.
Detector interface
Menu
parameter setting
Up
Save instant data(press and hold for 5 seconds)
(manually saving mode)
Up
Move up/ Value+
Down
Save instant data(press and hold for 5 seconds)
(manually saving mode)
Down
Move down/ Value-
Back
Switch gas detection mode and dust detection
mode(When dust detection is necessary)
Return to
previous menu
Return to previous menu
Ok
Enter menu(press and hold for 5 seconds)
Confirm to enter
menu
Enter/Select/Save
Run/stop
Pump switch/
Timing detection switch
Invalid
Invalid

ShenZhen Korno Import&Export Co.,Ltd http://szkorno.en.made-in-china.com
5
Power
On/Off(press and hold for 5 seconds)
On/Off(press and
hold for 5
secondseconds)
On/Off(press and hold for 5
seconds)
Print
Print instant gas concentration data
Invalid
Invalid
CAUTION:
1. All operations are operate by a short press of the button unless it is special noticed
2. GT-1000 series multifunctional gas and dust detector could be work normally only in condition of the pump was switched on
②Gas Detector Processing Operation under Out-range Status
Users should avoid to have sensor impacted by the gas with a pressure value greater than the maximum of the detector, which might
affect the service life and precision of the detector, or even directly damage detector.
When a user accidentally makes out-range operation, he should evacuate the instrument out of the detecting site and place it in the
clean air for more than half an hour. During the time, user should observe whether the density value of the instrument is keeping
decreasing or not. If it can straightly go down to normal value, then he can continue to use it after the zero calibration of instrument.
While the instrument after the out-range operation and user has placed it in clean air for hours, the density value remains high, then
it should be sent back to the manufacturer or agent for maintenance, be ready to replace the sensor.
Special Note: Detector damage resulted from out-range operation is not within the warranty.

ShenZhen Korno Import&Export Co.,Ltd http://szkorno.en.made-in-china.com
6
③Detector Calibration and Warranty
We guarantee all detector were precise calibrated with certain density standard gas. It’s not necessary for customer to re-calibrate
the detector after purchase unless encounter special situation. Also the calibration need to be operate under the guidance of the
professional.
All GT-1000 series products we provide 12-Mounths warranty for the detector and 3-Mounth warranty for the accessories. Beside ,
we have free calibration once a year during the entire products service life.
④Instruction of detector display dimmed
Power capacity protection program had been preset for all GT-1000 multifunctional gas detector, when no operation were made
within 30 seconds the protection program will activate and the display of the detector will dim out,user can light up the display by
press power button.
⑤GT-1000 series Hot Key Instruction
Mute: When detector is in the state of alarming user can mute the detector by pressing the “Up”or “Down”button.
Save manually:When storage mode was preset as manually, user can save the gas concentration value of each channel by long
press the “Up” button in detection interface
Function menu: When detector is in the detection menu user can enter system menu by pressing “Ok” button for 5 seconds
When gas concentration reach the alarming value and triggered the alarm,user can mute the detector by pressing Up or Down
button(Press to mute and press another time to restart the alarm)

ShenZhen Korno Import&Export Co.,Ltd http://szkorno.en.made-in-china.com
7
⑥Parameter modification instruction
User can modify all parameters by “Back”,“Up”,“Down”,“Ok”buttons.
1.Product Brief Introduction
GT-1000 series multifunctional gas detector are portable gas and dust detector which can be configure flexibly up to 5 gas sensors
or 3 gas sensors plus 1 dust sensor.With import gas sensor and most advance nanometer semiconductor technology GT-1000
series multifunctional gas detector can detect corresponding gas and dust concentration at the same time rapidly and precisely,we
maintain a leading position in domestic level and our products are famous of high stability and repeatability .User can custom setting
all parameters to ensure the operations are user-friendly,4000mA built-in high capacity polymer rechargeable battery,technical
indicators、gas concentrations and history data can be display in the 3.5 inches IPS technical grade screen,User can save
concentration data.output data,print and output data,detect temperature and humidity level.

ShenZhen Korno Import&Export Co.,Ltd http://szkorno.en.made-in-china.com
8
2.Key Features
With the most advance nanometer semiconductor technology ,ultra low power 32bit microprocessor,24bit ADC data
acquisition chip,outstanding accuracy.
3.5 inches IPS technical grade display with a pixel up to 320*480,display technical indicators and gas concentration value
perfectly.
Three concentration units are available PPM,%VOL,mg/m3.
User can combine different sensor,1-5 kinds of gas can be detect at the same time,PM 2.5 dust sensor, temperature and
humidity sensor and other kind of sensors are available.
Up to 100,000 group data can be storage,user can view history data on the display and data output is available.
GT-1000 allow user to connect to portable printer to print data
With temperature and humidity detection,user can detect temperature and humidity value on the scene or the
temperature and humidity value inside the pipe.
Five operation modes are optional:Detection mode,Storage mode,Printing mode,Display mode,Pumping mode.
With high-power pump allow device working under tiny negative pressure condition,the reasonable gas chamber design
ensures that the sensor is not affected by the pressure.
With over-voltage protection,overcharge protection,electrostatic prevention,magnetic-field interference prevention
All software automatic calibration, sensor up to 6 levels target calibration,ensure the accuracy and linearity of the entire
measurement,also with data recovery function.
Chinese and English operation model are available,user-friendly.
With temperature and humidity compensating function.With dust filter and dust-proof design allow device applies in all sort of
harsh conditions.

ShenZhen Korno Import&Export Co.,Ltd http://szkorno.en.made-in-china.com
9
3.Technical Parameters
Product type:
Multifunctional gas detector(Customize according to user need)
Detection Range:
Please refer to sensor list at end of this manual
Display:
Please refer to sensor list at end of this manual
Scalable gas
sensor:
User can customize 1-5 gas sensors in any combination,please refer to the
sensor parameters
Dust sensor:
Laser dust sensor (0.3um、0.5um、1.0um、2.5um、10um)is optional
Temperature and
humidity:
Temperature detection range:-40 ~120℃
Humidity detection range:0-100%RH
Detection pattern:
Pumping,with built-in high-power pump allow device working under tiny
negative pressure condition,the flow rate is adjustable.
Detection accuracy:
≤±3%F.S
Linearity error:
≤±1%F.S
Reaction Time:
≤20 S(T90)
Zero drift:
≤±1%(F.S/Year)
Recovery Time:
≤20 S
Repeatability:
≤±1%F.S
Detection pattern:
Real-time detection mode and timing detection mode can be switch freely
Storage pattern:
Automatically saving and manually saving is available,Up to 100,000 group
data ,user can view history data on the display.
Printing pattern:
Micro printer is optional,user can set

ShenZhen Korno Import&Export Co.,Ltd http://szkorno.en.made-in-china.com
10
Explosion proof
sign:
Exdll CT4 (IA)
Shell
material:
ABS+PC
ABS+PC
IP rating:
IP66
Working
temperature:
-30 ~60℃
Power:
4000mA high capacity
polymer rechargeable battery
Humidity:
≤95%RH,
Non-condensing
Dimensions:
220*88*55 mm(L×W×H)
0.5 Kg(net weight)
Working
pressure:
-30Kpa ~100Kpa
Accessories:
Dust filter、Case、User manual、Certification、USB charger+Data cable、
Calibration cover

ShenZhen Korno Import&Export Co.,Ltd http://szkorno.en.made-in-china.com
11
4.Product Structure

ShenZhen Korno Import&Export Co.,Ltd http://szkorno.en.made-in-china.com
12
5.Operation Instruction
5.1Button Description
There are seven buttons beneath the display screen: Up,Down,Back,Ok,Run/stop,Power,Print
Three operation interface:Detector interface、Menu、Parameter setting.
The following form is description of the seven buttons.
Detector interface
Menu
parameter setting
Up
Save instant data(press and hold for 5 seconds)
(manually saving mode)
Up
Move up/ Value+
Down
Save instant data(press and hold for 5 seconds)
(manually saving mode)
Down
Move down/ Value-
Back
Switch gas detection mode and dust detection
mode(When dust detection is necessary)
Return to previous
menu
Return to previous menu
Ok
Enter menu(press and hold for 5 seconds)
Confirm to enter
menu
Enter/Select/Save

ShenZhen Korno Import&Export Co.,Ltd http://szkorno.en.made-in-china.com
13
Run/stop
Pump switch/
Timing detection switch
Invalid
Invalid
Power
On/Off(press and hold for 5 seconds)
On/Off(press and hold
for 5 secondseconds)
On/Off(press and hold for 5
seconds)
Print
Print instant gas concentration data
Invalid
Invalid
CAUTION: GT-1000 series multifunctional gas detector will perform normally Only in condition of the pump was switched on
5.2Power On
Long press power button for five seconds until you hear a beep the “DI”
sound then the display and red signal light turn on,The screen
appears:Korno’s logo (3 seconds),Sensor information(1 second) ,Sensor
preheating and automatically start the pump(60 seconds count down)in
sequence as it show in figure 1-3,detector will start after the count down and enter detection interface as figure 4.
When the GT-1000 completes its startup sequence,it is in Measuring Mode.
The fan symbol in the upper right corner will appear

ShenZhen Korno Import&Export Co.,Ltd http://szkorno.en.made-in-china.com
14
5.3Power Off
In normal detection mode long press power button for five seconds until the “DI” sound ,display shows shutting
down as it show in figure 5,device will be shut off within 1 minute .
6.Operation Interface
6.1 Gas Detection Interface
Under normal-detection mode,according to the number
and types of sensors in the device,there are different
interfaces: single gas detection mode as shown in
figure6(O3 for example),two kinds of gas detection mode
as shown in figure 7 (O3、H2S for example) ,three kinds
of gas detection mode as shown in figure 8(O3、H2S、CO
for example),four kinds of gas detection mode as shown
in figure 9(O3、CO、H2S、CH4for example).
Icons at the top of the display shows the “pump status”,”battery capacity”,”humidity”,take figure 9 for example,there are four channels,
figure indicate corresponding gas concentration in each channel,”O3” is the gas’s molecular formula,lower right”PPM” is the
concentration unit;when one or several gas channel reach the alarm value,there will be a alarm sign under corresponding

ShenZhen Korno Import&Export Co.,Ltd http://szkorno.en.made-in-china.com
15
concentration figure.
6.2 Function Menu Instruction
Long press”OK” button for 5 seconds to enter function menu as shown in figure 10. Nine
sub-menus are including in function menu:Basic setting、History Log、RealTime Curve、
Zero calibration、Target calibration、Alarm setting、Measure Mode、Storage setting、
Print Setting、Time Setting、Factory Setting.In main menu move the cursor to different
sub-menu by press “Up” and “Down”button,press “Ok” to enter corresponding sub-menu,
press “Back” to return to normal detection interface or previous menu.
6.2.1 Basic Setting
In Basic setting menu user can see various setting as shown in figure 11,press “Up” and
“Down” button to move the cursor , press “Ok”to enter sub-menu and modify parameters.
1. Sensor setting:(as shown in figure 12)User set detection range and units( ppm、
mg/m³、mg/L、%VOL)of different gas
2. Channel setting:In this menu user can set to activate/shield one or various
gas channels as shown in figure 13,and also allow user to check channel address.
3. Temp Correction:In this menu user were allow to modify the temperature parameter
manually as shown in figure 14.

ShenZhen Korno Import&Export Co.,Ltd http://szkorno.en.made-in-china.com
16
4. Humi Correction:In this menu user were allow to modify the humidity parameter
manually as shown in figure 15.
5. Gravity Calibrate: In this The gravity sensor can be re-calibrated as shown in
figure 16.
6. Language Setting: User can switch between Chinese and English menu
as shown in figure 17.
7. 2 Special Sub-menu:VOC Gas Name Setting and PM2.5 Sensor Setting.
These two sub-menu only will exist when the detector is equipped with VOC sensor and dust particle sensor.The user can
choose the specific VOC gas name as shown in figure18,and choose the detection unit or the min detect diameter of dust
particle as shown in figure 19-20.
6.2.2 History Data Log
User can check history log, view history log curve, export history log and clear
history log as shown in figure 21.
1.Check History Log:Press “OK” to enter this sub-menu,the sensor name,
quantity of history data will be shown,press “OK” again to check all previous
concentration datalogs as it shown in figures 22-23.
2.History Log Curve:`Press “OK” to check history log in curve format as it shown in figures 24-25.

ShenZhen Korno Import&Export Co.,Ltd http://szkorno.en.made-in-china.com
17
3.History Log Export:Press “OK” and follow the procedure as it shown in figure 26 to export the history data.
4.Clear CH History Log:Press “OK” to enter this sub-menu,in this menu users can view all the sensors and corresponding data
quantity,press “OK” again to history data of specific channel as it shown in figure 27.
5.Clear ALL History Log:Press “OK” to delete all history data.
See “Appendix 9:Concentration Datalog Output Instruction” on page.
6.2.3 Realtime Curve
In this menu users can view all the sensors and corresponding channel.Press “Enter” to check each sensor’s real-time curve as
shown in figure 28-29.

ShenZhen Korno Import&Export Co.,Ltd http://szkorno.en.made-in-china.com
18
6.2.4 Zero Calibration
If zero drift of the sensor is over range, user can proceed zero calibration ,the gas concentration are defaulted set to zero after zero
calibration as shown in figures 30.
Special Note: 1.Zero calibration must be proceed in fresh air or high-purity inert gas(for example 99.999%VOL N2 etc)
2.Do not operate zero calibration for those gases which already exist in the air,such as oxygen,carbodioxide,nitrogen.
6.2.5 Target Calibration(Do Not Calibrate Unless You Are Professional)
Find a fresh-air environment.This is an environment free of toxic or combustible gases and
a normal oxygen content(20.9%VOL)
GT--1000 series gas detector provide 6 levels target gas concentration calibration,as shown in figure 31-32,this calibration should be

ShenZhen Korno Import&Export Co.,Ltd http://szkorno.en.made-in-china.com
19
operate under conditions of certain standard concentration gas, Pressure reduction valve ,Flow meter, Calibration cover and make
sure all instruments are well connected, otherwise this function is forbidden.
Procedures: Connect all instruments as shown in figure 33,enter target gas calibration interface,release standard gas slowly and
control gas flow within 600ml/min,observe the real-time concentration value(concentration value should be increasing),wait until
real-time concentration value rise to the peak reading and stay still, user can chose a un-calibrate option to operate(√ stand for this
level has been calibrated and × stand for this level still need to be calibrate);first of all input a concentration value of standard gas
then calibrate. Target gas concentration value will set up to be the standard gas concentration value after calibration.
6.2.6 Alarm Setting
User can set the alarm limit and alarm mode in this menu, as shown in figures 34-35,there are
two alarm value setting, which are high alarm and low alarm. When user set as the low alarm
mode, it will trigger alarm when real-time concentration is lower than preset value , when user
switch to high alarm mode, it will trigger alarm when real-time concentration is higher than
preset value.
Procedures: Enter alarm settings sub-menu, Move the cursor to “Enter”,press “Ok” to select and press “Up” and “Down” to switch alarm mode, then press “Ok” to
save your modification.

ShenZhen Korno Import&Export Co.,Ltd http://szkorno.en.made-in-china.com
20
6.2.7 Measure Mode
User can choose two measure mode:real time measure and fixed time measure as shown in
figure 36.When detector is preset as “real-time measure”mode, it provides continuous
monitoring and will shows real-time concentration of each channel in the display.And you can
select the duration of each fixed time detection, the detect cycle times and the interval between
the two fixed time measure as shown in figure 37.
6.2.8 Store Setting
Manually save、automatically save are optional in this menu,it also allows user to set
storage cycle under automatically storage mode. Users can set the storage interval(interval
of two storage data) when preset as “ Auto Store Mode” .The maximum setting is 999 second
and the minimum setting is 1 second.(figure 38-39)
6.2.9 Print Setting
Manually print、automatically print are optional in this menu. It can print data via a
micro printer(the micro printer is optional accessory). The report will print with company name,count,time and unit of time as shown
in figure 40-41.
Table of contents
Popular Security Sensor manuals by other brands

YATO
YATO YT-73138 Original instruction

schmersal
schmersal EDRRS40 series operating instructions

System Sensor
System Sensor B404BT Installation and maintenance instructions

Toshiba
Toshiba TCB-LD1UPE Installation & operation manual

B.E.G.
B.E.G. LUXOMAT RC-plus next Series Installation and operating instruction

CiA
CiA XR Series manual

Teknim
Teknim TFD-1260A Installation & user manual

Sensitron
Sensitron SMART S-MS MED instruction manual

diagral
diagral DV260 manual

Ravel
Ravel RE316 Series Installation Wiring Diagram

Reer
Reer ADMIRAL Directions for installation, use and maintenance

olympia electronics
olympia electronics BSR-6060 quick start guide