Koss DVP2161 User manual


25
WARNING
W RNING: TO REDUCE THE RISK OF FIRE OR ELECTRIC SHOCK, DO NOT EXPOSE THIS PPLI NCE
TO R IN OR MOISTURE. D NGEROUS HIGH VOLT GES RE PRESENT INSIDE THE
ENCLOSURE. DO NOT OPEN THE C BINET. REFER SERVICING TO QU LIFIED PERSON-
NEL ONLY.
ATTENTION: TO PREVENT ELECTRIC SHOCK, MATCH WIDE BLADE OF PLUG TO WIDE SLOT, FULLY
INSERT.
LASER: This Digital Video Disc Receiver employs a Laser System.
To ensure proper use of this product, please read this owners manual carefully and retain for future
reference. Should the unit require maintenance, contact an authorized service location - see
service procedure.
Use of controls, adjustments or the performance of procedures other than those specified may
result in hazardous radiation exposure.
To prevent direct exposure to laser beam, do not try to open the enclosure.
Visible and invisible laser radiation when open and interlocks defeated.
DO NOT ST RE INTO BE M
To reduce the risk of electric shock, do not remove cover (or back).
No user serviceable parts inside. Refer servicing to qualified service personnel.
CAUTION
The lightning flash with arrowhead symbol, with in an equilateral
triangle, is intended to alert user to the presence of uninsulated
"dangerous voltage" within the product enclosure that may be
of sufficient magnitude to constitute a risk of electric shock to
persons.
The exclamation point within an equilateral triangle is intended
to alert the user to the presence of important operating and
maintenance (servicing) instruction in the literature accompanying
the appliance.
INVISIBLE LASER RADIATION WHEN OPEN AND
INTERLOCK FAILED OR DEFEATED.
AVOID DIRECT EXPOSURE TO LASER BEAM.
WARNING :
To reduce the risk of fire or electric shock, do not expose this appliance
to rain or moisture.
CAUTION :
Use of controls or adjustments or performance of procedures other than
those specified may result in hazardous radiation exposure.
RISK OF ELECTRIC SHOCK. DO NOT OPEN
CAUTION
LASER
Type Semiconductor laser Ga I s
Wave length 650 nm/780nm
Output Power 5 mW
Beam divergence 60 degree

1
TABLE OF CONTENTS
INTRODUCTIONS ..................................................................................................................... 2
PACKAGE CONTENTS .............................................................................................................. 3
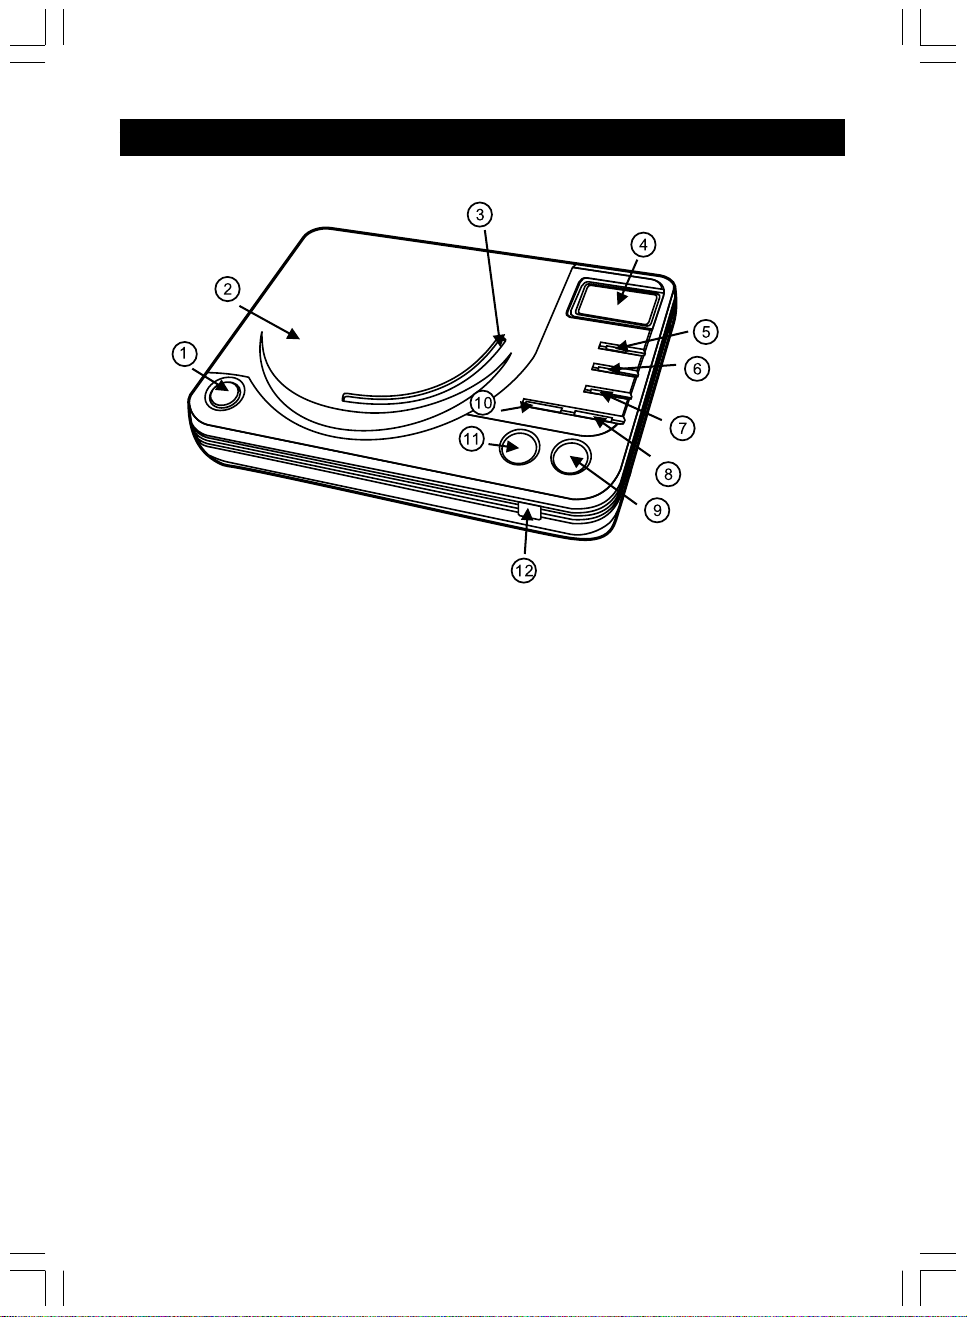
PARTS AND CONTROLS ............................................................................................................ 4
FRONT SIDE .............................................................................................................. 4
RIGHT SIDE ............................................................................................................... 5
REAR SIDE................................................................................................................ 5
REMOTE CONTROL .................................................................................................. 6-8
LCDDISPLAY ...................................................................................................................... 9
AUDIO/VIDEO CONNECTIONS .................................................................................................. 10
CONNECT AC OR DC ADAPTER INTO THE DC 12V SOCKET .......................................... 10
A/V(RCA)CABLE CONNECTION (3RCA CABLE INCLUDED) ........................................... 10
COMPONENT VIDEO OR "S"VIDEO CABLE CONNECTION (CABLE NOT INCLUDED) ..................... 11
FOR CONNECTION TO DOLBY DIGITAL 5.1RECEIVER ........................................................ 12
USINGTHE EARPHONES ............................................................................................. 13
USINGTHE REMOTE CONTROL ............................................................................................... 14
BASIC OPERATIONS .............................................................................................................. 15
PLAYBACK ................................................................................................................ 15
REPEAT PLAYBACK ..................................................................................................... 16
ZOOM FUNCTION ...................................................................................................... 16
LOCATING ATITLE,CHAPTER OR TRACK ......................................................................... 16
MP3PLAYBACK ....................................................................................................... 17
BROWSE /VIEW JPEGFILES ..................................................................................... 18
PARENTIAL CONTROL ............................................................................................18-20
CHANGING SETUPVALUES ..................................................................................................... 21
PROBLEMS ? (DVD PLAYER)................................................................................................ 22
ELECTRICAL SPECIFICATION ................................................................................................... 22
CONTENTS .......................................................................................................................... 23
SPECIFICATIONS ................................................................................................................... 24

2
INTRODUCTIONS
This DVD video player can play discs with the following marks:
DVDs (8cm / 12cm disc)
udio CDs (8cm / 12cm disc)
Video CDs (8cm / 12cm disc)
MP3 udio CDs (8cm / 12cm disc)
This DVD video player will play region 1 discs or region 1 on an all-
region disc only. Region 1 is the area for the U.S. and Canada. This
player can connect with a TV compatible with the NTSC or P L/3.58
PACK
When shipping the DVD video player, the original shipping carton and packing
comes in handy. For maximum protection, repack the unit as it was originally
packed at the factory.
fter unpacking, first check the contents of your DVD player package, as listed
below:
1. Operating manual (this manual)
2. DVD Video Player
3. Remote control unit with separately packed batteries
4. C/DC power adapter
5. udio and Video cables
6. Warranty Certificate system

3
PACKAGE CONTENTS

4
PARTS AND CONTROLS
Front Side
1. Open button
2. Disc compartment cover
3. Clear window
4. LCD unit
5. REPE T button
6. " -B" button
7. P USE button
8. F ST FORW RD button
9. STOP button
10. F ST B CKW RD button
11. PL Y button
12. Remote control sensor

5
PARTS AND CONTROLS
Right Side
1. Volume control wheel
2. Earphone jack
3. Power On/Off switch
Rear Side
1. DC IN 12V jack
2. Optical digital out jack
3. S-Video out jack
4. Video out jack (Yellow)
5. R channel audio out jack (Red)
6. L channel audio out jack (White)
7. Component Video Out jacks ( CR/CB/Y )

6
PARTS AND CONTROLS
Remote Control

7
PARTS AND CONTROLS
The instructions in this page describe the functions on the Remote
Control.
1. POWER Control the DC power ON/OFF.
2. NTSC/P L NTSC, and P L TV mode selection.
3. PBC ON/OFF Playback control for VCD 2.0 format.
4. OSD On screen display control menu.
5. - B Replaying point to point B when
select.
6. REPE T Replaying 1 track or all track of disc..
7. GOTO Jump to select chapter/time.
8. SHUFFLE Random programmed tracks playing
order.
9. PROGR M Programming the tracks playing order.
10. NUMBER BUTTONS (0~9, +10) Number keys.
VCD mode:
PBC OFF>+10>3, To choose No.13
track.
CD mode:
+10>+10>7, To choose No.27 track.
11. ZOOM Enlarge the picture on screen.
12. SETUP System setup key.
13. Direction keys (UP/DOWN/LEFT
RIGHT/ Enter)
14. MUTE Shut off all audio output.
15. RETURN Return to main menu. (VCD)
16. VOL + Control volume output - Enhance.
17. SUBTITLE Selecting subtitles.
18. TITLE Locating a specific title.
19. MENU Return to root menu. (DVD)
20. VOL Control volume output - Reduce.
21. UDIO Language/ udio track selection;
VCD: stereo, right or left.
DVD: selecting a language.
22. VOC L Right/Left sound track selection while
playing VCD.

8
PARTS AND CONTROLS
23. NGLE Selecting the camera angle.
24. NEXT Jump to next track.
25. PL Y Start playback.
26. PREV Jump to previous track.
27. F.F. Fast forward key. It can choose:
VCD: 2x,4x forward speed
DVD: 2x, 4x, 8x forward speed
28. STOP Stop the playing function.
29. F.B. Fast backward key. It can choose:
VCD: 2x, 4x backward speed.
DVD: 2x, 4x, 8x backward speed.
30. S.F. Play video disc forward in slow motion.
31. P USE Only plays one picture when push
button.
32. S.B. Play video disc backward in slow
motion.
33. STEP forward Only plays one picture forward when
push button.
34. STEP BWD Only plays one picture backward when
push button.

9
LCD DISPLAY
1. Disc is playing
2. Player is in pause mode
3. MP3 disc indicator
4. CD/VCD disc indicator; there is no display while playing DVD.
5. Disc playing time
6. Disc is playing in random order sequence
7. REPE T 1: Indicate the current track is playing repeatedly
8. REPE T LL: Indicate the whole disc is playing repeatedly
9. Disc track number

10
AUDIO/VIDEO CONNECTIONS
Connect AC or DC Adapter Into The DC 1 V Socket
A/V (RCA) Cable Connection (3 RCA cable included)
Connect the Yellow /V (RC ) cable to your TV Video Input and your DVD Player
Video Output.
Connect the Red and White /V (RC ) cable to the udio Input of your TV Set.
Connect the other end into your DVD Player udio Output.
Ensure that the Left and Right Channels are correct between the TV and your DVD
Player.

11
AUDIO/VIDEO CONNECTIONS
Component Video or "S" Video Cable Connection (cable not
included)
Connect the Component Video or "S" Video Cable into the Component Video or
"S" video input on the back of your TV.
Connect the other end to the back of your DVD Player.
Connect the Red and White /V (RC ) Cable to the udio Input of your TV Set.
Connect the other end into your DVD Player udio Output.
Ensure that the Left and Right Channels are correct between the TV and your DVD
Player.

12
AUDIO/VIDEO CONNECTIONS
For connection to Dolby Digital 5.1 Receiver
Connect your Component Video or "S" Video or /V (RC ) video cable as shown
in either P.11 picture for video source.
Use OPTIC L C BLE to connect from the OPTIC L OUTPUT on the back of
your DVD Player and connect into the OPTIC L INPUT on your Dolby Digital 5.1
Receiver.
NOTE:
1. The optical output needed to be turned on via the UDIO SETUP under SETUP MENU by the
following procedure:
SETUP button - AUDIO SETUP - DIGITAL ON / PCM
- Press SETUP button on the Remote Control, choose UDIO SETUP and press ENTER
and then choose UDIO OUT to select SPDIF/R W. Then press ENTER to confirm.
2. Either the optical output or analog audio output can be turned on.
3. During DTS DVD playback, the SPDIF/R W must be turned on in order to let the receiver to
decode the program/music correctly.
CAUTION :
The RECEIVER must be Dolby Digital 5.1 to reproduce the required sound quality.

13
AUDIO / VIDEO CONNECTIONS
Using the earphones
1. Set the volume control to "0".
2. Connect the plug of earphones to the player's "PHONES" jack.
3. djust the volume control to the desired sound level.

14
USING THE REMOTE CONTROL
The remote control will operate from a linear distance of
approximate 10 meters and within a horizontal and vertical range of
30 degrees.
3030
30
30

15
BASIC OPERATIONS
PLAYBACK
Getting ready to play
Turn on the television and set the video source to connect to DVD player.
* Turn on the audio device connected to the DVD player. If no other audio
amplifier connected, your TV is the audio device.
1. Turn on the power switch on the right side of the DVD player. Press power
button on the remote control.
2. Open the disc cover.
3. Load a disc with the label side up and push it down on the center.
4. Close the cover.
5. Your player should automatically play the disc. If the disc does not begin to
play, press button to start.
Stop Playback
Press on the remote control or STOP on the unit
When stop is pressed during playback, the DVD player remembers the place at
which playback stopped.
To resume play from the point where it stopped just press play.
To clear the point to be resumed, press stop again during stop.
Pause Playback
Press on the remote during playback. Press PL Y button to resume normal
playback.
Playing at Fast Speed
Press F.F. or F.B. button during playback.
The playback speed changes each time you press the F.F. or F.B.button.
Playback in Slow Motion
Press the SLOW button (S.B. or S.F.) during playback
The playback speed becomes 1/2, 1/4, or 1/8 of the normal speed each time you
press the SLOW button (S.B. or S.F.).
Note: During fast playback or slow motion playback, the sound is muted. To resume normal
playback, press PL Y.

16
BASIC OPERATIONS
REPEAT PLAYBACK
Repeat a Title, Subtitle, or Track
1. Select the title, Subtitle, or track you want to repeat.
2. Press the REPE T button.
Repeat a Section Between Point A and B
1. During playback, press REPE T -B button on the remote control at the
starting point of the section you want to repeat. (point )
2. Press REPE T -B button again at the ending point of the section you want
to repeat. (Point B)
3. Press REPE T -B button again to cancel the -B repeat function.
ZOOM FUNCTION
Press ZOOM on the remote control during playback. The picture around the
center of the screen is enlarged to 4 times. Press ZOOM again to return to
normal. During zoom playback, you can press to move the enlarged
picture.
LOCATING A TITLE, SUBTITLE OR TRACK
Press TITLE button and use number keys or buttons to locate your desired
sections.
This DVD player also allows to use SKIP NEXT or PREV button repeatedly to
display the requested title or track.
SELECTING SUBTITLES
You can select a preferred subtitle from those included on the DVD video disc by
pressing SUBTITLE button during playback. Use arrow keys to move cursor to
ON or OFF position and press SUBTITLE again to change it.
CHANGING THE ANGLE
Press the NGLE button while playing back a scene recorded with multiple
angles. If your DVD disc is not recorded with multiple angles, press NGLE
button will not have any effect.
CHANGING THE AUDIO/LANGUAGE
Press the UDIO button during playback, you can select different options of
language and sound recording system from those included on the DVD video disc.

17
BASIC OPERATIONS
MP3 PLAYBACK
1. Load a disc with MP3 encoded information into the player and wait for few
seconds.
2. fter reading the table of content (TOC) of the disc, the folder information of
the disc will be displayed on the TV / monitor.
3. Select the PL Y MODE by using the Direction/navigation keys: FOLDER (to
play a selected folder only), SINGLE (play a single song only) or DISC mode
(automatically play all the folder in the disc).
4. Use Direction / navigation keys to select a folder.
5. nd then use the Direction / navigation keys or the number key to select a
desire track.
6. The selected track will start to play.
Note:
If desire folder or track is required, you must connect the player to the TV and use the remote
control for operation.

18
BASIC OPERATIONS
BROWSE / VIEW JPEG FILES
You may use the player to view *.JPEG files. Load a JPEG files disc with the
label side up and push it down on the center. The "Smart Navigator" will appear on
the screen. Use keys (on the Remote Control) to select the file and Enter
to view.
PARENTIAL CONTROL
The parent can use this function to screen the title of discs for children. The
process is as follow:
Press the SETUP button and select the PREFERENCES option:
Press enter and go into the PREFERENCES table, select the P RENT L option:
The default setting is 8 DULT, using the UP/DOWN arrow key to select the
new setting, ex. 4 PG-13:
This manual suits for next models
4
Table of contents
Other Koss DVD Player manuals