Krüger & Matz KM0821 User manual

Alarm clock radio
KM0821
PL
INSTRUKCJA OBSŁUGI
EN
USER’S MANUAL
DE
CS
BEDIENUNGSANLEITUNG
NÁVOD K OBSLUZE
RO
MANUAL DE UTILIZARE

CSCS
Návod k obsluzeNávod k obsluze
2 3
BEZPEČNOSTNÍ POKYNY
Před použitím si pečlivě přečtěte návod k použití a
uschovejte jej pro budoucí použití.
1. Chraňte zařízení před vlhkostí, vodou a jinými
kapalinami.
2.Před připojením do elektrické sítě, zkontrolujte,
zda je napětí zásuvky a zařízení kompatibilní.
3.Zařízení by mělo být umístěno v místě se správnou
cirkulací vzduchu. Zařízení by mělo být chráněno
před zdroji tepla a extrémními teplotami.
4.Kryt přístroje by měl být pravidelně čištěn
měkkým a mírně vlhkým hadříkem. K čištění
tohoto zařízení nepoužívejte chemikálie ani
detergenty.
5.Pokud se zařízení nebude delší dobu používat,
odpojte jej od zdroje napájení. Skladujte zařízení
bez baterií uvnitř.
6.Zařízení nerozebírejte. V případě poškození
odneste zařízení do autorizovaného servisu k
opravě.
7. Nenechávejte v blízkosti rádia předměty citlivé na
magnety.
8.Nepřipojujte externí antény k anténnímu kabelu.
POPIS ZAŘÍZENÍ
1. Tlačítko Alarmu 1 / Hlasitost –
2.Tlačítko Alarmu 2 / Hlasitost +
3.Tlačítko nastavení času / programu
4.Tlačítko pro změnu podsvícení / letního času
5.Tlačítko HOUR / ladění -
6.Tlačítko MINUTE / ladění +
7. Tačítko Rádio
8.Tlačítko odložení
9.Ukazatel letního času
10. Indikátor bzučáku Alarmu 1
11. Indikátor rádia Alarmu 1

CSCS
Návod k obsluzeNávod k obsluze
4 5
12. Ukazatel FM rádia
13. Indikátor bzučáku Alarmu 2
14. Indikátor rádia Alarmu 2
12:00
1
10
13
11
14
9
12
2345
6
87
OBSLUHA
Chcete-li zařízení zapnout, připojte zástrčku
napájecího kabelu do elektrické zásuvky. Po vložení
baterie bude nastavení času zachováno během
výpadku napájení.
Nastavení hodin
1. ři prvním zapnutí spotřebiče se na displeji zobrazí
blikající 12:00, což znamená, že nejsou nastaveny
hodiny.
2.Stisknutím tlačítka HOUR nastavte hodiny.
Stisknutím tlačítka MINUTE nastavte hodiny.
Stisknutím a podržením tlačítka HOUR nebo
MINUTE rychle změníte hodiny nebo minuty.
3.Po nastavení správného času stiskněte tlačítko
nastavení času nebo počkejte 5 sekund. Po
uplynutí této doby hodiny automaticky potvrdí
hodinu.
Změna nastaveného času:
1. Ujistěte se, že je rádio vypnuto. Stiskněte a
podržte tlačítko Rádio.
2.Stiskněte a podržte tlačítko nastavení času, dokud
na displeji nezačnou blikat hodiny.
3.Opakujte kroky 2-3 z předchozího odstavce.
• Chcete-li zobrazit sekundy, stiskněte tlačítko
nastavení času. Po 5 sekundách zařízení znovu
zobrazí čas.
Změna podsvícení / Změna letního času
• Stisknutím tlačítka pro změnu podsvícení změníte
intenzitu podsvícení.
• Stisknutím a podržením tlačítka letního času
nastavíte letní čas. Aktivace bude signalizována
ukazatelem letního času.
Nastavení budíku
Poznámka: Pokud chcete, aby zvuk budíku byl rádio,
musíte před nastavením budíku nastavit rádio na
požadovanou stanici a hlasitost.
1. Ujistěte se, že je rádio vypnuto.
2.Stiskněte tlačítko Alarm 1 nebo Alarm 2. Začne

CSCS
Návod k obsluzeNávod k obsluze
6 7
blikat hodina a rozsvítí se indikátor odpovídajícího
budíku.
3.Pomocí tlačítek HOUR a MINUTE nastavte čas
budíku.
4.Potvrďte čas tlačítkem Alarm 1 nebo 2 nebo
počkejte 5 sekund, než se čas automaticky
potvrdí.
5.Dalším stisknutím tlačítka Alarm 1 nebo 2 vyberte
typ budíku: rádio nebo bzučák nebo budík
vypnete.
Po aktivaci budíku v nastavený čas:
• Stisknutím tlačítka Rádio vypněte budík.
• Stisknutím tlačítka Odložit zapněte 9 minutové odložení.
• Pokud chcete odložení vypnout, stiskněte tlačítko Rádio.
• Pokud budík nevypnete tlačítkem, vypne se
automaticky po jedné hodině.
• Budík se znovu zapne po 24 hodinách. Chcete-li
budík úplně vypnout, stiskněte tlačítko Alarm 1 nebo
2, dokud nezhasnou indikátory alarmu.
Nastavení časovače
Rádio má funkci automatického vypnutí po uplynutí
stanovené doby. Jak ji nastavit:
1. Při poslechu rádia stiskněte tlačítko odložení. Na
displeji se zobrazí blikající číslo 90, které označuje
minuty do vypnutí.
2.Stiskněte tlačítko odložení, dokud nedosáhnete
požadovaného času.
3.Po 2 sekundách od zvoleného času vypnutí se na
displeji znovu zobrazí aktuální čas a rádio se po
nastavené době vypne.
4.Stisknutím tlačítka odložení zobrazíte aktuální
zbývající čas do vypnutí rádia.
5.Chcete-li funkci časovače vypnout, stiskněte
tlačítko odložení, dokud se na displeji nezobrazí
OFF, nebo vypněte rádio.
Rádio
• Pokud chcete rádio zapnout, stiskněte tlačítko
Rádio. Na displeji se zobrazí aktuální frekvence a po
5 sekundách aktuální čas.
• Chcete-li rádio vypnout, stiskněte a podržte
tlačítko Rádio.
• Pomocí tlačítek hlasitosti upravte úroveň hlasitosti.
• Pomocí tlačítek ladění nastavte požadovanou frekvenci.
• Stisknutím a podržením jednoho z tlačítek ladění
aktivujete automatické vyhledávání stanice s
nejsilnějším signálem.
Uložení rozhlasových stanic
1. Nastavte požadovanou frekvenci.
2.Stiskněte a podržte tlačítko programu. Na displeji
se zobrazí číslo kanálu paměti.
3.Vyberte číslo kanálu paměti pomocí tlačítek
ladění.
4.Stiskněte programové tlačítko do 8 sekund po
výběru kanálu. Pokud není výběr potvrzen do 8
sekund, stanice nebude uložena.
5.Pokud je na zvoleném kanálu již uložená stanice,
bude přepsána.
6.Chcete-li přejít na uloženou stanici, stiskněte
programové tlačítko (při poslechu rádia). Bude
vybrána další uložená stanice a na displeji se
zobrazí číslo kanálu.
Funkce udržování nastaveného času
Po vložení baterií (2 baterie AAA 1,5 V) do zařízení dojde
při výpadku proudu k zálohování aktuálně nastaveného
času. Během výpadku proudu se displej nerozsvítí. Po
obnovení napájení se nastaví správný čas. Pokud není
napájení delší dobu nebo je baterie téměř vybitá,
obnovený čas nemusí být správný. Pokud se zařízení
nebude delší dobu používat, vyjměte z něj baterie.

CSCS
Návod k obsluzeNávod k obsluze
8 9
DEDE
Bedienungsanleitung
8
Bedienungsanleitung
9
Čeština
Správná likvidace výrobku
(opotřebované elektrické a elektronické vybavení)
Označení umístěné na výrobku anebo v textech, které se ho týkají, poukazuje
na skutečnost, že po vypršení doby používání je zakázáno likvidovat tento
výrobek společně s ostatním domovním odpadem. Pro to, abyste se vyhnuli
škodlivému vlivu na přírodní prostředí a lidské zdraví v důsledku
nekontrolované likvidace odpadů, oddělte tento výrobek od odpadů jiného typu
a zodpovědně ho recyklujte za účelem propagace opětovného využití
hmotných zdrojů coby stálé praxe. Pro více informací ohledně místa a způsobu
recyklace tohotovýrobku, která bude bezpečná pro životní prostředí, domácí
uživatelé mohou kontaktovat maloobchodní prodejnu, v níž výrobek zakoupili,
nebo orgán místní samosprávy. Firemní uživatelé mohou kontaktovat
dodavatele a zkontrolovat podmínky kupní smlouvy. Neodstraňujtevýrobek
společně s ostatními komerčními odpady. Vyrobeno v ČLR pro LECHPOL
ELECTRONICS Sp. z o.o. Sp.k., ul. Garwolińska 1, 08-400 Miętne, Polsko
SICHERHEITSANLEITUNGEN
Vor der ersten Benutzung lesen Sie alle Anweisungen
sorgfältig durch und bewahren diese Bedienungsanleitung
auf zum späteren Nachschlagen.
1. Schützen Sie das Gerät vor Feuchtigkeit, Wasser
und andere Flüssigkeiten.
2.Bevor Sie das Gerät an die Netzsteckdose
anschließen, vergewissern Sie sich, dass die auf
dem Gerät angegebene Spannung mit der
Spannung in der Netzsteckdose übereinstimmt.
3.Stellen Sie das Gerät an einen gut belüfteten Ort
auf. Schützen Sie das Gerät vor Wärmequellen und
extremen Temperaturen.
4.Reinigen Sie dieses Gerät mit einem weichen leicht
feuchten Tuch. Verwenden Sie keine Scheuermittel
oder Chemikalien um das Produkt zu reinigen.
5.Trennen Sie das Gerät von der Stromversorgung,
wenn es für eine lange Zeit nicht verwendet wird.
Lagern Sie das Gerät ohne Batterien im inneren.
6.Versuchen Sie nicht, dieses Gerät selbst zu
reparieren. Reparaturen sollten ausschließlich von
autorisiertem Kundendienst durchgeführt werden.
7. Lagern Sie keine magnetempndlichen
Gegenstände in der Nähe des Geräts.
8.Verbinden Sie keine externe Antenne an die
bestehende Antenne.
PRODUKTBESCHREIBUNG
1. Taste Alarm 1 / Lautstärke -
2.Taste Alarm 2 / Lautstärke +
3.Taste Zeiteinstellung / Programm
4.Taste Dimmer / DST
5.Taste Stunde / Frequenz -
6.Taste Minute / Frequenz +
7. Taste Radio
8.Taste Schlummern

DEDE
BedienungsanleitungBedienungsanleitung
10 11
9. DST Anzeige
10. Alarm 1 Summeranzeige
11. Alarm 1 Radioanzeige
12. UKW Radioanzeige
13. Alarm 2 Summeranzeige
14. Alarm 2 Radioanzeige
12:00
1
10
13
11
14
9
12
2345
6
87
BETRIEB
Um das Gerät einzuschalten, stecken Sie das
Netzkabel in eine Steckdose. Nach dem Einlegen der
Batterien bleiben die Zeiteinstellungen auch nach
Stromausfall erhalten.
Einstellen der Uhrzeit
1. Wenn das Gerät zum ersten Mal eingeschaltet wird,
zeigt das Display ein blinkendes 00:00 an, was
darauf hinweist, dass die Uhr nicht eingestellt ist.
2. Drücken Sie die Taste Stunde, um die Stunde
einzustellen. Drücken Sie die Taste Minute, um die
Minuten einzustellen. Halten Sie die Taste Stunde oder
Minute gedrückt, um die Uhrzeit schnell zu ändern.
3.Nachdem Sie die richtige Uhrzeit eingestellt
haben, drücken Sie die Taste Zeiteinstellung oder
warten 5 Sekunden. Nach 5 Sekunden ist die
Uhrzeit eingestellt.
Um die eingestellte Uhrzeit zu ändern:
1. Stellen Sie sicher dass das Radio ausgeschaltet
ist. Um dieses zu tun, die Taste Radio drücken und
halten.
2.Die Taste Zeiteinstellung drücken und halten bis
die Zeitanzeige am Display blinkt.
3.Wiederholen Sie die Schritte 2-3 vom vorherigen
Abschnitt.
• Um die Sekunden anzuzeigen, die Taste
Zeiteinstellung drücken. Nach 5 Sekunden zeigt das
Gerät wieder die aktuelle Zeit.
Ändern der Dimmer Einstellungen/ Einstellen der
Sommerzeit
• Drücken Sie die Taste Dimmer um die
Einstellungen zu ändern.
• Taste DST drücken und halten um zur Sommerzeit
zu wechseln. Die Sommerzeit wird durch die DST
Anzeige angezeigt.
Einstellen der Weckzeit
Achtung: Wenn Sie möchten dass der Alarm-Ton als
Radio ertönt, stellen Sie zuvor das Radio und die
Lautstärke ein.

DEDE
BedienungsanleitungBedienungsanleitung
12 13
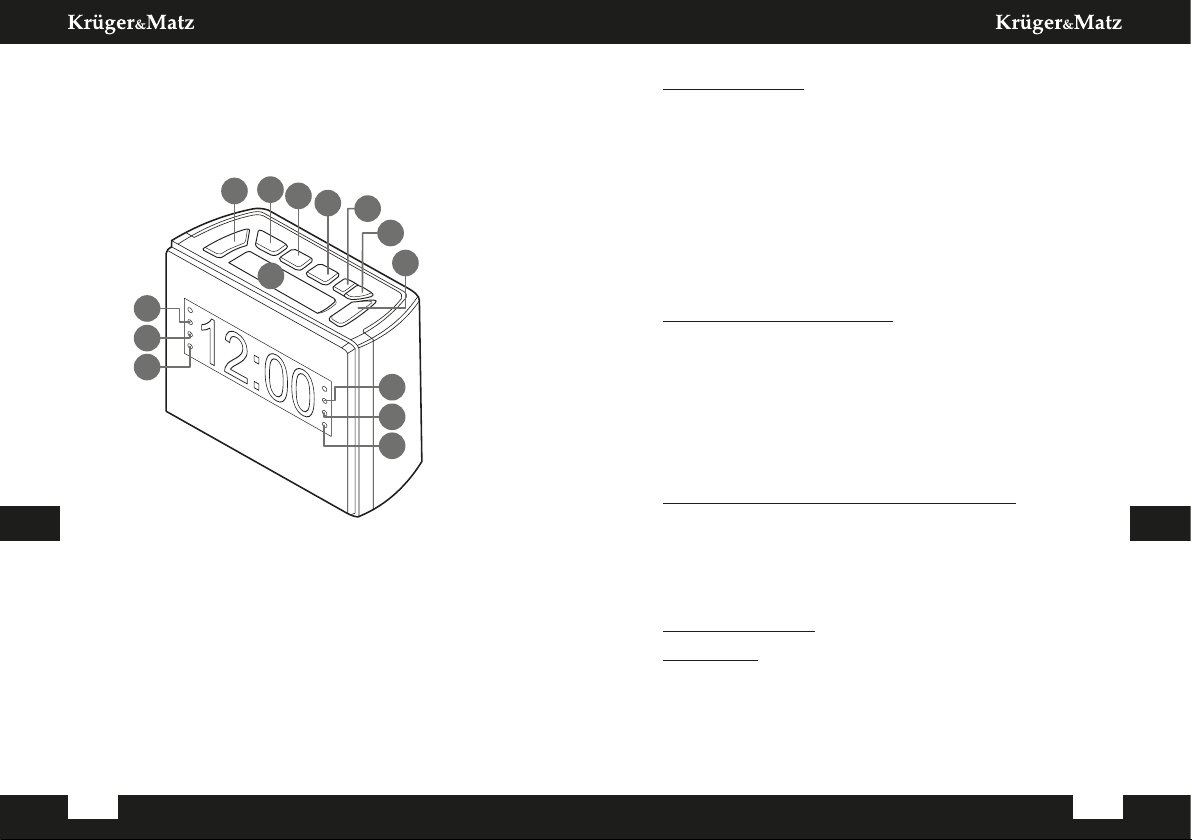
1. Stellen Sie sicher, dass das Radio ausgeschaltet
ist.
2.Drücken Sie die Taste Alarm 1 oder 2. Die Zeit
beginnt zu blinken und die Alarmanzeige blinkt
ebenfalls.
3.Stellen Sie mit den Tasten Stunden und Minute die
Weckzeit ein.
4.Drücken Sie die Taste Alarm 1 oder 2, um die
Weckzeit zu bestätigen (oder warten 5 Sekunden).
5.Drücken Sie erneut die Taste Alarm 1 oder 2, um
den Alarm-Ton auszuwählen: Radio oder Summer.
Wenn der Alarm-Ton zur eingestellten Zeit ertönt:
• Drücken Sie die Taste Radio um den Alarm-Ton
auszuschalten.
• Drücken Sie die Taste Schlummern um 9 Minuten
Schlummerzeit zu aktivieren.
• Um die Schlummerzeit auszuschalten, drücken
Sie die Taste Radio.
• Wenn der Alarm-Ton nicht mit einer Taste
ausgeschaltet wird, schaltet er sich automatisch
nach Ablauf einer Stunde aus.
• Der Wecker ertönt erneut nach 24 Stunden. Um
den Alarm auszuschalten, drücken Sie wiederholt die
Taste Alarm 1 oder 2, bis die Anzeige Alarm erlischt.
Timer einstellen
Das Gerät hat eine automatische Timerfunktion. Um
diese einzustellen:
1. Drücken Sie beim Radiohören die Taste
Schlummern. Am Display erscheint eine blinkende
Zahl 90, die die Zeit bis zur automatischen
Abschaltung anzeigt.
2.Drücken Sie wiederholt die Taste Schlummern, bis
die gewünschte Zeit erreicht ist.
3. Nach 2 Sekunden nach der gewählten Ausschaltzeit
zeigt das Display wieder die aktuelle Uhrzeit an und
das Radio schaltet sich nach der eingestellten Zeit aus.
4.Drücken Sie die Taste Schlummern, um die
Abschaltzeit anzuzeigen.
5.Um die Timerfunktion auszuschalten, drücken Sie
die Taste Schlummern, bis AUS [OFF] am Display
erscheint, oder schalten das Radio aus.
UKW Radio
• Drücken Sie die Radio-Taste, um das Radio
einzuschalten. Das Display zeigt nach 5 Sekunden
die aktuelle Frequenz und Uhrzeit an.
• Halten Sie die Taste Radio gedrückt, um das Radio
auszuschalten.
• Um die Lautstärke zu ändern, verwenden Sie die
Tasten Lautstärke +/-.
• Um die Frequenz einzustellen, verwenden Sie die
Tasten Frequenz +/-.
• Um den automatischen Sendersuchlauf zu aktivieren,
halten Sie eine der Tasten Frequenz +/- gedrückt.
Speichern der Radiosender
1. Stellen Sie die Frequenz ein.
2.Halten Sie die Taste Programm gedrückt. Die
Kanalnummer wird auf dem Display angezeigt.
3.Wählen Sie die Kanalnummer mit den Tasten
Frequenz +/-.
4.Nachdem Sie den Kanal ausgewählt haben,
drücken Sie die Taste Programm innerhalb von 8
Sekunden nach der Auswahl des Kanals. Wird die
Auswahl nicht innerhalb von 8 Sekunden bestätigt,
wird der Kanal nicht gespeichert.
5.Wenn für den ausgewählten Kanal bereits eine
Frequenz gespeichert ist, wird der gespeicherte
Sender überschrieben.
6.Um zum gespeicherten Sender zu gelangen
(während des Radiohörens), drücken Sie die Taste
Programm. Der gespeicherte Sender wird
ausgewählt und die Kanalnummer wird am Display
angezeigt.

User’s manualUser’s manual
EN
14
EN
15
SAFETY INSTRUCTIONS
Read the entire instruction manual before you start
installation and assembly and keep it for future reference.
1. Protect this device from humidity, water and other
liquid.
2. Before connecting the device to power supply socket,
make sure the voltage indicated on the appliance
corresponds to the voltage in the power supply socket.
3.Position the device in a properly ventilated place.
Protect the device from heat sources and extreme
temperatures.
4.Clean the device with a soft, slightly damp cloth. Do
not use any chemical agents to clean this device.
5.Disconnect the device from power outlet, if it is
not going to be used for a long time. Store the
device without the batteries inside.
6.Never disassemble this device. In case of damage,
contact the authorized service point for a repair.
7. Do not store magnet sensitive items near the device.
8.Do not connect any external antennas to the
existing antenna.
PRODUCT DESCRIPTION
1. Alarm 1 / Volume - button
2.Alarm 2 / Volume + button
3.Time set / program button
4.Dimmer / DST button
5.HOUR / Tuning - button
6.MINUTE / Tuning + button
7. Radio button
8.Sleep button
9. DST indicator
10. Alarm 1 buzzer indicator
11. Alarm 1 radio indicator
12. FM radio indicator
13. Alarm 2 buzzer indicator
14. Alarm 2 radio indicator
DEDE
Bedienungsanleitung
14
Bedienungsanleitung
15
Deutsch
Korrekte Entsorgung dieses Produkts
(Elektromüll)
(Anzuwenden in den Ländern der Europäischen Union und anderen
europäischen Ländern mit einem separaten Sammelsystem) Die
Kennzeichnung auf dem Produkt bzw. auf der dazugehörigen Literatur gibt an,
dass es nach seiner Lebensdauer nicht zusammen mit dam normalem
Haushaltsmüll entsorgt werden darf. Entsorgen Sie dieses Gerät bitte getrennt
von anderen Abfällen, um der Umwelt bzw. der menschlichen Gesundheit nicht
durch unkontrollierte Müllbeseitigung zu schaden. Recyceln Sie das Gerät, um
die nachhaltige Wiederverwertung von stoichen Ressourcen zu fördern.
Private Nutzer sollten den Händler, bei dem das Produkt gekauft wurde, oder
die zuständigen Behörden kontaktieren, um in Erfahrung zu bringen, wie sie
das Gerät auf umweltfreundliche Weise recyceln können. Gewerbliche Nutzer
sollten sich an Ihren Lieferanten wenden und die Bedingungen des
Verkaufsvertrags konsultieren. Dieses Produkt darf nicht zusammen mit
anderem Gewerbemüll entsorgt werden. Hergestellt in China für LECHPOL
ELECTRONICS Sp. z o.o. Sp.k., ul. Garwolińska 1, 08-400 Miętne.
TECHNISCHE DATEN
• UKW Radio
• 10 Stationsspeicher
• Doppelter Alarm
• Display: LED
• Lautsprecher: 8 Ohm / 0,5 W
• UKW Frequenzbereich: 87,5 – 108 MHz
• Leistung: 3 W
• Batterie: 2x AAA 1,5 V (Backup-Funktion)
• Stromversorgung: 230 V / 50 Hz
Batterie-Backup
Wenn Batterien (2x AAA 1,5V Batterien) in das Gerät
eingelegt sind, bleibt die aktuell eingestellte Uhrzeit bei
einem Stromausfall erhalten. Während eines
Stromausfalls wird das Display nicht beleuchtet. Wenn
die Stromversorgung wiederhergestellt ist, wird die
richtige Zeit angezeigt. Wenn längere Zeit kein Strom
vorhanden ist oder der Batteriestand niedrig ist, kann
die wiederhergestellte Zeit von der korrekten Zeit
abweichen. Nehmen Sie die Batterien heraus, wenn das
Gerät längere Zeit nicht benutzt wird.

User’s manualUser’s manual
EN
16
EN
17
12:00
1
10
13
11
14
9
12
2345
6
87
OPERATION
Tu turn on the device, plug the power cord to a power
outlet. After inserting the batteries, the time settings
will be kept after power cutout.
Setting the clock
1. The rst time the device is turned on, the display
will show a ashing 00:00, indicating that the
clock is not set.
2.Press the HOUR button to set the hour. Press the
MINUTE button to set the minutes. Press and hold the
HOUR or MINUTE button to quickly change the time.
3.After setting the correct time, press the time set
button or wait 5 seconds. After 5 seconds, the time will
be set.
To change set time:
1. Make sure that the radio is switched o. To do
this, press and hold the Radio button.
2.Press and hold the set time button, until the time
on display ashes.
3.Repeat steps 2-3 from previous paragraph.
• To display seconds, press the set time button.
After 5 seconds, the device will show the current
time back.
Changing the dim settings / changing the Daytime
Saving Time
• Press the dimmer button to change the dim
settings.
• Press and hold the DST button to switch to
Daytime Saving Time. The DST will be indicated by
the DST indicator.
Setting the alarm
Attention: if you want the alarm sound to be the
radio, set the radio and the volume before setting
the alarm.
1. Make sure that the radio is switched o.
2.Press the Alarm 1 or 2 button. The time will start
ashing and the corresponding alarm indicator
will ash as well.
3.Use the HOUR and MINUTE buttons to set the
alarm time.
4.Press the Alarm 1 or 2 button to conrm the alarm
time (or wait 5 seconds).
5.Press the Alarm 1 or 2 button again to choose the
alarm sound: radio or buzzer.

User’s manualUser’s manual
EN
18
EN
19
After the alarm is activated on set time:
• Press the Radio button to turn o the alarm.
• Press the snooze button to activate 9-minute
snooze.
• To turn o the snooze, press the Radio button.
• If the alarm is not deactivated by the button, it will
turn o automatically after one hour.
• Alarm will switch on after 24 hours. To turn o the
alarm, keep pressing the Alarm 1 or 2 button, until
the alarm indicator turns o.
Set timer
The device has the automatic timer functions. To set
it up:
1. While listening to the radio, press the snooze
button. A ashing number 90 will appear on the
display, indicating the time to automatic switch o.
2.Keep pressing the snooze button until you reach
the desired time.
3.After 2 seconds from the selected o time, the
display will show the current time again and the
radio will turn o after the set time.
4.Press the snooze button to display time to turn o.
5.To turn o the timer function, press the snooze
button until OFF appears on the display, or turn o
the radio.
FM Radio
• Press the Radio button to turn on the radio. The
display will show the current frequency and the
current time after 5 seconds.
• Press and hold the Radio button to turn o the radio.
• To change the volume level, use the volume
buttons.
• To set the frequency, use the tuning buttons.
• To enable automatic channel scanning, press and
hold one of the tuning buttons.
Saving radio stations
1. Set the frequency.
2.Press and hold the program button. The channel
number will appear on the display.
3.Select the channel number with the tuning buttons.
4.After selecting channel press the program button
within 8 seconds from selecting the channel. If the
choice is not conrmed within 8 seconds, the
channel will not be saved.
5.If the selected channel already has a frequency
saved, the saved station will be overwritten.
6.To go to the saved channel (while listening to the
radio), press the program button. Saved station
will be selected, and the channel number will
appear on the display.
Battery back-up
When batteries (2x AAA 1.5V batteries) are inserted
into the device, the currently set time will be
maintained during a power outage. During a power
outage, the display will not be illuminated. When
power is restored, the correct time will be set. If
there is no power for a long time, or the battery level
is low, the restored time may be dierent from the
correct time. Take out the batteries if the device is
not going to be used for a long time.

Instrukcja obsługiInstrukcja obsługi
PLPL
20 21
KWESTIE BEZPIECZEŃSTWA
Przed użyciem należy dokładnie zapoznać się z treścią
instrukcji obsługi, oraz zachować ją w celu późniejszego
wykorzystania.
1. Urządzenie należy chronić przed wilgocią, wodą
oraz innymi płynami.
2.Przed podłączeniem do źródła zasilania, należy
sprawdzić zgodność napięcia prądu gniazda
sieciowego i urządzenia.
3.Urządzenie należy umieścić w miejscu z
prawidłową cyrkulacją powietrza. Urządzenie
należy chronić przed źródłami ciepła oraz
ekstremalnymi temperaturami.
4.Obudowę urządzenia należy regularnie czyścić za
pomocą miękkiej, lekko wilgotnej ściereczki. Nie
należy używać środków chemicznych lub
detergentów do czyszczenia tego urządzenia.
5. Jeśli urządzenie nie będzie używane przez dłuższy
czas, należy odłączać je od źródła zasilania.
Urządzenie należy przechowywać bez baterii w środku.
6.Zabrania się demontażu urządzenia. W wypadku
uszkodzenia, należy oddać urządzenie do punktu
serwisowego w celu naprawy.
7. W pobliżu radia nie należy przechowywać
przedmiotów wrażliwych na magnesy.
8.Do kabla anteny nie należy podłączać anten
zewnętrznych.
OPIS URZĄDZENIA
1. Przycisk Alarmu 1 / Głośność –
2.Przycisk Alarmu 2 / Głośność +
3.Przycisk ustawiania czasu / programu
4.Przycisk zmiany podświetlenia / czasu letniego
5.Przycisk HOUR / strojenia –
6.Przycisk MINUTE / strojenia +
7. Przycisk Radio
User’s manualUser’s manual
EN
20
EN
21
English
Correct Disposal of This Product
(Waste Electrical & Electronic Equipment)
(Applicable in the European Union and other European countries with separate
collection systems) This marking shown on the product or its literature,
indicates that it should not be disposed with other household wastes at the
end of its working life. To prevent possible harm to the environment or human
health from uncontrolled waste disposal, please separate this from other
types of wastes and recycle it responsibly to promote the sustainable reuse of
material resources. Household users should contact either the retailer where
they purchased this product, or their local government oce, for details of
where and how they can take this item for environmentally safe recycling.
Business users should contact their supplier and check the terms and
conditions of the purchase contract. This product should not be mixed with
other commercial wastes for disposal.
Made in China for LECHPOL ELECTRONICS Sp. z o.o. Sp.k., ul. Garwolińska 1, 08-400
Miętne.
SPECIFICATION
• FM radio
• 10 stations memory
• Double alarm
• Display: LED
• Speaker: 8 Ohm / 0,5 W
• FM frequency range: 87,5 - 108 MHz
• Power: 3 W
• Battery: 2x AAA 1,5 V (for clock memory)
• Power supply: 220-240 V / 50-60 Hz

Instrukcja obsługiInstrukcja obsługi
PL
22
PL
23
8.Przycisk drzemki
9. Wskaźnik czasu letniego
10. Wskaźnik brzęczyka Alarmu 1
11. Wskaźnik radia Alarmu 1
12. Wskaźnik radia FM
13. Wskaźnik brzęczyka Alarmu 2
14. Wskaźnik radia Alarmu 2
12:00
1
10
13
11
14
9
12
2345
6
87
OBSŁUGA
Aby włączyć urządzenie należy podłączyć wtyczkę
kabla zasilającego do gniazdka sieciowego. Po włożeniu
baterii, ustawienia czas zostaną podtrzymane na czas
zaniku zasilania.
Ustawianie zegara
1. Przy pierwszym włączeniu urządzenia, na
wyświetlaczu pojawi się migająca godzina 00:00,
wskazując, że zegar nie jest ustawiony.
2.Nacisnąć przycisk HOUR, aby ustawić godzinę.
Nacisnąć przycisk MINUTE, aby ustawić minuty.
Nacisnąć i przytrzymać przycisk HOUR lub
MINUTE, aby szybko zmieniać godziny lub minuty.
3.Po ustawieniu poprawnej godziny, należy nacisnąć
przycisk ustawiania czasu, lub zaczekać 5 sekund. Po
tym czasie zegar potwierdzi godzinę samoczynnie.
Aby zmienić ustawiony czas:
1. Należy upewnić się, że radio jest wyłączone. Aby
to zrobić naciśnij i przytrzymaj przycisk Radia.
2.Nacisnąć i przytrzymać przycisk ustawiania czasu,
aż godzina na wyświetlaczu zacznie migać.
3.Powtórzyć kroki 2-3 z poprzedniego akapitu.
• Aby wyświetlić sekundy, należy nacisnąć przycisk
ustawiania czasu. Po 5 sekundach urządzenie
wyświetli ponownie godzinę.
Zmiana podświetlenia / zmiana czasu letniego
• Nacisnąć przycisk zmiany podświetlenia, aby
zmienić intensywność podświetlenia.
• Nacisnąć i przytrzymać przycisk czasu letniego,
aby ustawić czas letni. Włączenie będzie
sygnalizowane wskaźnikiem czasu letniego.
Ustawianie alarmu
Uwaga: jeżeli dźwiękiem alarmu ma być radio, przed
ustawieniem alarmu należy ustawić radio na
wybraną stację i głośność.
1. Upewnić się, że radio jest wyłączone.
2.Nacisnąć przycisk Alarmu 1 lub Alarmu 2. Godzina
zacznie migać oraz podświetli się wskaźnik

Instrukcja obsługiInstrukcja obsługi
PL
24
PL
25
odpowiadającego alarmu.
3.Użyć przycisków HOUR i MINUTE, aby ustawić
godzinę alarmu.
4.Potwierdzić godzinę przy pomocy przycisku
Alarmu 1 lub 2, lub odczekać 5 sekund, aby
godzina została potwierdzona samoczynnie.
5.Nacisnąć ponownie przycisk Alarmu 1 lub 2, aby
wybrać rodzaj budzika: radio lub brzęczyk, lub
wyłączyć alarm.
Po aktywacji alarmu o ustawionej godzinie:
• Nacisnąć przycisk Radia, aby wyłączyć alarm.
• Nacisnąć przycisk Drzemki, aby włączyć 9
minutową drzemkę.
• Aby wyłączyć drzemkę należy nacisnąć przycisk
Radia.
• Jeżeli alarm nie zostanie wyłączony przyciskiem,
wyłączy się on automatycznie po godzinie.
• Alarm włączy się ponownie po 24 godzinach. Aby
całkowicie wyłączyć alarm należy nacisnąć przycisk
Alarmu 1 lub 2, aż wskaźniki alarmu wyłączą się.
Ustawianie timera
Radio posiada funkcję automatycznego wyłączania
po określonym czasie. Aby ją ustawić:
1. Podczas słuchania radia należy nacisnąć przycisk
drzemki. Na wyświetlaczu pojawi się migająca
liczba 90, wskazująca minuty do wyłączenia.
2.Naciskać przycisk drzemki, aż do uzyskania
żądanego czasu.
3.Po 2 sekundach od wybranego czasu wyłączenia,
na wyświetlaczu ponownie pojawi się aktualny
czas, a radio wyłączy się po ustawionym czasie.
4.Nacisnąć przycisk drzemki, aby wyświetlić aktualny
czas do wyłączenia radia.
5.Aby wyłączyć funkcję timera, należy naciskać
przycisk drzemki, aż na wyświetlaczu pojawi się
komunikat OFF, lub wyłączyć radio.
Radio
• Aby włączyć radio należy nacisnąć przycisk Radia.
Na wyświetlaczu pojawi się aktualna częstotliwość,
a po 5 sekundach aktualny czas.
• Aby wyłączyć radio należy nacisnąć i przytrzymać
przycisk Radia.
• Do regulacji poziomu głośności należy użyć
przycisków głośności.
• Aby ustawić wybraną częstotliwość należy użyć
przycisków strojenia.
• Aby włączyć automatyczne skanowanie w
poszukiwaniu stacji o najsilniejszym sygnale, należy
nacisnąć i przytrzymać jeden z przycisków strojenia.
Zapisywanie stacji radiowych
1. Ustawić wybraną częstotliwość.
2.Nacisnąć i przytrzymać przycisk programu. Na
wyświetlaczu pojawi się numer kanału pamięci.
3.Wybrać numer kanału pamięci przy pomocy
przycisków strojenia.
4.Po wybraniu kanału należy nacisnąć przycisk
programu w ciągu 8 sekund od wybrania kanału.
Jeżeli wybór nie zostanie potwierdzony po 8
sekundach, stacja nie zostanie zapisana.
5.Jeżeli na wybranym kanale znajduje się już
zapisana stacja, zostanie ona nadpisana.
6.Aby przejść do zapisanej stacji należy (podczas
słuchania radia) nacisnąć przycisk programu.
Zostanie wybrana kolejna zapisana stacja, a na
wyświetlaczu pojawi się numer kanału.
Funkcja podtrzymywania czasu
Po włożeniu baterii (2 baterie AAA 1,5 V) do
urządzenia, aktualnie ustawiony czas zostanie
podtrzymany podczas zaniku zasilania. W czasie
zaniku zasilania wyświetlacz nie będzie
podświetlony. Po przywróceniu zasilania, właściwa

Instrukcja obsługiInstrukcja obsługi
PLPL
26 27
godzina zostanie ustawiona. Jeżeli zasilania nie
będzie przez dłuższy czas, lub poziom baterii jest
niski, przywrócona godzina może się różnić od
właściwej. Jeżeli urządzenie nie będzie używane
przez dłuższy czas, należy wyjąć z niego baterie.
Poland
Prawidłowe usuwanie produktu
(zużyty sprzęt elektryczny i elektroniczny)
Oznaczenie umieszczone na produkcie lub w odnoszących się do niego
tekstach wskazuje, że po upływie okresu użytkowania nie należy usuwać z
innymi odpadami pochodzącymi z gospodarstw domowych. Aby uniknąć
szkodliwego wpływu na środowisko naturalne i zdrowie ludzi wskutek
niekontrolowanego usuwania odpadów, prosimy o oddzielenie produktu od
innego typu odpadów oraz odpowiedzialny recykling w celu promowania
ponownego użycia zasobów materialnych jako stałej praktyki. W celu
uzyskania informacji na temat miejsca i sposobu bezpiecznego dla środowiska
recyklingu tego produktu użytkownicy w gospodarstwach domowych powinni
skontaktować się z punktem sprzedaży detalicznej, w którym dokonali zakupu
produktu, lub z organem władz lokalnych. Użytkownicy w rmach powinni
skontaktować się ze swoim dostawcą i sprawdzić warunki umowy zakupu.
Produktu nie należy usuwać razem z innymi odpadami komercyjnymi.
Wyprodukowano w CHRL dla LECHPOL ELECTRONICS Sp. z o.o. Sp.k., ul.
Garwolińska 1, 08-400 Miętne.
SPECYFIKACJA
• Radio FM
• Pamięć na 10 stacji radiowych
• Podwójny budzik
• Wyświetlacz: LED
• Głośnik: 8 Ohm / 0,5 W
• Zakres fal FM: 87,5 - 108 MHz
• Pobór mocy: 3 W
• Bateria: 2x AAA 1,5 V (do podtrzymania godziny)
• Zasilanie: 230 V / 50 Hz
Manual de utilizareManual de utilizare
RORO
26 27
INSTRUCȚIUNI PRIVIND SIGURANȚA
Citiți cu atenție manualul de instrucțiuni înainte de a
începe instalarea și asamblarea produsului și păstrați-l
pentru consultări ulterioare.
1. Feriți dispozitivul de umiditate, apă și alte lichide.
2.Înainte de a conecta dispozitivul la sursa de
alimentare, asigurați-vă că tensiunea indicată pe
aparat corespunde cu tensiunea rețelei.
3. Puneți aparatul într-ul loc bine ventilat. Feriți
dispozitivulde surse de căldură și temperaturi extreme.
4.Curățați dispozitivul cu un material textil moale,
ușor umezit. Nu utilizați agenți chimici pentru a
curăța dispozitivul.
5.Deconectați aparatulde la sursa de alimentare dacă
nu va utilizat o perioadă mai lungă de timp.
Scoateți bateriile din aparat înainte de a-l depozita.
6.Nu dezasamblați niciodată dispozitivul. În caz de
deteriorare, contactați un service autorizat pentru
vericare sau reparații.
7. Nu depozitați obiecte sensibile la magneți în
apropierea dispozitivului.
8.Nu conectați nicio antenă externă la antena
existentă.
DESCRIEREA PRODUSULUI
1. Buton Alarma 1 / Volum -
2.Buton Alarma 2 / Volum +
3.Buton setare oră / program
4.Buton Dimmer / DST
5.Buton HOUR / Tuning -
6.Buton MINUTE / Tuning +
7. Buton radio
8.Buton sleep
9. Indicator DST
10. Indicator sonor Alarma 1
11. Indicator radio Alarma 1

Manual de utilizareManual de utilizare
RO
28
RO
29
12. Indicator radio FM
13. Indicator sonor Alarma 2
14. Indicator radio Alarma 2
12:00
1
10
13
11
14
9
12
2345
6
87
FUNCȚIONARE
Pentru a porni dispozitivul, conectați cablul de alimentare
la o priză. După introducerea bateriilor, setările de oră vor
păstrate după întreruperea alimentării.
Setarea ceasului
1. La prima pornire a dispozitivului, pe ecran va
pâlpâi 00:00, indicând faptul că ceasul nu este
setat.
2.Apăsați butonul HOUR pentru a seta ora. Apăsați
butonul MINUTE pentru a seta minutele. Țineți
apăsat butonul HOUR sau MINUTE pentru a
schimba rapid ora sau minutele.
3.După setarea orei corecte, apăsați și țineți apăsat
butonul de setare a orei sau așteptați 5 secunde.
După 5 secunde, ora va setată.
Pentru a schimba ora setată:
1. Asigurați-vă că radioul este oprit. Pentru aceasta,
țineți apăsat butonul Radio.
2.Apăsați și țineți apăsat butonul de setare a oeri,,
până când ora așată pâlpâie.
3.Repetați pașii 2-3 din paragraful anterior.
• Pentru a așa secundele, apăsați butonul de
setare a orei. După 5 secunde, dispozitivul va așa
ora curentă înapoi.
Modicarea setărilor de estompare/ modicarea
timpului de economisire pe timp de zi (Daytime
Saving Time)
• Apăsați butonul Dimmer pentru a modica setările
de estompare.
• Apăsați și țineți apăsat butonul DST pentru a
comuta la modul de economisire. DST va indicat
de indicatorul DST.
Setarea alarmei
Atenție: Dacă doriți ca sunetul alarmei să e radioul,
setați radioul și volumul înainte de a seta alarma.
1. Asigurați-vă că radioul este oprit.
2.Apăsați butonul Alarmă 1 sau 2. Ora va începe să
pâlpâie, iar indicatorul de alarmă corespunzător va
pâlpâi, de asemenea.
3.Utilizați butoanele HOUR și MINUTE pentru a seta
ora alarmei.

Manual de utilizareManual de utilizare
RO
30
RO
31
4.Apăsați butonul Alarmă 1 sau 2 pentru a conrma
(sau așteptați 5 secunde).
5.Apăsați din nou butonul Alarmă 1 sau 2 pentru a
alege sunetul alarmei: radio sau buzzer.
După ce alarma este activată la ora stabilită:
• Apăsați butonul Radio pentru a opri alarma.
• Apăsați butonul de amânare pentru a activaa
amânarea de 9 minute.
• Pentru a opri amânarea, apăsați butonul Radio.
• Dacă alarma nu este dezactivată de buton,
aceasta se va opri automat după o oră.
• Alarma se va ctiva după 24 de ore. Pentru a opri
alarma, continuați să apăsați butonul Alarma 1 sau
2, până când indicatorul de alarmă se stinge.
Setare temporizator
Dispozitivul are funcțiile de temporizare automată:
Pentru a le congura:
1. În timp ce ascultați radioul, apăsați butonul de
amânare. Pe ecran va părea numărul 90
intermitent, care indică timpul de oprire automată.
2.Continuați să apăsați butonul de amânare până
când ajungeți la timpul dorit.
3.După 2 secunde de la timpul de oprire selectat, pe
ecran va așată din nou ora curentă și radioul se
va opri după timpul setat.
4.Apăsați butonul amânare pentru a așa timpul de
oprire.
5.Pentru a dezactiva funcția temporizatorului,
apăsați butonul de amânare până când este așat
pe ecran OFF sau opriți radioul.
Radio FM
• Apăsați butonul Radio pentru a porni radioul. Pe
ecran va așată frecvența curentă și ora curentă
după 5 secunde.
• Apăsați și țineți apăsat butonul Radio pentru a
opri radioul.
• Pentru a mmodica volumul, utilizați butoanele
pentru volum.
• Pentru a seta frecvența, utilizați butoanele de
reglare.
• Pentru a activa scanarea automată a posturilor,
apăsați și țineți apăsat unul dintre butoanele de
reglare.
Salvarea posturilor de radio
1. Setați frecvența.
2.Apăsați și țineți apăsat butonul program. Numărul
canalului va așat pe ecran.
3.Selectați numărul postului cu butoanele de
reglare.
4.După selectarea postului, apăsați butonul program
în 8 secunde de la selectarea postului. Dacă
alegerea nu este conrmată, canalul nu va salvat.
5.Dacă postul selectat are deja o frecvență salvată,
postul salvat va suprascris.
6.Pentru a accesa postul salvat (în timp ce ascultați
radioul), apăsați butonul program. Postul salvat va
selectat, iar numărul postului va așat pe ecran.
Baterie de rezervă
Când bateriile (2 baterii tip AAA 1,5 V) sunt introduse
în dispozitiv, ora setată în prezent va menținută în
timpul unei întreruperi de curent. În timpul unei
întreruperi de curent, ecranul nu va iluminat.
Când alimentarea este restabilită, va arătată ora
corectă. Dacă nu există energie pentru o perioadă
lungă de timp sau dacă nivelul bateriei este scăzut,
ora restabilită poate diferită față de ora corectă.
Scoateți bateriile dacă dispozitivul nu va folosit
pentru o perioadă lungă de timp.

Manual de utilizareManual de utilizare
RORO
32 33
Romania
Reciclarea corecta a acestui produs
(reziduuri provenind din aparatura electrica si electronica)
Marcajale de pe acest produs sau mentionate in instructiunile sale de folosire
indica faptul ca produsul nu trebuie aruncat impreuna cu alte reziduuri din
gospod arie atunci cand nu mai este in stare de functionare. Pentru a preveni
posibile efecte daunatoare asupra mediului inconjurator sau a san ata tii
oamenilor datorate evacuarii necontrolate a reziduurilor, vă rugăm să separați
acest produs de alte tipuri de reziduuri si să-l reciclati in mod responsabil
pentru a promova refolosirea resurselor materiale. Utilizatorii casnici sunt
rugati să ia legatura e cu distribuitorul de la care au achizitionat acest produs,
e cu autoritatile locale, pentru a primi informatii cu privire la locul si modul
in care pot depozita acest produs in vederea reciclarii sale ecologice.
Utilizatorii institutionali sunt rugati să ia legatura cu furnizorul și să verice
condițiile stipulate in contractul de vanzare. Acest produs nu trebuie
amestecat cu alte reziduuri de natura comerciala.
Distribuit de Lechpol Electronic SRL, Republicii nr. 5, Resita, CS, ROMANIA.
SPECIFICAȚII
• Radio FM
• Memorare 10 posturi de radio
• Alarmă dublă
• Așaj: LED
• Difuzor: 8 Ohm / 0.5 W
• Gama de frecvență FM: 87.5 - 108 MHz
• Putere: 3 W
• Baterie: 2 baterii tip AAA 1.5 V (pentru memorie
ceas)
• Alimentare: 230 V / 50 Hz

is a registered trademark
Table of contents
Languages:
Other Krüger & Matz Clock Radio manuals