Krenn KRC 8 User manual

PNEUMATIC
REBAR CUTTER
MODEL: KRC 8 / KRC 8 L
INSTRUCTION MANUAL

Instruction Manual
Table of Contents / Introduction
Table of Contents
Introduction 2
1 Safety
1.1 Possible Dangers operating the machine 3
1.2 Safety Instruction 3 – 4
1.3 Defined Use 5
1.4 Authorised Users 5
2 Start and Operation 6
2.1 Composition of the Cutter 6
2.2 Preliminary Operating Procedure 6
2.3 Operation of the Cutter 6
3 Inspection and Maintenance 7
3.1 Maintenance 7
3.2 Blade Replacement 8
4 Technical Specification 9
5 KRC 8 / KRC 8 L with head 10
6 Spare parts list KRC 8 / KRC 8 L 11

Introduction
You are now in possession of a Steel Cutter Model KRC. This machine has been
designed and manufactured in accordance with modern and reliable technology.
In order that you may enjoy the reliability of the cutter for a long time and to ensure
that a safe operation of the material can be guaranteed, it is absolutely necessary
to read this instruction manual thoroughly and to observe strictly the
instructions given therein b e f o r e starting the operating procedure.
All users, who are authorised to use the Steel Cutter, must know the contents of this
instruction manual and must strictly observe these instructions b e f o r e starting the
first operation.
Keep the instruction manual in a safe place in order to have these instructions at your
disposal whenever you need them.
The manufacturer reserves the right to carry out technical and optical modifications
owing to further technical development at any time and without giving prior notice.
Due to this fact, all measurements, information and indications stated in this
instruction manual have been given without any engagement. It is therefore not
possible to make any legal claims on account of this instruction manual.
2

1 Safety
1.1 Possible Dangers operating the Machine
The Steel Cutter Model RC has been manufactured according to the latest
technical knowledge and is operationally reliable. A functional and safety test
has been carried out. In spite of this fact, it is possible that certain dangers are
imminent if the cutter is not being operated by trained personnel or at least
personnel who has received relevant instruction on the operation. The same
goes for using the steel cutter if it is being operated in an inappropriate manner
and if it is being used for purposes which it has not been destined for.
ATTENTION: If the content of this instruction manual is not being
observed, the operator or any bystanders are running
the risk of getting injured!
1.2 Safety Instructions
During the cutting of steel, especially when cutting pieces under 20 cm in
length, there is always the risk of flying steel fragments. This can lead to
serious injuries to any bystanders who are within the danger area. This danger
area is a considerable area located within the circumference where the
operating is taking place. Operate the steel cutter only if there are no
bystanders within the danger area.
•Always wear safety goggles or a full-face shield when cutting.
•Always wear proper working clothes. It is not appropriate to wear wide
clothes, because it might get caught between the cutter blades.
•Always hold the cutter with both hands at the corresponding handles.
Keep your fingers away from the cutter blades.
•Before cutting, the steel bar must rest fully within the cutter blades.
•Avoid any unintentional operation of the cutter. Never carry the cutter
with your finger being at the switch.
•To prevent an electrical shock, never cut any cables which are current-
carrying.
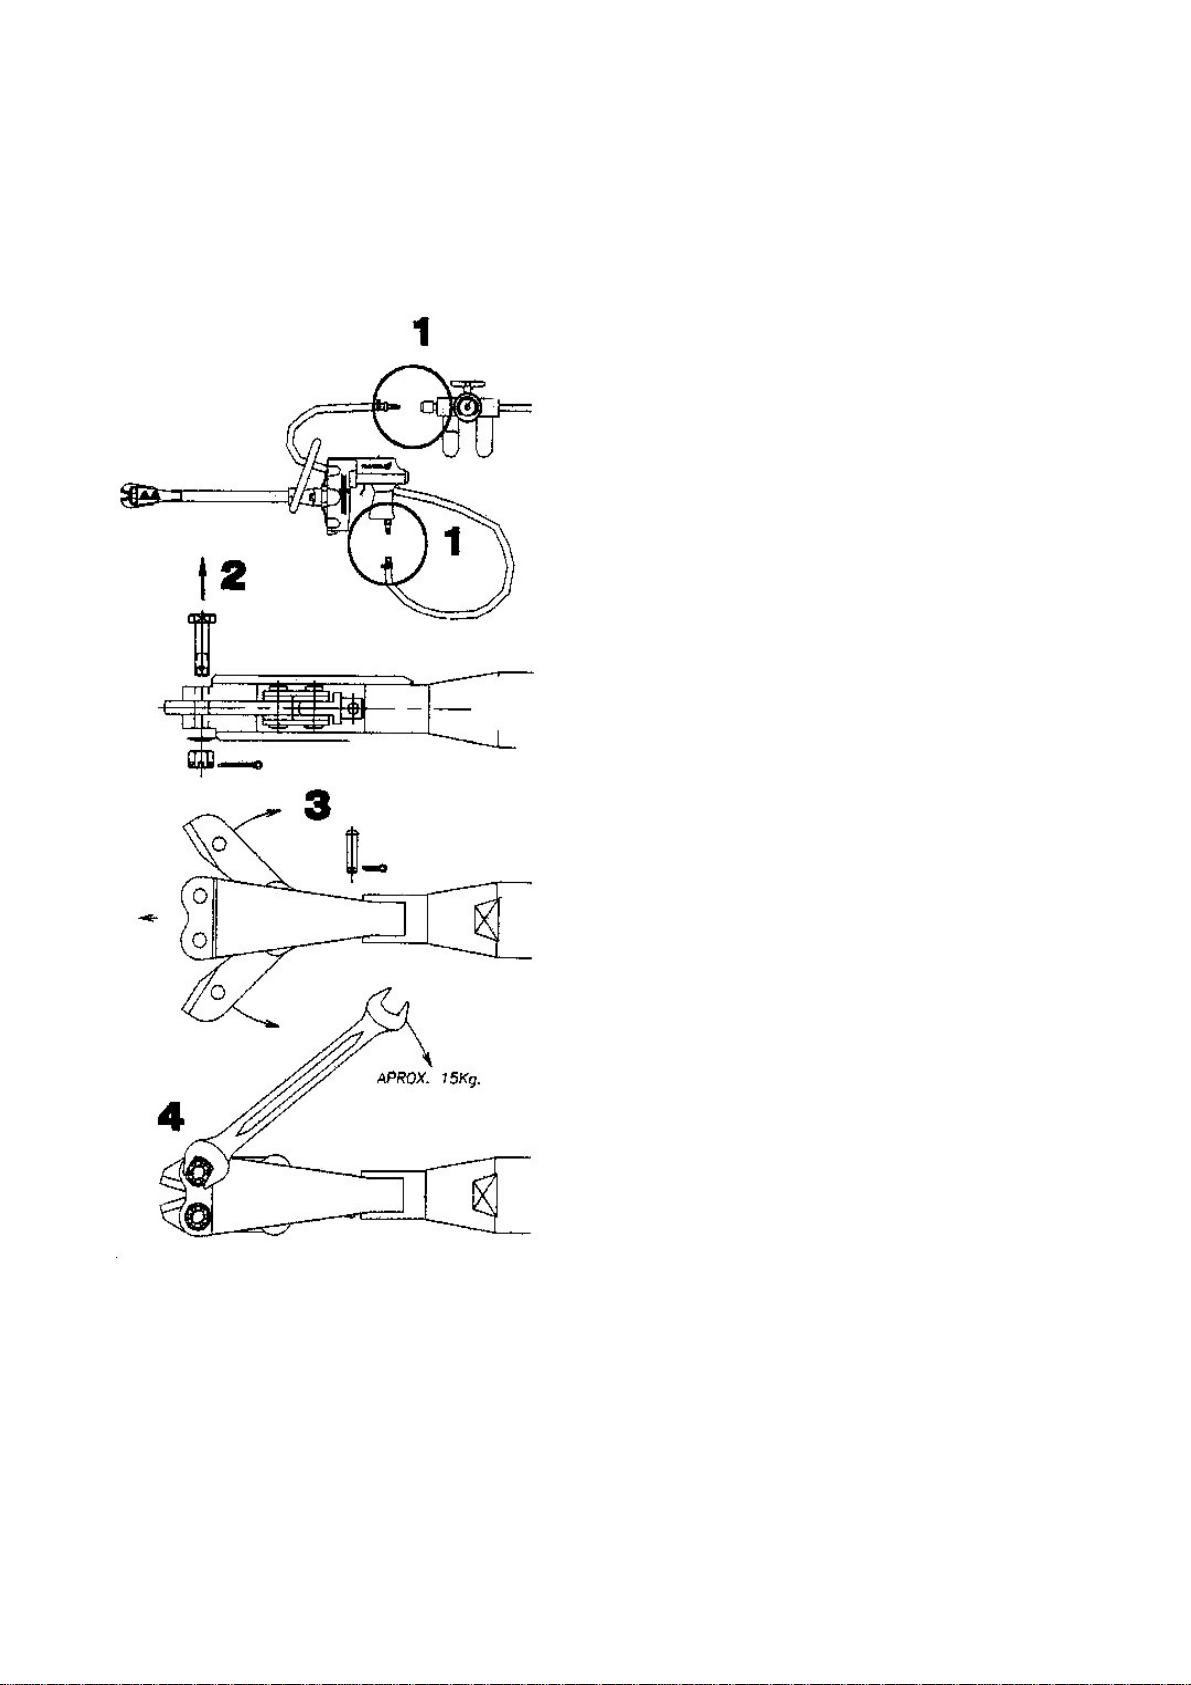
•If you are not using the cutter head or in case you are replacing it,
always disconnect the pneumatic air-hose and let the remaining air
escape by pressing the switch.
•Never use the steel cutter if you cannot concentrate on your work or if
your mind is diverted. Do by no means use the steel cutter if you are
under the influence of alcohol or tablets.
3

(Safety Instructions continued)
•During the work with the cutter, always see to it that your position is
safe and upright. Avoid any abnormal position of your body and do
always keep your balance.
•Whenever you use the cutter, inspect it as to any damages. If damages
on the cutter are being found, you are not allowed to use it anymore.
•Repair work on the steel cutter model KRC may only be carried out by a
trained specialist.
•It is strictly prohibited to dismount or to remove any safety installations
or to put them out of operation.
•Furthermore, it is strictly prohibited to carry out unauthorised
modifications or alterations due to safety reasons.
4

1.3 Defined Use
The Steel Cutter Model KRC has been designed and manufactured in order to
cut steel bars, steel profiles as well as constructional steel.
The steel cutter is destined for industrial purposes and applications.
The manufacturer is not undertaking any liability if the cutter is used for
purposes and applications which are not mentioned in this instruction manual.
Any warranty of guarantee will therefore also expire.
1.4 Authorised Users
The Steel Cutter Model KRC may only be used by workers who have been
authorised and instructed by the operational management.
The operator is being held responsible for any harm or injuries being inflicted
on third persons within his working area.
The operational management is obliged
•to make the instruction manual available to the operator
•to make sure that the operator has read and understood the contents
therein.
5

2 Start and Operation
2.1 Composition of the Cutter
16 Pneumatic Air Connection
15 First Handle
7 Second Handle
1 Cutter Head
21 Trigger
7 Suspension Device
2.2 Preliminary Operating Procedure
The cutter may be fastened by means of the suspension device (7) thus
enabling the stationary operation. A spring-traction device, e.g. with a carrying
force of min. 8 kg, is appropriate for this purpose.
Connect the pneumatic air by means of a plug-in coupling ¼’’.
2.3 Operation of the Cutter
The cutter can be operated horizontally as well as vertically.
Always hold the cutter with two hands. This will make sure that your fingers
are not getting caught between the blades as well as ensure the safe holding
of the cutter.
See to it that the piece you are cutting is located completely within the blade.
The cutter blades (1) will close as soon as the trigger (21) is being actuated.
As soon as the trigger is being loosened, the cutter blades will – pneumatically
– open again.
6

3 Inspection and Maintenance
3.1 Maintenance
Owing to the modern Pneumatic Technique, the cutter is maintenance-free.
If any defects should appear, please contact the manufacturer.
Lubricate blade head friction
areas every 500 cuts. Dip it in
lubricating oil and pull the trigger
several times keeping the blades By installing a device to remove
in the oil. THIS WAY YOU WILL water, adjust pressure and
OBTAIN OPTIMUM PERFORMANCE lubricate air, the useful life of the
OF THE BLADES DURING THEIR body and guides of the cutter is
USEFUL LIFE. remarkably lengthened.
7

3.2. Blade Replacement
1 TO PREVENT ANY ACCIDENTS
KEEP AIR SUPPLY DISCONNECTED
THROUGHOUT THE WHOLE BLADE
REPLACEMENT OPERATION
2 REMOVE THE TWO FORK BOLTS.
LOOSEN THE BOLTS AND REMOVE
THE TWO HEAD AXLES BY PUTTING IT
ON A FLAT SURFACE AND HITTING THE
THREAD AREA WITH A NYLON HAMMER,
NOT TO DAMAGE THE THREAD.
3 PULL THE TWO BLADES APART. REMOVE
THE BOLT FROM THE HINGE AND
ASSEMBLE THE NEW BLADES. IT IS
ADVISABLE TO OIL ALL THE FRICTION
AND TURNING AREAS DURING THIS
OPERATION.
4 TIGHTEN THE FASTENING NUTS WITH AN
APPROXIMATE TORQUE OF 4mt/kg. IF A
DYNAMOMETRIC WRENCH IS NOT
AVAILABLE, APPLY ABOUT 20 kg.
WITH A CONVENTIONAL 17 mm
WRENCH INTRODUCE THE BOLTS
SUPPLIED WITH THE PART.
8

4 TECHNICAL SPECIFICATION
POWER SUPPLY Filtered, lubricated air
CONSUMPTION 7 Lt./cut at 7 bar
MAXIMUM Ø CUT 8 Ø (Steel up to 70 kg/mm²)
6 Ø (Steel up to 180 kg/mm²)
SPEED 60 Ø Cuts/minute
MAXIMUM PRESSURE 8.5 bar
MINIMUM PRESSURE 6 bar
WEIGHT 5.8 kg (KRC 8)
7.2 kg (KRC 8 L)
9

Parts-List for Model KRC 8 / KRC 8 L
No.
Code
-
No.
Part name / Description
Qty
Unit
Remarks
1
M60AS
Set of blades
asymmetric
1
1
M60L
Set of blades
1
2
7001
Front axle
2
3
700
2
Rear guide support KRC 8
1
3
8L002
Rear guide support KRC 8 L
1
4
6007
Hinge bolt
1
5
6002
Female Screw
1
6
6004
Steel washer
1
7
7011
Subjection handle
1
8
7003
Counter nut
1
9
8001
Rear lid
1
10
8002
Lid joint
1
11
8003
Cylinder body
1
12
8006
Piston KRC 8
1
12
8L001
Piston KRC 8 L
1
13
8005
Piston joint
1
14
6017
Couple joints
2
15
6020
Distributor body
1
16
6032
¼” Tube connector
1
17
6031
3/8” Silen
cers
2
18
6018
Distributor screws
4
19
6034
Lid
-
fastening screws
9
20
6013
Piston rod joints
2
21
6021
Trigger
1
22
6026
Bearer guide
1
23
6027
Distributor joints
6
24
6028
Distributor spacers
5
25
6025
Bearer
1
26
6029
Spring
1
27
6030
Distributor lid
1
28
6033
¼” Connector female
1
10


KRC 8 / 8 L
This manual suits for next models
1
Table of contents