KRESS KAC900 User manual

60V Battery Harness
60-V-Akku-Tragegurt
Harnais de batterie 60 V
Zaino per batterie 60V
Arnés para baterías de 60V
Arnês de Bateria 60 V
60V batterijharnas
60V-os akkumulátor heveder
Rucsac cu baterii de 60 V
UprząĪ akumulatora 60 V
Postroj na 60 V baterii
60 V postroj
Nahrbtnik za baterijo 60 V
Baterijski pojas
60 V Batterirygsele
Akkuvaljaat
60V Batterisele
60V Batterisele
EN
D
F
I
ES
PT
NL
HU
RO
PL
CZ
SK
SL
HR
DK
FIN
NOR
SV
P03
P11
P19
P27
P35
P43
P51
P59
P67
P75
P83
P91
P99
P111
P115
P123
P131
P139
KAC900


EN
3
TABLE OF CONTENTS
INTRODUCTION...........................................................................................................................................3
COMPONENT LIST.....................................................................................................................................4
PRODUCT SAFETY.................................................................................................................................... 5
OPERATING INSTRUCTIONS.................................................................................................................6
MAINTENANCE AND CLEANING..........................................................................................................9
STORAGE.........................................................................................................................................................9
TROUBLESHOOTING................................................................................................................................9
TECHNICAL DATA ....................................................................................................................................10
INTRODUCTION
Dear Customer,
Thank you for buying this Kress Commercial product. We are dedicated to developing
high quality products to meet your commercial landscaping requirements.
The Kress brand is synonymous with premium quality service. Over the years of your
product's life, if you have any questions or concerns about your product, please
contact your dealer or our Customer Service Team for assistance.
We are condent you will enjoy working with your Kress product for years to come.
INTENDED USE
This harness allows the capability to connect to select Kress 60V handheld tools,
like a string trimmer, edger, or hedge trimmer, this harness gives you the exibility to
tackle big jobs and allowing longer runtime for larger jobs

4
EN
COMPONENT LIST
1. BATTERY ADAPTOR
2. CABLE
3. CHEST BUCKLE
4. SHOULDER STRAP
5. WAIST BUCKLE
6. BATTERY MOUNTING BASE
7. LOAD LIFT STRAP
8. CABLE MANAGEMENT FASTENER
9. FRAME HEIGHT ADJUSTMENT RELEASE
10. HEIGHT ADJUSTMENT SYMBOL
11. WEIGHT KIT*
12. BATTERY RELEASE BUTTON
Not all the accessories illustrated or described are included in standard delivery.
1
23
4
5
6
7
8
9
10
11
12

EN
5
ORIGINAL INSTRUCTIONS
PRODUCT SAFETY
GENERAL POWER TOOL
SAFETY WARNINGS
WARNING Read all safety warnings,
instructions, illustrations and specifications
provided with this power tool.
Failure to follow all
instructions listed below may result in electric shock,
re and/or serious injury.
Save all warnings and instructions for future
reference.
The term "power tool" in the warnings refers to your
mains-operated (corded) power tool or battery-
operated (cordless) power tool.
SYMBOLS
To reduce the risk of injury, user must
read instruction manual
Warning
1
2
Remove battery from the harness
before carrying out any adjustment,
servicing or maintenance.
Waste electrical products must
not be disposed of with household
waste. Please recycle where
facilities exist. Check with your local
authorities or retailer for recycling
advice.

6
EN
OPERATING INSTRUCTIONS
NOTE: Before using the tool, read the
instruction book carefully.
WARNING: This battery harness can only be
used with Kress cordless handheld tools.
BEFORE OPERATION
Note: Check the Kress batteries carefully to make
sure that no parts are damaged or missing. If any
damage occurred, please contact Service Agent.
OPERATION
Adjusting height of Frame(See Fig. A1,A2)
1
2
A1
Press
11
1
2
A2
1
2
Note: It is possible to adjust frame height based on
user height &weight. The Kress harness features
three height(S/M/L) for your choice.
1. Depress the button and release the slider from
the frame;
2. Find the suitable height, match the "-"symbol
as shown, t the slide and lift up to nish the
assembly, and you should hear a "click".
Install/Remove the battery pack (See Fig.
B1, B2,B3)
B1
B2
B3
1
2
1. Align the battery pack to the battery mounting
base, then slide it into the base to install the battery.
2. Press the battery pack release button, then lift the
battery pack along the mounting base to remove the
battery.
Fix the cable into harness positions.(See
Fig C)

EN
7
C
It is suggested to x the cable into the cable clips
during operation so as to avoid obstrucions by
cluttered cables.The cable clips are designed along
the shoulder belt and waist belt, which provides you
with two different ways to organize the cables.
Adjust the harness (See Fig. E1, E2,E3)
b
d
a
a
e
c
f
f
E1
E2
1
2
E3
1
23
1. Snap the waist buckle(d). Adjust the length of
waist strap(e) in order to make sure it is securely
positioned in your hips.(See Fig E2)
2. Tighten the shoudler strap(a)and remember to
leave a small gap over the shoulder to distribute
weight of battery over shoulders to balance weight.
(See Fig E3)
3. Snap the chest buckle(b) and adjust chest strap(c)
before work .(See Fig E3)
WARNING: Do not wear other shoulder straps when
using this backpack harness.
Connect the harness with your
machine(See Fig F1, F2)
F1
1. Insert the battery adaptor into the Kress cordless
handheld tool. Follow the instructions in the tool’s
manual to start the tool.Remove the adaptor from
the tool after use.

8
EN
1
2
F2
1
2
F3
NOTE: For better weight distribution, a weight kit
is supplied with the backpack harness.
1. LIft the ring and rotate the screw in a
counterclockwise direction, then push the weight kit
along the battery adaptor.(See Fig F2)
2. Rotate the screw in a clockwise direction to nish
the assembly of weight kit and battery adaptor. Then
insert the battery adaptor into the Kress handheld
tools.(See Fig F3)
WARNING: Before connection, make sure your
machine is turned off. When operating, wear
protective gloves.
REMOVE AND FIT HARNESS
Disassembly and assembly of the waist belt.
(See Fig G1,G2)
1
2
1
2
G1
1
2
1
2
G2
1. Open the velcro and remove the belt from the frame
ap.(See Fig G1)
2. Insert the frame ap into the pocket on the belt.
Rotate the belt until the whole of the frame ap is in
the pocket. Secure with the velcro tab.(See Fig G2)
Disassembly and assembly of the shoulder belt.
(See Fig H1,H2)
Press
1
1
1
2
H1
1. Press the button and release sliders from frame.
(See Fig H1)

EN
9
1
2
H2
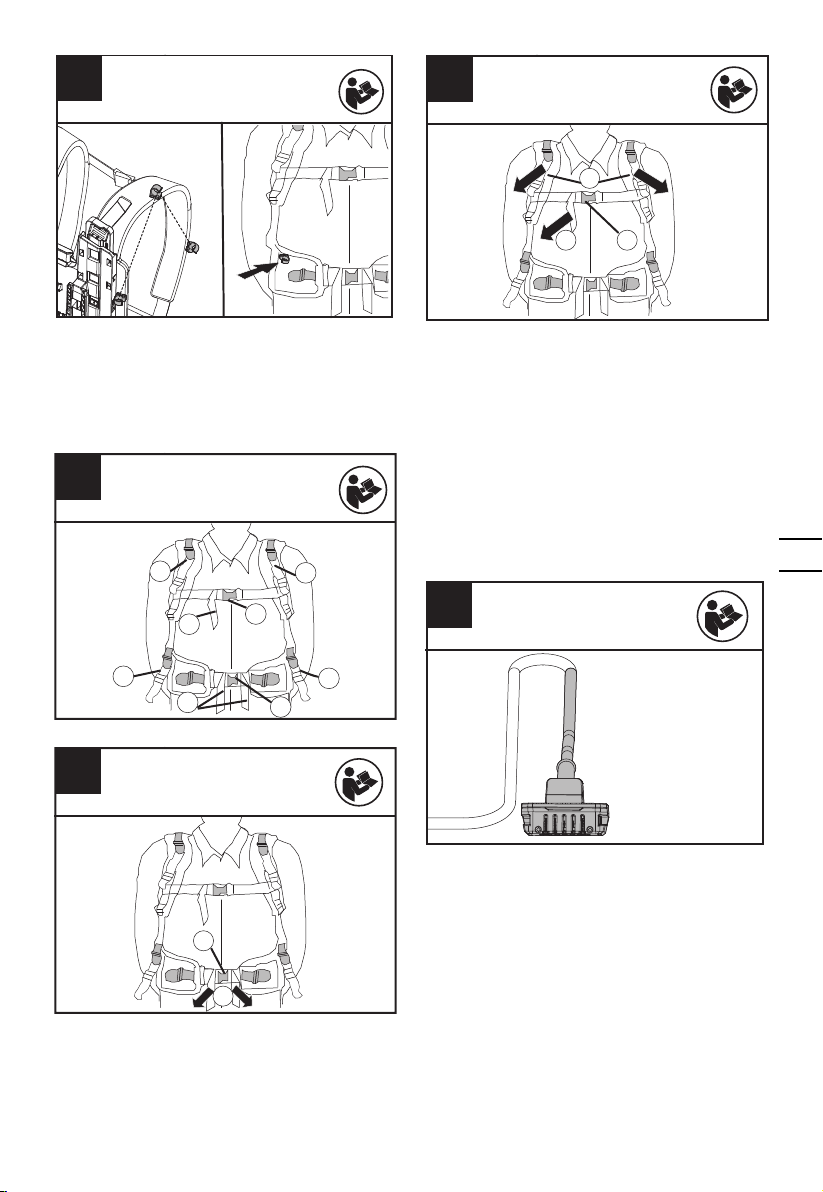
2.To remove the shoulder strap, push the strap
through the slot to release the toggle. Turn the
toggle triangle 90o and pass back through the slot to
remove.(See Fig H2)
I1
1
2
1
2
3. Match the "-" symbol between the frame and the
slider, then lift the slider up to assemble the harness.
(See Fig I1)
Note: The harness is designed with three height
(S/M/L) for you to choose the suitable height.
1
2
I2
4.Turn the toggle so that it lies 90oalong the strap.
Pass the toggle and strap through the slot in the
frame. Release the toggle and pull back towards the
frame. Ensure that the shoulder strap is not twisted.
(See Fig I2)
MAINTENANCE AND
CLEANING
Use soft brush to clean the debris on the surface of
harness. Never use water or chemical cleaners to
clean your harness. Wipe off any moisture with a soft
dry cloth as moisture can cause a shock hazard.
WARNING:Remove the battery and adaptor from
the harness before carrying out any adjustment,
servicing or maintenance.
STORAGE
Always store your harness in an enclosed space that
is inaccessible to children. Keep all working controls
free of dust. Keep away from corrosive agents. Do
not place any objects on top of the harness and put
the harness on the at oor.
TROUBLE SHOOTING
The following table gives problems and actions that
you can perform if your machine does not operate
correctly.
WARNING: Switch the machine off
and remove the battery prior to any
troubleshooting.
Problem Possible cause Solution
The tool
fails to
operate
1. Battery
not (properly)
inserted
2. No electrical
contact between
the battery pack
and backpack
harness
3. The battery
pack is depleted
4. No electrical
contact between
the adaptor and
tool
1. Properly
insert battery
into backpack
harness.
2. Remove the
battery pack
and check the
contact. Then
reinstall the
battery pack.
3. Charge the
battery pack.
4. Disconnect
the adaptor
from the tool,
then reconnect
them.

10
EN
TECHNICAL DATA
KAC900
Suitable battery pack Kress 60V battery pack (KAC804 KAC810)
Weight (Without battery) 2.25 kg
We recommend that you purchase your accessories from the same Dealer that sold you the tool. Refer to the
accessory packaging for further details. Your Dealer can assist you and offer advice.

D
11
INHALTSVERZEICHNIS
EINFÜHRUNG.............................................................................................................................................11
KOMPONENTEN.......................................................................................................................................12
ORIGINALBETRIEBSANLEITUNG ....................................................................................................13
MONTAGE UND BEDIENUNG ............................................................................................................14
WARTUNG UNDREINIGUNG...............................................................................................................17
LAGERUNG .................................................................................................................................................17
FEHLERBEHEBUNG ...............................................................................................................................17
TECHNISCHE DATEN .............................................................................................................................18
EINFÜHRUNG
Sehr geehrter Kunde,
Vielen Dank, dass Sie dieses Kress Commercial-Produkt gekauft haben. Wir sind
bestrebt, qualitativ hochwertige Produkte zu entwickeln, die Ihren Anforderungen im
gewerblichen Landschaftsbau gerecht werden.
Die Marke Kress steht für erstklassigen Service. Wenn Sie im Laufe der Jahre Fragen
oder Bedenken zu Ihrem Produkt haben, wenden Sie sich bitte an Ihren Händler oder
an unser Kundendienstteam, um Hilfe zu erhalten.
Wir sind zuversichtlich, dass Sie in den kommenden Jahren die Arbeit mit Ihrem
Kress-Produkt genießen werden.
BESTIMMUNGSGEMÄSSER GEBRAUCH
Dieser Tragegurt ermöglicht den Anschluss kabelloser 60-V-Handgeräten von Kress,
wie z. B. Fadentrimmer, Kantenschneider oder Heckenscheren. Dieser Tragegurt
gibt Ihnen die Flexibilität, auch große Aufgaben zu bewältigen und ermöglicht eine
längere Betriebsdauer für umfangreichere Arbeiten

12
D
KOMPONENTEN
1. AKKU-ADAPTER
2. KABEL
3. BRUSTSCHNALLE
4. SCHULTERGURT
5. HÜFTSCHNALLE
6. AKKU-HALTERUNG
7. LASTAUFNAHMEBAND
8. KABELMANAGEMENT-HALTERUNG
9. ENTRIEGELUNG DER RAHMENHÖHENVERSTELLUNG
10. SYMBOL FÜR HÖHENVERSTELLUNG
11. GEWICHT-KIT*
12. AKKU-ENTRIEGELUNGSTASTE
*Abgebildetes oder beschriebenes Zubehör gehört teilweise nicht zum Lieferumfang.
1
23
4
5
6
7
8
9
10
11
12

D
13
ORIGINALBETRIEBSANLEITUNG
EINFÜHRUNG
PRODUKTSICHERHEIT
ALLGEMEINE
SICHERHEITSHINWEISE
FÜR ELEKTROWERKZEUGE
WARNUNG! Machen Sie sich mit allen
Sicherheitswarnungen, Anweisungen,
Abbildungen und Spezifikationen
vertraut, die mit diesem Elektrowerkzeug
geliefert werden.
Die Nichtbeachtung der unten aufgeführten
Anweisungen kann in elektrischen Schlägen, Feuer
und/oder schweren Verletzungen resultieren.
Bewahren Sie alle Sicherheitshinweise und An-
weisungen für die Zukunft auf.
Der in den Sicherheitshinweisen verwendete Begriff
„Elektrowerkzeug“ bezieht sich auf akkubetriebene
Elektrowerkzeuge (ohne Netzkabel).
SYMBOLE
Zur Reduzierung der Verletzungsge-
fahr bitte die Bedienungsanleitung
durchlesen
Warnung
1
2
Stellen Sie sicher, dass der Akku vor
dem Wechseln des Zubehörs entfernt
wird.
Elektroprodukte dürfen nicht mit dem
normalen Haushaltsmüll entsorgt
werden, sondern sollten nach
Möglichkeit zu einer
Recyclingstelle gebracht werden.
Ihre zuständigen Behörden oder
Ihr Fachhändler geben Ihnen hierzu
gerne Auskunft.

14
D
MONTAGE UND
BEDIENUNG
HINWEIS: Lesen Sie das Handbuch vor
Inbetriebnahme des Werkzeuges sorgfältig
durch.
WARNUNG: Dieser Akku-Tragegurt kann
nur mit kabellosen Handgeräten von Kress
verwendet werden.
VOR DEM BETRIEB
Hinweis: Überprüfen Sie die Kress-Akkus sorgfältig,
um sicherzustellen, dass keine Teile beschädigt sind
oder fehlen. Wenden Sie sich bei Schäden bitte an
den Kundendienst.
BEDIENUNG
Einstellen der Höhe des Rahmens (siehe Abb.
A1, A2)
1
2
A1
Press
11
1
2
A2
1
2
Hinweis: Es ist möglich, die Höhe des Rahmens
an die Größe und das Gewicht des Benutzers
anzupassen. Der Kress-Tragegurt bietet drei Höhen
(S/M/L) zur Auswahl.
1. Drücken Sie den Knopf und lösen Sie den
Schieber aus dem Rahmen.
2. Finden Sie die gewünschte Höhe, passen Sie
das "-"Symbol wie abgebildet an, setzen Sie den
Schieber ein und heben Sie ihn an, um die Montage
zu beenden; Sie sollten ein "Klicken" hören.
Einsetzen/Ausbauen des Akkupacks (siehe
Abb. B1, B2,B3)
B1
B2
B3
1
2
1. Richten Sie den Akkupack auf die Akku-Halterung
aus und schieben Sie ihn dann in die Halterung.
2. Drücken Sie die Akku-Entriegelungstaste und
heben Sie dann den Akkupack entlang der Halterung
an, um den Akku zu entnehmen.
Befestigen Sie das Kabel in den
Tragegurtpositionen.(siehe Abb C)

D
15
C
Es wird empfohlen, die Kabel während des
Betriebs in den Kabelklemmen zu befestigen, um
Behinderungen durch Kabelgewirr zu vermeiden.
Die Kabelklemmen sind entlang des Schultergürtels
und des Hüftgurtes angebracht, was Ihnen zwei
verschiedene Möglichkeiten bietet, die Kabel zu
organisieren.
Einstellen des Tragegurtes (siehe Abb. E1,
E2,E3)
b
d
a
a
e
c
f
f
E1
E2
1
2
E3
1
23
1. Schnappen Sie die Hüftschnalle ein. Stellen Sie
die Länge des Hüftgurtes (e) so ein, dass er sicher
auf der Hüfte sitzt. (siehe Abb. E2)
2. Ziehen Sie den Schultergurt (a) fest und denken
Sie daran, einen kleinen Spalt über der Schulter
zu lassen, damit das Gewicht des Akkus auf die
Schultern verteilt werden kann, um das Gewicht
auszugleichen. (Siehe Abb. E3)
3. Schnappen Sie die Brustschnalle (b) ein und
justieren Sie den Brustgurt (c) vor Arbeitsbeginn.
(Siehe Abb. E3)
WARNUNG: Tragen Sie keine anderen Schultergurte,
wenn Sie dieses Rucksack-Gurtzeug verwenden.
Verbinden Sie den Tragegurt mit Ihrem
Gerät(siehe Abb F1, F2)
F1
1. Setzen Sie den Akku-Adapter in das kabellose
Handgerät von Kress ein. Folgen Sie den
Anweisungen im Handbuch des Werkzeugs, um das
Werkzeug zu starten. Entfernen Sie den Adapter
nach Gebrauch vom Werkzeug.

16
D
1
2
F2
1
2
F3
HINWEIS: Zur besseren Gewichtsverteilung
wird mit dem Rucksackgurt ein Gewichtskit
mitgeliefert.
1. Heben Sie den Ring an und drehen Sie die
Schraube gegen den Uhrzeigersinn, dann schieben
Sie den Gewichtssatz am Akku-Adapter entlang.
(Siehe Abb. F2)
2. Drehen Sie die Schraube im Uhrzeigersinn, um
die Montage des Gewichtssatzes und des Akku-
Adapters abzuschließen. Setzen Sie dann den Akku-
Adapter in das kabellose Handgerät von Kress ein.
(Siehe Abb. F3)
WARNUNG: Vergewissern Sie sich vor dem
Anschluss, dass Ihr Gerät ausgeschaltet ist. Tragen
Sie bei der Bedienung Schutzhandschuhe.
TRAGEGURT ABNEHMEN UND ANLEGEN
Demontage und Montage des Hüftgurtes.
(siehe Abb G1,G2)
1
2
1
2
G1
1
2
1
2
G2
1. Öffnen Sie den Klettverschluss und entfernen Sie
den Gurt von der Rahmenklappe. (Siehe Abb. G1)
2. Stecken Sie die Rahmenklappe in die Tasche am
Gürtel. Drehen Sie den Gurt, bis sich die gesamte
Rahmenklappe in der Tasche bendet. Sichern Sie sie
mit der Klettlasche. (Siehe Abb. G2)
Demontage und Montage des Schultergurtes.
(siehe Abb H1,H2)
Press
1
1
1
2
H1
1.Drücken Sie den Knopf und lösen Sie die Schieber
aus dem Rahmen.(siehe Abb H1)

D
17
1
2
H2
2Um den Schultergurt zu entfernen, schieben Sie
den Gurt durch den Schlitz, um den Knebel zu lösen.
Drehen Sie das Knebeldreieck um 90° und führen Sie
es zum Abnehmen durch den Schlitz zurück.(siehe
Abb H2)
I1
1
2
1
2
3. Bringen Sie das "-" Symbol zwischen dem
Rahmen und dem Schieber in Übereinstimmung und
heben Sie dann den Schieber an, um den Tragegurt
zusammenzufügen (siehe Abb. I1)
Hinweis: Der Gurt ist in drei Längen (S/M/L)
erhältlich, damit Sie die passende Größe wählen
können.
1
2
I2
4. Drehen Sie den Knebel so, dass er um
90° entlang des Gurtes liegt. Führen Sie den
Knebel und den Gurt durch den Schlitz im
Rahmen. Lassen Sie den Knebel los und
ziehen Sie ihn zum Rahmen zurück. Achten
Sie darauf, dass der Schultergurt nicht
verdreht ist.(siehe Abb I2)
WARTUNG UND REINIGUNG
Verwenden Sie eine weiche Bürste, um die
Oberäche des Tragegurtes von Verschmutzungen
zu reinigen. Verwenden Sie zur Reinigung Ihres
Tragegurtes niemals Wasser oder chemische
Reinigungsmittel. Wischen Sie jegliche Feuchtigkeit
mit einem weichen, trockenen Tuch ab, da
Feuchtigkeit zu einer Stromschlaggefahr führen
kann.
WARNUNG: Entfernen Sie den Akku und
den Adapter aus dem Tragegurt, bevor
Sie Einstellungen bzw. Wartungs- oder
Instandhaltungsarbeiten durchführen.
LAGERUNG
Bewahren Sie Ihren Tragegurt immer in einem
geschlossenen Raum auf, der für Kinder
unzugänglich ist. Halten Sie alle Bedienelemente
frei von Staub. Halten Sie das Gerät von korrosiven
Stoffen fern. Legen Sie keine Gegenstände auf den
Tragegurt und stellen Sie den Tragegurt auf einen
ebenen Boden.
FEHLERBEHEBUNG
In der folgenden Tabelle sind Probleme und
Maßnahmen aufgeführt, die Sie ergreifen können,
wenn Ihr Gerät nicht ordnungsgemäß funktioniert.
WARNUNG: Schalten Sie das Gerät aus
und entfernen Sie den Akku, bevor Sie eine
Fehlersuche durchführen.
Problem Mögliche Ur-
sache Abhilfe
Das
Werkzeug
funktioniert
nicht
1. Der Akku ist
nicht (richtig)
eingesetzt
2. Kein elek-
trischer Kontakt
zwischen
Akku-Pack
und Rucksack-
Gurtzeug
3. Der Akku-Pack
ist erschöpft
4. Kein elek-
trischer Kontakt
zwischen
Adapter und
Werkzeug
1. Akku korrekt in
das Rucksack-
Tragegurt
einsetzen.
2. Entfernen Sie
den Akku-Pack
und überprüfen
Sie den Kontakt.
Setzen Sie den
Akku-Pack dann
wieder ein.
3. Laden Sie den
Akku -Pack auf.
4. Trennen Sie
den Adapter vom
Werkzeug und
verbinden Sie ihn
dann wieder.

18
D
TECHNISCHE DATEN
KAC900
Geeigneter Akkupack Kress 60V Akku-Pack (KAC804 KAC810)
Gewicht (Ohne Akku) 2.25 kg
Wir empfehlen Ihnen, Ihr Zubehör bei demselben Händler zu kaufen, bei dem Sie das Gerät erworben haben.
Weitere Informationen nden Sie auf der Verpackung des Zubehörs. Lassen Sie sich von Ihrem Händler beraten
und unterstützen.

19
FR
SOMMAIRE
INTRODUCTION .......................................................................................................................................19
LISTE DES COMPOSANTS .................................................................................................................20
NOTICE ORIGINALE .............................................................................................................................. 21
ASSEMBLAGE ET FONCTIONNEMENT .......................................................................................22
ENTRETIEN ET NETTOYAGE...............................................................................................................25
RANGEMENT...............................................................................................................................................25
EN CAS DE PANNE...................................................................................................................................25
CARACTÉRISTIQUES TECHNIQUES .............................................................................................26
INTRODUCTION
Cher Client,
Merci d’avoir acheté ce produit de la marque Kress Commercial. Nous nous
engageons à développer des produits de haute qualité pour répondre à vos
exigences d'aménagement paysager.
La marque Kress est synonyme de service de qualité supérieure. Au cours des
années d'utilisation de votre produit, si vous avez des questions ou des inquiétudes à
son sujet, veuillez contacter votre revendeur ou notre équipe de service clientèle pour
obtenir de l'aide.
Nous espérons que vous serez satisfait de votre produit de la marque Kress pour les
années à venir.
UTILISATION CONFORME
Ce harnais est compatible avec certains modèles spéciques d’outils Kress 60 V
portatifs, tels que le taille-bordure à l, le taille-herbe ou le taille-haie. Ce harnais vous
donne la exibilité requise pour terminer les plus gros travaux qui nécessitent une
longue autonomie.

20
FR
LISTE DES COMPOSANTS
1. ADAPTATEUR DE BATTERIE
2. CÂBLE
3. BOUCLE DE POITRINE
4. SANGLE D’ÉPAULE
5. BOUCLE DE TAILLE
6. BASE DE FIXATION DE LA BATTERIE
7. SANGLE DE SUPPORT DE POIDS
8. FIXATION POUR RANGEMENT DES CÂBLES
9. DÉVERROUILLAGE DE RÉGLAGE EN HAUTEUR D’ARMATURE
10. SYMBOLE DE RÉGLAGE DE LA HAUTEUR
11. OUTIL DE POIDS*
12. BOUTON DE DÉCERROUILLAGE DE LA BATTERIE
*Les accessoires reproduits ou décrits ne sont pas tous compris avec le modèle standard livré.
1
23
4
5
6
7
8
9
10
11
12
Other manuals for KAC900
1
Table of contents
Other KRESS Tools manuals
Popular Tools manuals by other brands

Neilsen
Neilsen CT0933 operating instructions

Haussmann Xpert
Haussmann Xpert PNT116 Operator's manual

Ribimex
Ribimex Ribiland PRD22P User and maintenance manual

De Havilland
De Havilland DHC-4 CARIBOU Maintenance manual

TE Connectivity
TE Connectivity 2379255-1 instruction sheet

Dent Fix Equipment
Dent Fix Equipment CURE RIGHT DF-CR004 Owner's manual & safety instructions