Krups ZB500E User manual

2643682
Réalisation : Espace Graphique
EN . . . . . . . . p. 05
ES . . . . . . . . p. 11
P
A
B
C
E
G
H
I
K
F
N
LNJ
M
D
F
O
www.krups.com
EN
ES
INFINI Y SLOW JUICER
ZB500E
WWW.KRUPS.COM
KR_SLO -JUICER_2643682_MISEENPAGE02/05/1312:17PageC1

2643682
Réalisation : Espace Graphique
EN . . . . . . . . p. 05
ES . . . . . . . . p. 11
P
A
B
C
E
G
H
I
K
F
N
LNJ
M
D
F
O
www.krups.com
EN
ES
INFINI Y SLOW JUICER
ZB500E
WWW.KRUPS.COM
KR_SLO -JUICER_2643682_MISEENPAGE02/05/1312:17PageC1

OK
NO
2
1
2
1
1
2
21
fig. 1 fig. 2 fig. 3
fig. 4 fig. 5 fig. 6
fig. 7 fig. 8 fig. 9
fig. 10
KR_SLO -JUICER_2643682_MISEENPAGE02/05/1312:17PageC4

English
6
We thank you for having chosen a KRUPS appliance.
MPORTANT SAFEGUARDS
When using electrical appliances, basic safety precautions should be followed including
the following:
1 Read all instructions.
2. To protect against risk of electrical shock do not put unit in water or other liquid.
3. Close supervision is necessary when unit is used by or near children.
4. Unplug from outlet when not in use, before putting on or taking off parts and before cleaning.
5. Avoid contact with moving parts.
6. Never feed food by hand. Always use food pusher.
7. Do not operate appliance with a damaged cord or plug or after the appliance malfunctions, or
is dropped or damaged in any manner. Return appliance to the nearest authorized service facility
for examination, repair or electrical or mechanical adjustment.
8. Always make sure juicer cover is correctly locked in place before motor is turned on.
9. The use of attachments not recommended or sold by the manufacturer may cause fire, electric
shock or injury.
10. Make sure the motor stops completely and the power supply plug is removed from outlet before
disassembling.
11. Do not put your fingers or other objects into the juicer opening while it is in operation. f food
becomes lodged in opening, use food pusher or another piece of fruit or vegetable to push it
down. When this method is not possible turn the motor off, unplug it and disassemble juicer to
remove remaining food.
12. Ensure unit is completely assembled before use.
13. Do not use outdoors. This appliance is for household use only. Do not use this appliance for
anything other than its intended use.
14. Do not let cord hang over edge of table or counter or bench or touch hot surfaces, including the
stove.
15. Switch off the appliance before changing accessories or approaching parts which move in use.
16. Do not leave the juicer unattended when in use.
17. Always ensure the juicer is turned off. Then switch the appliance off and unplug the cord. Make
sure the pressing screw has stopped before opening, when the juicer is not in use, and before
disassembling, cleaning and storing.
18. Do not operate the appliance continuously for more than 20 minutes. Please let cool down a
few minutes.
19. Be careful when handling the stainless steel filter basket. The small cutting blades are very
sharp. Handle very carefully. Mishandling may cause injury.
SAVE THESE INSTRUCTIONS
KR_SLOW-JUICER_2643682_MISEENPAGE02/05/1312:17Pag 6

English
7
Polarization Plug
This appliance has a polarized plug (one blade is wider than the other). To reduce the risk of electrical
shock, this plug will fit in a polarized outlet only one way. f the plug does not fit fully in the outlet, reverse
the plug. f it still does not fit, contact a qualified electrician. Do not modify the plug in any way.
DESCR PT ON
BEFORE F RST USE
nUnpack the appliance and place it on a horizontal, solid and stable work-top, then take it apart completely.
Make sure that you have removed all packaging before you start using the appliance.
nWash all the removable parts, rinse them out and dry them carefully: the pusher (A), the feed tube (B),
the pressing screw (C), the filters (D and E), the residue strap (F), the bowl (G), the juice collector and
the spout with drip-stop (H and I), and the jugs (N).
US NG THE APPL ANCE F G. 1 TO 7
nAssemble the appliance as indicated on the drawings and choose the filter according to the desired
preparation:
Juice filter (D– orange colour) with small holes to make juices.
Coulis filter (E– raspberry colour) with wider holes to make thicker preparations, like coulis.
nDuring the assembly, make sure that the residue strap is correctly positioned on the filter (fig.1).
USE
nBefore use, wash all pre-treated food products carefully.
nPrepare the full amount of ingredients to be pressed. Most fruit and vegetables do not require peeling or
deseeding. Peel only those with thick skin (citrus fruits, bananas, pineapple, melon, passion fruit...).
Remove the stones (in peaches, apricots, mangoes...) and the hard cores of pineapples.
nCut up fruit and vegetables that are too large to fit through the feed tubes.
nNever put fruit stones, excessively hard foods (ice cubes, sugar cubes), extremely fibrous foods, or meat
into your juicer.
nPlace one jug (N) under the spout (I) and the other jug (N) under the residue exit (K) to collect the pulp
(fig. 8). Remember to empty the jug under the residue exit when it is full.
nPress the Start/Stop button (M) to turn on the appliance, place the food in the feed tubes (B) and push
them down using the pusher (A). Make sure that the spout (I) is in the “low” position (juice flow).
nThe fruit and vegetables must only be inserted while the motor is running.
nNever use your fingers or other utensils to push food through the spout.
nDo not press too hard on the pusher (A).
nOnce the ingredients have passed through, let the appliance turn for a few more seconds in order to
obtain the maximum amount of juice.
APusher
B3 part feed tube
CPressing screw
DJuice filter
ECoulis filter
FResidue strap (not separable from the filter)
GBowl
HJuice collector
ISpout with drip-stop system
JJuice exit
KResidue exit
Motor unit
MStart/Stop button
NJugs (one to collect residue and one to collect
juice)
OFoam separator
PCleaning brush
KR_SLOW-JUICER_2643682_MISEENPAGE02/05/1312:17Pag 7

English
8
nWe recommend that you do not use the appliance continuously for over 20 minutes.
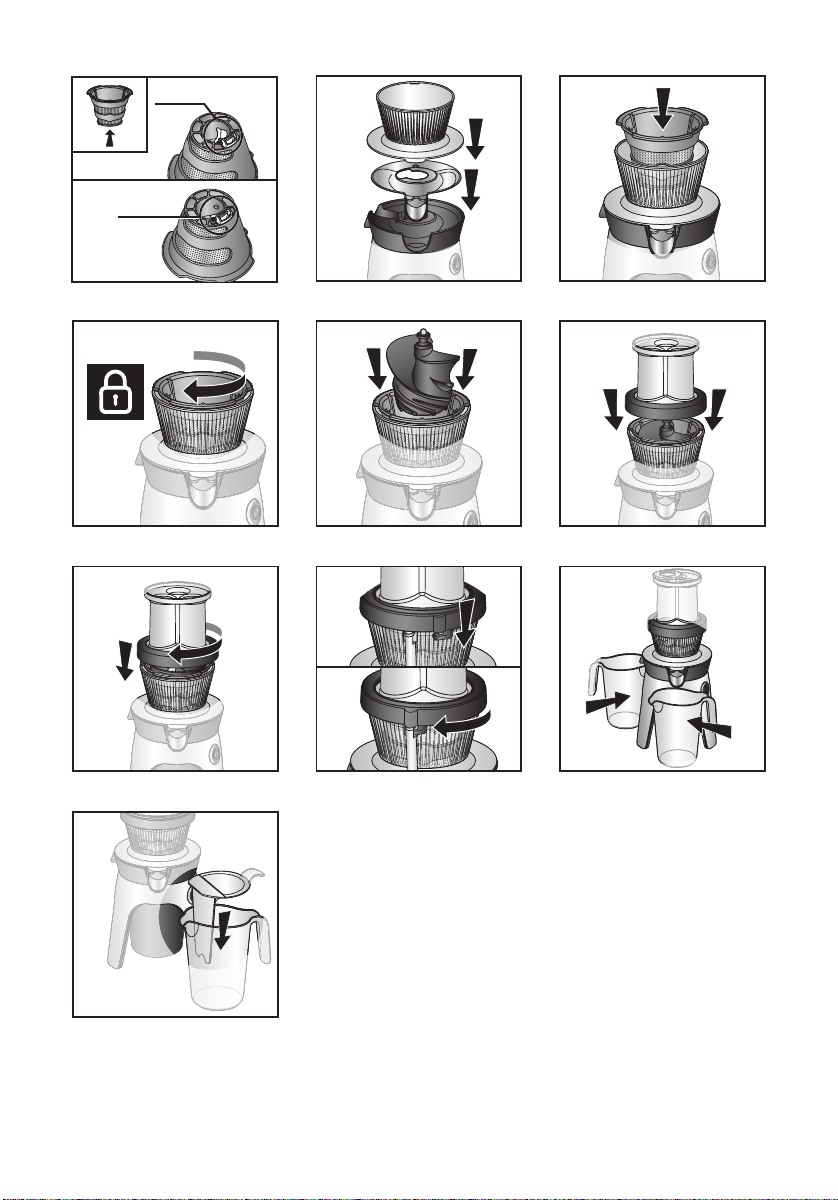
nAfter making your juice, activate the drip-stop system by pushing the spout up before removing the jug
to stop the flow of the juice.
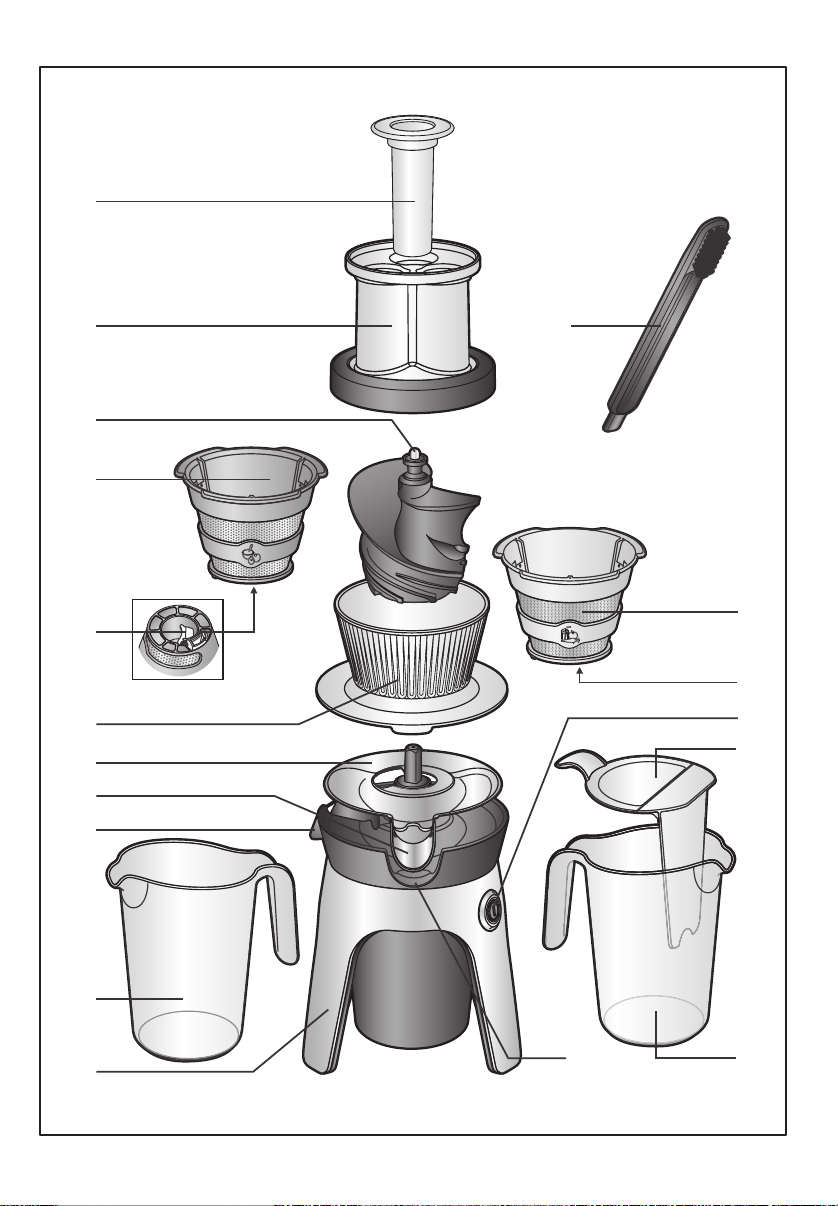
nf the juice contains froth, you can fit the foam separator accessory (O), onto the jug (N) which allows
you to keep the froth inside the jug when you pour out the juice into a glass (fig. 9).
Practical tips when choosing ingredients:
- Choose fruit and vegetables that are best for juicing such as oranges, apples, pears, pineapple,
grapes, tomatoes, carrots, celery, cucumber, beetroot ....
- t is difficult to extract juice from some fruits and vegetables such as bananas, avocados, aubergines
and figs.
- When you press less juicy fruit (like bananas) and aromatic herbs, alternate with other juicy fruits
or vegetables in order to facilitate extraction. Always finish with juicy fruit or vegetables.
- When you use fibrous vegetable with other ingredients, press them at the end and if you press fi-
brous vegetable alone, clean the screw regularly because fibers can block the screw.
- When you press long leaf herbs (such as wheatgrass), cut the leaves in 1 inch pieces in order to
keep them from getting tangled around the pressing screw. Press a maximum of 14 oz of herbs at
a time.
- Out of season, you can use frozen fruit. Let them thaw completely before pressing. You can also
use fruit with syrup (lychees, peaches...).
CLEAN NG
Between 2 preparations
nRinse the appliance without taking it apart by pouring water gradually into the feed funnel (B), with the
appliance on. Make sure that you have placed an empty jug (N) under the juice exit. You can then make
one juice immediately after the other!
After use
nCleaning must be carried out immediately after use.
nMake sure that the appliance is disconnected.
nNever immerse the motor unit ( ), power cord or plug in water or any other liquid.
nDo not put the motor unit ( ) in the dishwasher.
nTake apart and clean all the removable parts: filters (D-E) (if necessary, use the brush (P)), residue strap
(F) (inseparable from the filter but removable for cleaning purposes; if necessary, use the back end of
the brush (P)), bowl (G), juice collector (H) with spout with drip-stop (I).
nMake sure to clean the inside of the screw (C) carefully; if necessary, use the brush (P).
nClean the residue exit (K) with a lightly moist and non-abrasive sponge.
nThe pusher (A), the feed tube (B), the bowl (G), the screw (C), the juice collector (H) with the spout
with drip-stop (I), the jugs (N), and the foam separator (O) can all go into the dishwasher. f the filters
(D/E) are clogged, prewash them with warm water and washing up liquid and use the brush (P). f the
filter residue exit is clogged, remove the residues using the back end of the brush (P).
nDo not clean the juice collector (H), the spout with drip-stop (I), the plastic parts (bowl (G), food pusher
(A), feed tube (B)) with the abrasive side of the sponge.
Tips: To extract the screw (C) from the filter (D/E), turn both pieces together and then press on the screw.
KR_SLOW-JUICER_2643682_MISEENPAGE02/05/1312:17Pag 8

English
9
WHAT TO DO F YOUR APPL ANCE DOES NOT WORK
D SPOS NG OF YOUR APPL ANCE
Your appliance contains valuable materials which can be recovered or recycled.
Leave it at a local civic waste collection point or at an approved service centre.
MANUFACTURER’S WARRANTY
: www.krups.com
With a strong commitment to the environment, most of Krups products are repairable during and
after the warranty period. Before returning any defective products to the point of purchase,
please call Krups consumer service directly at the phone number below for repair options.
Your help to sustain the environment is appreciated!
The Warranty
This product is guaranteed by Krups for a period of 2 years against any manufacturing defect in materials or
workmanship, starting from the initial date of purchase.
The manufacturer's warranty by Krups is an extra benefit which does not affect consumer's Statutory Rights.
The Krups warranty covers all costs related to restoring the proven defective product so that it conforms to its
original specifications, through the repair or replacement of any defective part and the necessary labor. At Krups’s
choice, a replacement product may be provided instead of repairing a defective product. Krups’s sole obligation
and your exclusive resolution under this warranty are limited to such repair or replacement.
Conditions & Exclusions
The Krups warranty only applies within USA, Canada & Mexico, and is valid only on presentation of a proof of
purchase. The product can be taken directly in person to an authorized service centre or must be adequately
PROB EMS SO UTIONS
The appliance does not turn
on
- Make sure that all parts are correctly assembled.
- Make sure that your appliance is properly plugged in.
- Check that the feed tube (B) is correctly locked in position.
The appliance stops suddenly
while functioning:
the red light flashes
- Press the Start/Stop button (M) to switch off the appliance.
- Start your appliance again. f the safety mechanism shuts the ap-
pliance off again, take it apart, clean it and turn it on again.
- Make sure that the screw (C) is not blocked.
The appliance turns off:
the white light flashes
- This is a safety mechanism. We recommend that you let the ap-
pliance cool down for a few minutes, clean it, and then restart it
by pressing the Start/Stop button (M).
Poor juice extraction - Clean the appliance: wash, rinse out and dry: the feed tube (B),
the pressing screw (C), the filter (D or E), the residue strap (F),
the bowl (G), the jugs, and the spout (H and I).
- Make sure that the strap (F) is correctly positioned on the filter
(to collect residues) and that it is in good condition.
Problems related to
watertightness
- Check that all parts are correctly assembled, especially the 'spout
with drip-stop (I).
KR_SLOW-JUICER_2643682_MISEENPAGE02/05/1312:17Pag 9
Other manuals for ZB500E
1
Table of contents
Other Krups Juicer manuals