manuals.online logo
Brands
  1. Home
  2. •
  3. Brands
  4. •
  5. KSR
  6. •
  7. Floodlight
  8. •
  9. KSR Siena CCT KSR5285 Assembly instructions

KSR Siena CCT KSR5285 Assembly instructions

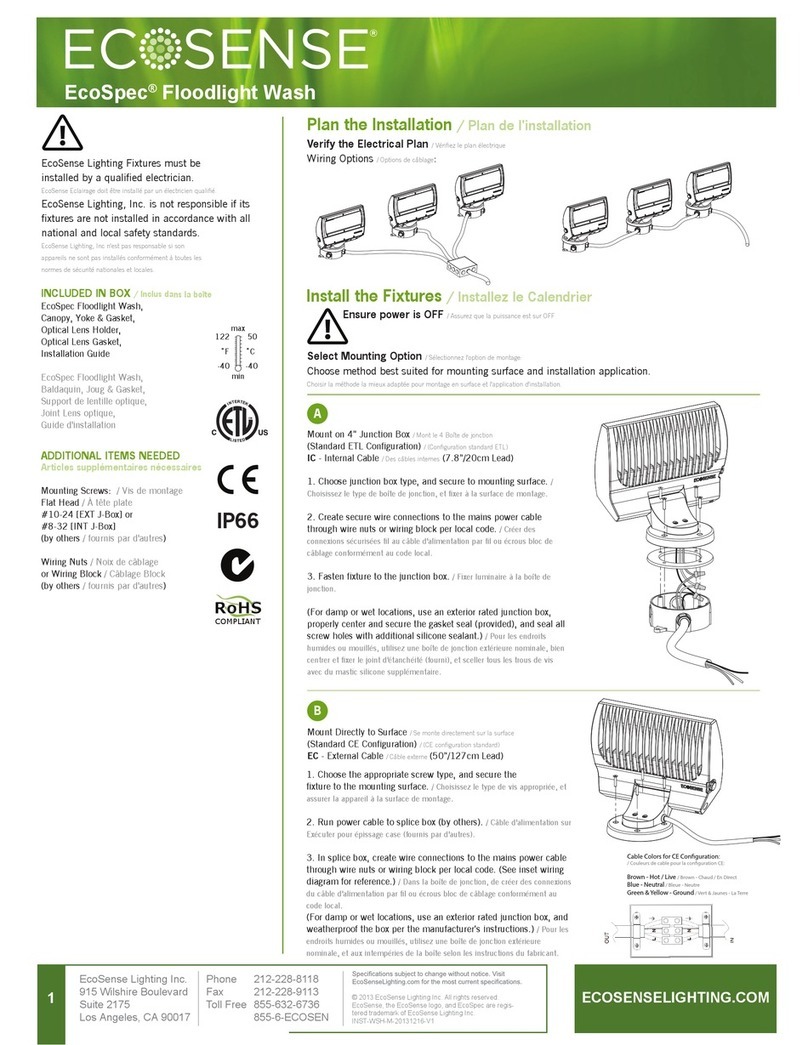
200mm
185mm
210mm
44mm
60mm
135mm
Drg No. KSR5285-IS-E
KSR Lighting Ltd, Unit E Hazleton Interchange, Lakesmere Road, Horndean, Hampshire, PO8 9JU
22.07.2021MAC
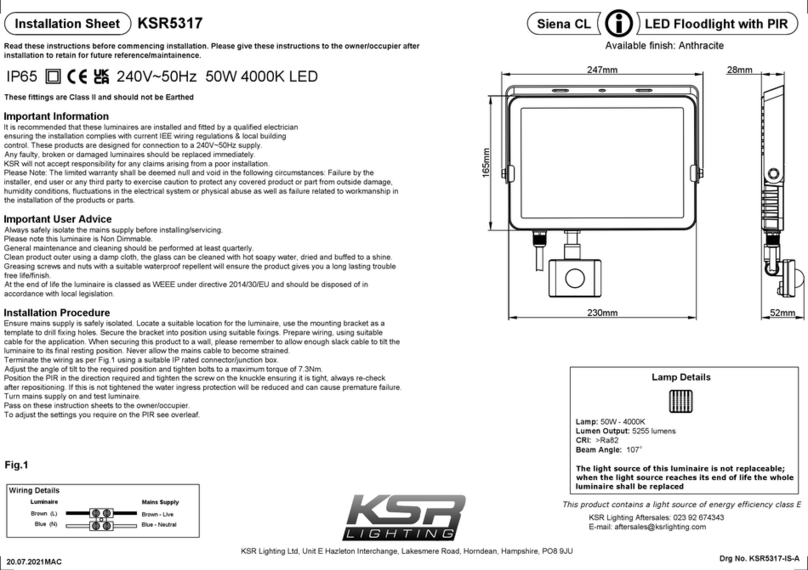
Installation Sheet KSR5285
Read these instructions before commencing installation. Please give these instructions to the owner/occupier after
installation to retain for future reference/maintainence.
Siena CCT LED
Available finish:- Black
LED Floodlight with PIR
IP65 240VAC~50Hz 30W Triple CCT LED
KSR Lighting Aftersales: 023 92 674343
E-mail: [email protected]
These fittings are Class I and must be Earthed
Important Information
It is recommended that these luminaires are installed and fitted by a qualified electrician
ensuring the installation complies with current IEE wiring regulations & local building
control. These products are designed for connection to a 240VAC~50Hz supply.
Any faulty, broken or damaged luminaires should be replaced immediately.
KSR will not accept responsibility for any claims arising from a poor installation.
Please Note: The limited warranty shall be deemed null and void in the following circumstances: Failure by the installer, end user or any third party
to exercise caution to protect any covered product or part from outside damage, humidity conditions, fluctuations in the electrical system or
physical abuse as well as failure related to workmanship in the installation of the products or parts.
Important User Advice
Always switch off mains supply before installing/servicing.
Please note this luminaire is Non Dimmable.
At the end of life the luminaire is classed as WEEE under directive 2014/30/EU and should be disposed of in accordance with local legislation.
General Maintenance
General maintenance and cleaning should be performed at least quarterly.
Clean product outer using a damp cloth, the glass can be cleaned with hot soapy water, dried and buffed to a shine.
To protect the paintwork we recommend the use of a good quality car wax.
After any maintenance remember to check all seals are intact.
Grease screws and nuts with a suitable waterproof repellent to ensure trouble free operation in the future.
Installation Procedure
Familiarize yourself with the luminaire and ensure the power is safely isolated before installing.
Locate a suitable location for the luminaire, use the mounting bracket as a template to drill fixing holes.
Secure the bracket into position using suitable fixings.
Prepare wiring, using suitable cable for the application. When securing this product to a wall, please remember to allow enough cable to tilt the
luminaire to its final resting position. Never allow the mains wiring to become strained.
Remove the terminal cover from the back of the fitting.
Terminate the wiring and select the CCT colour you require using the switch (Never switch the CCT colour while powered up as this can damage
the LED chips).
Class I Product so this luminaire must be earthed.
Reinstall the terminal cover ensuring the seal is in place, seated correctly and undamaged.
DO NOT use power drivers to tighten terminal cover screws as this can cause damage to the terminal cover and invalidate the warranty!
Finally, adjust the angle of tilt to the required position and tighten bolts. Remove the luminaire label from the glass.
Turn mains supply on and test luminaire. Pass on these instruction sheets to the owner/occupier.
Adjust the settings you require on the PIR see overleaf.
Wiring Details ( Class I )
Green/Yellow (E)
Blue (N)
Brown (L)
Luminaire
Blue - Neutral
Brown - Live
Green/Yellow - Earth
Mains Supply
Lamp Details
Lamp: 30W Triple CCT 3000K, 4000K or 6000K
Lumen Output:
3000K - 3565 lumens
4000K - 3820 lumens
6000K - 3710 lumens
CRI: >Ra82
The light source of this luminaire is not
replaceable; when the light source
reaches its end of life the whole
luminaire shall be replaced
0.5m
This product contains a light source of energy efficiency class E
KSR Lighting Ltd, Unit E Hazleton Interchange, Lakesmere Road, Horndean, Hampshire, PO8 9JU
03.03.2021RTG
PIR Controls
Read these instructions before commencing installation. Please give these instructions to the owner/occupier after
installation to retain for future reference/maintainence.
Siena CCT LED LED Floodlight with PIR
KSR Lighting Aftersales: 023 92 674343
E-mail: [email protected]
Description of Operation
This floodlight comes complete with an passive infrared detector. The lamp switches on when movement in the
surrounding area is detected or when natural day light becomes dusk. Ensure to replace any cracked shield / glass.
Operation Mode
When power is switched on, the PIR detector enters into the warm up
period (approx 15-30 seconds), the PIR will then change to the AUTO MODE
automatically, during the AUTO MODE walk testing can be easily carried out.
Walk Testing
Before walk testing, please put the LUX control to the day position ( ) and the TIME control to minimum (fully
clockwise). Once the PIR sensor receives a valid trigger signal (such as body movement) within its detection area,
the load / lamp will be turned on for a duration time, You will obtain the desired detection area by walking slowly
through the area to be covered.
Adjusting the Lux Control Level
The LUX control module has an in built sensing device (photocell) that detects daylight ( ) and darkness ( )
Rotating the LUX control anti-clockwise will take it from light to dark, set at desired level.
Note: You will need to wait 5 secs for the stability of the photocell (CDS) when adjusting the LUX control.
Adjusting the Duration Time
The length of time sensor remains on after activation can be adjusted from 10 secs to 9 mins. Rotate the TIME
control clockwise to increase the duration.
Note: Once the load has been triggered by the PIR detector any subsequent detection will restart the time period.
Adjusting the Sensitivity
With this control the sensitivity of the detector can be adjusted, turn the SENS control anti-clockwise to increase the
sensitivity.
Manual Override
With the floodlight powered on, switch the power off and then back on in less than 3 seconds.
This will override the sensor and the light will stay on.
To revert back to auto mode power off the floodlight for more than 5 seconds and power back on.
PIR Specification
Detection Range: 120°
Detection Distance: 2~10m(adjustable)
Time Delay: 10sec ±5sec ~ 7min ±2min (adjustable)
Ambient Light: <3 ~ 2000 LUX (adjustable)
Detection Motion Speed: 0.6-1.5m/s
Working Temperature: -10°c ~ +40°c
Working Humidity: <93%RH
Installation Height: 1-3m
Override Mode: Yes
PIR Adjustments
-
+
LUX
Please Note: After adjusting the PIR please make
sure the screw on the knuckle joint that allows you
to adjust the angle of the PIR is tightened to ensure
the fitting retains it's IP65 rating failure to do this
could result in water ingress and premature failure
of the luminaire.
SENSTIME
-
+

Other KSR Floodlight manuals

KSR KSR5303 Assembly instructions

KSR

KSR KSR5303 Assembly instructions

KSR Siena CL Assembly instructions

KSR

KSR Siena CL Assembly instructions

KSR Siena Assembly instructions

KSR

KSR Siena Assembly instructions

KSR KSR5307 Assembly instructions

KSR

KSR KSR5307 Assembly instructions

KSR Siena Cr Assembly instructions

KSR

KSR Siena Cr Assembly instructions

KSR Siena CL Assembly instructions

KSR

KSR Siena CL Assembly instructions

KSR KSR5305 Assembly instructions

KSR

KSR KSR5305 Assembly instructions

KSR KSR5315 Assembly instructions

KSR

KSR KSR5315 Assembly instructions

KSR KSR5311 Assembly instructions

KSR

KSR KSR5311 Assembly instructions

KSR KSR5283 Assembly instructions

KSR

KSR KSR5283 Assembly instructions

Popular Floodlight manuals by other brands

Chauvet SX Mix user manual

Chauvet

Chauvet SX Mix user manual

Kemot URZ3462 owner's manual

Kemot

Kemot URZ3462 owner's manual

SCANGRIP LITE FLOOD LITE S manual

SCANGRIP

SCANGRIP LITE FLOOD LITE S manual

WE-EF FLC240 EVG Installation and maintenance instructions

WE-EF

WE-EF FLC240 EVG Installation and maintenance instructions

yacht beam 6M Product support manual

yacht beam

yacht beam 6M Product support manual

MEDC XB4 Technical manual

MEDC

MEDC XB4 Technical manual

Extreme Tent EXLED-001 Safety instructions and operation manual

Extreme Tent

Extreme Tent EXLED-001 Safety instructions and operation manual

Ayce JF01C-P1W5M-BZH65 Operator's manual

Ayce

Ayce JF01C-P1W5M-BZH65 Operator's manual

Solena Mini Par 12 user manual

Solena

Solena Mini Par 12 user manual

Core Lighting Point 30 user manual

Core Lighting

Core Lighting Point 30 user manual

Probrite Fusion X FSNX15-5CCT-BZ INSTALLATION, USAGE, & CARE GUIDE

Probrite

Probrite Fusion X FSNX15-5CCT-BZ INSTALLATION, USAGE, & CARE GUIDE

Ape Labs Mobilight user manual

Ape Labs

Ape Labs Mobilight user manual

Anslut 427-601 Assembly instructions

Anslut

Anslut 427-601 Assembly instructions

Beamz Mini Star Ball Sound RGBWA LED 6x3W instruction manual

Beamz

Beamz Mini Star Ball Sound RGBWA LED 6x3W instruction manual

Chauvet PowerStream 4 Quick reference guide

Chauvet

Chauvet PowerStream 4 Quick reference guide

Ledj Stage Par Quad MKII user manual

Ledj

Ledj Stage Par Quad MKII user manual

Chauvet SNAPSHOT LED PAR 38 TRI-B user manual

Chauvet

Chauvet SNAPSHOT LED PAR 38 TRI-B user manual

Urrea RFRU1 Operation instructions

Urrea

Urrea RFRU1 Operation instructions

manuals.online logo
manuals.online logoBrands
  • About & Mission
  • Contact us
  • Privacy Policy
  • Terms and Conditions

Copyright 2025 Manuals.Online. All Rights Reserved.