Kstove NP-P15 User manual

1
FREESTANDING PELLET STOVE
(PLEASE KEEP THESE INSTRUCTIONS FOR FUTURE REFERENCE)
A LIFETIME OF WARMTH
*Please read this entire manual before installation and use of
this pellet fuel burning room heater. Failure to follow these
instructions could result in property damage, bodily injury, or
even death.
*Save these instructions!
INSTALLER: THIS MANUAL MUST STAY WITH APPLIANCE!

2
Table of Contents
1. Fuel Requirement------------------------------------------------3
2. Stove Features -----------------------------------------------------7
3. Structure instruction----------------------------------------------10
4. Installation and Caution ------------------------------------------12
5. Operation ----------------------------------------------------------21
6. Maintenance--------------------------------------------------------34
7. Troubleshooting----------------------------------------------------38
8. Warranty------------------------------------------------------------42
9. Electronic Plan---------------------------------------------------- 43

3
1. Fuel Requirement
Your pellet stove has been designed to burn wood pellets only. Do not use any other type of
fuel, as this will void any warranties stated in this manual.
Pellet quality is important for many years of reliable performance of your pelletstove:
We recommend the use of pellets that meet or exceed these standards. Please use a
recommended pellet type.
Moisture content (as fired basis)
CEN/TS 14774-1 and ISO 687
≤12%
Ash content (as fired basis)
ISO1171
≤0.7% without bark
≤2.0% with bark
Volatile matter (dry, ash-free basis)
ISO562
80% to 88%
Hydrogen content (as fired basis)
ISO609
5.0%to 6.5%
Carbon content (as fired basis)
ISO609
40% to 50%
Sulfur content (as fired basis)
ISO 351 and ISO 334
≤0.1%
Net (lower) calorific value (as fired
basis) ISO1928
16900KJ/KG to 19500KJ/KG
Diameter
4mm to 10mm
Swelling index
ISO 501
-
Length
≤50mm
CAUTION:
It is important to select and use only pellets that are dry and free of dirt or any impurities such
as high salt content. Dirty fuel will adversely affect the operation and performance of the unit
and will void the warranty.
ASH: The ash content of the fuel and operation of your stove will directly determine the
frequency of cleaning. The use of high ash fuels may result in the stove needing to be cleaned
daily. A low ash fuel may allow longer intervals between cleaning.
CLINKERING: [clinkers are silica (sand) or other impurities in the fuel that will form a hard
mass during the burning process]. This hard mass will block the air flow through the Burn Pot
Liner and affect the performance of the stove. Any fuel, even approved types, may tend to
clinker. Check the Burn-Pot Liner frequently to ensure that the holes are not blocked with
clinkers.
If they become blocked, remove the liner (when the unit is cold) and clean/scrape the clinkers
-out. Clean the holes with a small pointed object if required.
Refer to the section Routine Cleaning and Maintenance.

4
PELLET FEED RATES: Due to different fuel densities and sizes, pellet feed rates may vary.
This may require an adjustment to combustion fan’s speed or to the auger feed trim setting on
low.
Take care of the pellet. Do not damp or crush it. Or, it will affect the efficiency and the dust
will be collected on the door glass. Pellet fuel is made from sawdust and scrap wood from many
different species of wood. Pellets made from hardwoods contain more ash than those made from
softwoods. Minerals from ash and sand in the pellets clinker under the extreme temperatures in the
burn pot. Try burning various brands of pellets until you find one that burns with minimum ash
and clinkers. Once you find a pellet brand that burns well, continue using this brand. High ash fuel
increases the frequency of stove cleaning. Fuel with excessive moisture content may jam the auger
assembly.
Store pellets at least 1m away from the pellet stove
This appliance is not intended for use by persons (including
children) with reduced physical, sensory or mental capabilities,
or lack of experience and knowledge, unless they have been
given supervision or instruction concerning use of the appliance
by a person responsible for their safety: Children should be
supervised to ensure that they do not play with the appliance.

5
2. STOVE FEATURES
This Pellet stove has modern technology built in such as an individual fresh air input and
venting system. Controlled pressure burning technology causes high efficiency and low ash
production during burning. The burner has several safety features and will shut off
automatically when out of fuel or any malfunction.
Main performance
Model NP-P15
Dimension (WxHxD) MM 529x1025x512
Weight KG 115
Air inlet Pipe MM 50
Air outlet Pipe MM 80
HeatArea M2 120
Automatic Burning Time (Min-Max.) H 16/40
Fuel Wood Pellet
Consumption for Pellet (Min-Max) KG/H 0.8/1.7
Efficiency % 86%
Hopper Capacity KG 30
Electronic consumption W/H 100-400
Rating Voltage and Frequency V/HZ 230/50-115/60
Rating Power KW 11

6
Model NP-P01
Dimension (WxHxD) MM 510x1029x527
Weight KG 106
Air inlet Pipe MM 50
Air outlet Pipe MM 80
HeatArea M2 100
Automatic Burning Time (Min-Max.) H 20/40
Fuel Wood Pellet
Consumption for Pellet (Min-Max) 0.7/1.5
Efficiency % 85%
Hopper Capacity KG 28
Electronic consumption W/H 100-400
Rating Voltage and Frequency V/HZ 230/50-115/60
Rating Power KW 9

7
Model NP-PS
Dimension (WxHxD) MM 439x900x487
Weight KG 80
Air inlet Pipe MM 50
Air outlet Pipe MM 80
HeatArea M2 60
Automatic Burning Time (Min-Max.) H 20/50
Fuel Wood Pellet
Consumption for Pellet (Min-Max) 0.4/1.2
Efficiency % 82%
Hopper Capacity KG 20
Electronic consumption W/H 100-400
Rating Voltage and Frequency V/HZ 230/50-115/60
Rating Power KW 6
Model NP-PI
Dimension (WxHxD) MM 471x993x470
Weight KG 110
Air inlet Pipe MM 50
Air outlet Pipe MM 80
HeatArea M2 90
Automatic Burning Time (Min-Max.) H 18/34
Fuel Wood Pellet
Consumption for Pellet (Min-Max) 0.7/1.4
Efficiency % 85%
Hopper Capacity KG 25
Electronic consumption W/H 100-400
Rating Voltage and Frequency V/HZ 230/50-115/60
Rating Power KW 7.5

8
Model NP-PA
Dimension (WxHxD) MM 665x787x610
Weight KG 120
Air inlet Pipe MM 76
Air outlet Pipe MM 76
HeatArea M2 140
Automatic Burning Time (Min-Max.) H 13/33
Fuel Wood Pellet
Consumption for Pellet (Min-Max) 0.8/1.9
Efficiency % 83%
Hopper Capacity KG 27
Electronic consumption W/H 100-400
Rating Voltage and Frequency V/HZ 230/50-115/60
Rating Power KW 13

9
Model NP-PA-01
Dimension (WxHxD) MM 490x680x450
Weight KG 80
Air inlet Pipe MM 50
Air outlet Pipe MM 60
HeatArea M2 50
Automatic Burning Time (Min-Max.) H 15/24
Fuel Wood Pellet
Consumption for Pellet (Min-Max) KG/H 0.5/1.1
Efficiency % 80%
Hopper Capacity KG 12
Electronic consumption W/H 100-400
Rating Voltage and Frequency V/HZ 230/50-115/60-100/50
Rating Power KW 6
Thickness of steel, inside: MM 3
Thickness of steel, outside: MM 1.5-2

10
3.Structure instruction
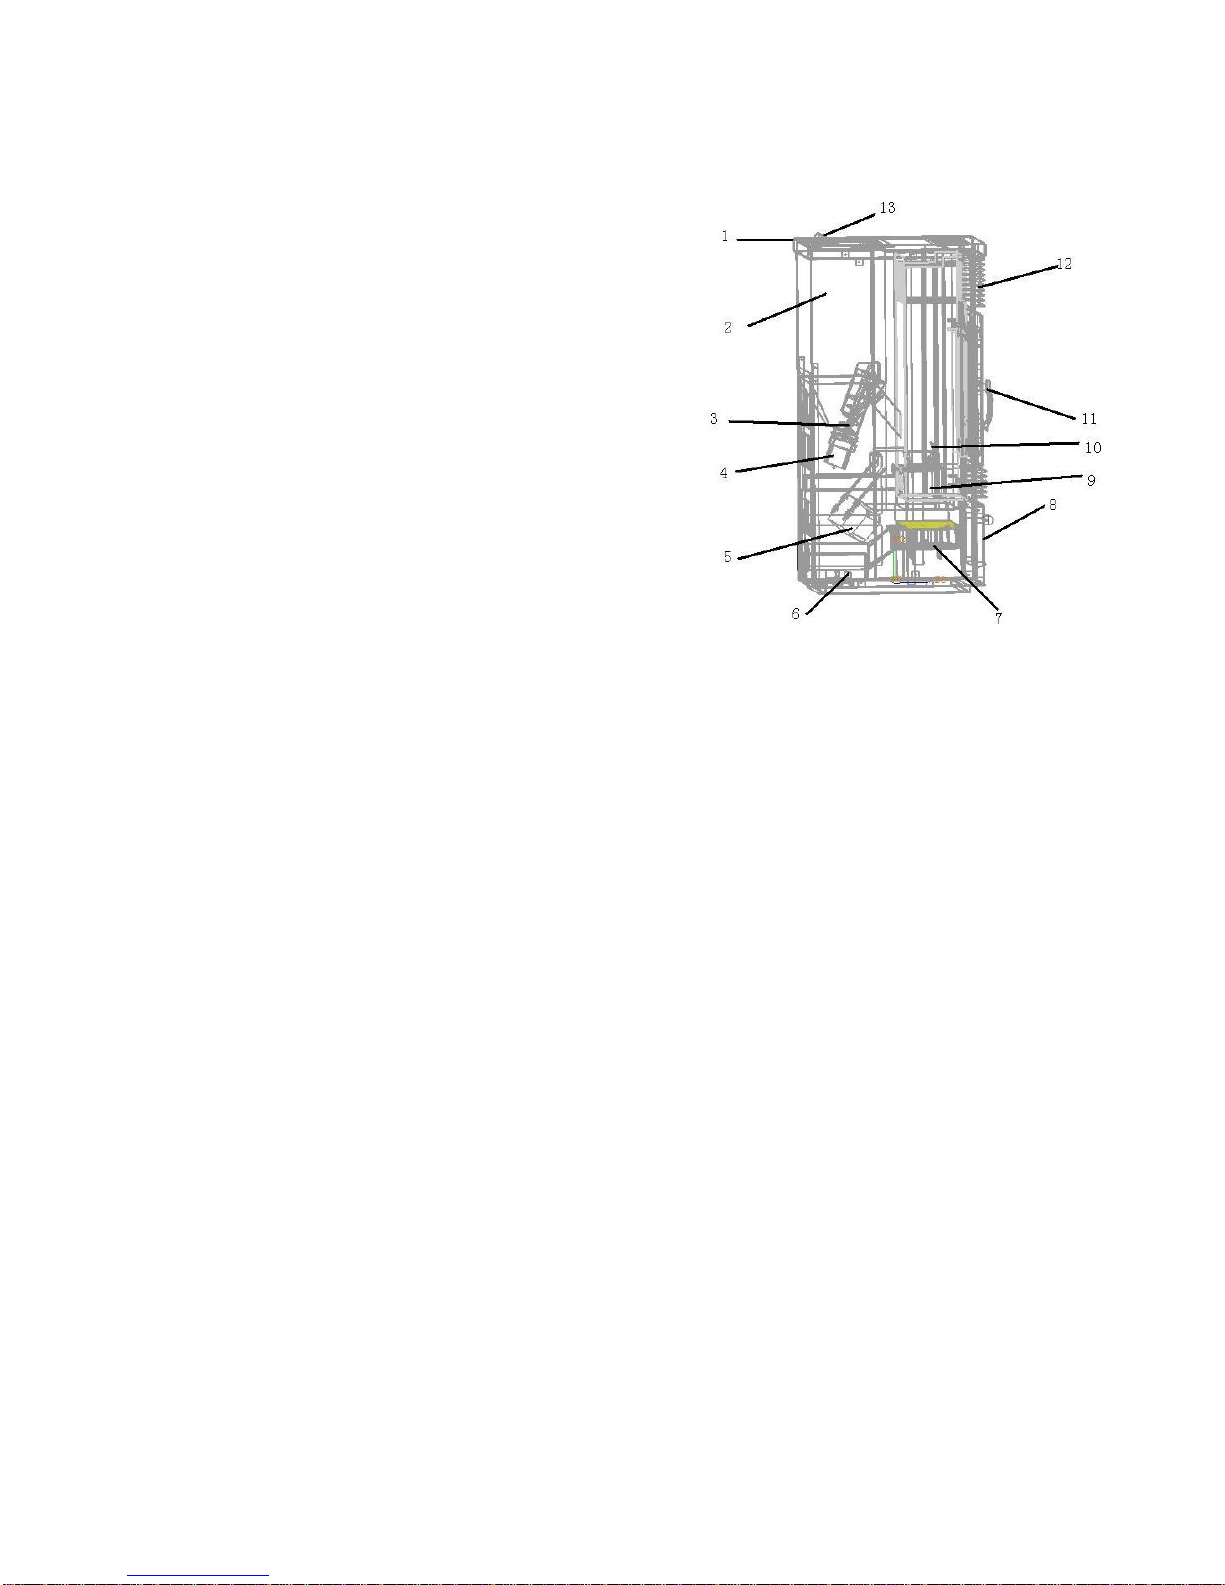
The stove essential components:
1. Hopper covers
2.hopper
3.auger
4. Auger motor
5. convection blower
6.venting pipe
7. Exhaust blower
8.front cover
9.ash drawer
10.fire shield
board
11.stove door
12.heat exchanger
13. Control board
The following is a list of main components and their
functions
IGNITER
The STOVE comes equipped with an automatic igniter
for lighting the fuel when the stove is in lighting mode. There are two ways to light the wood
pellet for our models.
One is the igniter heats wood pellets directly through the burn pot and then lighted by the
combustion blower.
The other one is that the igniter lights the pellet directly. The igniter remains energized
for the first eight minutes of the lighting sequence.
VACUUM SWITCH
The STOVE has s vacuum switch located behind the left door, fastened to the base. If a low
pressure is created in the firebox by a leak, opening the front door, a blocked flue, or unsealed ash
drawer, the vacuum switch will sense it and cause the stove to go into a shutdown mode.
Resetting?
AUGER AND AUGER MOTOR
The 5 RPM auger motor turns the auger, lifting pellets up the auger tube. The pellets are then
dropped down a tube and into the firepot. The auger is controlled by the control board.
OVERHEATING TEMPERATURE SWITCH
This switch is installed on the bottom of hopper and shut off the stove if it senses excessive
temperatures (70 ⁰c). This snap switch can be reset by……..!
CONVECTION BLOWER SWITCH
This switch is installed on the vent pipe and turns the convection blower on when the stove gets up
to temperature (30 ⁰C). It switch off the blower when the temperature goes below 30⁰C.

11
4. Pellet Stove installation
Please note that installation of the pallet stove must comply with your local
regulations.
Where to place your Pelletstove; CLEARANCES TO COMBUSTIBLES:
When installing this unit on a combustible floor (for example linoleum, hardwood flooring) a
noncombustible hearth pad (15mm thickness) must be under the unit. The pad must extend at least
the width of the appliance (56cm) and at least the depth of the appliance plus 16 cm) in front of
the appliance (76cm).
The clearance between the walls or to the top is no less than the size of 5cm.
1. Electrical:
The unit must be grounded. The grounded electrical cord should be connected to a standard
230V, 50Hz (4.5 Amps) electrical outlet. Be careful that the electrical cord is not trapped
under the appliance and that it is clear of any hot surfaces or sharp edges and also must be
accessible. If this power cord should become damaged, an original replacement power cord
must be purchased from the manufacturer or a qualified dealer.
2. Air input and venting pipe Installation
Several examples
Horizontal and Up,
Horizontal

12
Horizontal and Up through the eave
The Distance between wall and stove when it is installed in the
house (MM)

13
The stoves' air input pipe diameter is 50 mm, venting pipe diameter is ¢80 mm. The total
length of pipes is no longer than 3m and elbows are not foreseen. Indoor venting pipe joint
should be sealed by silicone sealant to prevent exhaust leaking into the room. Venting pipe
and termination should be waterproof and avoid being blocked. Or, the stove can not work
properly.
When the installation requires piping longer than 3m and/or elbows, the diameters of the air
input pipe and venting pipe must be increased properly for smooth convection. If not, it will
influence the burning and the stove can not work properly.
An professional and authorized installer will be able to advise you on the right installation.
When the pellet stove is in operation, the temperature on venting pipe surface can reach up to

14
200˚C, so the combustible materials ,particularly clothes and furniture should be away from
the venting pipe. To prevent scald, don’t touch the heating surface!
Vent Output Requirements
PLEASE NOTETHAT LOCAL REGULATIONS ALWAYS OVERRIDE ANY GUIDANCE
GIVEN IN THIS MANUAL.
(1)Please observe that it is not allowed to end the vent in any enclosed or semi enclosed area such
as a carport, garage, attic, crawlspace, narrow walkway, closely fenced area, under a sundeck or
porch, or any location that can build up a concentration of fumes such as stairwells, covered
breezeway,etc.
(2)Vent surfaces can become hot to cause burns if touched. Noncombustible shielding or guards
may be required.
(3)The vent must be placed above the air inlet elevation.
Pellet pipe type PL or L must be used to vent the STOVE. Single wall pipe cannot be used with
this pellet stove. The stove’s flue collar is 3”in diameter. An approved wall thimble or approved
ceiling firestop must be used when the pellet pipe passes through a combustible wall ceiling.
The stove’s combustion blower pressurizes and pushes flue gases out the pellet pipe .As a result,
all pipe joints should be locked together, or screwed with three screws if the pipe does not have a
locking system, and sealed with high temperature silicone.
The pipe should be siliconed and fastened with three screws to the stove’s flue collar.
The longer the run of pipe and the more elbows used, the greater the resistance to the flow of flue
gases. Four inch diameter pellet pipe is recommended for pipe runs greater than 3m or when a
number of elbows are used.
DO NOT INSTALL A FLUE DAMPER IN THE EXHAUST VENTING SYS TEM OF
THIS UNIT. DO NOT CONNECT THIS UNIT TO A CHIMNEY FLUE SERVING
ANOTHER APPLIANCE.

15
Here are some examples of installation in different situation
Horizontal installations that terminate without any vertical sections of pipe are approved;
However, wind may direct flue gases towed the house causing discoloring problems. For this
reason, horizontal and up 5 feet or horizontal and through the eave installations are recommended.
To aid in cleaning, wherever possible, the venting system should include a tee with clean out
attached to the flue collar on the stove.
Masonry Chimney
When venting into a masonry chimney, the pellet pipe can terminate just inside the chimney.
However, it is recommended to run the pellet pipe to the top of the chimney.
Fireplace
When venting into a fireplace chimney, the pellet pipe can terminate just above the damper.
However, it is recommended to run the pellet pipe to the top of the chimney.
Vertical
If the length of pipe exceeds 3m, 4 inch pipe rather than 3 inch vent pipe should be used.
WARNING:
DO NOT INSTALL THIS STOVE IN A BEDROOM.
SURGE PROTECTORS
A surge protector is recommended to ensure the stove’s electrical components are not damaged
due to a surge in the electrical supply. Only high quality protector should be used—cheap ones do
not provide the protection needed.
THERMOSTAT INSTALLATION
The stove comes from the factory wired to operate manually see control board operation on the
following page. A low voltage thermostat has been installed on the stove.
CAUTION: Please put the sensor (T3)at the rear away from the venting pipe. This
sensor is detecting the temperature in the room; it should not be influenced by any
other hot or cold object. Select a place that you think is appropriate for the desired
temperature in the room.
CAUTIONS INSTALLATION AND REPAIR SHOULD ONLY BE PERFORMED BY A
QUALIFIED SERVICE TECHNICIAN. DO NOT ATTEMPT TO SERVICE THE
APPLIANCE YOURSELF.

16
Avoid over firing the stove do not hand feed pellets to the appliance.
Never use gasoline, gasoline type lantern fuel, kerosene, charcoal lighter fluid, or similar liquids to
start or flesh up a fire in this heater. Keep all such liquids well away from the heater while it is in
use.
For your safety, do not install or operate your stove without first reading and understanding this
manual.
Any installation or operation of the appliance deviating from that which is stated in this instruction
manual WILL void the warranty and may be hazardous.
Due to high temperature, the stove should be located out of traffic areas and away from furniture
and draperies. Children and adults should be alert to the hazards of high surface temperature and
should stay away to avoid burns or clothing ignition. Young children should be carefully
supervised when they are in the same room as the STOVE. Clothing or any other flammable
material should not be placed on or near the stove. Any grille, panel, or glass removed for service
MUST be replaced prior to operating the stove.
Do not operate appliance with the glass front removed, cracked, or broken. Replacement of the
glass should be done by a qualified service technician. Country Stoves, its employees, or any of its
representatives assume no responsibility for any damages caused by an inoperable, inadequate, or
unsafe condition as a result of any improper operation, service, or installation procedures. Whether
direct or indirect. The appliance when installed must be electrically grounded in accordance with
local codes or, in the absence of local codes, with the National Electrical Code. ANSI\NFPA 70

17
5. Operation
ALL NATIONAL AND LOCAL REGULATIONS SHALL BE OBSERVED.
1. First operation.
Please put a handful of wood pellets in the firepot beforehand.
Put wood pellet fuel into the hopper, connect the power. The On/Off Light is burning. This
means that power is on. Operate as per the instruction on section 2“start and operation”
At the first operation, some unpleasant smell might come out. This is harmless, but unpleasant.
Please open a window to vent the smell.
2. Start and operation
Please operate the stove as following (refer to stove structure figure and electrical control figure):
Check the box, pellet grate bar,air mate board and ash pan then adjust to proper position.
Push On/Off button UP to 3secs?, the light is off and the combustion fan starts to work for 20
seconds to clean the fire pot, then feeding Light is On, meanwhile Convection Blower Lights and
Feel Intake Quantity Lights will be automatically selected to some level, ignitor is working as well.
After less than one Min’s Feeding, it stops for a while, some smoke will come out, meanwhile, the
combustion fan starts. After Less than one min., it forms a stable flame.
Note: If the new stove, when its first time using, it is necessary to put a handful of pellet to
the fire pot before hand.
Depending on the heating desire, fuel intake quantity can be adjusted from few to large by the fuel
intake Button. At the same time adjust the convection Button to blow the heat to the room to
reach the best combustion. (According to the various quality of wood pellet, please select right
feeding speed, in order to burn properly)
Note: if the ignition is failure, the thermal control will shut off the stove automatically. If want to
restart it again, Please Switch off the power for a while and then switch on the power (In order to
shut down the previous process of program), follow the above process to ignite and start again.
3. Turning Pellet Stove Off
Please turn off the stove as the following:
Press On/Off button up to 2 seconds; the auger motor will be stopped, the other motors continue to
operate as long as there is heat, meanwhile the ON/OFF light flashes, until the temperature
decreases to approx (30⁰C), then it will stop completely. This is controlled by the sensor is on
the venting pipe.

18
4. Safety
This stove has a threefold safety system:
(1) The stove will power off and the fire will be put out since the stove decreases to the safety
temperature,(T1)
(2) The stove will be shut down, when the thermodisc (for the hopper) T2 ≥70˚C. Wait and let the
stove cool down and restart. If problem occurs again contact your installer.
(3) When vent pipe is blocked, the vent pipe indicator light will be on and the stove will shut
down. Then please check it or call your dealer!
SAFETY WARNINGS AND RECOMMENDATIONS:
Caution. It is important to select and use only pellets that are dry and free of dirt or any
impurities such as high salt content. Dirty fuel will adversely affect the operation and
performance of the unit and will void the warranty. We have listed a standard for wood pellet
(please check FUEL REQUIREMENT page 3). We recommend the use of pellets that meet or
exceed these standards. Ask your dealer for a recommended pellet type.
Caution: Do not connect to any air distribution duct or system. Do not burn garbage or
flammable fluids such as gasoline, naphtha or engine oil. When unit in operation, Keep
children, clothing and furniture away. Contact may cause skin burns.
SOOT: Operation of the stove with insufficient combustion air will result in the formation of
soot which will collect on the glass, the heat exchanger, the exhaust vent system, and may
stain the outside of the house. This is an inefficient and potentially dangerous situation.
Frequently check your stove and remove the dust inside of stove ensure proper combustion. If
it is necessary, call your dealer to adjust the speed of fan or feeding speed.
CLEANING: There will be some of fly ash and small amounts of creosote built up in the
exhaust. This will vary due to the ash content of the fuel used and the operation of the stove.
It is advisable to inspect and clean the exhaust vent semi-annually or every 2000kg of pellets.
Caution:. Please keep the door closing and sealing during burning for good efficiency and
preventing hot ash flying out. (The fire box shall always be closed when the appliance is in
operation)
The burning features ---bright yellow flame, the pellet burning with a little jumping in the
grate bar. No pile pellet and no smoke venting. If it becomes a little dark glow and lazy flame,
smoke appears from the venting terminal, speed up the combustion blower to add the air
input.
Venting pipe and air input pipe should keep unblocked.
Do not modify the appliance. Broken parts should be replaced only with original parts.

19
USER MANUAL

20
Switching on
The heater is switched on by pressing the ON/OFF key
At the switching on the display will show Cleaning
Cleaning’is displayed for 20 second, in order to clean the fire pot.
The heater is switched off by pressing the ON/OFF key
Switching off is displayed
After the temperature in the stove is lower than 30 ⁰C , the phrase
Goodbye is displayed.
5.OperationSwitching on\off
This manual suits for next models
4
Table of contents
Other Kstove Stove manuals
Popular Stove manuals by other brands

Hunter Stoves
Hunter Stoves Inglenook CEV. II Installation and operating instructions

EVA Stampaggi
EVA Stampaggi COSTANZA instruction manual

BONFEU
BONFEU BONTON 40 Assembly instructions

Brasslite
Brasslite Turbo I instructions

Nor-Varm
Nor-Varm 79654 instruction manual

Continental Fireplaces
Continental Fireplaces CDVS600-1NA Installation and operation manual

HTW
HTW HTW-EST800VER owner's manual

MCZ
MCZ EGO AIR 8 M1 installation guide

Green Stoves
Green Stoves 8kW Installation and operating instructions

Dovre
Dovre 250 Installation instructions and operating manual

Coleman
Coleman 9946 Series Instructions for use

Kenyon
Kenyon 550 series Operating instructions and parts list