Kuppersbusch PGW 4000 User manual

BEDIENUNGSANWEISUNG
mit Montageanweisungen
Instructions for use and installation instructions
Instructions d’utilisation et avis de montage
Gebruiksaanwijzing en montagehandleiding
Istruzioni di uso e di montaggio
Instrucciones de uso y de montaje
Instruções de uso com indicações para montagem
Ðtv³wuÒxvÒvÒÊËwÒ´ÎËxÑÐÌгv&&vÒ
Bruksanvisning i monteringanvisningar
PGW 4000
072587 L51

PGW 4000 9
For your information...
You should carefully read the information in this manual before you use your
Gourmet-Grill. Here you will find important notes concerning safety and how
to use, look after and service your appliance so that it enjoys a long service
life.
Should a fault arise, please first consult chapter “What to do if trouble occurs”.
You can often remedy minor faults yourself and thus save unnecessary service
costs.
Always keep these instructions in a safe place and pass them on to new
owners for their information and safety.
The following symbols are used in this operating manual:
[The warning triangle draws your attention to possible risks for your
health or damages that might be caused at your appliance.
FHere you will find information and notes.
Conditions of guarantee
The conditions of guarantee applicable for this product are subject to those
published by the representative in the relevant country.
Details regarding same may be obtained from the dealer from whom the
appliance was purchased. For claims under guarantee the sales receipt must
be produced.
Contents
Safety instructions . . . . . . . . . . . . . . . . . . . . . . . . . . . . . 9
for connecting up and functioning
for the grilling surface
General advice for use . . . . . . . . . . . . . . . . . . . . . . . . . . 9
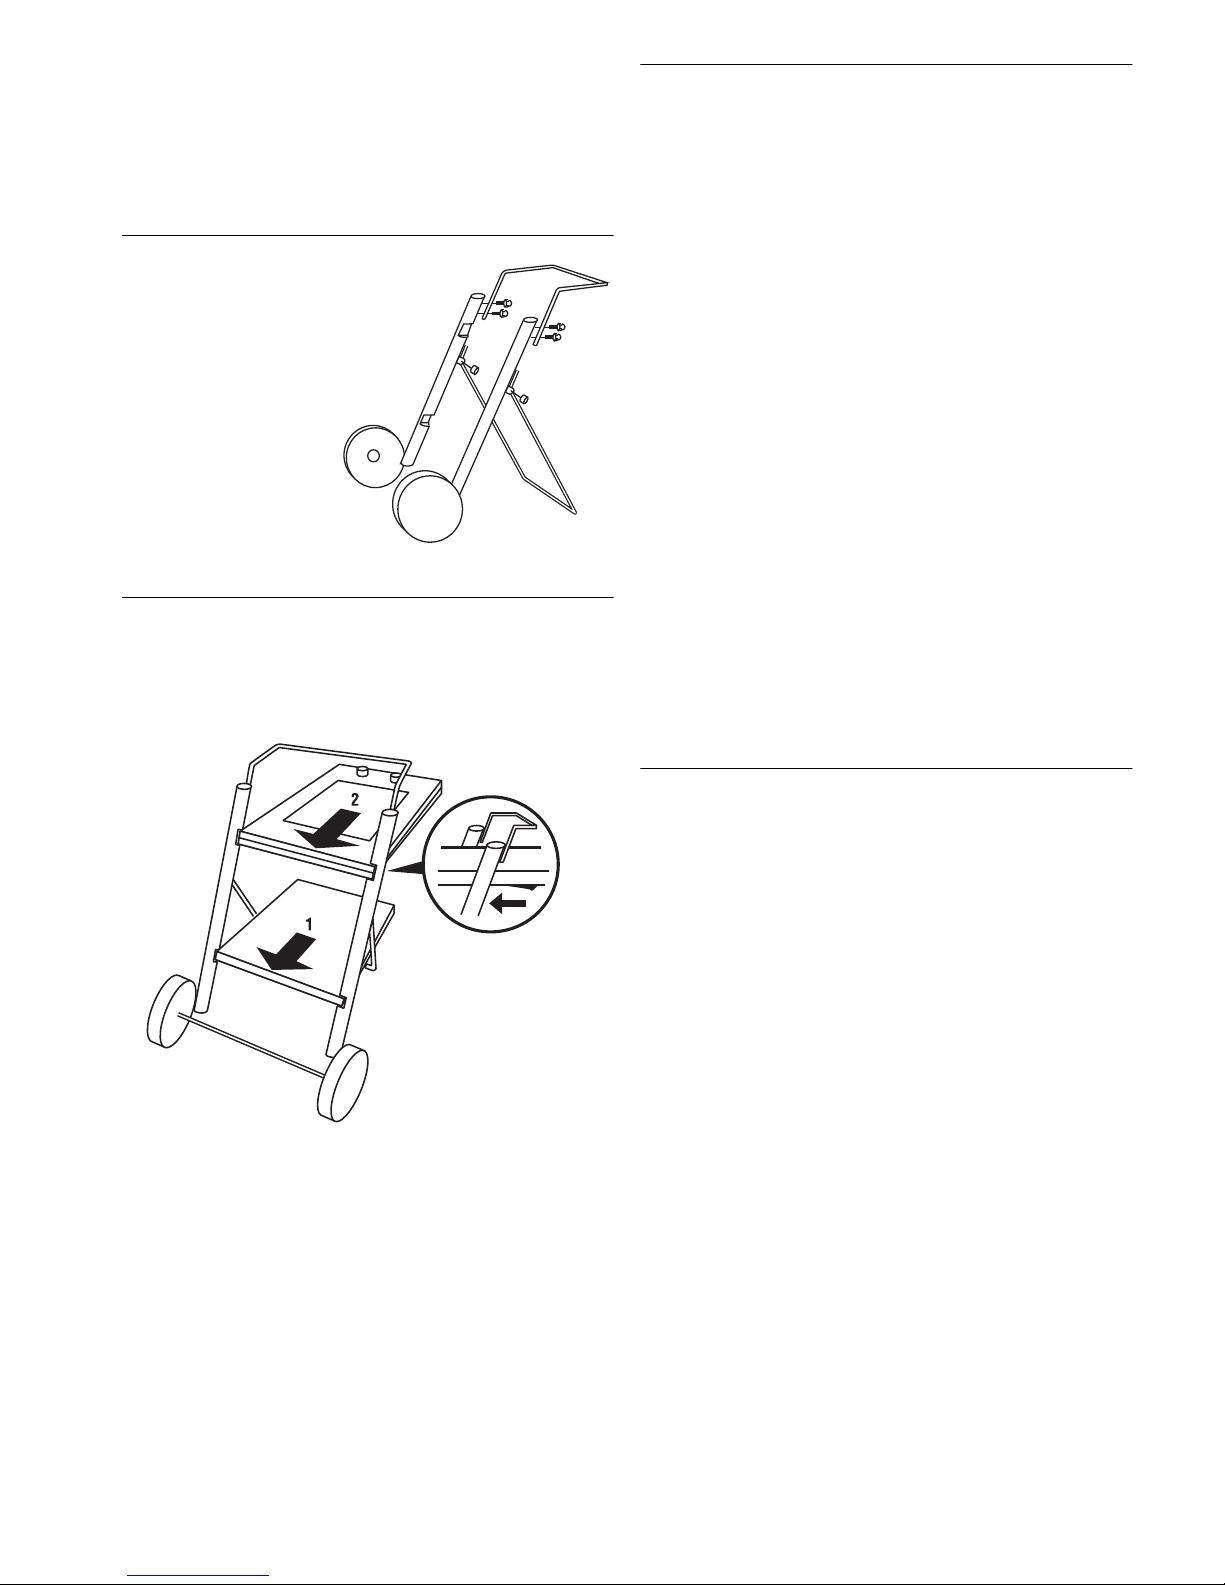
Assembly instructions. . . . . . . . . . . . . . . . . . . . . . . . . . 10
Setting up the Gourmet-Grill
Insert the grill assembly and tray
Electrical connection
Disassembly of the barbecue
Technical data. . . . . . . . . . . . . . . . . . . . . . . . . . . . . . . 10
Your appliance at a glance . . . . . . . . . . . . . . . . . . . . . . 11
Using the barbeque . . . . . . . . . . . . . . . . . . . . . . . . . . . 11
Before using the first time
The grilling zones
Temperature setting
Grilling
Grilling times
Additional applications
Cleaning and care . . . . . . . . . . . . . . . . . . . . . . . . . . . . 12
Cleaning the grill surface
Cleaning the stainless steel parts
What to do if trouble occurs... . . . . . . . . . . . . . . . . . . . . 12
Type plate
Recipe suggestions . . . . . . . . . . . . . . . . . . . . . . . . . . . 13
Safety instructions
for connecting up and functioning
■ Maintenance and repair of the appliance may only be carried out by an
authorized expert in accordance with the valid safety regulations. Improperly
performed works endanger your safety.
■ Regularly check the mains cable for damage. If it is damaged, the grill
surface must not be used
■ The supply connecting line is mounted in accordance with mounting type Y.
This means that this connection cable must under no circumstances be
repaired or replaced by a commercially available connection cable. In
case of a failure, the connection cable must be replaced by a Küppersbusch
service technician in order to exclude any safety risk.
■ Danger of burning! The grilling and warming module
becomes hot during operation. Therefore caution:
Danger of burning! Generally keep little children away
from the appliance.
■ The appliance must neither be sprayed down nor stand in the rain.
■ Fire hazard! The appliance must not be operated under sunshades and
awnings or near objects sensitive to heat or inflammable.
■ Do not leave the appliance standing outside overnight. This could cause
condensation to form.
■ The appliance may only be operated on flat surfaces.
■ The appliance is exclusively designed for preparing meals in the household.
for the grilling surface
■ Prevent hard objects from falling onto the grilling surface. Lumped impact
loads may result in a breaking of the grilling surface.
■ Risk of personal injury! In case of cracks, fractures or breaches of the
grilling surface immediately put the appliance out of operation. Disconnect
the power plug.
■ The connecting cable must not contact the hot grilling surface.
■ Do not put any combustible, easily inflammable or deformable objects onto
the grilling surface. This is also valid for the grilling cutlery depositing tray.
■ Caution: Overheated greases and oils may inflame themselves. Prepare
meals with greases and oils only under control. Never extinguish inflamed
greases or oils with water!
■ The grilling surface must not be used as depositing place when hot.
■ Do not put kitchen foil or plastic onto the grilling surface. Things that
may melt, e.g. plastics, foils or sugar, must be kept away from the grilling
surface. Melted parts must immediately be lifted off from the grilling
surface when still hot by means of the supplied cleaning scraper in order
to avoid damaging.
■ Avoid repeated burning of contaminations.
■ Lime deposits are harmful to the grilling surface.
■ Please observe the cleaning and servicing instructions.
■ Never use silicone-containing cleansing agents to clean the grilling surface!
General advice for use
■ The grilling surface is resistant against thermal shocks (coldness and heat)
and also very robust.
■ When switching on the grilling surface a short buzzing noise may be heard from
the heating. This is design-specific and has no influence on quality and operation.
■ We would like to indicate that scratches on the grilling surface caused by im-
proper cleaning or cutting with knives do not have a negative influence on the
operation of the appliance. They merely impair the appearance of the appliance.

10 PGW 4000
Assembly instructions
The barbecue-on-wheels is equipped with:
1 glass scrapper 2 ring spanners
6 screws 2 hex nuts
Setting up the Gourmet-Grill
– Attach handle and supports
as shown in the drawing
using the screws provided.
Use the 8mm ring spanners
provided to tighten the
screws.
Insert the grill assembly and tray
– Unfold the support.
– Then insert the grill assembly and tray evenly to a positive stop. The sur-
faces will then automatically be aligned parallel and horizontal.
The Gourmet-Grill is now ready to use.
Electrical connection
[WARNING! This appliance must be earthed!
[Make sure that the connected loads of the household comply with the
maximum voltage of the appliance (as indicated on the type plate).
[If the barbecue shall be used in the open air, we recommend to connect
a high-sensitivity residual-current-operated-circuit-breaker (30 mA) in
the incoming circuit. This type of breaker can be purchased from any
electrician.
[Please note that the supply connection cable must not contact the hot
grilling surface.
■ The electrical connection is realized by means of a shock-proof plug at a
socket.
Electrical requirements (for UK and Republic of Ireland only)
■ Check that the voltage stamped on the rating plate corresponds with your
house electricity supply, which must be AC (alternating current). Electrical
connection of the apppliance must be performed by a trained electrician.
The legally recognized regulations and the connection requirements of the
electricity board seving your area must be fully complied with. When
operating the appliance outdoors, we recommend protecting it with a highly
sensitive residual current operated appliance ( 30 mA), which can be
bought from any electrical fitter. Please note that the mains connection
cable should not come into contact with the hot grilling surface.
[WARNING! Should the appliance be supplied with a continental two-pin
plug fitted, then this plug must be cut off from the connection cable. Dis-
pose of the plug safely; do not insert it in a 13 A socket elsewhere in
the house as this could cause a shock hazard.
Disassembly of the barbecue
– Pull out plug.
– Remove the grilling module and tray.
– Flap the brackets together.
Technical data
Connected load: approx. 2.3 kW, 230 V ~
Dimensions:
L x W x H:
Grilling surface:
approx. 880 x 668 x 650 mm
approx. 410 x 360 mm

PGW 4000 11
Your appliance at a glance
1 Right grilling zone 4 Pilot light to indicate
standby function
2 Left grilling zone 5 Control for left grilling zone
3 Control for right 6 Connection cable (approx. 2 m)
Using the barbeque
Before using the first time
[Generally switch off the appliance before any cleaning operation is
performed and disconnect the power plug!
– Before preparing the first meals clean the grilling surface by means of a
moist cloth and a bit washing-up liquid. Afterwards wipe it dry with a non-
fluffy cloth.
The grilling zones
The grilling surface consists of two grilling zones. Each grilling zone is finely
adjustable via a grilling zone regulator.
Temperature setting
The grilling zones can be adjusted to any setting you like, from “minimum
temperature” to “maximum temperature”!
The barbecue only heats in order to reach or maintain the preset temperature
setting. This means that the barbecue does not permanently heat with full
power, but always switches off for a short time. This „cycling“ is absolutely
okay and does in no way represent a fault.
Grilling
[Please do not use olive oil for grilling. Burnt-in olive oil residuals can
hardly be removed.
– Immediately prior to grilling, operate the grill for approx. 5 minutes at the
maximum setting.
– Grill food on each side at the maximum temperature until it comes away
from the grill surface. In this way the meat juices remain in the grill goods.
– Then switch down, if required (e.g. to 2/3 of the maximum power), and grill
the meat until it is done. Toss thick pieces of meat or sausages several
times.
– Remove the grilling residuals by means of the cleaning scraper after every
grilling procedure.
FShould the grill have been operated at a low temperature, heat it up
again at the maximum temperature before putting on food again.
FDo not grease the grilling surface with oil. Lean meat can be greased
with oil. When grilling very fatty foods, carefully dab away the fat using
a paper kitchen towel.
FIn case of pickled meat, remove surplus grease and coarse spices (like
onions, leaves or thyme).
FPlease keep in mind that large quantities of meat and sausages need
longer grilling times than small quantities. We therefore recommend to
grill several smaller quantities one after the other.
Grilling times
Additional applications
The grilling module can also be used
without wheels
- as table grill,
- as warming plate or
-asfryingplate.
FTo guard against high temperatures always place the tray under the grill
assembly!
FIf the appliance has been stored in rooms with an increased air humidity
for a longer period of time (e.g. cellar or garage), water may condense
in the appliance during commissioning. Please keep this in mind when
using the appliance as table grill, warming, cooking or frying plate and
put the appliance onto a suitable base as a precaution.
Grilling goods Total grilling times in min.
(Guidelines)
Sausages 6 - 10
Chops 10 - 16
Rump-steak 10 - 14
Fillet-steak 4 - 8
Rissoles 8 - 12
Trout 12 - 16
Toast 2 - 4
Grilled apple/banana slices 4 - 6

12 PGW 4000
Cleaning and care
[Generally switch off the appliance before any cleaning operation is
performed and disconnect the power plug
[Never dip the appliance into water!
[Caution: When cleaning the grilling surface do not reach between grilling
surface and housing with the peak of the glass scraper!
■ Clean the grilling surface after every use.
■ Use only the glass scraper provided for removing large food particles left
from grilling.
■ Sugar and melted plastic should be removed from the hot grill surface
immediately using the glass scraper.
■ Never use abrasive materials such as steel wool or abrasive cleansers!
■ Never use cleansers which contain silicon. These will leave a film on the
grill surface which could be absorbed by the food upon next use. Therefore,
follow the instructions of the manufacturer in this regard.
■ We recommend you to rub down the grill surface with half a lemon or lemon
juice. Any slight dirt marks from protein, e.g. from meat, is removed and
the grill surface shines again.
Cleaning the grill surface
[Make sure that no cleaning residuals remain on the grilling surface.
– First of all remove all food residuals and fat splashes from the hot grilling
surface by means of the glass scraper.
– Clean the grill surface with water and some detergent.
– Rewipe it with clear water and finally dry it.
FIn case there are still some soil particles left on the grilling surface after
cleaning, they can easily be removed by means of a special cleansing
agent, e.g. VSR O-FIX-C (available from the Küppersbusch Customer
service). Then wipe off the entire grilling surface with a wet and
afterwards with a dry cloth.
Cleaning the stainless steel parts
[Stainless steel is very sensitive to scratches!
Do not use a cleaning scraper!
[Remove any deposits of calcium or any spots of grease, and starch as
soon as possible, or stains will appear!
– Clean these parts with a soft sponge and a bit hand washing-up liquid.
– Then wipe them off with a dry cloth.
For the cleaning a cleaning agent for stainless steel can be used.
We recommend to clean once a week stainless steel surfaces with an usual
cleaning agent for stainless steel. This will create a protective film protecting
the stainless steel surface from discolouring.
What to do if trouble occurs...
[Never unscrew the appliance! Repairs may only be carried out by an
authorized expert.
You can deal with some problems that occur yourself. First check whether
there has been any operating error. Repairs during the guarantee period are
not free of charge, when they are caused by operating errors or non-
observance of the following instructions:
Type plate
The type plate is located at the bottom side of the grilling surface.
When calling the Customer service or ordering spare parts indicate the data
given on the type plate.
– Take them down for possible consultations with our Customer service:
Fault Cause Remedy
Grilling surface cannot
be switched off.
Regulator is
defective.
Disconnect the mains
plug and hand over the
appliance to the
Customer service.
Grilling surface isn’t
heat
The grilling zone
regulator has not
been switched on.
Set the grilling zone
regulator.
Plug has not been
inserted?
Insert the mains plug.
Household fuse
defective?
Check and replace fuse.
Regulator or
grilling zone
defective.
Hand over the appliance
to the Customer service.
F-number:
Type designation:

PGW 4000 13
Recipe suggestions
FQuantities given are for four persons unless otherwise indicated.
FFor grilling at a high temperature, always pre-heat the grill at the
maximum temperature for 5 minutes, after which the setting could be
reduced to 2/3 of the maximum power.
FOnly use well-hung meat for grilling!
Gourmet steak
Ingredients: 4 steaks of veal or pork, 2 tablespoons of oil, pepper, rosemary.
Cooking instructions: Stir the oil adding salt, pepper and rosemary. Coat the
steaks with this mixture and then grill on both sides for approx. 7 minutes.
T-bone steaks
Ingredients: 2 T-bone steaks, salt, pepper, oil, 1 tomato.
Cooking instructions: Sprinkle some oil onto both sides of the T-bone steaks
and grill on both sides for 8-10 minutes. After grilling, season with salt and
pepper. Cut the tomato in half, coat it with oil and grill it with the steak. When
serving, decorate the steak with half a tomato on each side.
Belly pork slices
Ingredients: 4 slices of belly pork, oil, salt, half a teaspoon of majoram,
freshly ground pepper.
Cooking instructions: Grill the belly pork on both sides for 6 minutes.
1 minute before finishing grilling, beat a little oil with majoran and use it to
coat the slices. Serve with freshly ground pepper.
Grilled slices of ham
Ingredients: 4 slices of cooked ham (approx. 1 cm thick), oil, 1 teaspoon of
mustard, salt.
Cooking instructions: Mix the oil with the mustard and use the mixture to
coat the slices of ham. Grill the ham on both sides for about 4 minutes.
President fillet steak
Ingredients: 2 fillets of steak, two slices of lean, raw ham, oil, pepper,
paprika, salt.
Cooking instructions: Decorate the fillets of steak with the ham, coat with a
marinade of oil, pepper, salt, and paprika. Leave to soak in the marinade for
20 minutes. Grill the steaks on both sides for 4 minutes.
Liver rolls
Ingredients: 4 slices of veal’s liver (200 grams each), 1 teaspoon of salt,
30 grams of butter, 1 pinch of oregano, thyme, 200 grams of streaky bacon,
4 thin slices of Dutch cheese.
Cooking instructions: Sprinkle the slices of veal with drops of melted butter.
Mix the salt, the oregano and the thyme and coat the slices of liver in the
mixture. Top with cheese. Fold the slices of liver together once, wrap each
slice in 2-3 slices of bacon and hold together with a toothpick. Grill the slices
of liver on both sides for 4 minutes.
Stuffed ham rolls
Ingredients: 4 slices of cooked ham, 12 stalks of asparagus, 4 thin slices of
Dutch cheese.
Cooking instructions: Place the asparagus and the cheese onto the ham
slices and form into a roll. Grill on each side for 4 minutes.
Table of contents
Other Kuppersbusch Grill manuals

Kuppersbusch
Kuppersbusch GW 30 User manual

Kuppersbusch
Kuppersbusch EGS 4710.0 Manual

Kuppersbusch
Kuppersbusch VKEL3800.0 Operation manual

Kuppersbusch
Kuppersbusch Azzurro Specification sheet

Kuppersbusch
Kuppersbusch MG 10 User manual

Kuppersbusch
Kuppersbusch PGW 45 Technical manual

Kuppersbusch
Kuppersbusch GW 20 Specification sheet

Kuppersbusch
Kuppersbusch PGW 400 User manual
Popular Grill manuals by other brands

George Foreman
George Foreman GR64G Instructions and warranty

Lagrange
Lagrange evolution manual

CDS
CDS Cook -N-Dine MO-61 Quick start quide

Campingaz
Campingaz PRIMERO Operation and maintenance

Rinnai
Rinnai 4 burner Gourmet Customer's operating and assembly instructions

Steba
Steba VG 110 Instructions for use