KUSATEK K-Tec User manual

Druck-Nr.: 2902 5045
Stand: 24/2021
DE
Made in Germany
K-Tec
Control for gas-operated sauna heaters
Installation Instructions for retailers

DE-2 Installation Instructions - K-Tec-Leistungsteil
Documentation
DE
Documentation
Manufacturer
Original installation instructions EN
Copyright for these installation instructions remains with
EOS Saunatechnik GmbH.
Copyright as per DIN ISO 16016:
The copying and distribution of this document, as well as the use and com-
munication of its contents without express authorisation, are not permit-
ted. Compensation will be claimed in the event of infringements.
All rights reserved with regard to patent claims or submission of design or
utility patent.
Characters, symbols and illustrations
Revision history
EOS Saunatechnik GmbH
Schneiderstriesch 1
35759 Driedorf, Germany
Tel. +49 2775 82-0
Fax +49 2775 82-431
Email [email protected]
Web www.eos-sauna.com
Additional information about an operating step
Cross-reference to a page
Read instructions
Result of a step
Table title
Title of figure
Date Version Description
15.06.2021 01.10 Scope of delivery changed.
1Apr.2021 01.00 First version

K-Tec-Leistungsteil - Installation Instructions DE-3
Contents
Documentation..................................................................................................DE-2
1 Safety......................................................................................................................DE-5
1.1 Safety levels................................................................................................DE-5
1.2 Mounting and electrical installation .................................................DE-5
1.3 Operator instruction ...............................................................................DE-7
1.4 Standards and regulations ...................................................................DE-8
2 Identification ......................................................................................................DE-9
2.1 Information about the unit...................................................................DE-9
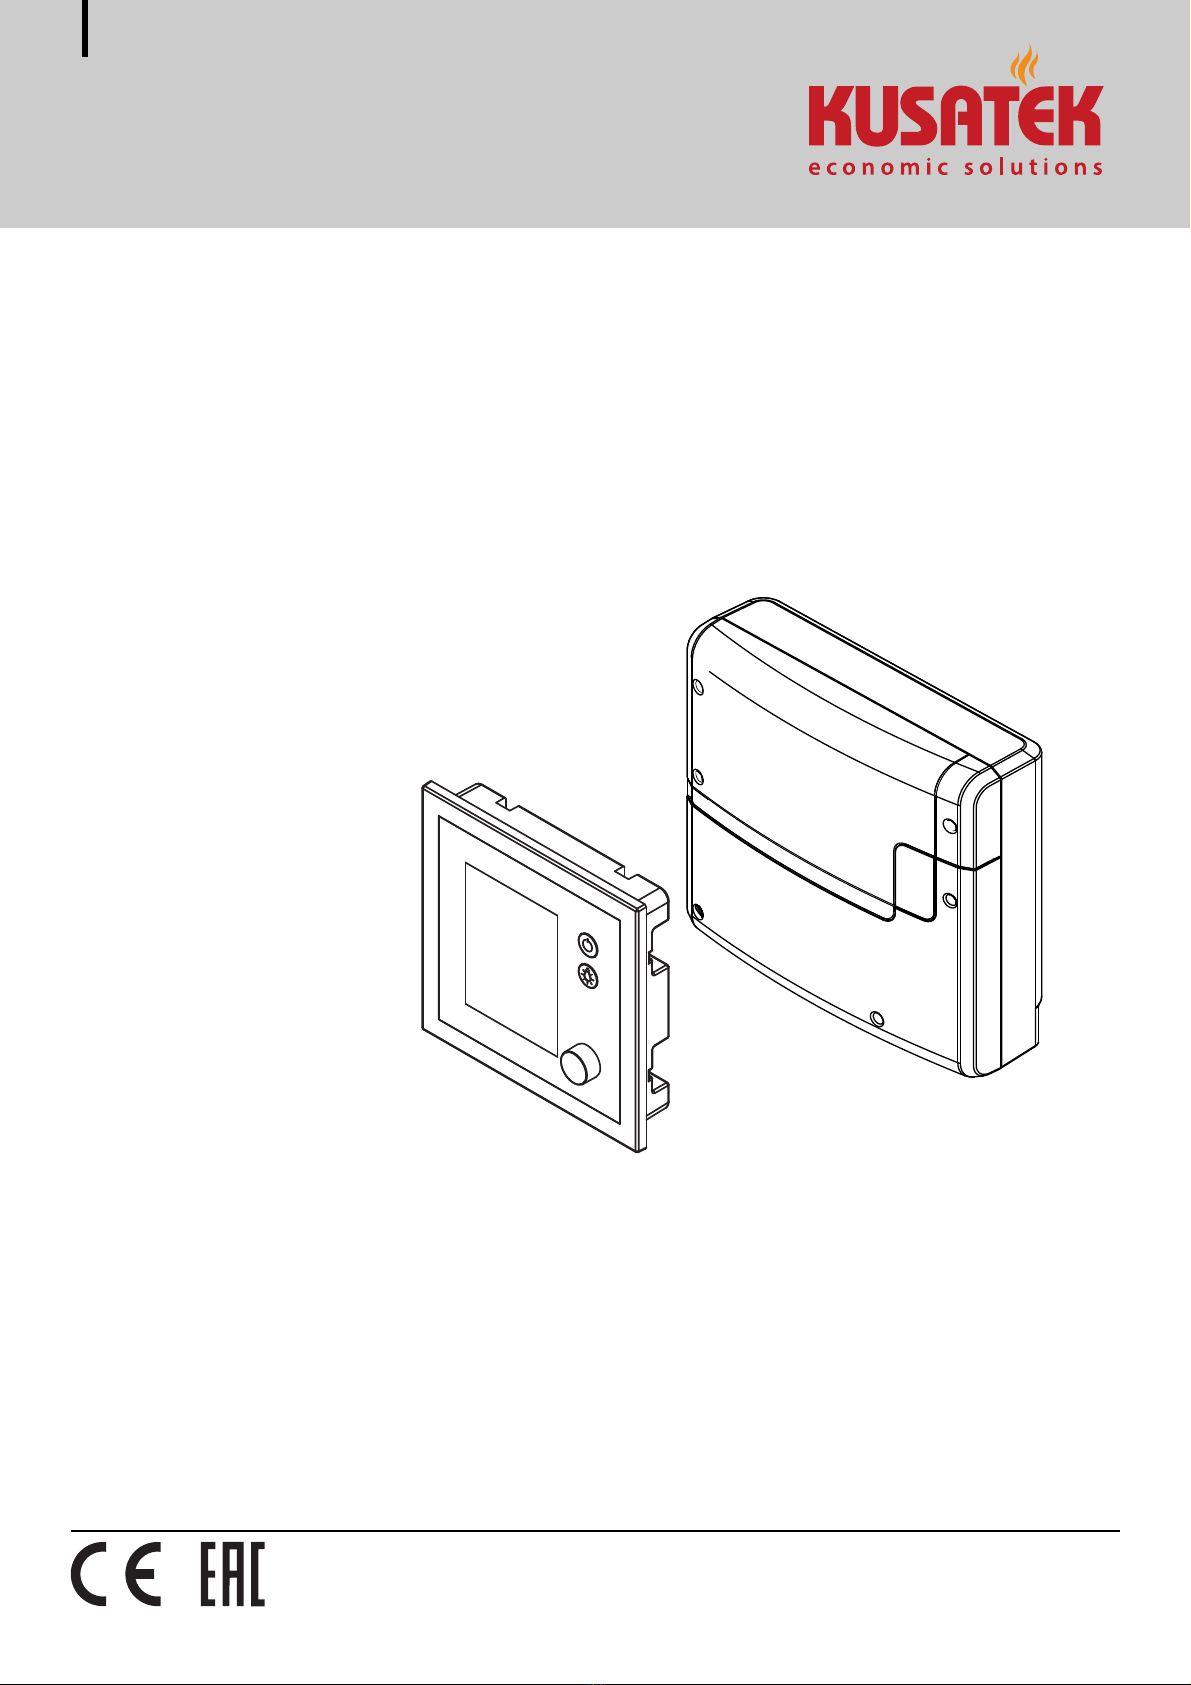
2.1.1 K-Tec-Leistungsteil .................................................................DE-9
2.1.2 Control panel ..........................................................................DE-10
2.1.3 Plug-in modules (optional) ................................................DE-10
2.2 Intended use............................................................................................DE-10
3Description.........................................................................................................DE-11
3.1 Scope of delivery....................................................................................DE-11
3.2 Functions and applications ................................................................DE-12
3.3 Overview of relay box...........................................................................DE-14
3.4 Internal view of relay box....................................................................DE-16
3.5 Control panel ..........................................................................................DE-17
3.6 Technical data .........................................................................................DE-18
4 Installation.........................................................................................................DE-19
4.1 Power supply and data lines .............................................................DE-19
4.2 Installation work inside the cabin....................................................DE-21
4.2.1 Installing the cabin fan ........................................................DE-21
4.2.2 Installing the temperature sensor and safety
temperature limiter...............................................................DE-21
4.2.3 Installing cabin lighting.......................................................DE-23
4.3 Relay box ..................................................................................................DE-24
4.3.1 Guidelines.................................................................................DE-24
4.3.2 Installing the relay box ........................................................DE-27
4.4 Control panel...........................................................................................DE-30
4.4.1 Guidelines.................................................................................DE-31
4.4.2 Mounting the housing.........................................................DE-32
4.4.3 Mounting the control panel...............................................DE-37

DE-4 Installation Instructions - K-Tec-Leistungsteil
DE
5Connections...................................................................................................... DE-39
5.1 Installation examples........................................................................... DE-40
5.2 Circuit board assignment................................................................... DE-42
5.3 Dip switch ................................................................................................ DE-43
5.3.1 ADDRESS dip switch ........................................................... DE-43
5.3.2 CONFIG dip switch................................................................ DE-43
5.4 Connection diagram ............................................................................ DE-45
5.5 IO-EXT-HV module................................................................................ DE-46
5.5.1 Input and output assignments ........................................ DE-47
5.5.2 Connecting a module.......................................................... DE-48
5.6 Connecting the mains supply and consumer............................. DE-49
5.6.1 Connecting lighting and mains supply......................... DE-50
5.6.2 Connecting the burners...................................................... DE-50
5.6.3 Connecting the air supply fan .......................................... DE-51
5.6.4 Connecting the exhaust gas fan and cabin fan.......... DE-52
5.6.5 Connecting the vaporiser .................................................. DE-52
5.7 Connecting data lines.......................................................................... DE-53
5.8 Connecting the emergency button................................................ DE-55
5.9 Defining the heating time limitation ............................................. DE-57
5.10 Closing the relay box ........................................................................... DE-57
6Commissioning.............................................................................................. DE-58
6.1 Operation basics ................................................................................... DE-59
6.2 Setup during commissioning or after a reset ............................. DE-60
6.3 Setting up the vaporiser ..................................................................... DE-61
6.4 Adjusting the switching hysteresis................................................. DE-61
6.5 HOME function....................................................................................... DE-63
6.6 Troubleshooting ................................................................................... DE-68
7 General terms and conditions of service ........................................... DE-69
8Disposal.............................................................................................................. DE-71

K-Tec-Leistungsteil - Installation Instructions DE-5
Safety
Safety
1.1 Safety levels
Safety instructions and important operating instructions are classified.
Please familiarise yourself with the following terms and symbols:
WARNING
Warning
Indicates a hazardous situation which, if not avoided, could result
in death or serious injury.
CAUTION
Caution
Indicates a hazardous situation which, if not avoided, could result
in minor or moderate injury.
NOTICE
Notice
Indicates a hazardous situation which, if not avoided, will result in
damage to the unit.
1.2 Mounting and electrical installation
These installation instructions are intended for qualified person-
nel familiar with the laws and regulations applicable to electrical
installations, gas installations, and infrared radiators at the instal-
lation site.
Observe also the installation and operating instructions for the
gas-fuelled sauna heater.
Mounting and installation must be performed only by:
KUSATEK customer service
Technicians who have been trained by KUSATEK
Other trained technicians if technicians trained by KUSATEK do not ser-
vice the area in which the installation site of the gas-fuelled sauna
heater is located.

DE-6 Installation Instructions - K-Tec-Leistungsteil
Safety
DE
Observe the following general safety instructions during mount-
ing, configuration and commissioning of the product.
Risk to life and limb
and risk of fire
Risk to life and limb from electric shock and fire in the event of im-
proper or faulty electrical connection. This risk also applies follow-
ing completion of the installation work.
The electrical installation of the sauna control unit and other
electrical systems or equipment with a fixed mains connection
may be performed only by a trained electrician from an author-
ised electrical company.
Ensure compliance with the standards and regulations for elec-
trical installation and gas installation in your country.
The system must be disconnected and removed entirely from
the mains supply before commencing installation and repair
work.
The housing cover must only be removed by a specialist.
Fire hazard from
overheating
Insufficient ventilation can lead to device overheating and fire.
Do not install the control panel and the relay box in enclosed
cabinets or wood panelling.
Observe the sauna heater manufacturer's safety and installa-
tion instructions.
Observe the gas-fuelled heater manufacturer's safety and in-
stallation instructions.
Touchable glass surfaces on the outside of the cabins could
reach a maximum of 76°C. Attach safety systems if needed.
Damage due to
incorrect mounting
location
The control unit is not suitable for outdoor use.
It must be operated only inside buildings and may not be ex-
posed to environmental conditions such as extreme humidity
and moisture or the possible formation of condensation or cor-
rosive substances in the ambient air, as well as other weather
conditions.
Similarly, excessive cold and extreme exposure to sunlight must
be prevented.
Protect the unit accordingly if there is an increased risk of me-
chanical damage.

K-Tec-Leistungsteil - Installation Instructions DE-7
Safety
1.3 Operator instruction
The operator of the sauna cabin must be instructed in the general
safety instructions during commissioning. The operator must be
given a copy of the operating instructions.
Risk of electric shock A risk to life and limb from electric shock and fire arises in the event
of improper repair work. This risk also applies after work is com-
pleted.
The housing cover must only be removed by a specialist.
Repairs and installations must only be performed by a trained
specialist.
The system must be disconnected and removed entirely from
the mains supply before commencing repair work.
Use only original spare parts from the manufacturer.
Fire hazard Objects placed on the gas-fuelled sauna heaters can easily be ig-
nited and cause fires.
Do not place objects on the gas-fuelled sauna heater.
Fill the rock store as directed.
If you switch on the gas-fuelled sauna heater using pre-set tim-
ers or a remote control, attach a protective cover to the heater
or install a suitable safety system.
Inspect the sauna cabin prior to each recommissioning and en-
sure that no towels, cleaning agents or other objects are lying
on the gas-fuelled sauna heater.
Risk of burns and
chemical burns
Touching hot parts may lead to skin burns and chemical burns of
the skin.
The operator must be familiar with the unit's hot parts and be
able to identify them.
The operator must be familiar with the settings for the heating
period and understand how it is controlled.
Health risks Spending time in a sauna cabin can lead to serious health risks or
even death for persons with health impairments.
Persons with health impairments who spend time in a sauna
must consult a doctor before entering a sauna.

DE-8 Installation Instructions - K-Tec-Leistungsteil
Safety
DE
Equipment damage
due to overuse
Excessive humidity in commercial sauna cabins can lead to prop-
erty damage.
If the sauna cabin is used commercially, the heating time must
be set so that it switches off automatically after a specific period
of time.
If the heating does not switch off automatically after a defined
heating period, cabin use must be supervised at all times.
Inspect the cabin before each use.
Operating the unit The gas-fuelled sauna heater may be operated by persons who
have been instructed in the safe use of the unit and understand
the risks it poses. Children must not play with the gas-fuelled sau-
na heater.
Children must be supervised to ensure they do not play with
the gas-fuelled sauna heater.
Ensure that children and unauthorised persons do not have ac-
cess to the plant room.
Service and
maintenance
There is a risk to health and risk of fire if service and maintenance
work is not performed in a professional manner.
Service and maintenance work must be performed only by:
KUSATEK customer service
Technicians who have been trained by KUSATEK
Other trained technicians if technicians trained by KUSATEK do
not service the area in which the installation site of the gas-
fuelled sauna heater is located.
1.4 Standards and regulations
For an overview of the standards that were observed during design and
construction of the sauna heaters, please refer to the individual product's
technical data sheet that can be downloaded from www.eos-sauna.com.

K-Tec-Leistungsteil - Installation Instructions DE-9
Identification
Identification
The relay box must be installed with a control panel. The relay box can be
supplemented with functions when plug-in modules are added.
2.1 Information about the unit
2.1.1 K-Tec-Leistungsteil
Nameplate
The nameplate is attached to the underside of the base of the housing.
Nameplate (example)
Requirements for operation and storage
The K-Tec output controller is only intended for installation outside the
sauna cabin. The mounting location must meet the following climate con-
dition requirements:
Ambient temperature during operation -10°C to 40°C
Storage temperature: -20°C to 60°C
A Name F Country of origin
B Model G Manufacturer
C Item number H Protection class
D Mains supply I Manufacturing date
E Max. electrical switching output J Serial number
Gasofensteuergerät
Type K-Tec
Art.-Nr. 94 7588 00
230 V 1N AC 50 Hz
Max. elektr. Schaltleistung 3,5 kW
Made in Germany
Kusatek GmbH, 35759 Driedorf
S-No. 12.19 00001
IPX4
A
B
C
D
E
F
G
I J
H

DE-10 Installation Instructions - K-Tec-Leistungsteil
Identification
DE
2.1.2 Control panel
The K-Tec output controller is installed with a control panel (software
version 3.62 or higher).
The control panel is included in the scope of delivery.
For more information about the control panel, see the operating instruc-
tions and chapter 6.1 Operation basics, DE-59.
2.1.3 Plug-in modules (optional)
A plug-in module can be added to the circuit board of the relay box. It
enhances the functions of the K-Tec control panel.
LV module
Four inputs and four outputs for various cabin statuses and connections
to a PLC.
2.2 Intended use
The K-Tec is designed to operate sauna cabins with gas-fuelled heaters. It
must be mounted on a wall.
The K-Tec is suitable for use with private or commercial cabins.
The control unit is not suitable for outdoor use.
It must be operated only inside buildings and may not be exposed to envi-
ronmental conditions such as extreme humidity and moisture or the possi-
ble formation of condensation or corrosive substances in the ambient air,
as well as other weather conditions. Similarly, excessive cold and extreme
exposure to sunlight must be prevented. Protect the unit accordingly if
there is an increased risk of mechanical damage.
Foreseeable misuse
The following are considered instances of foreseeable misuse:
The control and sensor cable plugs are plugged in incorrectly.
The unit is operated without knowledge of or compliance with the
safety instructions.
Operating, service and maintenance requirements are not observed.
The unit is operated after technical or other modifications are made to
the relay box.
The unit is operated by children or persons with reduced mental capac-
ity or by persons who have not been thoroughly instructed in its use.
Safety, DE-5

K-Tec-Leistungsteil - Installation Instructions DE-11
Description
Description
3.1 Scope of delivery
The relay box is enclosed in a plastic housing. The housing completely
encloses the circuit board and the electronics.
The following components are included in the scope of delivery:
K-Tec scope of delivery
A Relay box with 2-piece front cover
B 5 bushings
C 3 wood screws 5 x 25 mm
D 5 m connecting cable with RJ14/RJ10 modular plug for
control panel
E Removal tool for front panel
F Control panel with housing for mounting in the wall or
mounting on the wall
G Installation and operating instructions
H Temperature sensor with safety temperature limiter,
including 5 m connecting cable with RJ10 plug,
housing, circuit board, 2 screws 4x40 mm
A
BG
H
C D FE

DE-12 Installation Instructions - K-Tec-Leistungsteil
Description
DE
Accessories (optional)
3.2 Functions and applications
The K-Tec is used to control gas-fuelled heaters in sauna cabins and various
extra functions, such as:
Up to 8 burners and the corresponding fans
Evaluating burner malfunctions (up to 4 inputs)
Vaporiser or automatic water splash for humidification
HOT function
AquaDisp or WDT automatic water splash
Heater, bench, and humidity sensor
Accessories Item no.
10 m connecting cable for sauna bus (RJ12/RJ12) 94.5861
25 m connecting cable for sauna bus (RJ12/RJ12) 94.4647
50 m connecting cable for sauna bus (RJ12/RJ12) 94.4648
20 m connecting cable for temperature sensor 94.6281
50 m connecting cable for temperature sensor 94.6282
10 m connecting cable for control panel (RJ10/RJ14) 94.6802
25 m connecting cable for control panel (RJ10/RJ14) 94.6285
50 m connecting cable for control panel (RJ10/RJ14) 94.6968
100 m connecting cable for control panel (RJ10/RJ14) 94.6969
Set SBM ECO push button 94.6980
SBM-WCI-01 web app module 94.5987
SBM-S BT sound module 94.5920, 94.5921
SBM-HOT set 94.6800
SBM-GLT-MOD HOME Modbus module 94.7077
SBM-GLT-KNX HOME KNX module 94.7078
SBM-FL75/150 coloured light module 94.5996, 94.6007
SBM remote start 94.5782
Emergency stop button 945777, 945779
Modular distributor RJ12 for connecting cable for control
panel and sauna bus
2001.5298
Infrared receiver for coloured light module and sound mod-
ule
94.6810
Humidity sensor 94.5726
Digital temperature sensor for bench heating 94.6617
Bench sensor 94.5725

K-Tec-Leistungsteil - Installation Instructions DE-13
Description
Burners and fans
The output at each terminal may not exceed a 0.5 kW AC3 load. If more
than 0.5 kW is required, a contactor must be connected during installation.
To connect more than one line per circuit, the corresponding lines must
have an identical line cross-section. You must connect the lines in the on-
site plug-in modules that are separate from the K-Tec output controller.
See Example – plug-in module (optional), DE-50
Air supply fan
The air supply fans can be single- or double-stage. The higher-power
stage must be connected in such a way that it switches on with the
burner. The device switches to the second stage in the burner’s control
intermission.
Exhaust gas fans
The connected exhaust gas fans automatically run for 10 minutes once
the device shuts off.
Evaluating a burner fault
The line for the burner fault can be connected to the HV-IN terminal. If
there are multiple burners, it can also function as a manifold. Alter-
nately, the IO-EXT-HV module can be used. If 4 burners are connected,
each burner is assigned its own fault input so burner faults can be
assigned to the corresponding burner.
If more than 4 burners are connected, two fault lines must be assigned
to one fault input.
Vaporisers
The following vaporisers can be connected:
SteamRock Basic steam generator
(has one status output)
SteamAttrac steam generator
(has one status output)
WDT automatic water splash
(has one HOT function)
Vaporiser without status output
If a vaporiser with status output or a WDT automatic water splash is con-
nected, the burner faults must be connected to the IO-EXT-HV module.
The vaporiser’s status output or the connection for the HOT request is con-
nected to the HV-IN terminal and evaluated by the electronics.

DE-14 Installation Instructions - K-Tec-Leistungsteil
Description
DE
Temperature sensor, emergency button and other functions
Each cabin must have sensors for monitoring the temperature. They may
be analogue or digital sensors. The KTY 11/5 TO-92 Mini is the only ana-
logue temperature sensor that may be used.
Temperature sensor
Each cabin must have one temperature sensor. It may be an analogue or
digital sensor.
Bench sensor
A bench sensor may also be connected. It may be an analogue or digital
sensor.
Humidity sensor
A digital humidity sensor may also be connected. A humidity sensor
should be connected if a vaporiser is connected.
Emergency button and manifold fault
An emergency button, whose signal is emitted via an output, may be
connected. Fault messages may also be issued via this output.
Mains supply and low voltage
The circuit board has switch contacts for mains supply (HV) and low
voltage (LV). You can configure their use for emergency functions or the
manifold fault line.
3.3 Overview of relay box
Housing
K-Tec output controller
A Housing cover – top piece
B Housing
C Retaining screws for top piece
D Unit switch
E Retaining screws for bottom piece
F Housing cover – bottom piece
F
A
C
E
C
C
E
E
D
B

K-Tec-Leistungsteil - Installation Instructions DE-15
Description
Unit switch
The relay box is equipped with an on/off switch on the left side.
Position I:
Relay box is switched on (factory setting).
The relay box is ready for operation in standby mode.
Position 0:
Relay box is completely switched off.
Parts of the circuit board are still energised.
Position II:
Cabin lighting is switched on, relay box is switched off.
Position for maintenance and cleaning.

DE-16 Installation Instructions - K-Tec-Leistungsteil
Description
DE
3.4 Internal view of relay box
Housing base
The cables for mains supply and low voltage can be routed through the
holes on the back side or base of the housing.
Holes can be punched out at the predetermined points where needed.
For more information on the circuit board, see
5.2 Circuit board assignment, DE-42
A Top mounting hole
B Housing cover fixtures – top piece
C Unit switch
D Circuit board
E Housing cover fixtures – bottom piece
F Lower mounting holes
G Feed-throughs for cables with mains voltage
H Feed-throughs for cables with low voltage
B
A
G E
C
B
B
E
F
E H
D
F

K-Tec-Leistungsteil - Installation Instructions DE-17
Description
3.5 Control panel
Control panel
The control panel is available in two models:
Model for mounting in the wall (A): The housing is mounted in the wall.
Model for mounting on the wall (E): The housing is mounted on the
wall.
The connecting cable for the relay box is fed through the back of the hous-
ing. The circuit board is affixed to the front panel.
A Housing for mounting in the
wall
C Slot at base for removal tool
B Front panel with display D Opening for sauna bus connection
E Housing for mounting on the wall
B
D
C
A E

DE-18 Installation Instructions - K-Tec-Leistungsteil
Description
DE
3.6 Technical data
Ambient temperature -10°C to +40°C
Storage temperature -20°C to +60°C
Relay box housing Plastic
Relay box dimensions (H x W x D) 240 x 230 x 70 mm
Weight Approx. 1.5 kg
Relay box outputs/inputs 3 x RJ10 jack for sensor connection
4 x RJ14 jack for control panel and add-on modules
Power supply 230 V 1N AC 50 Hz
Switching output Max. 3.5 kW
Circuits 5 separate circuits with total output of 3.5 kW
Temperature control Measured room temperature: 30°C–125°C
Connection for lighting Min.5W(20mA),max.250W
Sensor system Room temperature sensor, analogue or digital
Heating time limitation Upto6hrs/12hrs/18hrs/infinite
Control panel K-Tec
Control panel dimensions (W x H x
D)
127 x 130 x 25 mm, mounting depth approx. 20 mm
Display TFT colour display 55 x 74 mm (3.5”diagonal)
Control panel outputs/inputs 1 x RJ10 jack for relay box
1 x connection for memory card (microSD memory card reader)
Operation Buttons for on/off and lighting, jog dial

K-Tec-Leistungsteil - Installation Instructions DE-19
Installation
Installation
This chapter describes how to install the relay box and the control panel.
All data and power supply lines must be laid prior to installing the device
on the cabin wall.
NOTICE
Damage due to incorrect mounting location
The control unit is not suitable for outdoor use.
It must be operated only inside buildings and may not be ex-
posed to environmental conditions such as extreme humidity
and moisture or the possible formation of condensation or cor-
rosive substances in the ambient air, as well as other weather
conditions.
Similarly, excessive cold and extreme exposure to sunlight must
be prevented.
Protect the unit accordingly if there is an increased risk of me-
chanical damage.
4.1 Power supply and data lines
All electrical installations and all connecting lines laid inside the cabin must
be suitable for a temperature of at least 170°C.
All lines must be routed in such a way that they are well-protected, e.g. in a
cable duct.
NOTICE
Electronics malfunctions
Routing data and power supply lines together can lead to elec-
tronics malfunctions because, e.g. because the sensor will not be
detected.
Do not route sensor and sauna bus lines together with power
supply lines.
Route separate cable conduits.

DE-20 Installation Instructions - K-Tec-Leistungsteil
Installation
DE
Line routing
The individual component lines to the relay box may not exceed 50 m in
length.
The relay box contains 5 circuits:
BRNR: Burner and air supply fan
BRN: Second ventilator stage of the air supply fan.
EXH: Exhaust gas fan
CAB: Cabin fan
VAP: Vaporiser
To connect more than one line per circuit, you must terminate the corre-
sponding lines in the on-site plug-in modules outside the K-Tec output
controller.
See Example – plug-in module (optional), DE-50
To switch more than 0.5 kW AC3 power to a circuit, you must also connect
additional contactors inline.
The control line must only be routed between the insulation and the outer
wall of the cabin. Cabin insulation must be installed in such a way that the
temperature in the area in which cables are routed cannot exceed 75°C.
Extending the control panel's control line
For longer connections, special RJ10/RJ14 connecting cables with lengths
of 10 m, 25 m, 50 m and 100 m are available as an option.
Alternately, the supplied (as standard) 5 m line can also be extended with
an RJ12/RJ12 coupling and an RJ12/RJ12 extension cord.
The extensions and couplings are available as options.
See Accessories (optional), DE-12
Table of contents
Popular Control Unit manuals by other brands

ferrotec
ferrotec Genius II quick start guide

Delta
Delta RTU-PD01 Operation manual

National Instruments
National Instruments NI 9227 Operating instructions and specifications

H3C
H3C S9500E Series Card Manual

Grundfos
Grundfos CU 401 Installation and operating instructions

Satel
Satel SATELLINE-M3-TR1 user guide