KuSh Audio TWEAKER User manual


1
Part One:
Compression Philosophy
aka Why the Tweaker?
Why can’t a pair of Distressors glue a mix exactly like an api 2500?
Why can’t the 2500 level a vocal exactly like a Urei LA2a? Why can’t
the LA2a crush a drum loop exactly like a Valley People Dynamite?
Why can’t the Dynamite growl and distort without compressing, like
an 1176?
Better yet, why can’t one single compressor mimic *all* of those wildly
differing compressors doing their compression tricks, and do so with
such precision that even a veteran recording engineer would have
difficulty telling the results apart in a blind a/b test?
Behold UBK’s shamelessly self-serving claim #327: the Tweaker can
replicate, with extraordinary authenticity, all of the above
compressors doing the things they do best; it can also do a lot of
things none of them can.
Conventional wisdom generally holds that a VCA compressor without
transformers has one ‘style’ of grab (popular descriptors are snappy,
punchy), while an opto with tubes and transformers has quite
another style of grab (musical, silky); more importantly, conventional
wisdom also holds that ne’er the twain shall meet.
On the flipside, almost every guy I know who not only designs
compressors but also understands compression (trust me, that
second camp is a lot smaller than the first) will acknowledge that the
largest factor *by far* in determining how a compressor responds
to, grabs, and releases a signal is not the vca/fet/vari-mu gain
reduction topology, nor is it the transformer-transformerless-ic-
based-discrete inputs and outputs. What makes the biggest impact
on how a compressor behaves is the part that’s least talked about
and least understood by non-designers: the detector.
The detector is the part of the compressor which ‘hears’ the signal to
be compressed; if you change how the compressor hears, you
change how the compressor responds.

2
Armed with that understanding, my mind slowly began to form the
question whose answer is at the heart of the Tweaker: what if a
compressor offered so much control over its detector that it could,
with a little patience and exploration, be made to replicate the
*behavior*, if not precisely the tone, of scores of compressors doing
innumerable styles and degrees of compression? Better yet, what if
it could do so using existing, affordable, and (in many cases)
outmoded analog technology that had been abandoned by modern
designers in the often dogmatic pursuit of lower noise, lower
distortion, and wider bandwidth?
So I set about creating the ‘detector of my dreams’, and in the process
also made the ‘VCA of my dreams’. Most modern VCA compressors
use the same all-in-one detector and vca chips made by the same
manufacturer, Tweaker’s detector and VCA were custom designed
from the ground up. Having those key parts of the circuit built from
scratch using allowed me to spend countless hours with the Tweaker
sitting side by side with the coolest compressors on the planet,
massaging the circuit until I could get my baby to smooth a vocal
like an LA-2a and suck a drum loop inside out like a Distressor. And
I wasn’t looking for ‘pretty close’, I was looking for ‘so close most
engineers would be shocked to know they were done by completely
different compressors.’
Tweaker is an entirely new animal, and the controls that let you cop
the best tricks from other smashboxes also let you go way beyond...
and I do mean *way* beyond. While it’s a bit cliché, it’s also true:
some tools are only limited by your imagination. Tweaker is one
such tool.
So fire it up, dig in, and enjoy.
-Gregory Scott | ubk

3
Part Two: Tweaker Specs
aka Just the Facts
• Mono Compressor, Stereo Linkable via TRS-TRS
• Balanced Input & Output via XLR & TRS
• Sidechain Shaper®with Extensive Detector-Path Filtering
• Additional External Sidechain Insert via XLR
• Tri-Metering®for Simultaneous Input, Output, & Gain Reduction Monitoring
• Freq Response 10Hz-22kHz +/- 1dB
• THD = 003% - 10% (translation: a little or a lot)
• Bespoke, Discrete-Transistor VCA
• Bespoke RMS Detector
• Mix Control for Parallel Compression
Part Three – Front Panel Layout
Aka Why Does it Look Like This?
In addition to being freakin’ gorgeous, Tweaker’s extensive front
panel controls are purposefully divided into 3 sections, each of
which corresponds with the 3 critical signal paths inside the
compressor:
I. Audio Path: in the left-most group of controls you’ll find Drive,
Mix, and Output knobs, which let you adjust the various levels of
audio passing through the Tweaker.

4
2. Sidechain Path: the middle group of controls contains the
Threshold and Contour knobs, plus the Sidechain Shaper switch.
This powerful trio lets you tell the Tweaker when, where, and why to
compress, respectively.
3. Detector Path: the right-most group of controls contains the
Attack, Release, and Curve knobs. Collectively, this is where you
tell the Tweaker how to compress.
Part Four - Tweaker In Depth
Aka What Do All These Knobs Do?
Drive
Truth: Drive dictates the amount of gain pushed out of the VCA. Less
drive = less distortion, more drive = more distortion. Because of the
signal flow, this distortion is mitigated during the attack phase of
compression, resulting in clearer, less distorted transients.
Hype: With most compressors, we’re given one choice: turn the
amount of compression up or down. If we’re really lucky, we’re able
to adjust the amount of distortion and compression simultaneously
via an Input level control. In the first scenario, distortion is what it is,
and compression is the goal. With the second choice, more
distortion = more compression, and vice versa, and that’s that.
Because I’m equal parts ‘unapologetic snob’ and ‘restless artist’, there
are many times when I find those two rigid choices overly restrictive
and a good deal less than inspiring. Thus, from the depths of my
neurotic studio meanderings was born the Tweaker’s inimitable
Drive knob. Drive is designed to give you complete control over the
amount of saturation and/or distortion you get, and to do so

5
regardless of the amount of compression being applied with the
Threshold control.
Conceptually, this is a small step forward for compressor technology –
what the design world calls a ‘soft innovation’. In practice, I believe
Drive’s implementation places this box in another universe entirely
when it comes to shaping the energy and impact of sound.
When turned fully counter-clockwise, Drive significantly attenuates the
input signal, thus increasing available headroom inside the circuit
and reducing overall distortion. You can definitely get some filth
out of this box, but you don’t have to; at its cleanest, the Tweaker
runs at .003% THD, making it one of the cleanest compressors
around.
Here’s a simple chart that will either clarify or confuse the issue for
you:
Low
Threshold
High
Threshold
Less Drive
Clean
Compression
Little to No
Processing
More Drive
Dirty
Compression
Sat / Distortion
Little to No Comp
Turning the Drive knob clockwise slowly increases the levels of --- and
therefore the distortion produced by --- the amps that are fed by the
discrete transistors in the VCA. Generating the dirt inside the VCA
is a very different approach from most other boxes, which distort
either the input or the output stages. For starters, this VCA uses
shamefully outdated technology, and I like the grind it produces –
it’s a very dry 70’s kind of grunge.

6
But beyond that, I made the circuit this way in order to solve what is,
for me, a constant problem I have in the studio: distortion sounds
cool, but kills transients. Compressing a distorted signal results in
lots of flavor and zero punch.
Think for a second about what a VCA does: during compression, the
VCA is lowering the signal level by an amount reflected in the Gain
Reduction meter, then restoring it. Here’s the trick: if a VCA is
overloaded and distorting, and then for a split second is asked to
do, say, 8dB of reduction on your drum buss, for that split second
the level produced by the VCA is reduced by 8dB… which reduces
the distortion it generates. So the Tweaker’s distortion is ‘cleaned
up’ in direct proportion to the amount of compression being
applied, which means you can grunge up your drums but still have
the transient punch come thru; or, add some grit to a vocal, but not
have the loudest parts degrade into unintelligible fuzz.
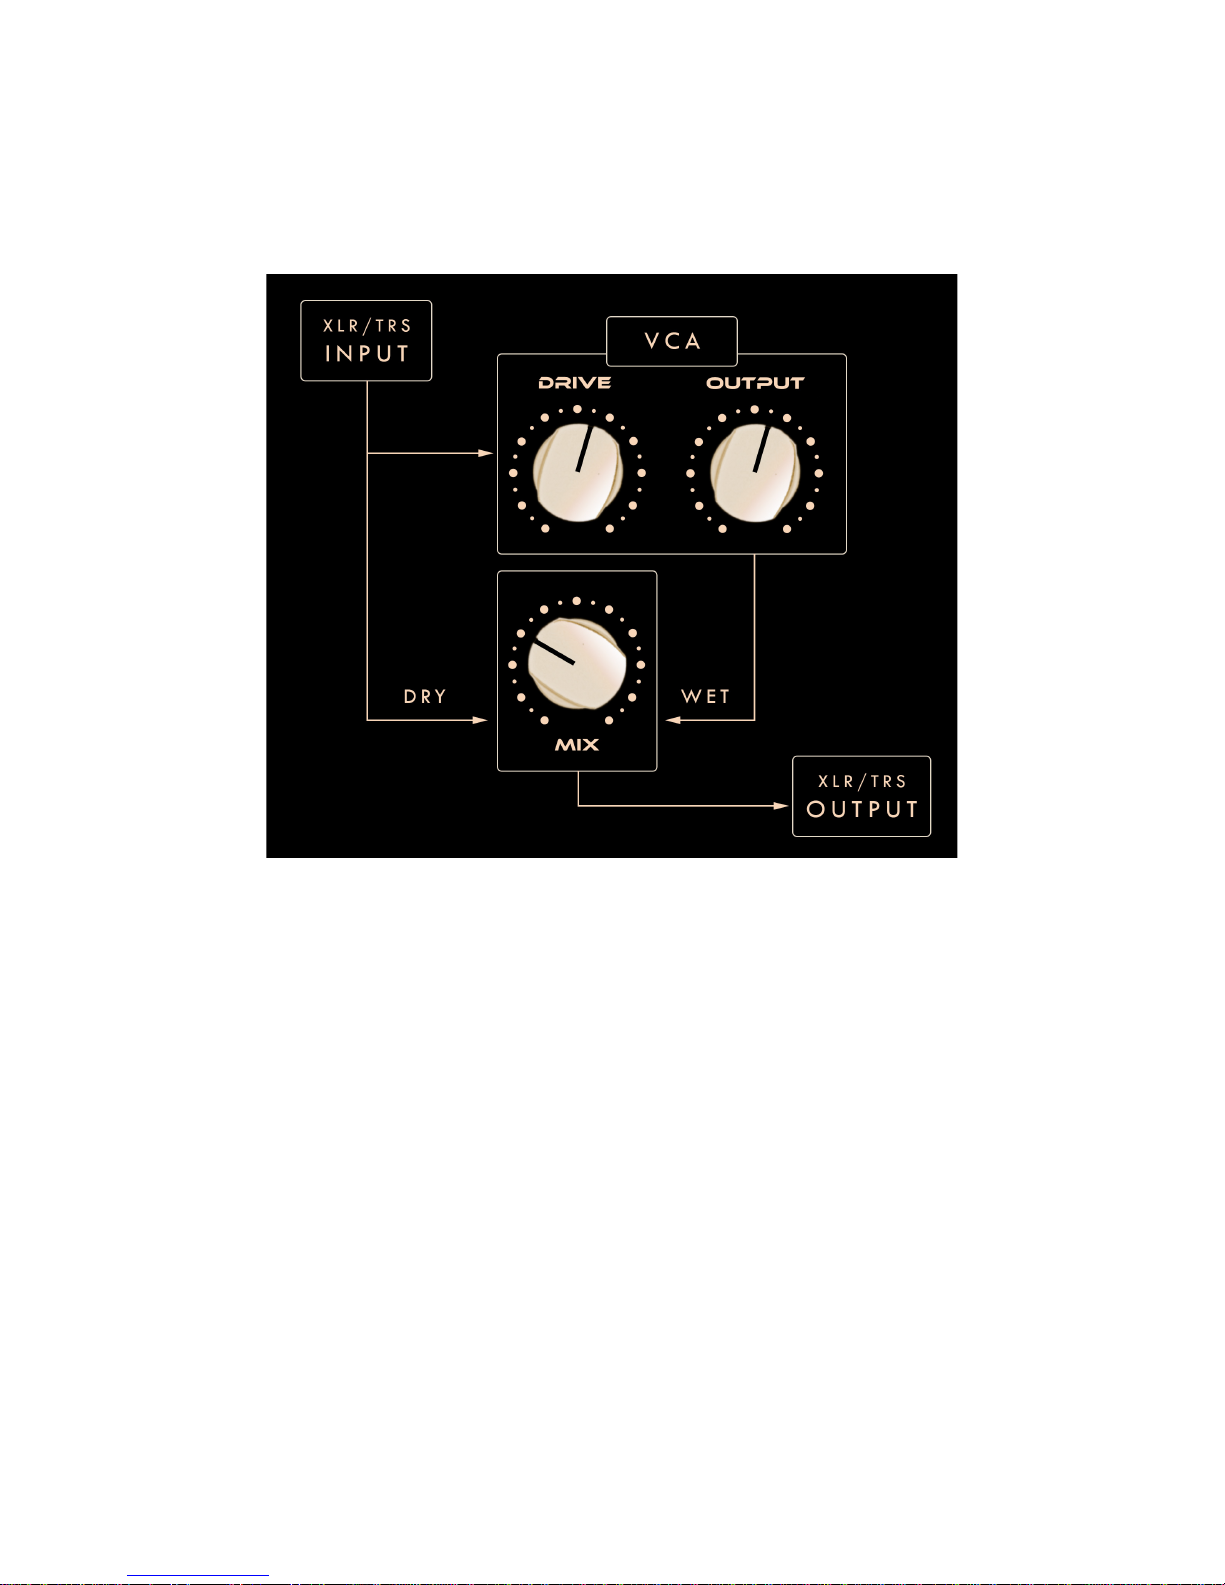
Mix & Output
Truth: Mix blends the unaffected Input signal with the post-VCA
compressed signal. The range is 100% dry to 100% wet. Output
controls the level of the VCA’s output, prior to the Mix control.
Output can attenuate or boost the signal by +/- 20dB.
Hype: Tweaker’s Mix & Output controls were designed to work
together to give you simultaneous control over both the relative and
absolute levels of your Wet and Dry signals. This amount of control
comes at a slight cost, namely: it is a slightly complex scheme that
takes a few minutes to get your head around how it all works. But
once you do, you again find that you have more control than more
conventional parallel compression designs.

7
Even the simplest signal flows can be confusing, so let’s take a
closer look to make sure you get the most out of the Tweaker’s
unorthodox approach to parallel compression.
On the Mix control, counterclockwise is your Dry signal, at unity gain,
straight off the Inputs, untouched by any further circuitry. Clockwise
is the signal post-VCA, and therefore post-
saturation/distortion/compression.
Output controls the output of the VCA, and therefore the level of Wet
being fed to the Mix knob. It’s job is to restore level that’s been lost
due to compression, so that you can achieve a good balance with
the Mix control. If it were otherwise, you would always have the Mix
control heavy clockwise as the compressed Wet signal would be
significantly quieter than the Dry signal and there’d be no way to
compensate for that.
NOTE: It is critically important to understand that the Output control
does not adjust the overall output level of the compressor. If you
find that you want more overall output from the Tweaker but do not
wish to change your Wet/Dry relationship, turn the Output control

8
up and turn the Mix control down by the same amount. This will
increase the level of Output from the VCA and increase the amount
of Dry signal that’s mixed with it. Conversely, if you want less
overall level coming out of the Tweaker and wish to preserve the
Wet/Dry balance, turn the Output down and turn the Mix knob up.
What could be simpler? Wait, don’t answer that!
threshold
Truth: This controls sets the level at which compression will begin. If
you want more compression, turn this knob clockwise. If you want
less, turn it counterclockwise.
Hype: At last, a truly simple, straightforward control!
over-threshold led
Truth: This LED illuminates when the incoming signal crosses the
Threshold, and it stays illuminated until the signal drops below
Threshold.
Hype: This amazing little light lets you know the instant your signal
crosses the threshold, enabling you to see where compression
actually begins, long before it accumulates to 1dB ( the bottom-
most LED on the Gain Reduction meter). The Threshold LED also
shows you precisely where your signal drops back below threshold,
but the best part is that it does these things independent of the
attack and release controls.
Being able to see when a signal crosses Threshold before Gain
Reduction accumulates, and being able to see when it’s dropped
below threshold even though compression is still occurring (because
the VCA is still releasing)… this is another one of those deceptively
simple things the Tweaker does that can end up taking on a life of
its own in your workflow, if you know how to leverage its
capabilities.

9
For starters, in the case of low-ratio/high-threshold compression –
often found in mix bus and mastering applications – you will find this
LED is capable of teaching you to hear incredibly light and
transparent forms of compression that you might otherwise miss if
you were looking to the Gain Reduction meter to cue your ears to
the compression.
Conversely, if you have high ratio limiting coupled with a high
threshold, the Threshold LED can train your ear to hear the subtle
shaving of transients that occur with tiny amounts of limiting which
still fall short of 1dB.
When you want to go beyond subtle transient reshaping and into
heavy-handed density control and groove management, the
Threshold LED is a formidable ally in the shaping of not only your
levels but also the movement of the sound. It can help you to set
the Threshold at a point where the transients are musically dipping
below, and then knocking back up against, the knee of the
compressor. In the process, you can see how how your signal will
stay buried in compression regardless of the release.
Getting this LED to dance in time with your groove is often a great
starting point for reshaping the movement of a drum bus,
percussion track, acoustic guitar track, vocal…
I could go on endlessly about the uses for this light, but I’ll end with
one last gem: when two Tweakers are linked on stereo instrument
and mix busses, the Threshold LED’s are still independent, and
therefore will show which side of your program is causing both
channels to compress, and when they’re doing so. This can reveal
energetic imbalances in your mix; by no means are imbalances a
bad thing, but sometimes they’re unintentional and sometimes they
signify problems which, if addressed, result in a clearer, tighter,
possibly even wider-sounding mix.

10
Contour®
Truth: Contour is only active when ‘Edge Contour’ is selected on the
Sidechain Shaper.
Hype: Edge Contour is one of the coolest controls any compressor
has ever sported; see next section for additional hype.
Sidechain Shaper®
Truth: Sidechain Shaper offers an array of on-board filters that are
automatically inserted into the Sidechain of the Tweaker.
Hype: Of all the extraordinary capabilities the Tweaker exhibits, the
Sidechain Shaper is arguably the most powerful and transformative.
If I can offer this way of looking at things: the Drive, Threshold,
Attack, Release, and Curve controls, both individually and
collectively, let you dictate when and how the Tweaker compresses.
But the Sidechain Shaper lets you dictate why the Tweaker
compresses, or perhaps another way of looking at it is that you now
have an unprecedented level of built-in control over which parts of
the signal the your compressor pays attention to, and which parts it
ignores.
In short, with a little studied practice, you can get the Tweaker to hear
the way you hear, and to focus on the aspects of the sound you
want it to focus on. The impact this has on your ability to sculpt the
compression cannot be overstated.
If you’ve ever patched an eq into the sidechain of a compressor, or
keyed a bass track or entire mix to the kick drum, then you
understand what the Sidechain Shaper does. Essentially, it has
various filters that eq the detector path of the compressor but not
the main audio path, so the compressor reacts to your input as if it
were completely different than it is. But to do what the Sidechain
Shaper’s ingenious bank of filters does, you’d need a spare pair of
gentle outboard HPF’s at 60Hz and 300Hz laying around. You’d
also need an eq that has a 600Hz high shelf and 4k low shelf which

11
move in simultaneous opposition to one another (i.e., one goes up
while the other goes down). And finally, you’d need an extra
Clariphonic laying around, set to Shimmer, with the Full Frequency
Switch in Bypass… and you’d need all of those eq’s patched in and
ready to go at the flick of a switch.
Since many of those filters don’t actually exist in the analog domain,
and since an attempt to replicate them with plugins would eat 2
extra i/o on your converters and mandate that you somehow
eliminate all latency to and from your DAW, odds are extremely
high that there is no way you can do what the Sidechain Shaper
does regardless of how exotic or capable your system is, and there’s
definitely no way you’d have this kind of power effortlessly within
reach at all times, all at your fingertips.
60Hz HPF
The 60Hz HPF is nothing new, in fact it’s a time honored filter which
allows the compressor to ignore subs, thus restoring punch while
applying compression on a kick, bass, drum bus, or full mix. Use it
anywhere you want the Tweaker to ignore the extreme bottom end
when doing what it does.
300Hz HPF
The 300Hz HPF is a very special filter, and is much higher than the
HPF’s you’ll find on other analog boxes. Indeed, its inspiration
came from the UBK-1 plugin, which has a variable HPF that sweeps
up to 500Hz, but which I consistently found myself setting around
300Hz for things like intimate male vocals, acoustic guitar, fat synths
pads and stabs… basically any sound with a lot of body that can
easily swamp a compressor.
Anywhere you want the low-mid warmth and fullness to remain
relatively unsquozen while controlling the midrange frequencies and
up, this filter is the ticket. Try it on full mixes too, where it can allow

12
you to compress more assertively without causing the mix to choke
or feel congested.
Treble Smash
Treble Smash is what you get when you stick a Clariphonic in the
Sidechain Insert, set it to Sheen, and bypass the Full Frequency. On
one particularly experimental day when I was patching various weird
things into the sidechain of an early Tweaker prototype; at some
point the Clariphonic at the top of my rack caught my eye, and my
world has never been the same since. In that moment it occurred to
me that since the Clariphonic has the ability to lift up the top in ways
no other eq can do, inserting one into the sidechain of the Tweaker
would likewise allow it to press those high frequencies back down in
a way no other compressor could.
Not only was my hunch correct, the resulting effect vastly outstripped
my expectation. Used subtly, Treble Smash produces an effortless
softening and thickening of the top end in a way that is
extraordinarily similar to analog tape; there are no transient clicks,
no strange pumping, just a gentle, round flavor of density. If you
really dig in, you get something more akin to the extremely distinct
and recognizable sound we’ve all come to expect from FM radio; it’s
at once shiny, present, and smooth.
Treble Smash can rescue brittle acoustic guitars, screechy or honky
vocals, brash overheads… anything where the upper mids,
presence, and treble bands are attacking the ears, it will subdue
them resoundingly. It can also take tambourines, shakers, rimshots,
and other overly-fast sounds and turn them into pure liquid,
rounding out not only the transients but also the groove itself,
spreading the pocket deeper and wider.
It’s an effect you’ve likely never had access to before, so my
suggestion is to spend some time getting to know it on all kinds of
sources and material. Experimentation is likely to produce big
rewards.

13
Edge Contour
The Edge Contour is, for me, the control that puts this machine over
the top in terms of flexibility and versatility. The concept is
straightforward enough: straight up at 12 o’clock, the sidechain is
unaffected and the compressor behaves the same as if the
Sidechain Shaper were set to ‘Flat’. As you turn the knob
counterclockwise, Tweaker becomes more and more responsive to
low mids and bass, and less responsive to mids and treble.
Conversely, as you turn the knob clockwise, Tweaker becomes more
responsive to mids and treble, less responsive to low mids and bass.
Tweaker achieves this by chaining a high shelf and a low shelf
together, and moving them in opposition to one another; as one
shelf goes up, the other goes down. It’s a trick that’s been used in
the tone stacks of guitar amplifiers for more than half a century; I’m
glad to be the first to stick it in the sidechain of a compressor,
because it’s usefulness is nothing short of remarkable.
Lately I’ve become addicted to reaching for Edge Contour when I
want to ‘regroove’ a drumbeat in extremely specific ways; one of my
favorite uses is to take an otherwise flat or ‘heavy’ beat and pull the
hi-hats upwards on the ‘and’ (as in the eighth notes denoted by one-
and-two-and-three-and-four-and). I’ll turn the Contour knob heavily
to the left to focus the Tweaker on the low end, then define the
degree of hat snap by massaging the attack until the beat is
pumping upwards with a strong ‘chik’. I’ll then take that
exaggerated counter-rhythm and blend it back in parallel with the
Dry signal until it sounds like the drummer was playing a totally
different groove altogether. Depending on the time constants and
degree of blend, it won’t even sound compressed, just tightened
and reshaped. A faster Attack and heavier Mix will tighten and
regroove in one stroke.
Twisting Edge Contour to the right is a lovely way to move into mid-
and high-frequency specific compression in a way that’s more subtle
and broadband than Treble Smash. You can tailor the amount of

14
smoothing on the honky part of a vocal in relation to the sibilants, or
growl on guitar vs. the hash, or the bite of a VI synth vs. the fizz.
Edge Contour is also killer on a mix, as you can dial with extreme
specificity how much low end ‘pump’ you want the compressor to
impart in relation to the mid and high frequency glue. I often like it
two or three ticks to the left, getting the Threshold LED to flicker
with the transients, then massaging Curve and Release until things
are swinging juuust right.
Attack
Truth: Attack determines the speed with which Tweaker applies its
Gain Reduction, with a range from 20 microseconds to 70
milliseconds.
Hype: Tweaker doesn’t reinvent Attack, but it does offer a new
experience of the animal by significantly expanding its range
outwards in both directions. On the fast side it’s absurdly fast – 20
microseconds at its fastest --- but it balances that aggressive
capability with a downright leisurely 70 milliseconds at the other
extreme.
In practical terms, this means the Tweaker is capable of shaving all the
transients flat, or letting all of them thru with a satisfying degree of
impact & transparency.
For those used to defaulting to slow-attack / fast-release compression,
you may find that the slowest attack is a lot slower than you’re used
to, and setting it somewhere between noon and 3 o’clock produces
more familiar results.
As with all controls on the Tweaker, each click makes a meaningful
difference to the sound, so you won’t be struggling to hear what this
thing is doing as you step thru the options; on the flipside, each
increment is close enough to the adjacent steps that you can find
pretty much any degree of transient snap you’re looking for.

15
Release
Truth: Release determines the speed with which the Tweaker reverses
the Gain Reduction and restores your signal’s level. The range is
20us to 500ms in a single stage, or 500-7500ms in two stages.
Hype: Of all the controls on a compressor, it seems to me that
Release has traditionally been the least sexy and most underrated of
all. If I have my way, the Tweaker is going to change that forever.
To be fair, the fact that Release is generally overlooked is
understandable enough; since compression is, in the current world
of music production, generally used in very audible ways to create
large-scale changes in the texture, density, and energy of sounds,
the modern engineer’s mind is captivated by thoughts of fast
Attacks and high Ratio’s.
But once you go beyond thinking of compression as ‘dynamics
control’ and start thinking of it in terms of ‘movement’, Release
quickly steps to the front as the control to keep your eyes (and ears)
on. The more time I spend picking the brains of the masters of this
craft, and the more time I spend parked between high resolution
monitors, the more I’ve come to understand that nothing offers as
much power over the ability to define (and re-define) the sound’s
groove as the humble Release control.
Armed with that understanding, I wanted Tweaker’s release control to
offer the operator new inroads into truly new territories. On the first
two prototypes, the Release ranged from 100ms to 1500ms, and I
kept coming up against the reality that the fast wasn’t fast enough,
and overall the whole affair wasn’t ‘interesting’ enough, to give me
access to all the flavors of movement that spark my creative drive.
‘Not fast enough’ was a simple matter, I just made it faster by
changing the timing capacitor inside the circuit. ‘Not interesting
enough’ was a whole different animal entirely, one which required a
more philosophic approach to what I wanted to hear, and why. At
some point, for reasons I still cannot explain, I began to fantasize

16
the wicked grab of the Tweaker’s VCA married to the spongy,
unfailingly musical release of my (vintage, hot-rodded) LA2a.
The rest, as they say, is history, and the result is available with the
press of Tweaker’s Fast/Dual switch. Fast is the same as any other
compressor with a variable release: it is linear in nature, and behaves
much as you would expect. Dual, however, is a very special mode
that gives the Tweaker the same 2-stage release found in LA2a’s.
What that means is that the Tweaker will release the first 50% of
gain reduction very quickly, and the second 50% much more slowly.
This is how LA2a’s are able to be effective at being both fast and
transparent when peak limiting; they grab the really loud stuff very
fast and let it go very fast, but they ‘ride’ the more average-level
part of the program more casually, and it’s that second, slower
stage that allows it to remain musical and gentle even when doing a
lot of gain reduction.
But where the LA2a’s releases are fixed, an inherent byproduct of the
photosensitive cell that reads the music’s energy, Tweaker’s second
stage is fully variable and corresponds proportionally to the first
stage. So the more you turn the knob clockwise, the slower both
stages become. At it’s slowest, the Tweaker will take over 7
seconds to fully release its gain reduction. Coupled with the slowest
attack, Tweaker may well be capable of applying the slowest
compression anywhere.
To be clear, there’s a lot more at stake here than artfully squeezing a
vocal, bass, guitar, or anything else that LA2a’s famously squeeze so
well. In practice, you will find the Dual release to be an
extraordinary tool for a shockingly tight, ‘bone dry’ style of
compression that no other compressor I’ve ever used can do with
such finesse and flexibility. I’m constantly amazed at how heavily I
can lay into a sound when the Dual stage is active, and the result is
both uncannily transparent and improbably firm. On drums it’s a no
brainer, delivering one of the punchiest flavors of smack I’ve ever
heard. But try it on unruly vocals, stabbing synths, basses of all ilk…
it really is a whole new world to explore, one which still manages to
surprise me in all the best ways.

17
Curve
Truth: Curve controls both ratio and knee simultaneously.
Counterclockwise is 2:1 soft knee, clockwise is 30:1 hard knee.
Hype: Lots of compressors have a control to adjust the ratio of
compression. Very few compressors have a control to adjust the
knee of the compressor. And to the best of my knowledge, only
one compressor on the planet has one control to adjust both the
ratio and the knee, simultaneously: yes, that’s right, the Tweaker has
just such a control, and it’s called ‘Curve’.
Curve starts off low and gentle, with a relaxed 2:1 ratio that is applied
with a soft knee. As you turn it to the right, the ratio gets
progressively higher, and the knee gets progressively harder. At full
clockwise rotation, Curve control produces an aggressive 30:1 hard
knee limiter that grabs with a ferocity that very few other
compressors have ever been able to achieve, and certainly not with
the degree of control and flexibility that the Tweaker possesses.

18
Part five - the tri-meter®
Aka So many pretty lights!
More than any other feature, the Tweaker’s Tri-Meter sets it apart,
both visually and functionally, from every other analog compressor.
As functional as it is beautiful, this meter array allows you to
visualize, simultaneously and at-a-glance, the levels of your
unprocessed Input signal, the Tweaker’s Output, and the amount of
Gain Reduction. I’m not aware of any other hardware unit that
allows for such easy reference to everything that’s going on with the
signal.
Several key aspects make Tri-Meter a thoroughly modern tool. First,
rather than the traditional/universal ‘bar graph’, Tweaker’s Gain
Reduction meter uses a Single Point Array®. That means only one
LED is lit at a time, creating a highly visible, singular dot that dances
up and down in time with the compression itself.
In practice, you’ll find that the Single Point Array makes it incredibly
easy to perceive the ‘movement’ of your gain reduction. In
particular, using this meter every single day for months on end has
caused my ears to become deeply sensitive to how the
compressor’s Release time affects the ‘swing’ of the groove, and
also the ‘dry’ vs. wet’ quality of the compression, and (coupled with
the attack) the transparency vs. audibility of the entire affect being
applied.

19
Over the years, I’ve found that the presence of numbers on a Gain
Reduction meter somehow discourages people, however subtly,
from applying “too much” compression. Since my own artistic bias
is to simply listen and go with what feels right, I have --- probably to
the great consternation of many --- left dB values off the meter. But
for those interested in what each LED actually represents, here’s the
breakdown:
Moving on to the humble Input and Output meters, even these have
received a bit of a philosophical overhaul. In my humble opinion,
the traditional design of meters contains a bias against distortion, a
bias I don’t share. More than that, the levels they report are rooted
in a thinking that dates back to the habits and practices of recording
to analog tape. I understand why, I’m an avid tape lover myself and
have 2 machines that are central to the artistic side of my musical
endeavors.
But most engineers today, especially those who began engineering in
a DAW, think almost exclusively in the dBFS scale, where 0dB is an
absolute ceiling. Beyond that 0dBFS celing there are no more
dynamics, only hard-clipped distortion, and below that 0dBFS
ceiling you’re mostly in the clear. But analog gear is different than
digital gear because it can begin to distort long before the hard-clip
ceiling is reached.
And so it is that most digital meters don’t show red until you’re very
close to 0dBFS, which makes sense. The only trouble is, most
analog meters show red anywhere from 14-20dB lower than 0dbFS,
because that’s where many analog designs begin to run out of
headroom and slowly begin distorting.
With all of this in my head, I decided that the Tweaker’s Input and
Output meters--- much like the Gain Reduction meter --- would not
be labeled with any dB value, and in fact do not obviously indicate
any specific level at all. To be clear: these meters very much do
represent specific levels, but I left the scales off the front panel
because I wanted to present several reference options in the
manual, depending on your recording rig’s a/d calibration level,
Table of contents
Popular Air Compressor manuals by other brands

Emerson
Emerson Copeland Scroll ZBKC Application guidelines

Clarke
Clarke COUGAR 25 Operation & maintenance instructions

Kingsley
Kingsley Bushranger RV AIR owner's manual

Heyner
Heyner MaxxAir Pro instruction manual

Sparmax
Sparmax AC-500 user manual

Corken
Corken D Series Installation, operation & maintenance manual

Alsafix
Alsafix ALAIR 60/310 User manual and spare parts list

Mouvex
Mouvex 15L quick start guide

Craftsman
Craftsman 921.16475 owner's manual

Schneider Airsystems
Schneider Airsystems UNM 660-10-90 DX Original operating manual

Sealey
Sealey SAC10030VE.V2 quick start guide

Emerson
Emerson Copeland Scroll ZP K6 Series Bulletin