KUVING M1 User manual

'LIFE TASTES GOOD'
A GLOBAL COMPANY
JM1.ⓛ.2-130830M
M1
MANUAL
KUVINGS
• After you read this manual,
keep in the place you can reach easily.
• The color of product may vary.
•
Household use only.
EN
CE
LT

3
ㆍThis appliance is for household use only. Please carefully follow the instructions in the manual.
(The appliance cannot be covered under the manufacture warranty if the product is abnormally or commercially used.)
ㆍSave the instruction manual for future reference
ㆍIf the appliance is given away as a gift, please include the manual with the product.
The following precaution is provided to ensure the safety of the user. Please carefully read through the pre-
cautions and exercise a degree of care when using the appliance.
Warning : Warns risk of death of severe injuries.
Caution : Warns risk of injuries or appliance damage.
Prohibited
Follow instruction
Unplug from the outlet
Do not disassemble
Must take action
Be cautious of electric shock
Read all instructions before use
When using electrical appliances, basic safety precautions should always be followed
including the following:
1. Read all instructions.
2. To protect against risk of electrical shock do not put motor or base of unit in water or other liquid.
3. Close supervision is necessary when any appliance is used by or near children.
4. Unplug from outlet when not in use, before putting on or taking o parts, and before cleaning.
5. Avoid contacting moving parts.
6. Do not operate any appliance with a damaged cord or plug or after the appliance malfunctions, or is dropped
or damaged in any manner. Return appliance to the nearest authorized service facility for examination,
repair or electrical or mechanical adjustment.
7. The use of attachments not recommended or sold by the manufacturer may cause re, electric shock or injury.
8. Do not use outdoors.
9. Do not let cord hang over edge of table or counter.
10. Always make sure juicer cover is clamped securely in place before motor is turned on. Do not unfasten clamps
while juicer is in operation.
11. Be sure to turn switch to OFF position after each use of your juicer. Make sure the motor stops completely
before disassembling.
12. Do not put your ngers or other objects into the juicer opening while it is in operation. If food becomes lodged
in opening, use food pusher or another piece of fruit or vegetable to push it down. When this method is not
possible turn the motor o and disassemble juicer to remove the remaining food.
13. Do not use the appliance if the rotating sieve is damaged.
14. When a separable pulp container is provided, Do not operate without the pulp container in place.
15. Please do not alter the appliance in anyway.
16. Do not use the appliance for anything other than its intended purpose as described in the manual.
17. The appliance should be used for limited period of time.
EN
Read all instructions before use
Safety Warning
Safety Caution
Parts
How to Assemble
How to Operate
Tips on Operation
Tips on Ingredient Preparation
How to Disassemble and Clean
How to Clean Silicone Parts
OPTIONAL | How to Use the CleaningTool
Troubleshooting (Q&A)
Specication
03
04
05
06
08
10
12
14
16
18
19
20
22

5
4
Safety CautionSafety Warning
Do not plug multiple power cords on a single outlet during operation.
→It may cause and explosion or re.
Do not touch the power cord with wet hands.
→It may cause electrical shock.
Do not repair, disassemble the base, or customize the appliance.
→The appliance may not operate properly causing re, electrical shock, or injury.
Do not put the parts in the dishwasher or extremely hot water.
→The parts may wear faster.
Do not use the appliance on an uneven surface.
→It may cause a malfunction if the appliance tips over.
To protect the power cord, please do not aggressively bend or put heavy
object on top of the power cord.
→It may cause short circuit or even re.
Keep away from children and store the appliance in a safe place.
→If may cause injury.
Please do not store or operate the appliance nearby heating appliance.
→The appliance may become discolored or deformed.
Do not use any hazardous chemicals to clean the appliance or spray am-
mable sprays near the appliance.
→It may change the color of the appliance or could result in a re.
Use a dry towel to clean the power cord if it is dirty or wet.
→It may cause electrical shock or le
Do not drop the appliance nor inict strong force to the appliance.
→It may damage or break the appliance.
Do not unplug by pulling o the power cord cable.
→It may damage the power cord and cause electrical shock.
Do not put your nger or other objects into the feeding tube while it is in
operation.
→If may cause injury.
Do not leave the appliance unattended. Unplug the power cord from the
outlet when not in use.
EN
Operating the juicer without ingredients can cause damage to the screw.

7
6
* The products illustrated/photographed in this booklet may vary slightly from the actual product.
Parts
Align the red dots ●on each part and
assemble in the order shown. Once
assembled, turn the drum lid clockwise to
close.
STEP 1
Top-set Assembly
STEP 2
Top-set and base assembly
2. Drum Lid
4. Pulp Cup
3. Juicing Bowl
6. Juice Cup
5. Smart Cap
7. Base
1. Hopper
10. Juicing Screw
9. Strainer
11. Pusher
8. Rotation Wiper
12. Cleaning Brush
Detachable
+
+
+
+
+
EN
Assemble the entire top-set onto the base
ensuring the arrow symbol ▼on the drum
lid is aligned with the arrow symbol on the
base.Turn the top-set clockwise ensuring the
arrow symbol ▼is aligned with the arrow
symbol .

9
8
How to Assemble
Firmly insert the compression silicone into the
slot below pulp spout.
The Juicer may leak if not assembled properly.
Note The juicing screw needs to be locked in its place in
order to close the drum lid.
Note
The
o
r
d
STEP 1
/ Top-set assembly
STEP 2
/ Top-set and base assembly
Assemble the strainer into the rotation wiper then
place this assembly in to the juicing bowl ensuring
the red dot ●on the strainer is aligned with the
red dot ●on the juicing bowl.
Place the juicing screw into the strainer. Turn and
press down on it until it clicks into place.
Place the drum lid on to the juicing bowl aligning
the red dot ●on the drum lid with the red dot
●on the juicing bowl. Turn clockwise to close
aligning the red on ●on the drum lid with the
close mark .
* The products illustrated/photographed in this booklet may vary slightly from the actual product.
Silicone Ring / Silicone Brush
Silicone parts are able to be washed. Dry the parts
after washing.
→
After cleaning, push in the silicone ring with the
smaller surface facing down.
→
After cleaning insert into the slot with the tail
pointing down as shown in the illustration.
tail
Check before
operating
ㆍWash the parts before rst use.
ㆍEnsure that the compression silicone and silicone ring are assembled properly.
1
2
3
4
Place the pulp cup under the pulp spout and place
the juice cup under the juice spout as shown in the
illustration.
75
Detachable
EN
Place the top-set on top of the base. Align the
arrow ▼on the drum lid with the arrow (open)
on the base then turn clockwise toward the arrow
(close).
The juicer will not operate if not assembled properly.
Note
The
Open/Close mark on the top-set.
6
Open
Close

11
10
How to Operate
EN
If the juicer stops during operation
▶▶▶
ㆍREVERSE: Pushes back up the ingredients to dislodge.
(REVERSE button only works while holding down the switch.)
ㆍSwitch OFF ensuring that the juicer comes to a complete stop.Then press the REVERSE.
(Hold the REVERSE button for 2-3 seconds and release. Repeat as needed)
(Let the juicer stop completely before using the REVERSE button. If not, it may cause the juicer to malfunction)
ㆍIf the juicer still does not work, disassemble and clean the parts before operating the juicer again.
Switch the button to OFF position then press and hold the REVERSE button until the ingredients become dislodged.
Repeat REVERSE - OFF - FORWARD as needed.
4
1 3
2
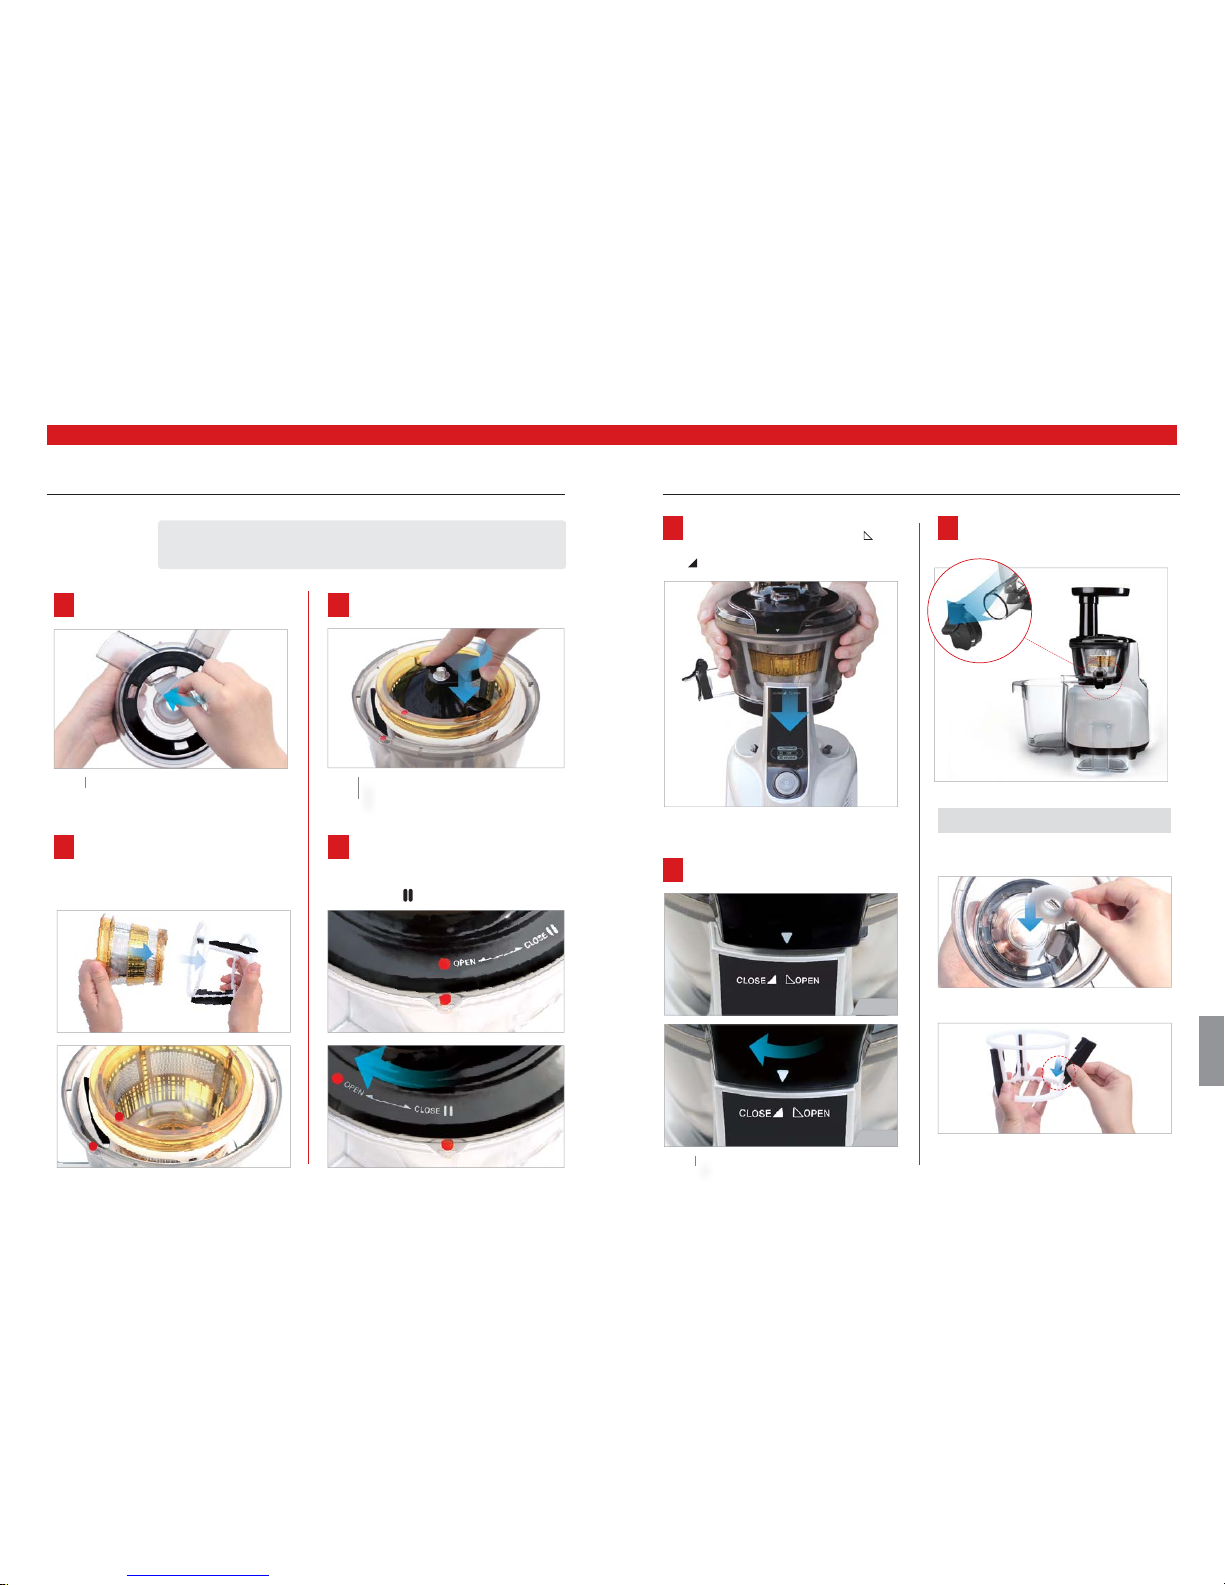
OFF OFFREVERSE FORWARD ㆍ
If the remaining ingredients in the juicing bowl have not been extracted completely, the
drum lid may not open easily. (After each extraction, run the juicer for additional 30 seconds
to let the juicer extract the remaining pulp.)
When the drum lid is stuck, press the REVERSE - OFF - FORWARD button in the order,
switching back and forth 2~3 times to dislodge.Then place your hands on top of the drum
lid and rmly press down as you simultaneously turn the drum lid counter clockwise to open.
※Depending on the ingredients, pour water down the feeding tube to rinse out the interior
of the juicing bowl and then try to take o the drum lid.
After juice and pulp have been completely extracted, switch the unit OFF.
Note
TIP
Note
Use the smart cap to make mixed juice, block juice from dripping,
or rinse between dierent juices.
ㆍ
Juicing with the smart cap closed creates various mixed juice creations with dierent fruits
and vegetables, milk, banana, beans and other ingredients.
ㆍ
After juicing, close the smart cap to stop juice from dripping, especially when disassembling
the juicing bowl o of the base.
ㆍ
When making dierent juices, quickly rinse any left over avors by running a glass of water in
the juicer with the smart cap closed.
ㆍ
Leave the smart cap open when juicing ingredients that often creates foam during extraction.
(e.g. apples, celery)
ㆍ
Pay close attention when operating with the smart cap closed. Juice may overflow if the juice
collected in the juicing bowl exceeds its capacity .
Smart Cap
After preparing the ingredients, plug the power cord into a wall outlet.
ㆍDo not touch the power cord with wet hands. (It may cause electrical shock, short-circuit, or fire)
ㆍPlease check the safety of the wall outlet.
Note
Press the FORWARD button to operate.
ㆍForward: Pulls down and slowly masticates the ingredients.
ㆍReverse: Pushes back up the ingredients to dislodge.
※
If the ingredients become jammed in the screw and the drum lid does not open, press the
OFF button. Then press and hold the REVERSE button until the ingredients become dislodged.
Repeat REVERSE - OFF - FORWARD as needed.
Note
Insert the prepared ingredients into the feeding tube, one piece at a time.
ㆍPrepare ingredients for optimal extraction.
-Tough and brous ingredients: Cut to 1/2-1 inches wide and 2 inches long.
- Fibrous leafy vegetables (celery, kale, collard greens, etc.):
Cut the stems into 2 inches long and bundle up the leafy part as you insert them into the juicer.
- Remove hard seeds or pits in fruits.When juicing frozen fruits, completely thaw before juicing.
ㆍIf large quantity of ingredients are put into the feeding tube, it can cause the juicer to stop.
Insert the ingredients one piece at a time.
Note

13
12
Tips on Operation
Do not put into the juicer
!
Juicer damage due to owner’s negligence to follow the instructions from the manual will void warranty service.
Peaches, nectarines, apricots, plums, papaya, mangoes etc.
Remove hard seeds from the ingredients before juicing.
Hard seeds
Pineapple, melon, watermelon, mango, orange etc.
Peel the skins from the ingredients before juicing.
Hard or
inedible skins
Frozen strawberries, blueberries, raspberries etc.
Completely thaw the frozen fruits before juicing.
Do not use Ice.
Frozen fruits or
ice
Sesame seeds, butter, margarine etc.
Do not extract ingredients with vegetable or animal oil.
This can reduce performance and even damage the juicer.
Vegetable/
animal oil
Coconut, sugarcane, whole grains etc.
Do not extract ingredients with no water content.
Others
The Silent Juicer is an innovative product that uses a patented slow speed
masticating technology to efficiently extract the juice from ingredients.The juicer
is designed to obtain the best result from ingredients with strong composition
and with high water content.
For the best result, each ingredients should be prepared and extracted in various
ways depending on the characteristics and properties.
Experience the best quality juice by understanding each ingredient’s characteristics and
knowing the optimal way of handling the ingredients.
1. Operating the juicer without ingredients can cause damage to the screw.
2. Do not continuously operate the juicer for more than 30 minutes.
This can damage the motor from overheating.
·After continuous use, let the juicer rest for 30 minutes to cool down before starting another session.
3. During operation, do not put spoon, spatula or other objects into the feeding tube.
If other object is put into the feeding tube during operation, such materials can get stuck and damage the juicer parts.
4. Do not put your nger or other objects into the feeding tube other than the provided pusher.
5. Do not put dried whole grains, fruits with hard seeds or ice.
It may damage juicer parts (e.g. juicing bowl, juicing screw, and strainer)
·
Beans or grains can be used if soaked overnight or boiled. Fruits with pits and hard seeds
(e.g. nectarines, peaches, mangoes and cherries) must be pitted before juicing.
When using frozen fruits with small seeds such as grapes, completely thaw before inserting them
into the juicer.
Use of ice in the juicer will decrease the product durability over time.
6. Do not use ingredients with excessive amount of vegetable oil or animal fat.
Do not use the juicer to extract vegetable oil from ingredients.
If vegetable/animal oil gets on the juicing screw, it may reduce performance and even damage the part.
7. Do not reinsert the extracted pulp into the juicer.This can cause the juicer to stop or cause the
drum lid to not open.
8. After juicing ingredients with seeds like grapes, thoroughly clean all the crevice on the bottom
of the juicing screw.
EN

15
14
Tips on Ingredient Preparation
Adjustment of the
amount of pulp in
the juice
Note
Before Operating!
Juice Yield
For the optimal extraction and maximum juice yield, cut the ingredients following
the guides given in this section.
Insert ingredients slowly checking how the ingredients are extracted.
(The juice yield may vary depending on the juicing speed)
When continuous juice, it may contain ne pulp a lot depending on ingredient.
To reduce ne pulp, do extract after cleaning top-set frequently.
ㆍ
If the juicer is jammed or if the drum lid does not open, press the REVERSE button and hold it until
it becomes dislodged. Repeat REVERSE-OFF-FORWARD as needed.
ㆍ
Continue operating the juicer until all the ingredients in the juicing bowl is extracted.The drum lid
may not open easily if there is a lot of remaining pulp in the juicer.
ㆍNote that every ingredient yields dierent amounts of juice.
Hard fruits and vegetables
may put excess strain onto
the motor and cause it to
stall.
Soak in cold water for 3
hours prior to juicing and
cut to appropriate size.
To increase the juice yield,
juice with fruits with high
water content.
Cutting Tip
·Slice the ingredients 1 inch thick or cut 1 inch wide and 2-6 inches long.
·Soak the ingredient like carrots and ginger in cold water for 3 hours prior to juicing.
Extraction Tip
·Slowly insert the ingredients one at a time.
·Pace the juicing speed ensuring each ingredients is thoroughly extracted.
·To increase the juice yield, juice with ingredients with high water content.
| (E.g. carrots, beets, & spinach)
Cutting Tip
· Cut to 8-12 wedges.
Extraction Tip
· Slowly insert the ingredients one piece at a time.
· Use the pusher to push the ingredients down the feeding tube. (It helps with juice spraying out of the feeding tube
when extracting ingredients with high water content)
· Leave the smart cap opened when juicing ingredients that often creates foam during extraction.
(Foams from ingredients can accumulate if operated with the smart cap closed)
· It is recommended to drink the juice within 48 hours after extraction. Depending on the density of the ingredients, the
extracted juice can gradually show layers over time.
· If there are excessive amount of form use mesh strainer to separate foam the juice.
Fruits with seeds must be pitted before extraction.
Cut to 8-12 wedges then slowly insert the ingredients
down the feeding tube.
8-12 wedges
1 inch
6 inch
| (E.g. Carrots &Yacon)
| (E.g. apples, oranges & tomatoes)
Enzyme-rich fruits and vegetables | (E.g. Apples)
It is possible to be occured separated layer/bubble/browning due to activation of enzyme, hence drinking
within a short time is highly recommended.
TIP
ㆍ
Juicing with the smart cap closed allows various mixed juice creations with dierent fruits and
vegetables, milk, banana, beans and other ingredients.
ㆍ
After juicing, close the smart cap to block access juice from dripping, especially when
disassembling the juicing bowl o of the base.
ㆍ
When making dierent juices, quickly rinse any left over avors by running a glass of water in the
juicer with the smart cap closed.
ㆍ
Leave the smart cap opened when juicing ingredients that often creates foam during extraction.
(E.g. apples, celery)
ㆍ
Pay close attention when operating with the smart cap closed. Juice may overow if the juice
collected in the juicing bowl exceeds its the capacity.
How to Use
the Smart Cap
| (E.g. carrots, beets, & spinach)| (E.g. Carrots &Yacon)
Hard fruits and vegetables
The hard type fruits and vegetables such as carrot slice into thin and then extract slowly.
TIP
| (E.g. Carrots &Yacon)
EN

17
16
How to Disassemble and Clean
Note
Place the juicing bowl underneath the running
water and unplug the compression silicone to
clean the pulp spout.
Soak the juicing bowl in a solution of warm water with baking
soda or little bit of bleach to clean the excess build up.
Tip
It is not necessary to completely clean the juicer in
between making multiple juices. When nished with
juicing, disassemble and clean thoroughly.
Tip
Clean the base with soft damp towel and dry.
Remove the juicing screw, stainer and rotation
wiper unit from the juicing bowl. Clean with
provided brush.
Note
Tip
Note
Underneath the running water, clean the out
side of the juicing screw with a dish scrub. Use
the end tip of the cleaning brush to push out
any residue within the crevices on bottom of the
juicing screw.
With the smart cap closed, ll the juicing bowl
with water and turn on the juicer.
After a moment, open the Smart Cap and let
the water run out of the juicing bowl.
* The products illustrated/photographed in this booklet may vary slightly from the actual product.
Turn the drum lid counter clockwise to open.
Turn the top-set counter clockwise and lift o
the base.
Note If the towel is very wet, make sure to squeeze out the
access liquid before using it on the juicer.
After juicing ingredients with seeds, make sure to
thoroughly clean the bottom crevice of the juicing
screw. If this area isn’t properly cleaned, this can aect
the balance between the juicing screw and the strainer
and damage the parts.
ㆍ
Extract all the remaing pulp in the juicing bowl
before stopping the juicer.
ㆍ
For easier clean up, operate the juicer for additional
30 seconds after juice has been extracted.
When the drum lid is stuck, press the REVERSE - OFF
- FORWARD button in the order, switching back and
forth 2~3 times to dislodge. Then place your hands
on top of the drum lid and rmly press down as you
simultaneously turn the drum lid counter clockwise
to open.
Please thoroughly clean the juicing screw under
running water with the cleaning brush.
Completely dry before using ensuring that the juicing
screw is clean without any residue.
ㆍ
Immediately clean the juicer after each use. If remaining
residue in the juicer dries up, it can make disassembling
dicult as well as clean-up.The excess build up can
cause poor performance in future uses.
ㆍ
For easier disassembling, place the top-set in the sink
and run the water down from the top of the top-set.
ㆍ
Thoroughly dry the bottom of the juicing screw where it
connects to the metal cylinder shaft on the base.
Switch OFF and unplug the power cord from the
wall outlet.
Rinsing
1
1 4 6
7
5
2
3
1
2
EN
Note When moving the appliance, do not lift by grabbing
the feeding tube. Always lift the appliance by
grabbing the base or handle.

19
18
Hold the cleaning tool with one hand and insert the
strainer into the cleaning tool.
Under running water, rotate the cleaning tool and the
strainer in opposite directions to clean.
Thoroughly rinse the inside and outside of the
strainer under running water.
After cleaning, remove the strainer from the cleaning
tool. Dry before storing.
Insert the strainer until you hear a click.
Note
Tip
The cleaning tool makes clean-up quick and easy. Completely dry after cleaning.
How to Clean Silicone Parts
Tip
Clean the rotation wiper under running water.
Thoroughly dry after cleaning. Before assembling the top-set, ensure that the compression silicone and silicone ring
are firmly inserted.
Clean and assemble the silicone brush
Clean and assemble the compression silicone
Clean and assemble the silicone ring
Clean and assemble the smart cap
<Silicone Brush>
Pull out the silicone brush from the
rotation wiper to clean
After cleaning insert into the slot with
the tail pointing down as shown in the
illustration.
<Compression Silicone>
Unplug to clean
After cleaning, rmly insert into the slot
below pulp spout.
<Silicone Ring>
Remove the silicone ring from the
juicing bowl to clean
After cleaning, push in the silicone ring
with the smaller surface facing down.
<Smart Cap>
Remove from the juice spout to
clean
After cleaning, attach the smart cap
to the smart cap silicone on the juice
spout.
If the compression silicone and silicone ring are not rmly inserted, juice may leak from the bottom of the juicing bowl.
Note
* The products illustrated/photographed in this booklet may vary slightly from the actual product.
How to Use the CleaningToolOPTIONAL
EN

21
20
ㆍ
When juicing just started, the pulp can be moist.
ㆍ
Depending on the ingredient’s condition, the extracted
pulp can be affected. Especially when the ingredient is
not fresh, the juice can be extracted with the pulp.
■ The extracted pulp is very moist
ㆍ
Ingredients like celery or ginger have long fibers that
can wrap around the juicing screw and effect the juicer’s
performance. When juicing fibrous ingredients, do not
collect more than 1lb of juice. After collecting 1lb of
juice or less clean up the top-set completely before juic-
ing again.
■ Can you juice ingredients with tough fiber?
ㆍ
After juicing, if you do not clean the juicer right away
the remaining pulp inside the top-set can dry up which
can make disassembling and cleaning hard. This can
also effect the juicer’s performance.
ㆍ
Ingredients that are rich in carotenoids such as carrots
and spinach can dye plastic parts. When the parts are
dyed with carotenoids, rub vegetable oil to the dyed
areas and use mild detergent to clean.
ㆍ
The vegetable oil should only be used during clean up
for parts that are dyed with color. Do not use vegetable
oil on juicing screw or the strainer. If vegetable oil or oil
from animal fat gets on the juicing screw or the strainer,
this can effect the juicers performance and could result
in damaged parts.
ㆍ
The silicone pieces on the top-set can be detached so
that they can be thoroughly cleaned.
■ I see discoloration of the plastic parts.
ㆍ
This juicer is designed to juice ingredients like fruits and
vegetables.
ㆍ
Do not use the juicer for extracting vegetable oil.
ㆍ
Do not juice ingredients with high contents of vegetable/
animal oil.
ㆍ
If vegetable/animal oil gets on the juicing screw or the
strainer, this can affect the performance of the juicer and
could result in damaged parts.
■
Can the juicer be used for other purpose
other than juicing?
ㆍ
The juicing screw and the strainer is setup so that as it
cuts and squeezes the ingredients the juicing screw and
the strainer will vibrate.
ㆍ
If the ingredient contain strong fiber, the vibration from
the top-set can be greater.
■ During operation, the juicing bowl shakes
ㆍ
Depending on the density of the ingredients, the ex-
tracted juice can gradually show layers over time. This is
different from oxidation that is caused by juicing with a
traditional high speed juicer.
■ I see separation of layers in the juice
ㆍ
After juicing, let the juicer operate for another 30 seconds
to extract the remaining pulp.
ㆍ
If there is enough pulp within the top-set, this can cause
the drum lid to not open. In this situation, press RE-
VERSE - OFF - FORWARD button in the order, switch-
ing back and forth 2~3 times.
ㆍ
Depending on the ingredients, pour water down the
feeding tube to rinse out the insides, then try opening the
drum lid.
■ The drum lid is not coming off
ㆍ
If the compression silicone on the bottom of the juicing
bowl is not plugged in correctly, the juice can seep out
onto the juicer base. Before assembling the parts together,
check and make sure the compression silicone is plugged
in correctly.
■ There is juice dripping down the body of the base
※Read carefully before contacting the customer support for a service.
■ Hear odd noise from the juicer
ㆍ
Check the power cord and make sure it is plugged in cor-
rectly.
ㆍ
Check if all the parts are correctly assembled.
ㆍ
If you insert too much ingredients at a time, this can cause
the juicer to stop.
ㆍ
When the juicer stops from too much ingredients, press
REVERSE - OFF - FORWARD button in the order,
switching back and forth 2~3 times.
ㆍ
The reverse setting will push back up the ingredients, and
the forward setting will pull down the ingredients.
ㆍ
If the juicer stops due to overload protection, let the juicer
rest to cool off for 30 minutes to 2 hours before you start
juicing again.
ㆍ
If there are hard seeds within the ingredients, please
remove the hard seeds before juicing. Hard seeds can
damage the juicer.
■ During juicing, the juicer stopped
ㆍ
Make sure the juicing screw is pushed all the way in the
strainer in order for the drum lid to close properly.
If the juicing screw is not properly in its position, the drum
lid may not close.
■The drum lid will not close
ㆍ
When continuous juice, it may contain fine pulp a lot
depending on ingredient. To reduce fine pulp, do extract
after cleaning top-set frequently.
ㆍ
Depending on the ingredient, the amount of pulp can vary.
Use a mesh strainer to collect the unwanted pulp in the
juice.
ㆍ
If the strainer and the screw is effecting the juicer perfor-
mance due to damage, it is recommended to replace the
parts.
※
The lifetime of each part may vary depending on use
and ingredients extracted.
ㆍ
If the ingredients are inserted too much at a time and
caused the juicer to frequently stop, this can lead to pulpy
juice. Try inserting the ingredients slowly.
■There is too much pulp in the juice.
ㆍCheck if the power cord is properly plugged in.
ㆍ
Check if the drum lid and the juicing bowl are properly
assembled.
ㆍ
Check if the top-set and the base are properly assembled.
If all the parts are not properly assembled, the juicer will
not operate.
■When there is no power to the juicer.
ㆍ
Different ingredients hold different amount of fluid that
willl yield different amount of juice.
ㆍ
If the ingredients are not fresh, there will be reduced
amount of fluid within the ingredient which will yield less
juice.
ㆍ
Check if the compression silicone is firmly inserted.
ㆍ
If the ingredient itself has low fluid content, it helps to
soak it in the water before juicing.
ㆍ
If the juicing ingredient is small with soft seeds, after juic-
ing few servings can gradually affect the juice yield. For
best result, disassemble and wash the top-set in between
juicing.
ㆍ
If there is seed residue on the bottom of the strainer, this
can affect the juicer performance and the overall juice
yield.
■Low juice yield
Troubleshooting (Q&A)
EN
ㆍ
Check if the parts are assembled correctly. Try reassem-
bling the parts and check if you still hear the noise.
ㆍ
Do not start the juicer without any ingredients or liquid put
into the juicer.
ㆍOperating the juicer without ingredients can cause damage
to the screw.
ㆍ
If the juicer is operated without any ingredients or liquid,
the noise level can increase and could lead to damaging the
juicer.
ㆍ
The friction noise from the juicing screw and the strainer
will disappear when ingredients are inserted into the juicer.
ㆍ
If the noise occurs when ingredients are inserted into the
juicer, please check the size of the ingredients. Do not go
over 1 inch in thickness when preparing your ingredients.
ㆍ
Depending on the ingredients, the dimension can decrease.
ㆍ
The noise can occur if the juicer is operated on a slant
surface. Place the juicer on a horizontally flat surface
when operating the juicer.

22
Specication
Voltage
Power Consumption
Maximum Use
Weight
Dimension
Manufacturer
Type
AC220-240V, 50/60Hz
240W
Less than 30 min
6.5kg
228 x 208x 414 (mm)
NUC Electronics Co., Ltd.
Low speed compression
Product
Model
Juicer
NS-110CEM, NS-120CEM, NS-150CEM
M1
NAUDOJIMOSI
INSTRUKCIJA
KUVINGS
• Perskaitę instrukciją,
laikykite lengvai pasiekiamoje vietoje.
• Produkto spalva gali skirtis nuo
parodyto paveikslėlyje.
• Tik buitiniam naudojimui.
LETAEIGE
SULCIASPAUDE
LT

25
ㆍ
Šis prietaisas skirtas tik naudojimui namuose. Atidžiai sekite naudojimosi instrukcijas.
(Prietaisui nesuteikiama garantija, jeigu jis naudojamas komerciškai ar ne pagal paskirtį.)
ㆍIšsaugokite šias instrukcijas naudojimui ateityje.
ㆍJeigu prietaisas dovanojamas kaip dovana, pridėkite šias instrukcijas.
Žemiau esančios įspėjimo priemonės yra skirtos užtikrinti naudotojo saugumą. Atidžiai perskaitykite įspėjimo
priemones ir atsargiai elkitės naudodami prietaisą.
Įspėjimas : Įspėjimas apie galimus sunkius sužeidimus ar mirtį.
Atsargiai! :
Įspėjimas apie galimus sužalojimus arba prietaiso sugadinimą.
Uždrausta
Sekite instrukcijas
Ištraukite iš elektros lizdo
Neardykite
Būtina imtis veiksmų
Saugokitės elektros šoko
Prieš naudodamiesi perskaitykite visas instrukcijas
Naudojant elektrinius prietaisus visada reikia imtis bendrųjų atsargumo priemonių:
1. Perskaitykite visą instrukciją
2. Norėdami apsisaugoti nuo elektros šoko , nemerkite prietaiso į vandenį ar kitą skystį.
3. Naudojant prietaisą šalia vaikų, reikalinga atidi priežiūra.
4. Kai prietaiso nenaudojate ar norite nuimti dalis, ištraukite jį iš elektros lizdo.
5. Venkite sąlyčio su judančiomis dalimis.
6. Nenaudokite prietaiso su sugadintu laidu arba po gedimo, arba, jiegu prietaisas buvo numestas ir bet kokiu
būdu sugadintas. Grąžinkite prietaisą į artimiausią autorizuotą servisą apžiūrai, pataisymui.
7. Papildomų priedų naudojimas, įskaitant stiklainius, yra nerekomenduojamas, nes gali sukelti sužeidimus.
8. Nenaudokite prietaiso lauke.
9. Nenuleiskite maitimo laido nuo stalo ar spintelės krašto.
10. Prieš įjungdami prietaisą, visada įsitikinkite, kad sulčiaspaudės dangtis yra tvirtai uždėtas.
11. Po kiekvieno naudojimo, prietaisą nustatykite į OFF (išjungta) poziciją. Prieš išardydamiįsitikinkite, kad
sulčiaspaudė visiškai sustojo.
12. Nekiškite pirštų ar kitų objektų į sulčiaspaudę, kai ji dirba. Jei maistas nenukrenta per piltuvėlį, naudokite
stūmiklį. Kai šis metodas neįmanomas, išjunkite prietaisą ir išvalykite likusį maistą.
13. Nenaudokite prietaiso, jei besisukantis sietas yra sugedęs.
14. Nenaudokite be tyrės indo, jei jis yra pridėtas komplektacijoje.
15.
16. Prietaisą naudokite tik pagal jo paskirtį aprašytą instrukcijoje.
17. Prietaisas turėtų būti naudojamas ribotą laiką.
SVARBIOS SAUGUMO PRIEMONĖS
IŠSAUGOKITE ŠIAS INSTRUKCIJAS
Prieš naudodamiesi perskaitykite visas instrukcijas
Saugumo įspėjimai
Atsargiai!
Dalys
Kaip surinkti
Kaip naudotis
Patarimai naudojantis sulčiaspaude
Patarimai ingredientu paruošimui
Kaip išrinkti ir išvalyti
Kaip valyti silikonines dalis
PRIEDAI
|
Kaip naudoti valymo įrankį
Klausimai ir atsakymai
Techninė informacija / Ocialus atstovas
25
26
27
28
30
32
34
36
38
40
41
42
44
LT

27
26
Atsargiai!Saugumo įspėjimai
Naudodami prietaisą nejunkite kelių maitinimo laidų į vieną elektros lizdą.
ĺTai gali sukelti sprogimą ar gaisrą.
Nelieskite maitinimo laido šlapiomis rankomis.
ĺTai gali sukelti elektros šoką.
Netaisykite, neardykite, nekeiskite pagrindinės prietaiso dalies.
ĺPrietaisas gali veikti netinkamai sukeldamas gaisrą, elektros šoką ar sužalojimus.
Nedėkite dalių į indaplovę ar į ypač karštą vandenį.
ĺDalys gali greičiau nusidėvėti.
Nenaudokite prietaiso ant nelygaus paviršiaus.
ĺTai gali sugadinti prietaisą jei jis nuvirs.
Norėdami apsaugoti maitinimo laidą, stipriai nelankstykite ir ant jo nedėkite
sunkių objektų.
ĺTai gali sukelti trumpą jungimą ir netgi gaisrą.
Ilgai laikydami įjungtą sulčiaspaudę be jokių ingredientų, galite sugadinti sraigtą.
Prietaisą laikykite saugioje vietoje ir saugokite atokiai nuo vaikų.
ĺPriešingu atveju, galimi sužalojimai.
Nenaudokite ir nelaikykite prietaiso šalia karščio šaltinių.
ĺPrietaisas gali prarasti savo spalvas bei formą.
Nenaudokite kenksmingų bei degių chemikalų šalia prietaiso ar jo valymui.
ĺTai gali pakeisti prietaiso spalvą ar sukelti gaisrą.
Sušlapusio maitinimo laido nusausinimui naudokite sausą šluostę.
ĺTai gali sukelti elektros šoką ar gaisrą.
Nenumeskite ir nenaudokite stiprios jėgos naudojantis prietaisu.
ĺTai gali sugadinti arba sulaužyti prietaisą.
Netraukite maitinimo kabelio laikydami už laido.
ĺTai gali sugadinti maitinimo laidą arba sukelti elektros šoką.
Nekiškite pirštų ar kitų objektų į įdėjimo angą, kai prietaisas dirba.
ĺTai gali sužaloti.
Nepalikite prietaiso be priežiūros. Kai prietaiso nenaudojate, ištraukite
prietaiso maitinimo laidą iš elektros lizdo.
LT

29
28
* Produktai iliustruoti/nufotografuoti šioje instrukcijoje gali šiek tiek skirtis nuo produkto.
Dalys
Suderinkite raudonus taškus ●ant
kiekvienos dalies kaip parodyta. Surinkę,
pasukite dangtį pagal laikrodžio rodyklę.
1 ŽINGSNIS
Viršutinės dalies surinkimas
2 ŽINGSNIS
Viršutinio rinkinio ir pagrindo surinkimas
2. Būgno dangtis
4. Tyrės puodelis
3. Sulčių spaudimo
dubuo
6. Sulčių puodelis
5. Smart Cap
7. Pagrindas
1. Dėtuvė
10. Išspaudimo sraigtas
9. Koštuvas
11. Stūmiklis
8. Sukamasis šepetėlis
12. Valymo šepetėlis
Nuimamas
+
+
+
+
+
LT
Uždėkite surinktą viršutinę dalį ant
pagrindo. Sulygiuokite parodytą ženkliuką
▼ant viršutinės dalies su simboliu
(open) ant pagrindo ir pasukite
laikrodžio rodyklės kryptimi iki simbolio
(close).

31
30
Kaip surinkti
Sultys gali pratekėti, jei sulčiaspaudė nebus
surinkta tinkamai.
Pastaba Pastaba
1 ŽINGSNIS 2 ŽINGSNIS
*Produktai iliustruoti/nufotografuoti šioje instrukcijoje gali šiek tiek skirtis nuo produkto.
Silikono žiedas / Silikono šepetėlis
Silikonines dalis galima plauti. Po plovimo jas
nusausinkite.
→
Po valymo įdėkite į angą su uodegėle nukreipta
žemyn, kaip parodyta iliustracijoje.
Uodegėlė
Patikrinkite
prieš naudojimą
1 3
Uždėkite dangtį ant dubens sulygindami
raudonus taškus ●ant dangčio ir dubens.
Pasukite pagal laikrodžio rodyklę, kad taškas ●
dubens susilygintų su uždarymo žyme .
4
Open/Close simboliai.
Padėkite atliekų dubenį ties atliekų išmetimo
anga ir sulčių ties sulčių snapeliu kaip parodyta
iliustracijoje.
7
6
5
Nuimamas Smart Cap
dangtelis
Nesurinkus teisingai- sulčiaspaudė neįsijungs.
Pastaba
Nes
Atidaryta
Uždaryta
Tvirtai įstatykite kompresijos silikoną į angą
po tyrės snapeliu.
/ Viršutinio rinkinio surinkimas / Viršutinio rinkinio ir pagrindo surinkimas
ㆍPrieš pirmą naudojimą nuplaukite dalis.
ㆍĮsitikinkite, kad kompresijos silikonas ir silikono žiedas yra surinkti tinkamai.
→Po valymo įspauskite siliko žiedą su mažesniu
paviršiumi nukreiptu žemyn.
2
Uždėkite surinktą viršutinę dalį ant pagrindo.
Sulygiuokite parodytą ženkliuką ▼ant
viršutinės dalies su simboliu (open) ant
pagrindo ir pasukite laikrodžio rodyklės kryptimi
iki simbolio (close).
LT

33
32
Visiškai išspaudę sultis ir minkštimą, išjunkite prietaisą
Patarimas
Pastaba
Pastaba
Naudokite Smart Cap sulčių maišymui, lašėjimo sustabdymui
SMART CAP
Kaip naudotis
Paruošę ingredientus, įkiškite maiitinimo laidą į elektros lizdą.
ㆍ
Nelieskite maitinimo laido šlapiomis rankomis. (Tai gali sukelti elektros šoką ar gaisrą)
Patikrinkite elektros lizdo saugumą.
ㆍ
Pastaba
Pastaba
Prietaiso veikimui spauskite mygtuką FORWARD
ㆍ
Forward(Pirmyn): Stumia žemyn ir išspaudžia ingredientus.
ㆍ
Reverse(Atbulinė eiga): Parstumia ingredientus atkimšimui.
Ź
Jeigu sulčiaspaudė sustoja veikimo metu
ㆍREVERSE (ATBULINĖ EIGA): Parstumia ingredientus atkimšimui.
(Atbulinė eiga veikia tik, kai jis laikomas paspaustas.)
ㆍPerjunkite į OFF poziciją, įsitikinkite, kad prietaisas visiškai sustojo. Tada spauskite REVERSE.
(Laikykite REVERSE mygtuką 2-3 sekundes ir atleiskite. Kartokite pagal poreikį.)
(Leiskite sulčiaspaudei visiškai sustoti prieš jungiant REVERSE mygtuką.)
ㆍJeigu sulčiaspaudė vis tiek neveikia, išrinkite ir išvalykite dalis, tada naudokite vėl.
Perjunkite mygtuką į OFF poziciją ir laikykite REVERSE mygtuką kol ingredientai išsilaisvins.
Kartokite REVERSE- OFF- FORWARD kol bus pasiektas norimas rezultatas.
FORWARD: Stumia žemyn ingredientus
OFF:
Sustabdo veikimą
REVERSE: Parstumia ingredientus
Dėkite ingredientus į dėtuvę po vieną
ㆍ
ㆍ
Pastaba
ㆍ
ㆍ
ㆍ
ㆍ
ㆍ
ㆍ
ㆍ
Jeigu ingredientai užstringa išspaudimo sraigte ir indo dangtis neatsidaro, paspauskite
OFF(išjungimo) mygtuką. Tada paspauskite ir laikykite atbulinės eigos mygtuką kol
ingredientai išsilaisvins. Kartokite žingsnius REVERSE - OFF - FORWARD, kol bus pasiektas
norimas rezultatas. Smart cap dangtelio dėka galėsite iš karto paruošti skirtingų vaisių ar daržovių koktelių, su pienu,
bananais ar kitais ingredientais.
Po sulčių spaudimo, uždarykite Smart Cap dangtelį, kad sustabdytumėte lašėjimą, ypač tada, kai
nuimate sulčių spaudimo dubenį nuo pagrindo.
Spausdami skirtingas sultis, išskalaukite likučius įpildami stiklinę vandens, kai Smart Cap dangtelis
yra uždarytas.
Palikite Smart Cap dangtelį atidarytą, kai spaudžiate ingredientus, kurie dažnai putoja
(pvz. obuoliai).
Kai dangtelis uždarytas, sultis spauskite labai atsargiai. Sulčiaspaud
ė
gali persipildyti jei bus viršyta
dubens talpa.
Jeigu sulčiaspaudėje yra likusių neišsispaudusių ingredientų, gali būti sunku nuimti dangtį.
(Po kiekvieno spaudimo, leiskite sulčiaspaudei padirbti 30 sekundžių, kad būtų pašalintas likęs
minkštimas).
Jeigu dangtis nenusiima, spauskite REVERSE - OFF - FORWARD mygtukus, jungiant pirmyn ir
atgal 2-3 kartus. Tada suimkite dangtį ir spausdami žemyn sukite dangtį prieš laikrodžio rodyklę
kol dangtis atsidarys.
ŹPriklausomai nuo ingredientų, įpilkite vandens pro dėtuvę, kad išskalautumėte sulčiaspaudės
indą ir tada mėginkite nuimti dangtį.
Paruoškite ingredientus optimaliam išspaudimui.
- Tvirtus ir pluoštinius ingredientus: Supjaustykite 1,5 - 3 cm pločio ir 5 cm ilgio dalimis.
- Pluoštines, lapuotas daržoves (salierai, kopūstai ir t.t.):
Stiebus supjaustykite 5 cm ilgio dalimis ir dėkite lapinėmis dalimis žemyn.
- Pašalinkite kietas sėklas. Spaudžiant šaldytus vaisius, juos visiškai atšildykite.
Jeigu iškart dėsite per didelį kiekį ingredientų, sulčiaspaudė gali sustoti.
Dėkite ingredientus po vieną.
▶▶▶
4
1 3
2
OFF
(IŠJUNGTI)
OFF
(IŠJUNGTI)
REVERSE
(ATGAL)
FORWARD
(PIMRYN)
LT
Dėkite ingredientus į dėtuvę po vieną
ㆍ
ㆍ
Pastaba
Paruoškite ingredientus optimaliam išspaudimui.
- Tvirtus ir pluoštinius ingredientus: Supjaustykite 1,5 - 3 cm pločio ir 5 cm ilgio dalimis.
- Pluoštines, lapuotas daržoves (salierai, kopūstai ir t.t.):
Stiebus supjaustykite 5 cm ilgio dalimis ir dėkite lapinėmis dalimis žemyn.
- Pašalinkite kietas sėklas. Spaudžiant šaldytus vaisius, juos visiškai atšildykite.
Jeigu iškart dėsite per didelį kiekį ingredientų, sulčiaspaudė gali sustoti.
Dėkite ingredientus po vieną.
Patarimas
Pastaba
Naudokite Smart Cap sulčių maišymui, lašėjimo sustabdymui
SMART CAP
ㆍ
ㆍ
ㆍ
ㆍ
ㆍ
Smart cap dangtelio dėka galėsite iš karto paruošti skirtingų vaisių ar daržovių koktelių, su pienu,
bananais ar kitais ingredientais.
Po sulčių spaudimo, uždarykite Smart Cap dangtelį, kad sustabdytumėte lašėjimą, ypač tada, kai
nuimate sulčių spaudimo dubenį nuo pagrindo.
Spausdami skirtingas sultis, išskalaukite likučius įpildami stiklinę vandens, kai Smart Cap dangtelis
yra uždarytas.
Palikite Smart Cap dangtelį atidarytą, kai spaudžiate ingredientus, kurie dažnai putoja
(pvz. obuoliai).
Kai dangtelis uždarytas, sultis spauskite labai atsargiai. Sulčiaspaud
ė
gali persipildyti jei bus viršyta
dubens talpa.
Visiškai išspaudę sultis ir minkštimą, išjunkite prietaisą
Pastaba
ㆍ
ㆍ
Jeigu sulčiaspaudėje yra likusių neišsispaudusių ingredientų, gali būti sunku nuimti dangtį.
(Po kiekvieno spaudimo, leiskite sulčiaspaudei padirbti 30 sekundžių, kad būtų pašalintas likęs
minkštimas).
Jeigu dangtis nenusiima, spauskite REVERSE - OFF - FORWARD mygtukus, jungiant pirmyn ir
atgal 2-3 kartus. Tada suimkite dangtį ir spausdami žemyn sukite dangtį prieš laikrodžio rodyklę
kol dangtis atsidarys.
ŹPriklausomai nuo ingredientų, įpilkite vandens pro dėtuvę, kad išskalautumėte sulčiaspaudės
indą ir tada mėginkite nuimti dangtį.

35
34
Patarimai naudojantis sulčiaspaude
Nedėkite į sulčiaspaudę
!
Sulčiaspaudės sugadinimas sukeltas dėl nerūpestingo instrukcijų sekimo nutrauks garantinį aptarnavimą.
3DWLUNLWHDXNãþLDXVLRVNRN\EŏVVXOWLVVXSUDVGDPLNLHNYLHQRLQJUHGLHQWRFKDUDNWHULVWLNDVLU
åLQRGDPLRSWLPDOLDXVLąEźGąDSGRURWLLQJUHGLHQWXV
Ilgai laikydami įjungtą sulčiaspaudę be jokių ingredientų, galite sugadinti sraigtą.
Nenaudokite sulčiaspaudės ilgiau negu 30 minučių.
Tai gali sugadinti variklį dėl perkaitimo.
Po pastovaus naudojimosi, leiskite sulčiaspaudei pastovėti 30 minučių kol ji atvės.
Spausdami sultis į dėtuvę nedėkite šaukštų, mentelių ar kitokių objektų.
Tokie objektai sulčiaspaudėje gali užstrigti ir ją sugadinti.
Nenaudokite ingredientų su dideliais aliejaus kiekiais.
Nenaudokite sulčiaspaudės aliejaus spaudimui.
Augalinis/gyvulinis aliejus patekęs ant spaudimo sraigto gali sumažinti efektyvumą ar net jį sugadinti.
Nedėkite išspausto minkštimo atgal į sulčiaspaudę. Tai gali sustabdyti sulčiaspaudę
ar gali būti sunku atidaryti dangtį.
Po ingredientų su sėklomis spaudimo, atidžiai išvalykite visus tarpelius spaudimo
sraigto apačioje.
Nedėkite džiovintų, neskaldytų grūdų, vaisių su kietomis sėklomis arba ledo.
· Pupelės, grūdai gali būti naudojami, po išmirkymo ar išvirimo. Vaisiams turi būti pašalintos kietos sėklos ir
kiauliukai (pvz.nektarinai, persikai, mangai ir vyšnios).
Naudodami šaldytus vaisius su mažomis sėklomis (pvz.vynuogės), juos visiškai atlaidinkite.
Ledo naudojimas trumpina prietaiso patvarumą.
Nekiškite pirštų ar kitokių objektų į dėtuvę, išskyrus komplektacijoje pridėtą stūmiklį.
1.
2.
3.
4.
5.
6.
7.
8.
Augalinis ir
gyvūlinis
aliejus
Kita
Šaldyti vaisiai
ar ledas
Kieta ar
nevalgoma
žievė
Kietos sėklos
Persikai, nektarinai, abrikosai, slyvos, papajos, mangai ir t.t.
Prieš spausdami sultis iš ingredientų pašalinkite kietas sėklas.
Ananasai, melionai, arbūzai, mangai, apelsinai ir t.t.
Prieš spausdami sultis nuo ingredientų nulupkite žieves.
Sušaldytos braškės, mėlynės, avietės ir t.t.
Prieš spausdami sultis, šaldytus vaisius visiškai atšildykite.
Nenaudokite ledo.
Sezamo sėklos, sviestas, margarinas ir t.t.
Nespauskite sulčių iš ingredientų su aliejumi.
Tai gali sumažinti efektyvumą ar net sugadinti sulčiaspaudę.
Kokosai
Prieš spausdami sultis kokosą susmulkinkite ir pamirkykite
šiltame vandenyje.
Ši sulčiaspaudė yra novatoriškas produktas, kuris naudoja patentuotą
lėto spaudimo technologiją efektyviai išgauti sultis iš ingredientų.
Didžiausią naudą pajusite spaudžiant sultingus vaisius ir daržoves.
Geriausiems rezultatams pasiekti, kiekvienas ingredientas turi būti
paruoštas ir išspaustas skirtingais būdais priklausomai nuo jo charakteris-
tikos ir ypatybių.
LT

37
36
Patarimai ingredientų paruošimui
Pastaba
Prieš naudojimą!
Patarimas
| (E.g. carrots, beets, & spinach)
Patarimas
·
·
·
·
·
·
·
·
·
·
·
8-12 skiltelių
1,5 cm
15 cm
acon)
Fermentais praturtinti vaisiai ir daržovės |(Obuoliai)
Dėl fermentų obuolių sultyse, rekomenduojama jas išgerti per trumpą laiką.
Patarimas Patarimas
Kaip naudoti
Smart Cap
| (E.g. carrots, beets, & spinach)acon)
Kieti vaisiai ir daržovės
Kieto tipo vaisius ir daržoves supjausykite mažais gabalėliais ir spauskite neskubėdami.
| (Morkos)
Kieti vaisiai ir daržovės gali
apkrauti variklį ir priversti jį
sustoti.
Prieš spaudžiant 3 val.
mirkykite šaltame
vandenyje, po to smulkiai
supjaustykite.
Norėdami išgauti daugiau
sulčių, spauskite
ingredientus turinčius didelį
kiekį vandens
Smart cap dangtelio dėka galėsite iš karto paruošti skirtingų vaisių ar daržovių koktelių, su pienu,
bananais ar kitais ingredientais.
Po sulčių spaudimo, uždarykite Smart Cap dangtelį, kad sustabdytumėte lašėjimą, ypač tada,
kai nuimate sulčių spaudimo dubenį nuo pagrindo.
Spausdami skirtingas sultis, išskalaukite likučius įpildami stiklinę vandens, kai Smart Cap dangtelis
yra uždarytas.
ㆍ
ㆍ
ㆍ
Palikite Smart Cap dangtelį atidarytą, kai spaudžiate ingredientus, kurie dažnai putoja (pvz. obuoliai).
Kai dangtelis uždarytas, sultis spauskite labai atsargiai. Sulčiaspaud
ė
gali persipildyti jei bus viršyta
dubens talpa.
ㆍ
ㆍ
Išspaustų sulčių
kiekis
Minkštimo kiekio
sultyse reguliavimas
ㆍ
ㆍ
ㆍ
Jeigu sulčiaspaudė užstrigusi arba dangtis neatsidaro, paspauskite ATGAL mygtuką ir laikykite
kol atstrigs. Kartokite ATGAL-IŠJUNGTI-PIRMYN pagal poreikį.
Tęskite naudojimąsi sulčiaspaude kol visi ingredientai bus išspausti. Dangtį gali būti sunku atidaryti
jeigu sulčiaspaudėje bus likusio minkštimo.
Atkreipkite dėmesį į tai, kad iš skirtingų ingredientų išsispaudžia skirtingi kiekiai sulčių.
Geriausiems rezultatams pasiekti, vadovaukitės šioje sekcijoje pateiktais patarimais kaip paruošti
ingredientus.
Ingredientus dėkite lėtai, patikrindami kaip išsispaudžia.
(Sulčių kiekis gali skirtis priklausomai nuo spaudimo greičio.)
Po ilgo, nuolatinio spaudimo į sultis gali patekti smulkios tyrės.
Norėdami šito išvengti, dažnai valykite viršutinį sulčiaspaudės rinkinį.
Sėklos iš vaisių turi būti pašalintos prieš spaudimą.
Supjaustykite į 8 -12 skiltelių ir lėtai dėkite ingredientus į
dėtuvę.
Supjaustykite į 8 -12 skiltelių.
Ingredientus dėkite lėtai ir po vieną.
Naudokite stūmiklį ingredientams nustumti (Tai apsaugo nuo vaisių su dideliu kiekiu vandens taškymosi).
Kai spaudžiate ingredientus, kurie putoja, palikite Smart Cap dangtelį atidarytą.
Sultis rekomenduojama gerti ne vėliau kaip 48 val. po išspaudimo. Priklausomai nuo ingreduotų tankio
išspaustose sultyse palaipsniui gali pasirodyti sluoksniai.
Jeigu kaupiasi per dideli putos kiekiai, naudokite sietelį.
Ingredientus supjaustykite 1,5 cm storio gabalėliais arba pjaustykite 1,5 cm pločio ir 3-6 cm ilgio gabalėliais.
Tokius ingredientus, kaip morkos ar imbieras, prieš spausdami sultis 3 valandas išmirkykite vandenyje.
Ingredientus dėkite lėtai ir po vieną.
Reguliuokite spaudimo laiką pagal tai kaip išsispaudžia ingredientai.
Norėdami išgauti daugiau sulčių, spauskite ingredientus turiunčius didelį kiekį vandens.
LT

39
38
Kaip išrinkti ir išvalyti
Pastaba
Pakiškite dubenį po bėgančiu vandenių ir nuimkite
kompresijos silikoną, išvalykite tyrės snapelį.
Išmirkykite dubenį šilto vandens ir kepimo miltelių mišinyje,
kad likučius valyti būtų paprasčiau.
Patarimas
Nebūtina visiškai išvalyti sulčiaspaudės prieš spau-
džiant skirtingas sultis. Pabaigę sulčių spaudimą
išrinkite prietaisą ir atidžiai išvalykite.
Patarimas
Nuvalykite pagrindą su drėgnu skudurėliu ir nu-
sausinkite.
Pastaba
Išimkite spaudimo sraigtą, koštuvą ir sukamąjį
šepetėlį iš dubens. Išvalykite su komplektacijoje
pridėtu šepetėliu.
Pastaba
Patarimas
Pastaba
Naudodamiesi kempine, po bėgančiu vandeniu
nuvalykite išorinę sraigto dalį. Sunkiai prieina-
mas dalis ir tarpus valykite šepetėlio galu.
Uždarykite Smart Cap dangtelį ir pripylę sulčia-
spaudę vandens, ją įjunkite
Po kelių sekundžių atidarykite Smart Cap dang-
telį ir leiskite vandeniui išbėgti iš dubens.
* Produktai iliustruoti/nufotografuoti šioje instrukcijoje gali šiek tiek skirtis nuo produkto.
Pasukite dangtį prieš laikrodžio rodyklę ir nuimkite.
Pasukite viršutinį rinkinį prieš laikrodžio rodyklę
ir nuimkite nuo pagrindo.
Jeigu skudurėlis labai šlapias, išspauskite perteklių
prieš valydami sulčiaspaudės pagrindą.
Po sulčių spaudimo iš ingredientų su sėklomis, ati-
džiai išvalykite apatinę indo dalį bei visus sraigto
tarpus ir angas. Priešingu atveju tai gali paveikti
prietaiso efektyvumą ir sugadinti dalis.
ㆍ
ㆍ
Po bėgančiu vandeniu su valymo šepetėliu atidžiai
išvalykite sulčių spaudimo sraigtą.
Visiškai nusausinkite ir prieš naudojimą įsitikinkite, kad
sraigtas yra švarus ir nėra likę jokiu likučių.
ㆍ
Sulčiaspaudę valykite iškart po sulčių spaudimo.
Jeigu likę likučiai išdžiūna, gali būti sunku prietaisą
išrinkti ir išvalyti. Pertekliniai likučiai gali sumažinti
prietaiso efektyvumą.
ㆍ
Lengvesniam išrinkimui, padėkite viršutinį rinkinį
į kriauklę ir pilkite vandenį pro rinkinio viršų.
ㆍ
Kruopščiai išdžiovinkite sraigto apatinę dalį, kuri
jungiasi su metaline pagrindo dalimi.
Perjunkite į IŠJUNGTI ir ištraukite maitinmo laidą
iš elektros lizdo.
Skalavimas
1
1 4 6
7
5
2
3
1
2
Prieš sustabdydami sulčiaspaudę, pašalinkite
Pastaba
Prietaisą pakelkite tik laikydami už pagrindo
apačios arba rankenos.
visą
likusią tyrę.
Norėdami lengviau išvalyti, po sulčių spaudimo
dar 30 sekundžių palaikykite sulčiaspaudę įjungtą.
Jeigu dangtis nenusiima, spauskite ATGAL - IŠJUNGTI
- PIMRYN mygtukus, jungiant pirmyn ir atgal 2~3
kartus. Tada suimkite dangtį ir spausdami žemyn
sukite dangtį prieš laikrodžio rodyklę kol dangtis
atsidarys.
LT
Table of contents
Languages: