Kuvinos AUTO10 User manual

10EN231024B
Do not place parts in a dishwasher, dish dryer,
microwaver, or under extremely hot water.
AUTO10
MANUAL
Kuvings Hands-Free Slow Juicer
PRODUCT INFORMATION

03Kuvings Hands-Free Slow Juicer AUTO10
03 IMPORTANT SAFEGUARDS
04 SAFETY WARNING
05 WARNING / CAUTION
06 PARTS
08 HOW TO ASSEMBLE
10 HOW TO OPERATE
12 INGREDIENTS PREPARATION
14 HOW TO DISASSEMBLE
15 HOW TO CLEAN
16 HOW TO USE THE SILICONE PARTS
18 HOW TO USE THE CITRUS MAKER
19 HOW TO USE THE OPTIONAL STRAINER
20 TROUBLESHOOTING Q&A
22 SPECIFICATIONS
AUTO10
CONTENTS
01 Read all instructions.
02 To protect against risk of electrical shock, do not put motor or base of
unit in water or other liquid.
03 Keep away from children.
04 Unplug from outlet when not in use, before adding or removing parts,
and before cleaning.
05 Avoid contact with moving parts. Do not attempt to alter the parts to
disable the safety interlock mechanisms.
06 Do not operate any appliance with a damaged cord or plug or after
the appliance malfunctions, or is dropped or damaged in any manner.
Contact the manufacturer at their customer service telephone number
for information on examination, repair, or adjustment.
07 The use of attachments not recommended or sold by the manufacturer
may cause re, electric shock or injury.
08 Do not use outdoors.
09 Do not let cord hang over edge of table or counter.
10 To unplug the machine from an outlet, grasp the plug and pull.
Never pull from the power cord.
11 Always attach plug to the appliance and check that the control is OFF
before plugging cord into wall outlet. To disconnect, turn the control to
OFF, then remove plug from wall outlet.
12 Make sure juicer is assembled properly before motor is turned on.
Do not remove drum lid or parts while juicer is in operation.
13 Turn switch to OFF position after using juicer. Make sure the motor
stops completely before disassembling.
When using electrical appliances, basic safety precautions should
always be followed including the following:
IMPORTANT SAFEGUARDS

0504 Kuvings Hands-Free Slow Juicer AUTO10
• This appliance is for household use only. Please carefully follow the
instructions in the manual.
(The appliance cannot be covered under the manufacture warranty if the
product is abnormally or commercially used.)
• Save the instruction manual for future reference.
• If the appliance is given away as a gift, please include the manual with the
product.
• These instruction shall also be available in an alternative format.
e.g on a website. www.kuvings.com
SAFETY WARNING
WARNING
Warns risk of death or severe injuries.
Prohibited Must take action Do not disassemble Follow instruction
Do not plug multiple power cords on a
single outlet during operation.
It may cause an explosion or re.
Do not touch the power cord with wet
hands.
It may cause electrical shock.
Do not leave the appliance unattended.
Unplug the power cord from the outlet
when not in use.
Use a dry towel to clean the power cord if it
is dirty or wet.
It may cause electrical shock or re.
Do not drop the appliance nor inict strong
force to the appliance.
It may damage or break the appliance.
Do not unplug by pulling o the power cord
cable.
It may damage the power cord and cause
electrical shock
Do not insert your nger or other objects
into the feeding tube while it is in operation.
It may cause injury.
Do not place the parts in the dishwasher or
hot water above 40 .
The parts may wear faster.
Do not repair, disassemble the base, or
customize the appliance.
The appliance may not operate properly
causing re, electrical shock or injury.
Do not use the appliance on an uneven
surface.
It may cause a malfunction if the appliance
tips over.
Keep away from children and store the
appliance in a safe place.
It may cause injury.
Please do not store or operate the appliance
near any heating appliance.
The appliance may become discolored or
deformed.
Do not use any hazardous chemical to clean
the appliance or flammable sprays near the
appliance.
It may change the color of the appliance
or could result in a re.
To protect the power cord, please do not
aggressively bend or put heavy object on
top of the power cord.
It may cause short circuit or even re.
Operating the juicer without ingredients can
cause damage to the screw.
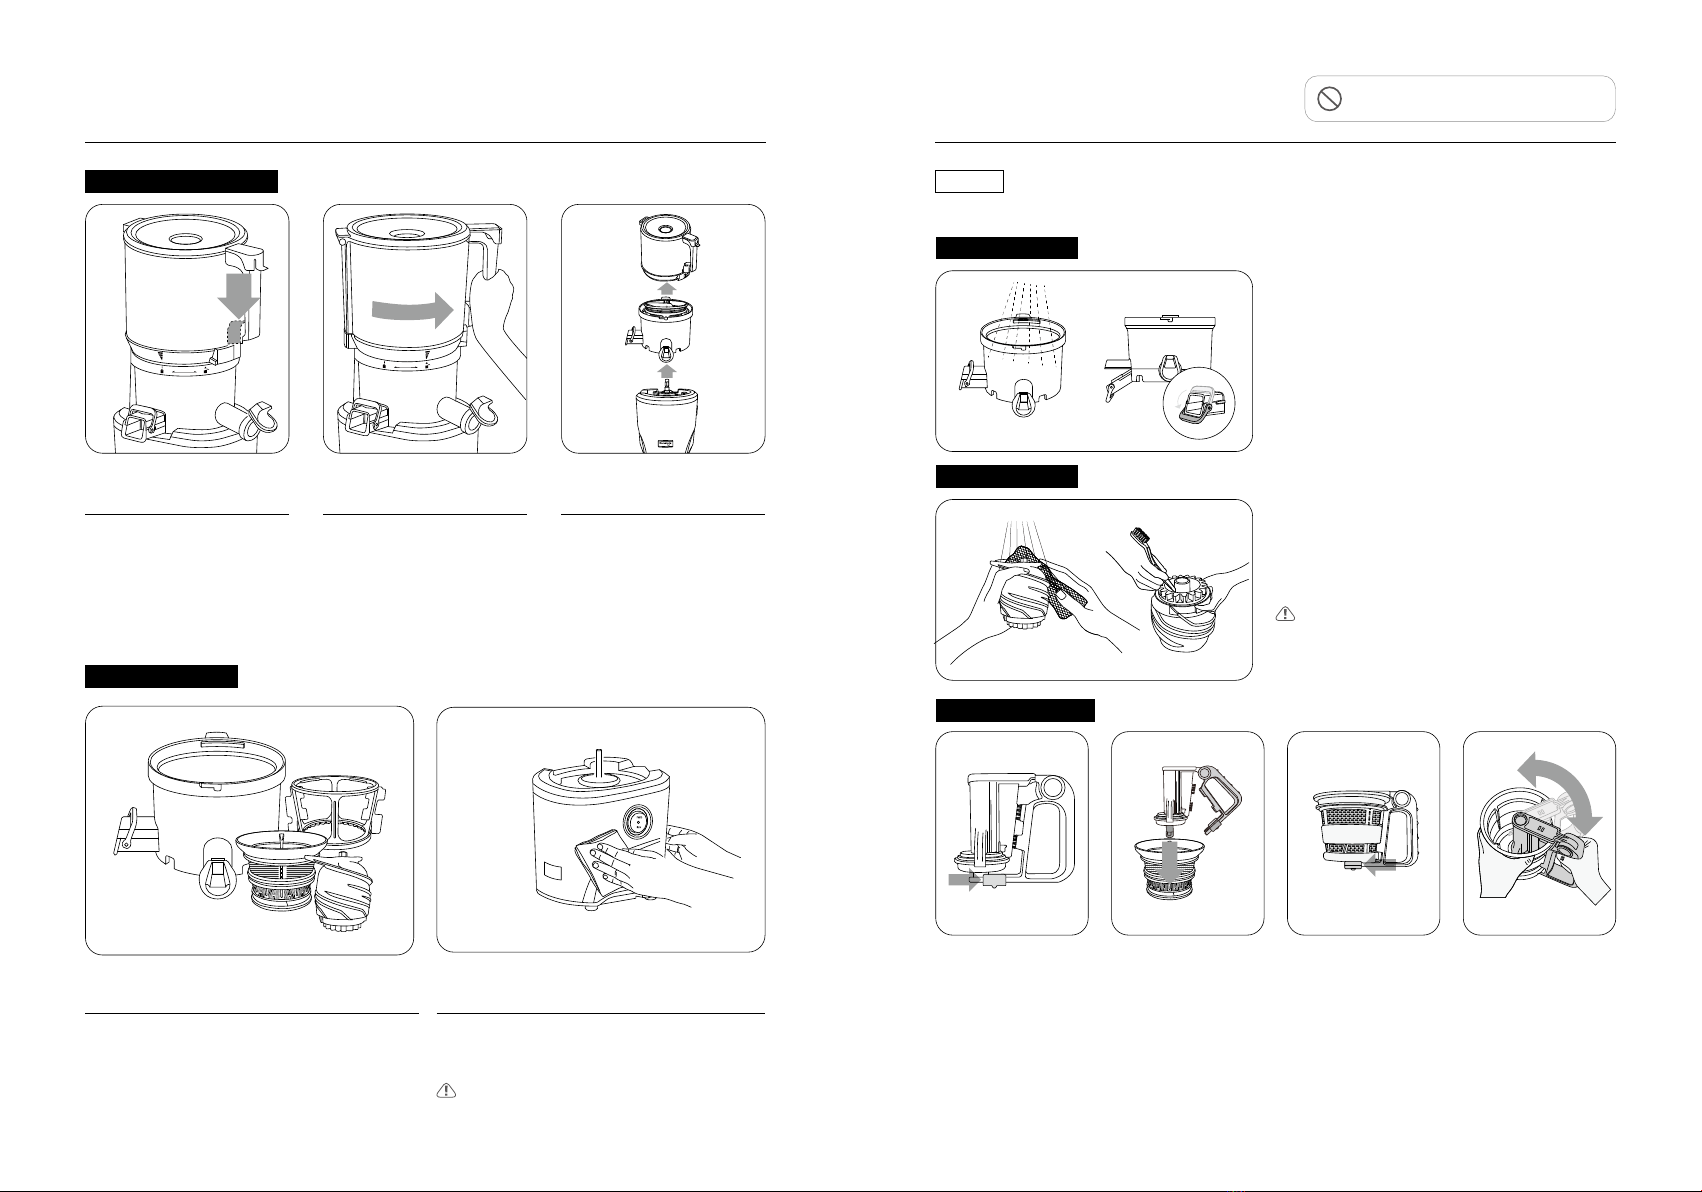
For cleaning parts that come in contact with
food, please follow the instruction on pages
15-17.
CAUTION
Warns risk of injuries or appliance damage.
14 Do not put your ngers or other objects into the juicer opening while it
is in operation. If food becomes lodged in opening, use food pusher or
another piece of fruit or vegetable to push it down. When this method
is not possible, turn the motor o and disassemble juicer to remove the
remaining food.
15 Do not use the appliance if the rotation wiper is damaged.
16 Make sure the juice cup and pulp cup are always in place before
operating juicer.
17 Please do not alter the appliance in any way.
18 Do not use the appliance for anything other than its intended purpose
as described in the manual.
19 This appliance should be used for the recommended use time.
20 This appliance is not intended for use by persons (including children)
with reduced physical, sensory, or mental capabilities, or lack of
experience and knowledge, unless they are closely supervised by a
person responsible for their safety. Children shall not play with the
appliance. Cleaning and user maintenance shall not be made by
children without supervision.
21 Do not use or store the appliance near a heated oven or stove.

JUICE
SMOOTHIE
COARSE
0706 Kuvings Hands-Free Slow Juicer AUTO10
PARTS
Locking Tab
Auto Hopper Hole
Auto Hopper Lid
Drum Set
Base
Maximum Fill Line
Auto Hopper Handle
Juice Spout
Smart Cap
Pulp Spout
Auto Hopper
Unlock Button
BASIC
Juicing Bowl Juicing StrainerRotation Wiper Juicing Screw
OPTIONAL
Coarse Strainer
[OPTIONAL]
Smoothie Strainer
[OPTIONAL]
Blank Strainer
[OPTIONAL]
Citrus Maker
[OPTIONAL]
Pulp Cup PusherJuice Cup
BASEAUTO HOPPER
Lid
Hole switch
Hopper
Auto Hopper
Round Brush
[OPTIONAL]
Pulp Mesh
[OPTIONAL]
Brush
Rotating Brush
[OPTIONAL]

JUICE
JUICE
Lock Open
JUICE
09
According to your preference, it is used
for ltering the pulp. Place the pulp
mesh on top of the juice cup as shown
in picture .
0908 Kuvings Hands-Free Slow Juicer AUTO10
02 03
Place the auto hopper onto the juicing bowl
aligning the sign on the auto hopper with the
unlock mark
on the drum.
04
01
Turn the auto hopper clockwise until the sign
on the auto hopper is lined up with the lock
mark on the drum.
05
STEP 3 BASE & TOP SET
Completely insert the
juicing strainer into the
rotation wiper.
Once tightened normally,
the rotation wiper will
turn smoothly.
Place a strainer into the
drum ensuring the red
dot on the strainer is
aligned with the red dot
on the drum.
Gently press the screw
into the center of the
strainer.
If the screw is not
completely tightened,
the auto hopper cannot
be fastened.
STEP 1 DRUM SET
STEP 2 DRUM SET & AUTO HOPPER
HOW TO ASSEMBLE
Clamp
06
Place the assembled top set on the base
clamp in an aligned way.
07
Make sure the pulp outlet lock is
assembled.
The pulp outlet lock can be rotated up to
lock or downwards to unlock.
08
Place the pulp cup under the pulp spout
and place the juice cup under the juice
spout as shown in the illustration.

FWD
REV
FWD
REV
FWD
REV
1110 Kuvings Hands-Free Slow Juicer AUTO10
HOW TO OPERATE
Add ingredients through the auto hopper
hole in the hopper while the machine is ON.
If the Auto Hopper Lid is opened and ingredients
are feeding in, the operation will stop.
Set the switch to [STOP(O)] and stop the
operation.
Press the locking tab all the way down and
completely close the auto hopper lid, and
then put the juice cup and pulp in place
aligned with the outlet.
If the auto hopper lid is not completely
* closed, the product will not work.
Run the product until the pulp is completely
drained.
•
If the product stops during use, set the switch to [STOP (O)], stop the operation completely,
and return the ingredients upwards with the [REVERSE(REV)] switch.
• The [REVERSE(REV)] switch works only while it is pressed, Hold the REVERSE button for
2-3 seconds and release.
Open the auto hopper lid using the
locking tab, and insert the ingredients.
* Refer to Insertion guide: 12P~13P
• [FORWARD (FWD)] Perform the juicing of the ingredients.
• [STOP(O)] Stop the operation.
• [REVERSE(REV)] Return the ingredients upwards.
NOTE NOTE
01 04
02 05
06
Press the [FWD] switch to start operation.
Keep the juice cap open. If the smart cap
is closed during extraction, the juice may
ow backwards.
03

1312 Kuvings Hands-Free Slow Juicer AUTO10
INGREDIENTS PREPARATION
* Large ingredients can be inserted in whole, using the large-capacity size Auto
Hopper of 3,000cc class, but it is possible to extract the juice in the optimal way by
cutting it into an appropriate size and inserting it.
When juicing mixed ingredients, put in soft ingredients and stringy ingredients
rst and then put in hard ingredients such as carrots and beetroot to juice more
eeciently.
Ingredients
Fruits and Vegetables
Cut the ingredients into an appropriate
size to t in the auto hopper.
Hard seeds must be removed before
extraction.
ex) apple, peach, tomatoes, nectarines,
apricot, plum, etc.
Peel the skins and cut the ingredients an
appropriate size to t in the auto hopper.
For long ingredients, cut them
vertically for extraction.
ex) carrots, beet, ginger
Root vegetables
Thick-skinned fruits
Peel the skins from the ingredients
and cut the ingredients into an
appropriate size before juicing.
Hard seeds must be removed before
extraction.
ex) oranges, melons, mango, pineapple,
dragon fruit.
Cut leaf/stem vegetables with a lot of
ber, into 2~3 inches (5cm~7.6cm) or
less before feeding.
ex) Kale, cabbage, celery, etc.
When a whole size of ingredients
containing a lot of ber is inserted,
the ingredient may wind around
the screw.
Leaf/stem vegetables
• Do not feed ingredients over the maximum capacity line.
• Juicing soft & hard ingredients altogether increases efficiency.
NOTE NOTE
pineapple, melon, watermelon
2 SOFT
carrot, beet
4 HARD
kale, cabbage
1 LEAFY
apple, peach, cucumber, celery
3 SEMIHARD
POMEGRANATE: Add only the kernels after peeling.
GRAPES: Insert just grapes only, not stems. slowly insert ingredients through the auto
hopper hole.
GINGER, KOHLRABI : Cut it by 1 inches of width or less, before feeding. Do not juice
the above ingredients by itself. Add only a small amount with the moist ingredients.
ALMONDS, BEANS, WALNUTS, PINE NUTS, ETC. : Soak ingredients in the water for
at least 8 hours before juicing. Insert small amount with the liquids. Add ingredients
through the auto hopper hole in the hopper.
SESAME SEED, BUTTER,
MARGARINE, ETC.
Do not extract ingredients
containing vegetable or
animal oil.
COCONUT, SUGARCANE,
ETC.
Do not extract extremely
brous or dry ingredients.
ICE
Do not use ice.
INGREDIENTS THAT REQUIRED TO CARE WHEN HANDLED
DO NOT INSERT THE FOLLOWING INGREDIENTS INTO THE JUICER

JUICE
P
U
S
H
JUICE
1514 Kuvings Hands-Free Slow Juicer AUTO10
Do not place parts in a dishwasher, dish dryer,
microwaver, or under extremely hot water.
HOW TO DISASSEMBLE HOW TO CLEAN
Press the handle switch.
01
Open the auto hopper
by turning the handle
counterclockwise while
pressing the handle
switch.
02
Lift the auto hopper and
drum set in sequence
and separate them from
the base.
03
Separate the juicing strainer, rotation
wiper and screw from the drum set.
Wipe the base with a soft cloth
containing a little moisture.
The base cannot be washed with water,
so wipe it with a cloth containing a little
moisture.
04 05
Remove foreign substances(seeds, grains)
stuck in the screw groove with the tip of
the cleaning brush.
If the seeds remain in the groove, the
screw may break, so washing should be in
completely clean state.
Pull the pulp outlet lock down to unlock
for cleaning.
ROTATING BRUSH
JUICING BOWL
AUTO HOPPER & BASE
DRUM SET & BASE
JUICING SCREW
Push the slide
lock of the dual
cleaning tool
toward the handle
to release it.
After inserting
the fastening bar
into the silicon
ring groove in
the center of the
strainer, then lower
the handle.
In that state, push
the slide rock at
the bottom with
the strainer and
tighten it.
Wash from side to
side while rotating
the dual cleaning
tool and strainer
in opposite
directions under
running water.
Wash each part thoroughly under running water. Except the base, all parts can be
washed with water.
NOTE

FWD
REV
1716 Kuvings Hands-Free Slow Juicer AUTO10
SILICONE PARTS
HOW TO CLEAN SILICONE PARTS
• Silicone parts can be separated and assembled.
• The silicone parts should be dried after washed and stored.
• Make sure that the silicone parts are properly inserted before assembling.
* If the silicone part is not completely inserted, the amount of undiluted juice
solution may be less, or the undiluted solution may flow out.
Pull the silicone brush from the rotary wiper to
separate it and wash it.
* After washing, insert the silicone brush with
the tail of the brush facing down in order of
“from bottom to top” through the wide part in
the middle of the wiper.
Silicone Brush
Remove the smart cap silicone from the smart
cap and wash it.
* After washing, insert silicone into the smart cap
before use.
Smart Cap Silicone
Remove the silicone ring from the juicing bowl
to clean. After cleaning, push in the silicone
ring with the smaller surface facing down.
Silicone Ring
Pull the silicone from the drum and wash it.
The pulp outlet silicone is connected to the
drum and cannot be separated completely.
After washing, Insert the silicone completely
into the groove.
If the silicone part is not completely inserted,
the amount of undiluted solution may ow out.
Pulp outlet silicone
QUICK RINSING
Close the smart cap.
01
Open the smart cap and let the water run
out of the drum.
03
Pour water through the auto hopper hole
and operate for 30 seconds.
02
It is possible to juicing ingredients one after another after simple washing. After all juicing is
completed The top set must be separated and washed fully.
NOTE
CAUTION

SMOOTHIE COARSE
1918 Kuvings Hands-Free Slow Juicer AUTO10
HOW TO USE THE CITRUS MAKER
Open the lid after
placing the drum set on
the base.
Assemble the citrus maker by inserting
the strainer and cone into the center of
the citrus maker drum.
Place the assembled drum set onto the
base to use.
01
01 02
Press the FWD button to
start the citrus maker.
02
Cut the fruits in half and
press them gently on
the cone.
(The motor rotates the
cone to extract the juice.)
03
HOW TO USE THE OPTIONAL STRAINER
Cone
Strainer
Be sure to check that silicone parts are properly inserted before use.
Remove the seeds and skins from ingredients having hard seeds or thick skins before use.
It is recommended to cut the ingredients into small pieces and freeze them.
Cut the fruit in half for juicing. The amount of resulting juice may vary
depending on the ingredients used.
Ingredients :
Frozen fruits (strawberry, pineapple, mango, etc.)
Precautions : Blank Strainer is only for frozen ingredients.
Allow the frozen items to thaw for 5 to
10 minutes before use. slowly insert small
amounts through the auto hopper hole.
*Always leave the smart cap open.
Blank Strainer
HOW TO ASSEMBLE
HOW TO OPERATE
NOTE
NOTE
CAUTION
Ingredients : Fruits (strawberry, blueberry, pineapple, mango, etc.)
Coarse Strainer
Ingredients : Frozen fruits (strawberry, mango, etc.), liquids
(milk, water, etc.)
Precautions : Allow the frozen items to thaw for 5 to 20
minutes before use. Close the smart cap. Turn
the juicer on and add the liquid first. slowly
insert small amounts through the auto hopper hole.
* Operate for at least 1 minute with the smart cap closed.
*
We recommend a 1:1 ratio between frozen ingredients and liquid.
Smoothie Strainer

2120 Kuvings Hands-Free Slow Juicer AUTO10
TROUBLESHOOTING Q&A TROUBLESHOOTING Q&A
When there is no power
• Check if the power cord is properly plugged in.
• Check if the drum lid and the juicing bowl are
properly assembled.
• Check if the top-set and the body are properly
assembled.
*
Juicer will not operate if parts are not properly
assembled and if the arrows are not aligned.
Low juice yield
• Dierent ingredients produce varying amounts
of uid that will yield dierent amounts of juice.
• If the ingredients are not fresh, they may contain
reduced amount of uid, which will yield less
juice. Soak ingredients in cold water for about
30 mins prior to juicing for the best results.
• If the ingredient itself has low water content, it
may help to soak it in water before juicing.
• If juicing ingredients with small seeds, after a
few servings, it may reduce the juice yield. For
best result, disassemble and wash the top-set
in between juicing.
*
If there is seed residue on the bottom of the
strainer, this can aect juicer's performance and
the overall juice yield.
Too much pulp in juice
• To reduce the ne pulp, clean the top-set
frequently and extract the pulp.
• Cutting down brous foods into smaller pieces
and juicing them at a slower pace can reduce
pulp buildup inside the juicer.
• If the strainer and the screw are damaged
and aecting the juicer’s performance, it is
recommended the parts be replaced.
*
The lifetime of each part may vary depending
on length and method of use and ingredients
extracted.
The auto hopper will not close
• Make sure the juicing screw is pushed all the
way into the strainer in order for the drum lid
to close properly.
*
If the juicing screw is not properly in position,
the auto hopper may not close.
Noise from the juicer
• Check if the parts are assembled correctly.
Try to reassemble the parts and check for noise.
• Do not run the juicer without any ingredients.
*
Operating the juicer without ingredients can
cause damage to the screw.
• If the juicer is operated without any ingredients
or liquid, the noise can be loud, and it can
cause the damage
• The friction noise from the juicing screw and
the strainer will disappear when ingredients
are inserted into the juicer.
• If the noise occurs when ingredients are
inserted into the juicer, check the size of the
ingredients. Do not insert any hard ingredients
that are more than 1 inch thick.
*
The noise can occur if the juicer is operated on
an uneven or slanted surface. Place the juicer on
a horizontally at surface when operating.
The extracted pulp is very moist
• During the very beginning of extraction, the
pulp can be more moist.
• There may be pulp buildup inside the juicer.
Clean the parts to remove excess pulp or
pieces of food that may be clogged.
During operation, the durm shakes.
• The juicing screw and the strainer are set up to
crush and squeeze the ingredients. It is normal
for the juicing screw and the strainer to vibrate.
• If the ingredient contains strong ber, the
vibration from the top-set may be stronger.
During juicing, the motor stopped
• Check the power cord and make sure it is
plugged in correctly.
• Check that all the parts are correctly assembled.
• If too many ingredients are inserted at one
time, this can cause the juicer to stop.
• When the juicer stops because there are too
many ingredients inserted in it, press the
REVERSE - OFF - FORWARD button in this order,
switching back and forth 2 to 3 times.
• The reverse setting will push the ingredients
up, and the forward setting will pull the
ingredients down.
• After using more than 30 minutes continuously,
the overload protection feature may stop the
juicer. Let the juicer cool for 30 minutes to 1
hours before juicing again.
• If there are hard seeds within the ingredients,
remove them before juicing. Hard seeds can
damage the juicer.
Layer separation of juice
• Depending on the density of the ingredients, the
extracted juice may show layers of dierent juices.
It is dierent from separation due to oxidation
caused by juicing with a high-speed juicer.
The auto hopper is stuck
• After juicing, let the juicer operate for another
30 seconds to extract the remaining pulp.
• If there is too much pulp in the top-set, this
can cause the auto hopper not to open. In this
situation, press the REVERSE-OFF-FORWARD
button in the order, switching back and forth 2
to 3 times.
• Pour water down the auto hopper hole to rinse
out the insides and then try opening the drum lid.
Juice dripping down the body
• If the silicone parts on the bottom of the pulp
outlet are not plugged in correctly, the juice
may seep out on to the juicer body. Before
assembling the parts, make sure the silicone
parts are plugged in correctly.
Is it possible to juice ingredients with
tough ber?
• Ingredients like celery or ginger contain long
bers that may wrap around the juicing screw
and aect the juicer’s performance. When
juicing brous ingredients, cut them down
to smaller pieces and alternate with other
ingredients. Clean the top set regularly if
juicing larger amounts of brous produce.
Plastic parts are discolored
• After juicing, if the juicer is not cleaned right
away, the remaining pulp inside the top-set
can dry up which can make disassembling and
cleaning hard. This can also aect the juicer’s
performance and color.
• Ingredients that are rich in carotenoids such
as carrots and spinach may dye plastic parts.
When the parts are dyed with carotenoids,
rub vegetable oil or lemon juice into the dyed
areas and use mild detergent to clean.
• Vegetable oil should only be used during
clean-up for parts that are discolored. Do not
use vegetable oil on the juicing screw or the
strainer. If vegetable oil or oil from animal fat
gets on the juicing screw or the strainer, this
can aect the juicer’s performance and may
result in damaged parts.
• The silicone pieces on the top-set can be
detached to be thoroughly cleaned.
Using for dierent purposes
• This juicer is designed for home use to juice
ingredients like fruits, vegetables, soaked nuts,
and soaked soybeans.
• Do not use the juicer for extracting oils or
butters.
• Do not juice ingredients with high contents of
vegetable/ animal oil.
• If vegetable/animal oil gets on the juicing
screw or the strainer, this can aect the
performance of the juicer and could result in
damaged parts.

22
Product Juicer
Model AUTO10, KSP-2529CE, KSP-2559CE, KSP-2529CB, KSP-2559CB,
KHS-2520CE, KHS-2510CE, KHS-2520CB, KHS-2510CB
Voltage AC220-240V, 50/60Hz
Power Consumption 200W
Maximum Use Less than 30 min
Weight 7.2kg
Dimension 210x253x472 mm
Manufacturer NUC Electronics Co., Ltd.
Type Low speed compression
Origin Made in Korea
SPECIFICATIONS
Table of contents
Other Kuvinos Juicer manuals
Popular Juicer manuals by other brands

Caso
Caso Whole Slow Juicer SJW 400 Original operating manual

Ceado
Ceado CP150 Use and maintenance manual

NUTRIBULLET
NUTRIBULLET JUICER PRO user guide

Jack LaLanne's
Jack LaLanne's Power Juicer operating manual

Philips
Philips Walita RI1854 Specifications

Gastroback
Gastroback DESIGN JUICER BASIC Instructions for use and recipes