Sym MMBCU User manual

TDA16T1-EU
SANYANG MOTOR CO.,LTD.
NO.3 Chung Hua Road, Hukou, Hsinchu,Taiwan R.O.C.
T +886-3-598-1911
F +886-3-597-1981
W http://www.sym-global.com/
Owner's Manual

0
This manual describes the correct usage of this scooter including safety riding, simple
inspection methods, etc. For a more comfortable and safety riding, please read this manual
carefully.
For your benefit, please ask your SYM dealer to read the manual and operate carefully the
following:
Correct use of the scooter.
Pre-delivery inspection and maintenance.
Warranty useage, contents, and period.
•In case the scooter’s specifications and construction are modified and different from the
photos and diagrams on the owner’s manual / catalogues, the specifications and
construction of the actual scooter shall prevail.
◎Safety Notification◎
We care about you and your scooter. Hence we provide safety notification of vehicle usage in
the manual. Please read and follow the instruction.
The safety notifications illustrate some potential dangers which may cause injury. Every safety
notification has specific symbol and description as following.
!CAUTION
Not following instruction will cause serious damage, even death.
!WARNING
Not following instruction may cause serious damage, even death.
!CAREFUL
Not following instruction may cause damage.
Every safety notification has description illustrating what danger may occur and how to avoid or
reduce it.
Beside the abovementioned 3 symbols, there is also one important symbol 【Attention】. Not
following may damage your vehicle.
Before your first ride on this scooter, please pay attention to the following operation.
Under Idling Start & Stop mode:
Indicator on meter
Starting method
Flashing Pull throttle or
restart
Off Restart
Contact your SYM authorized dealer, if you have any question.

1
1. Contents
1. Contents ....................................................................................................................... 1
2. Before Riding ............................................................................................................... 3
3. Safe Riding.................................................................................................................... 3
4. Driving..............................................................................................................................4
5. Use Genuine Spare Parts............................................................................................. 5
6. Parts Location and Operation...................................................................................... 6
Parts Location.................................................................................................................... 6
Parts Operation.................................................................................................................. 7
Main switch Operation....................................................................................................................11
Handlebar Switches.......................................................................................................... 12
USB Charge Unit ............................................................................................................. 13
Front Compartment .......................................................................................................... 13
Fuel Tank Cap................................................................................................................. 13
Helmet Hook ................................................................................................................... 14
Luggage Box................................................................................................................... 14
Brake.............................................................................................................................. 14
Passenger Footrest ........................................................................................................ 14
7. How to Start the Engine.............................................................................................. 15
8. How to Ride the Scooter............................................................................................. 15
9. Specification................................................................................................................ 17
10.Maintenance and Adjustment .................................................................................. 18
Routine Checks ............................................................................................................... 18
Engine Oil Check and Change........................................................................................... 18
Engine Oil Strainer Clean.................................................................................................. 18
Fuel Inspection ................................................................................................................ 19
Transmission Oil Change and Inspection............................................................................. 19
Brake System Inspection................................................................................................... 19
Throttle Free Play Inspection ........................................................................................... 21
Battery Inspection ............................................................................................................ 21
Tire Inspection................................................................................................................. 22
Steering and Front Fork Inspection..................................................................................... 22
Fuse Inspection ............................................................................................................... 23
Headlight and Tail Light Inspection..................................................................................... 23
Brake Light Inspection ...................................................................................................... 23
Turn Light and Horn Inspection .......................................................................................... 23

2
Fuel Leakage Inspection ................................................................................................... 23
General Lubrication.......................................................................................................... 24
Spark Plug Inspection....................................................................................................... 24
Cooling System Inspection................................................................................................ 24
Air Cleaner Inspection....................................................................................................... 25
11. Taking Care of Your Scooter..................................................................................... 26
Washing ......................................................................................................................... 26
Storage........................................................................................................................... 27
12.Trouble Shooting ...................................................................................................... 28
Engine Does not Start ..................................................................................................... 28
13. Periodic Maintenance Schedule .............................................................................. 29

3
2. Before Riding
This manual describes the correct usage of this scooter including safety riding, simple inspection
methods, etc.
For a more comfortable and safety riding, please read this manual carefully.
For your benefit, please ask your SYM dealer to read the manual and operate carefully the
following:
‧Correct use of the scooter.
‧Pre-delivery inspection and maintenance.
Thank you very much for your patronage
In order to maximize your scooter’s performance, a periodical inspection and maintenance
should be completely carried out.
We recommend that after riding your new scooter for the first 300 kilometers, you should
take your scooter to the original dealer for an initial inspection, and to have your scooter
inspected periodically every 1000 kilometers thereafter.
In case the scooter’s specifications and construction are modified and different from the
photos and diagrams on the owner’s manual / catalogues, the specifications and construction
of the actual scooter shall prevail.
3. Safe Riding
When driving, it is very important to be relaxed, clothe properly, follow traffic regulations, do not
rush, and always drive carefully.
Usually, most people would ride their newly bought scooters very carefully, but after they became
familiar with their scooters, they tend to become reckless, which may result in an accident.
To remind you:
Please wear a safety helmet.
Do not use cellphone during riding.
Observe the speed limit.
Perform periodical maintenance and
inspection.
WARNING
!!
For both rider and passenger, get on the scooter from the left side. Passenger should keep
both feet on the footrest to avoid getting burned by exhaust pipe.
Recover footrest when not in use to secure pedestrian’s safety.
After running, the exhaust pipe is very hot, select a suitable location to park your scooter to
avoid others getting burned by the exhaust pipe.
High temperature!
Do not touch
!

4
4. Driving
Rider’s posture will greatly affect riding safety. Always keep your body’s gravity in the center of
the saddle, if your body’s gravity is on the rear part of saddle, the front wheel load will be
reduced, and this will cause the steering handle shaking. It is dangerous to ride a scooter with
an unstable handle.
Turning
•It will be much easier to make a turn if rider inclines his body inward when turning. On the
other hand, the rider will feel unstable if his body and the scooter do not incline.
Key point for turning:
①Decelerate before turning.
②Keep steady speed when turning.
③Accelerate properly when exiting turn.
④After exiting turn, make sure road safety then
reaccelerate.
Braking
•Apply both front and rear brake when
braking. Avoid hard/sudden braking and
keep vehicle and brake force steady.
Do not lock the brake. On well-paved road,
the front brake should be applied a bit more
than the rear. The brake force should be
adjusted according to the road condition.
Apply less front brake force on worse
road condition.
Correct
Wrong
One finger width
Wrist angle
②
③
④
Centrifugal
force
Gravity
Gravity
center
①
Inertia force
Brake force
Gravity
Brake force
Gravity

5
•The scooter is hard to control on a bumpy, unleveled, unpaved road, try to know the road
conditions in advance, slow down and use your shoulder’s force to control the handle.
Caution
•Do not place flammable materials such as rags between the body side cover and
engine to avoid components damaging by fire.
•Do not load objects on areas not specified for loading to avoid damage.
•Overload may affect handlebar operation.
•The rider’s feeling on the handle is slightly different with a load or without a load.
Overload may cause the handle to swing and affects the riding safety.
•Modified scooter will affect its structure or performance, and cause poor engine
operation or exhaust noise, which will result in shortening the scooter’s service life. Do
not modify your scooter at will.
•Turn off main switch and then turn on to restart the engine, when the vehicle falls down
and goes off.
To remind you:
•Wear a helmet when riding.
•Be sure to inspect your scooter before every ride
•Keep safety distance when riding.
•Decelerate when crossing intersection.
•Yield to moving pedestrians and vehicles.
•Do not modify your scooter at will.
•Turn on headlight in morning and at dawn.
•Do not drink and drive.
•Do not use cellphone when riding.
5. Use Genuine Spare Parts
In order to maintain the scooter’s best performance, each part’s quality, material, and
machined precision conform with the design requirements. “SYM Genuine Spare Parts” are
made from the same high quality materials used for the original scooter. No parts would be
sold to the market until they could meet the designed specifications through sophisticated
engineering and stringent quality control. Therefore, it is necessary to purchase “SYM
Genuine Spare Parts” from “SYM Authorized Dealers or Franchised Dealers” when replacing
spare parts. If you buy cheap, or fake substitute parts from the market, no guarantee can be
provided either for the quality or durability. Also, it may result in unexpected troubles and
lowering the scooter’s performance.

6
6. Parts location and operation
Parts Location
DRGBT
(5)
(4)
(1) Front brake lever
(2) Speedometer
(3) Rear brake lever
(3)
(7) Fuel cap
(8) Front fork
(9) Seat/luggage box
(10) Fame number
(19) Front winker
(20) Position light
(21) Headlight
(22) Left handle switch
(1)
(6)
(4)Brake fluid reservoir
(5) Oil level gauge
(6) Fuse box
(7)
(8)
(9)
(10
)
(12)
(13)
(14)
(15)
(16)
(17)
(18)
(11) License light
(12) Air cleaner
(13) Rear cushion
(14) Pillion step bar
(15) Coolant level inspection window
(16) Engine number
(17) Main stand
(18) Side stand with side stand switch
(19)
(20)
(22)
(23)
(24)
(25)
(26)
(27)
(28)
(11)
(29)
(30)
(23) Throttle grip
(24) Right handle switch
(25) OBDI coupler/battery
(26) Multi-function main switch
(27) USB charge unit
(28) Tail/brake light
(29) Rear winker
(30) Muffler
(21)
(2)

7
Parts Operation
LED speedometer
ⒶSide Stand Down Indicator Light
This indicator comes on when the side stand is kicked down. The engine cannot be started
when the side stand is down. The engine will be stopped if the side stand is kicked down
while the engine is running. This indicator goes off when the side stand is up.
ⒷTurn Signal Indicator Light
The corresponding turn signal indicator light blinks when the turn signal switch is pushed to
the right or left.
ⒸIdling Start & Stop Indicator Light
Turn the Idling Start & Stop switch to “ ” position to enter Idling Start & Stop mode. Turn the
Idling Start & Stop switch to “OFF” position to exit Idling Start & Stop mode.
When side stand is up and the scooter is ridden and reaches the setting condition, the Idling
Start & Stop indicator “ ”is on, the Idling Start & Stop mode is activated.
When speed is less than 1km/h or the scooter is idling, the Idling Start & Stop indicator
“ ” will blink 3 times and then engine will go off automatically and the Idling Start & Stop
indicator “ ” will keep blinking. During riding, the Idling Start & Stop indicator “ ” is on
without blinking.
When the engine is off under the Idling Start & Stop mode, slightly open the throttle or press
the electrical start button while applying brake to re-start the engine.
Waiting time protection: When the engine is off under the Idling Start & Stop mode, the
engine cannot be re-started after 4 minutes waiting without starting. To avoid mistakenly
touching the throttle and the engine is started, the Idling Start & Stop mode is cancelled
automatically. To re-start the engine, please press the electrical start button while applying
brake.
Pushing protection: When the engine is off under the Idling Start & Stop mode, and you
are pushing the scooter for more than 5 seconds, the Idling Start & Stop mode is
Ⓐ
Ⓗ
Ⓖ
Ⓑ
Ⓒ
Ⓓ
Ⓔ
Ⓕ
Ⓘ
Ⓙ
Ⓚ
○
L

8
cancelled automatically to avoid mistakenly touching the throttle and the engine is started.
To re-start the engine, please press the electrical start button while applying brake.
Under the Idling Start & Stop mode, when the engine cannot be re-started by slightly
opening the throttle. Please turn off the Idling Start & Stop mode and have your scooter
checked by an authorized SYM dealer.
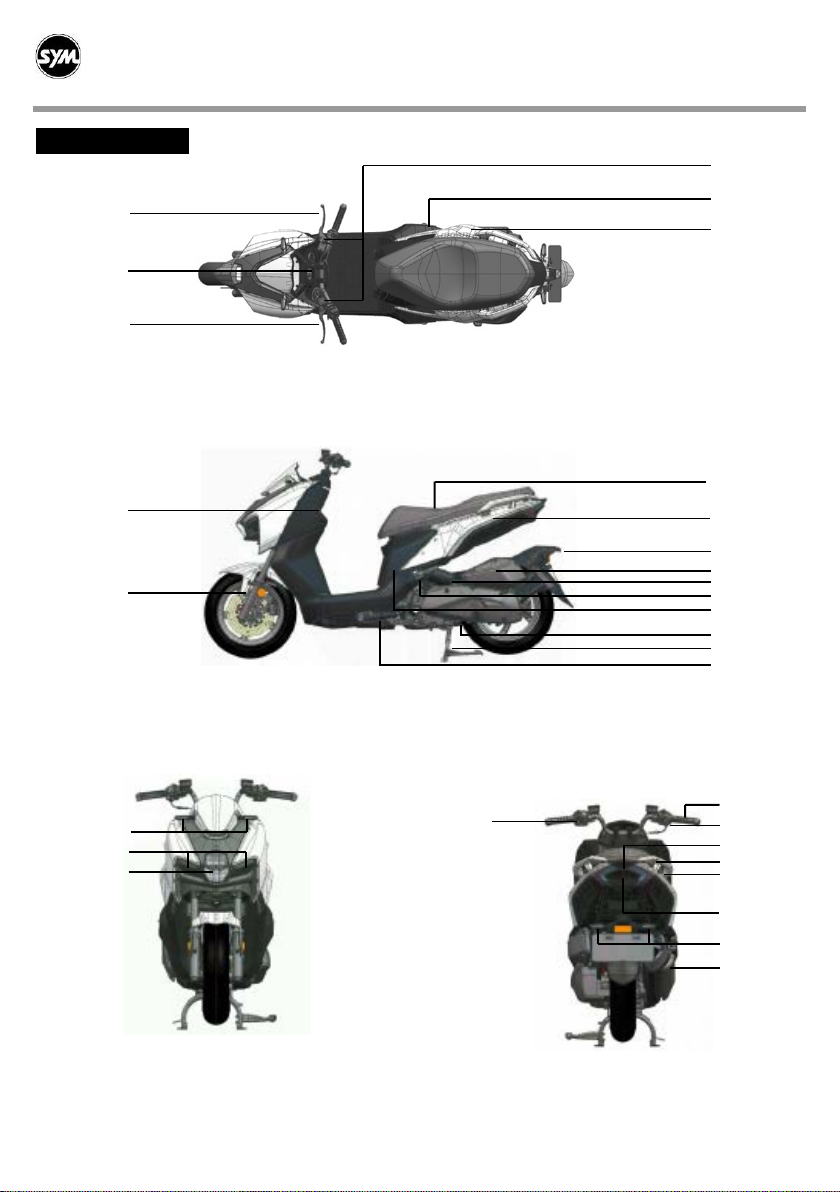
ⒹOil Check Indicator Light
The oil check indicator shows how long the engine oil is used. The oil check indicator light
turns on at every 1,000km riding distance according to the oil distance meter.
When this indicator comes on, please check the oil level by oil level gauge. In oil meter
mode, quickly press the S button twice to reset the oil check indicator light.
ⒺEFi Warning Indicator Light
When the main switch is turned on, the EFi warning indicator remains on initially. It should
go off immediately after the engine is running. It displays the condition if the EFi system is
working correctly. If there is any problem on the EFi system, the warning indicator remains
on all the time. Please contact your SYM authorized dealer if this indicator goes on.
ⒻHigh Beam Indicator Light
The high beam indicator turns on with high beam headlight is turned on.
ⒼOdometer
shows the total distance in kilometers the scooter has been ridden, ranging
0~99999km,and will return to 0 and starts working again.
shows the distance in kilometers since it was last reset to zero, ranging
0.0~999.9km,and will return to 0 and starts working again.
In trip meter mode, push S button for more than 2 seconds to reset trip meter.
records how long the engine oil is used, ranging 0.0~9999.9km,and will return to 0
and starts working again.
In oil distance mode, quickly push S button twice to reset oil distance meter.
Switch // by pushing M button.
ⒽABS Indicator Light
The ABS (Anti-lock Brake System) indicator light goes on when the main switch is turned on
and goes off shortly after the scooter starts moving. If the ABS is normal, it stays off. If
something is wrong with the ABS, the indicator goes on and stays on. When the indicator
light is on, the ABS does not function, but if the ABS fails, the conventional brake system will
still work normally.
ⒾEngine Overheat Indicator Light
When engine overheat indicator light is on during riding, the coolant temperature is
overheated. Please check if the coolant is within standard level. Contact your SYM
authorized dealer, if there is abnormal situation.
ⒿTCS Indicator
The TCS indicator flashes when traction control has engaged. If the traction control system is
turned off, this indicator will go on. This indicator comes on whenever the ignition switch is
turned off and turned to “On” position; this indicator will not go off until the engine is started. If
the indicator does not go on after turning the ignition switch on, or if the indicator remains on
when the engine is started, have the scooter checked by an authorized SYM dealer.

9
ⓀFuel Gauge /Low fuel Indicator Light
This digital fuel gauge shows the fuel level when the main switch is turned on. There are 5
sectors in the fuel gauge. F means full and E means empty. The low fuel indicator will be on
when the fuel level is at E. please refuel the fuel tank immediately.
CAUTION
!!
Turn main switch to “ ” position, press the start button and pull the brake lever for the first
engine start.
Turn the Idling Start & Stop switch to “ ” position, the Idling Start & Stop mode is activated
only when the scooter is ridden and reaches the setting condition (engine heated).
For safety start, it is recommended pull the brake lever while pulling throttle for starting.
When engine temperature is low or the previous engine stop is not controlled by EFi system,
the Idling Start & Stop mode will not be activated.
When Idling Start & Stop switch is turned on, the engine will stop while idling, so the EFi
system is not able to timely adjust the idle learning and O2 sensor learning. It is suggested to
turn off the Idling Start & Stop switch and carry out the idle speed learning every 5,000km.
When the idle learning step is not proper, the engine start can possibly be difficult. When the
starting RPM is low, the EFi system will automatically cancel the Idling Start & Stop
mechanism, hence there will be no Idling Start & Stop function for EFi compulsory idling
learning.
Idling start & stop mechanism can be recovered when main switch is turned off and turned on.
Vehicle speed is very important for Idling Start & Stop mechanism. For driving safety, if the
speed is abnormal, please Contact your SYM authorized dealer for repair.
Display Shift
When the main switch is turned on, under “TOTAL” mode, the below display mode can be shifted
circularly by pushing the M button once.
shows the total distance in kilometers the scooter has been ridden and
cannot be reset.
Under mode, push S button for more than 2 seconds to reset.
Under “UNIT” mode, push S button for more than 2 seconds , metric/imperial can be
interchangeable.(Including speed/TOTAL/TRIP/OIL)
Time Setting
This clock displays 24-hour mode.
When the main switch is turned on, this clock will display 24-hour mode.
•Under mode, push the “M” button for more than 2 seconds to enter time setting mode.
Quickly push “M” button (0.5 second) to select setting mode (hour→tens digit in minute→
units digit in minute→exit), quickly push “S” button (0.5 second) once the digit will increase 1
each time. If the clock is idled about 30 seconds while setting, it will exit setting mode
automatically and starts working again.
UNIT

10
Battery Voltage Gauge
The battery voltage display shows current battery voltage. Under “OIL” mode, quick push “M”
button to siwtch to battery voltage mode “”. It is forced to display about 10 seconds
when the ignition switch is turned on.
CAUTION
!!
•If the battery voltage is below 11.5V when the main switch is turned onhave your scooter
checked by an authorized SYM dealer.
•If the battery voltage is below 10.0V or above 15.0V when the engine is running, have your
scooter checked by an authorized SYM dealer.
CAUTION
!!
•Do not clean the speedometer, headlight, and other plastic parts by using organic solvents.
•When the scooter is used under high moisture environment, there could possibly be vapor
condensed in speedometer and lights. It is considered as a normal situation, if the vapor
evaporates gradually.
•Remove the protection film sticker on the speedometer before using the scooter. Or the
speedometer display can possibly be unclear, when the stick deteriorates under sun light and
rain.
•Check/replace engine oil at the first 300 km; and check every 1,000 afterwards
•If the oil check indicator
does not light on when the scooter reaches oil replacement mileage,
have your scooter checked by an authorized SYM dealer.

11
Main Switch Operation
ⒶIgnition Key Slot
The ignition key into the ignition key hole to operate the ignition switch.
Ⓑ“On” Position
Engine can be started in this position. Ignition key cannot be removed.
Ⓒ“Off” Position
Engine can be turned off in this position. Ignition key can be removed.
Ⓓ“Fuel Lid” Position
The fuel lid can be opened in this position. Turn the ignition key to “OFF ” position, push the
ignition key and turn clockwise to open the fuel lid.
Ⓔ“Lock” Position
The handlebar can be locked in this position. Turn the ignition key to “OFF ” position to stop the
engine. Turn the handlebar fully to the left. Push the ignition key anti-clockwise to lock the
handlebar. The ignition key can be removed in this position. To unlock the handlebar, turn the
ignition key clockwise to “OFF ” position.
Ⓕ“Seat Open” Position
The seat can be opened in these positions.
In“ON”position, turn the ignition key clockwise, the ignition key will return to“ON”position
automatically.
In“OFF”position, turn the ignition key anti-clockwise, the ignition key will return to “OFF”
position automatically.
In“Lock”position, turn the ignition key anti-clockwise, the ignition key will return to “Lock”
position automatically.
ⒼMagnetic Shutter
Push the “PUSH SHUT” button to close the ignition key slot.
ⒽShutter Opener
Align the projection ○aE A of the shutter key with the shutter slot, and turn the shutter key
clockwise to open.
CAUTION:
Remove protection film sticker on the main switch to avoid it stuck into the main switch and
cause malfunction.
Do not attach too many objects to the ignition key to prevent interfering the workability of the
ignition switch.
Ignition Key
○
Ⓑ
Ⓒ
Ⓓ
Ⓔ
Ⓕ
Ⓗ
ⓐ
Ⓐ
Ⓖ

12
Handlebar Switches
Daytime Running Lights System
Turn the main switch to “ON” position, the position light, tail light, and license light will be on at
the same time.
After the engine is started, the headlight will be on. Until the main switch is turned to “OFF”
position, all lights will be off.
This is to increase the visibility at daytime and to secure road safety.
ⒶPassing Light Button / Dimmer Switch
When pushing the passing light button , the high beam indicator light goes on to signal the
driver of the vehicle ahead that you are about to pass. Release to recover its original position.
High and low beam can be selected with this switch. When the headlight is on high beam , the
high beam indicator light goes on.
High beam
Low beam
ⒷEngine Stop Switch
This switch should normally remain in the position for the scooter to operate. In an
emergency, switch to the position to stop the engine.
ⒸTurn Signal Switch
When the turn signal switch is turned to the left or right , the corresponding turn signals
blink on and off. To stop blinking, push the switch in.
ⒹHorn Button
When the horn button is pushed when the ignition switch is turned on; the horn sounds.
WARNING!!
When the main switch is turned to “ON”
position, Daytime Running Lights System is activated. If
the engine is not started for a long time to recharge the battery, the battery will be dried out of
power.
Ⓐ
Ⓖ
Ⓑ
Ⓒ
Ⓓ
Ⓔ
Ⓕ
Ⓐ
Passing Light Button/ Dimmer Switch
ⒷEngine Stop Switch
ⒸTurn Signal Switch
ⒹHorn Button
Ⓔ
Hazard Switch
ⒻIdling Start & Stop Switch
ⒼStarter Button

13
ⒺHazard Switch
Turn on the hazard switch, all the turn signal lights and turn signal indicators will blink.
At this time, turning main switch to OFF position cannot cancel the hazard function, and it
will keep consuming battery power. Please do not use for a long period, or the engine
probably cannot be started. To turn off the hazard function, the main switch has to be
turned to “ON” position.
ⒻIdling Start & Stop Switch
Turn the Idling Start & Stop Switch to “” position to activate the Idling Start & Stop mode.
Turn the switch to “OFF” position to exit.
ⒼStarter Button
For electrical starting the engine, please push the starter button.
Turn the ignition switch on; push this button while holding the front or rear brake lever to start
the engine.
USB Charge Unit (with blue LED )
•Rated voltage: Main switch “ON”, DC 12V input
•Voltage usage range: 10.5V~16V
•Output voltage: DC3.6V~12V±10%V,blue LED on
•Output ampere: 3.0±10%A , 2.0A±10% A, 1.5A±10% A, auto shift
•Fast charge support BC1.2, QC2.0/3.0, auto shift
•Overload protection: Over 3.3A, blue LED off
•Overheat protection: Output cut off when temperature
is above 135°C; output recover when temperature at 100°C.
•USB waterproof cover: USB socket has to be kept clean and dry. The USB waterproof cover
can help prevent dust from getting in and reduce oxidization of the socket.
Front Compartment
•Do not overload the front compartment to avoid
affecting handlebar operation.
•When washing your scooter, remove your valuables
from front compartment to avoid damage.
Fuel Tank Cap
Insert ignition key to main switch and turn
counterclockwise to open the fuel tank cap.
After refilling fuel, press close the cap until “click” sounds.
WARNING
!!
It is suggest not to use the hazard function under Idling Start & Stop mode. If hazard function
and Idling Start & Stop are activated at the same time, it is possible to dry out battery power.
WARNING
•To avoid engine damage, do not push the starter button after the engine is started.
•For safety reason, the brake has to be applied for electrical starting.
USB charge
unit
Waterproof
cover
Fuel tank cap
Front compartment

14
Helmet Hook
•Open the seat and hang helmet on the
helmet hook, then lock the seat.
Luggage Box
•The luggage box is under the seat.
•Maximum load: 10 kg.
•Please check if the seat is locked properly.
•Do not put things, such as electrical products, fresh produce, and high evaporation products,
which are easily affected by heat in the luggage box due to the high temperature transmitted
from engine.
•Take away your valuables before leaving the scooter.
•Remove things from luggage box before washing the scooter.
Brake
•Avoid unnecessary sudden brakes.
•Slow down in rain ride and apply early brake.
•Long time and continuous brake will make the
brake overheated and reduce brake force.
•Apply both front and rear brakes.
Passenger Footrest
•Flip down the footrest for passenger usage. A
•Fold up the footrest when not in use. B
CAUTION
•Gasoline is extremely flammable and can be explosive under certain conditions. Do
not smoke and turn the ignition switch off when fueling. Make sure the area is well
ventilated and free of any flammable source.
•Never fill the fuel tank to the top. If the tank is filled to the top, heat may cause the fuel
to overflow.
•Make sure the fuel tank cap is closed securely after refueling.
•Wipe off the gasoline immediately if it is
spilled out on the scooter.
WARNING
•Do not hang helmet on the helmet hook
while riding.
CAUTION
!!
Fold up footrest when not in use to secure pedestrian’s safety.
For front brake
For rear brake
A
B
Helmet hook

15
7. How to Start the Engine
Turn the main switch to “ ON ” position.
Do not pull throttle; under brake condition,
push starter button.
8. How to Ride the Scooter
Moving Off
•Turn on your turn light before moving off and
make sure surrounding area is clear and safe.
•Make sure your main / side stand is up before
moving off.
Throttle Control
•To accelerate, slowly open the throttle Ⓐ.
•To decelerate, close the throttle Ⓑ.
Parking and Turning off Engine
Closing to parking position
•Turn on your turn light to notice other vehicles, decelerate, and pull over.
•While closing throttle, apply your front and rear brakes at the same time
Fully stop
•Recover your turn light and turn main switch to “ OFF ” position to stop the engine.
After stopping the scooter, step down from the left side of the scooter and park with
main stand on a level ground.
Lock the scooter and remove the ignition key after parking the scooter properly.
CAUTION
•Check engine oil and fuel before starting the engine.
•To avoid sudden dash, start the engine while rear brake is applied
•
Check if the Idling Start & Stop switch is turned on and the indicator is on for Idling Start &
Stop standby.
ⒷⒶ
Full
close
Full
open

16
CAUTION
•Do not turn your main switch with ignition key during riding.
•After running, the exhaust pipe is very hot, park the scooter away from pedestrian and
children. Keep combustibles away from exhaust pipe.
•On the occasion of long term not using the scooter, it is suggested to start the engine for
around 10 minutes every week to maintain the best engine starting condition.
Transmission
This scooter is equipped with CVT mechanism. CVT can timely and smoothly transfer engine
power to wheel according to road condition, loading, speed, and other factors. There is no need
to change between gears.

17
9. Specification
※In case the scooter’s specifications and construction are modified and different from the photos and
diagrams on the owner’s manual / catalogues, the specifications and construction of the actual scooter shall
prevail.
Model MMBCU (TDA6T1-EU)
Length/Width/Height (mm) 1,990 / 740 / 1,120
Curb weight / Maximium load 136kg / 286kg
Wheel base / Seat height 1,380mm / 803 mm
Min. turning radius 2.0 m
LED headlight (High / Low beam) LED / LED
Position light LED
Tail / brake light LED
Front / rear turn light LED
Turn light indicator LED
High beam indicator LED
Fuse 20A*1 15A*1 10A*2 5A*3
Battery GT7B-BS/YT7B-BS 12V 6.5Ah
Spark plug CPR8EA-9
Front brake Disk (Ø 260mm)
Rear brake Disk (Ø 230mm)
Tire (Front / rear) 120/70-13 130/70-13
Tire pressure (Front / rear) 1.8 kgf/㎠/ 2.3 kgf/㎠
Max. horse power 15.6 PS / 8,000 rpm
Max. torque 15.0 Nm / 6,000 rpm
Climbing Ability 28°
Cylinder bore x stroke Ø59.0 ㎜×57.8 ㎜
Compression ratio / displacement 11.2:1 / 158 cc
Idle speed 1,750 ±150 rpm
Ignition system / starting system Full transistor ignition / electrical starter
Fuel tank capacity 7.4 L
Engine oil capacity 1.05 L (total), 1.0 L (change)
Transmission oil capacity 110 c.c. (total), 100 c.c. (change)

18
10. Maintenance and Adjustment
Routine Checks
Engine Oil Check and Change
•Park the scooter at level ground with main stand. Turn off the engine and wait for 2~3 minutes.
Remove the oil level gauge, clean it and insert (not tighten) to check the oil level.
•Check if the oil level is between upper and lower limit.
•If the oil level is at the lower limit, refill oil to upper limit.
•Please choose oil grade that is equal to (or greater than) SAE 5W-40 ~ SAE 20W-50 API SL.
SYM is not responsible for any damage caused by improper oil.
•The genuine “SYMOIL” are designed and recommended for your vehicle.
Engine Oil Strainer Clean
•Remove cap and strainer. Clean the strainer
with gasoline or compressed air.
Item
Check point
Engine oil Sufficient engine oil?
Fuel
Sufficient fuel?
Brake
Front
Brake lever free play 1~2cm
Rear
Brake lever free play 1~2cm
Tire
Front
Tire pressure1.8kgf/㎠
Rear
Tire pressure 2.3kgf/㎠
Handle bar
Abnormal vibration or difficult operation?
Speedometer/lights/back mirror
Functioning well? Lights illuminates? Can see the
rearview clearly?
Major tightening parts
Loose screw, nut, or bolt?
Battery
Battery voltage lower than 11.5V? (20°C)
Caution
•If there is abnormal in routine check, please contact your SYM authorized dealer for repair.
CAUTION
•After the cap is removed, strainer, magnet, and spring will fall out. Do not lose these parts.
Strainer
Spring
Cap
Magnet
This manual suits for next models
1
Table of contents
Other Sym Motorcycle manuals

Sym
Sym Joyride125 User manual

Sym
Sym XC12 Series User manual

Sym
Sym MAXSYM 400i User manual

Sym
Sym Fiddle III 50i CC User manual

Sym
Sym JET 14 XC05W1-EU Series User manual

Sym
Sym Wolf SB 250 Ni User manual

Sym
Sym CRUiSYM 300i User manual

Sym
Sym Symba 110 MB10A7 Series User manual

Sym
Sym VS150 User manual

Sym
Sym HD2 125 User manual