Kystar KS800 User manual

Kystar KS800 2K HD Big LED Display Video Processor
Multi-Window Processor
1
Full-Color LED Multi-Window
Video Processor
User Manual

Kystar KS800 2K HD Big LED Display Video Processor
Multi-Window Processor
2
Safety precautions
Danger
● High voltage exists in the device and non-professional maintenance personnel shall never open its back
cover, lest risks happen.
Warning
●This is not a waterproof device, so appropriate waterproof measures shall be taken in a damp
environment;
●Never have this device kept near any fire source or high temperature environment;
●If this device gives out strange noise, smoke or smell, unplug the battery socket immediately and contact
with its dealer;
●Never plug/unplug any charged VGA, DVI or HDMI signal cable.
Caution
1. Please read this Manual carefully before operation and keep it properly for future use.
2. In the case of lightning or long-term downtime, please unplug the power socket.
3. This device is not suitable for non-professional debugging or operation, so please use it under the
guidance of professionals;
4. Never force anything into this device from its air vent, lest device damages or accidents happen;
5. This device should not be placed or used near water or wherever wet;
6. This device should not be placed or used near cooling fins or wherever hot;
7. Please clear up and keep the power lines properly to prevent damages;
8. If the following situations occur, unplug the power socket of this device and contact for maintenance:
●When this device is contaminated with liquid;
●When this device is dropped or its framework is damaged;
●When this device suffers from significant dysfunction or obvious performance deterioration

Kystar KS800 2K HD Big LED Display Video Processor
Multi-Window Processor
3
Table of Contents
I. Product descriptions ..............................................................................................................................4
II. Product features....................................................................................................................................5
III. Technical specifications......................................................................................................................6
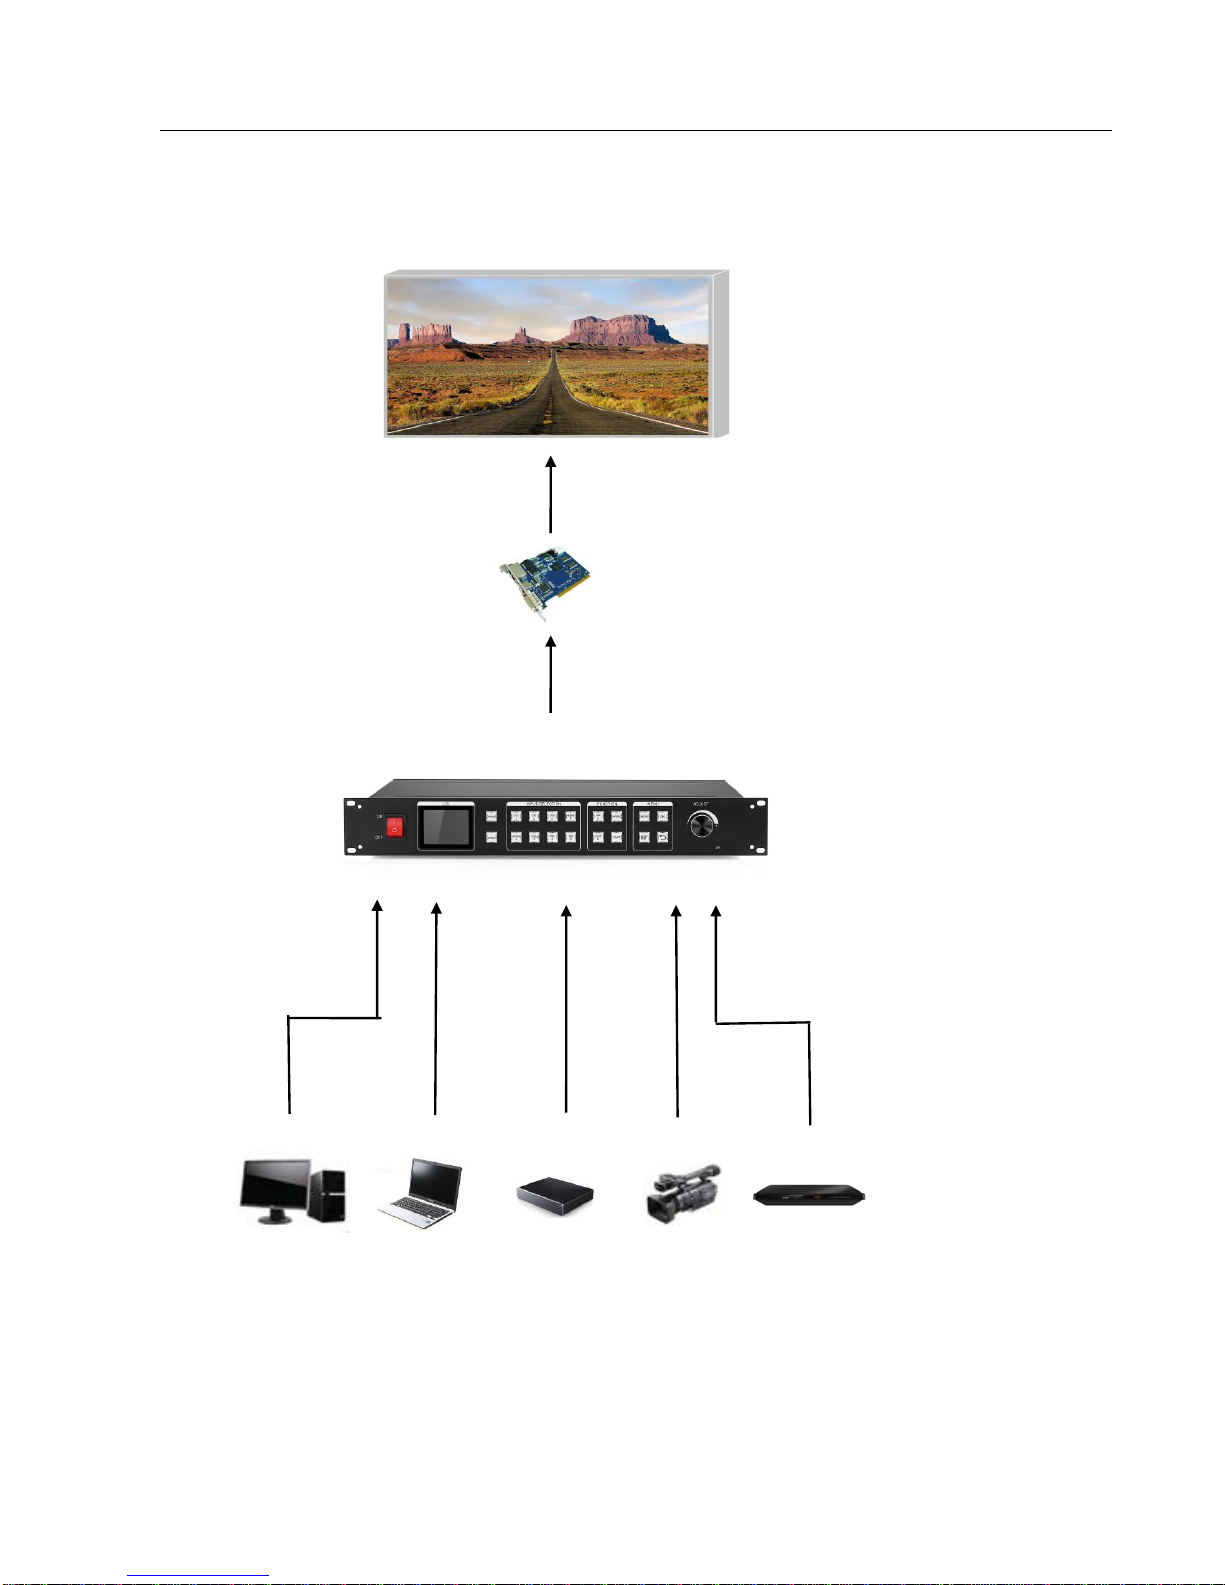
IV Work schematic diagram......................................................................................................................8
V. Panel structure......................................................................................................................................9
Front panel.........................................................................................................................................9
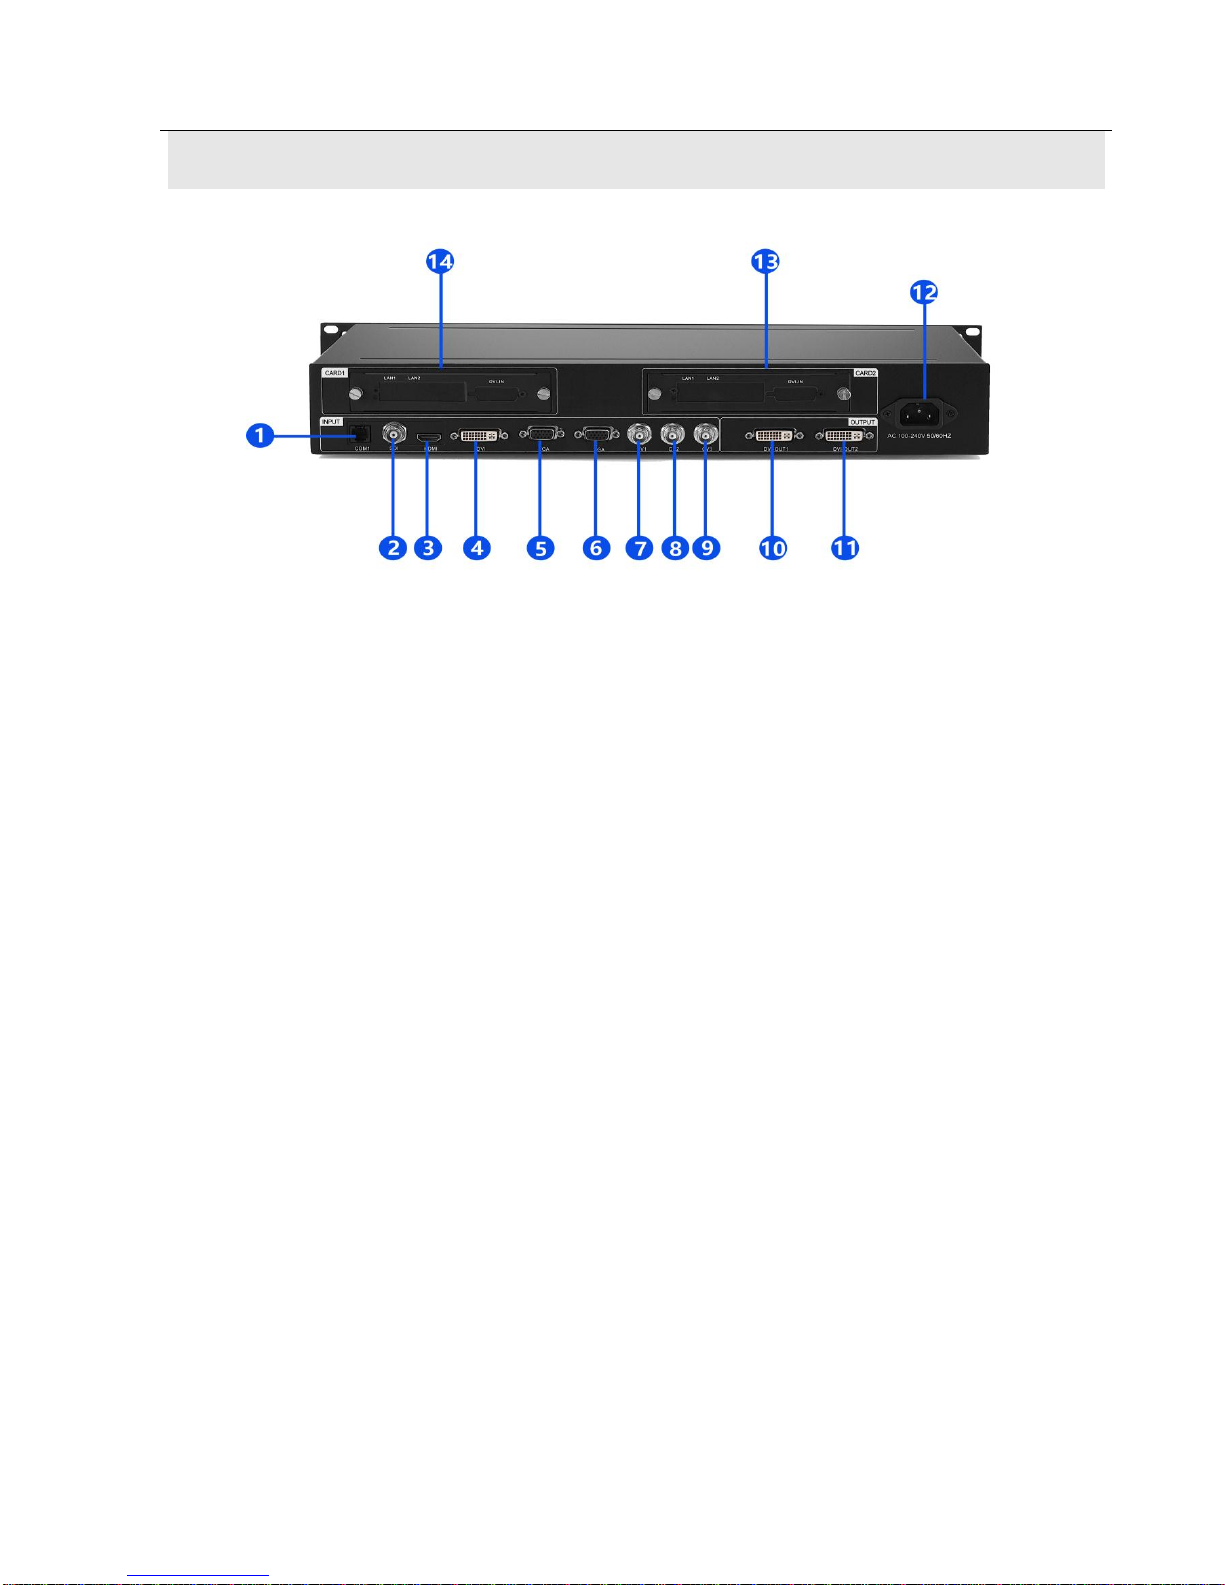
Back panel........................................................................................................................................10
VI. Wiring and installation......................................................................................................................11
Wiring diagram ................................................................................................................................11
Installation steps...............................................................................................................................11
VII. Settings............................................................................................................................................12
Full-screen........................................................................................................................................12
1. One transmitter card has one frame enabled;........................................................................12
2. One transmitter card has two frames enabled;......................................................................14
3. Two transmitter cards have one frame enabled;....................................................................17
4. Two transmitter cards have two frames enabled;..................................................................19
Partial debugging.............................................................................................................................22
1. Single-window partial display ..............................................................................................22
2. Double-window partial display.............................................................................................24
VIII. Control menu..................................................................................................................................26
(1) Language options .......................................................................................................................28
(2) Factory Settings..........................................................................................................................28
(3) Technical support .......................................................................................................................29
(4) Output resolution........................................................................................................................29
(5) Output settings............................................................................................................................29
(6) VGA settings ..............................................................................................................................29
(7) Brightness settings......................................................................................................................29
(8) Image static ................................................................................................................................29
(9) Sound settings ............................................................................................................................29
(10) Expert settings..........................................................................................................................29
IX. FAQ...................................................................................................................................................30

Kystar KS800 2K HD Big LED Display Video Processor
Multi-Window Processor
4
I. Product descriptions
With the rapid development of the LED display industry and the growing demands for applications, all control
requirements arise at the right moment for controlling of the large-screen control system. However, due to the
limitations to the large-screen control system in image processing, frame control and signal format conversion, the
LED large-screen control system is somewhat weak and can not meet users’ needs mainly because:
1. The signal source access format is limited for LED large-screen control systems and currently only the digital
DVI signal can be used, but many signal sources (for example, VGA, etc.) can't be directly displayed on an LED led
screen through the control system;
2. The traditional signal acquisition card is poor in its image processing effect, which will have the image
definition suffer from bigger loss during signal format conversion;
3. The LED large-screen control system can only capture and display the images at the corresponding pixels on
the LED led screen, while some users need casual display of partial or complete computer desk pictures freely at the
scene;
4. With the constant decrease of the LED screen spacing and the constant increase of the on-screen pixels, the
era will no longer exist for a single loaded card to display a single frame on a single display screen and more
application and display demands will be highlighted, so the LED large-screen control system can not properly satisfy
customer's needs unless better cooperation is available with other peripheral device.
For the above problems, our company has independently researched and developed many video processing
products. Our products have integrated advanced control and image processing technology, not only able to achieve
rapid and stable signal switching but also able to complete multi-layer processing of images. In addition, such
products can be controlled and operated simply and conveniently through the device keyboard and PC.

Kystar KS800 2K HD Big LED Display Video Processor
Multi-Window Processor
5
II. Product features
1. Support independent operation on the control panel; the knob and number key design offers more
convenience for device use;
2. Support host PC software control to realize visual and quick operation by virtue of the software operation and
display synchronization;
3. Support perfect fade-in and fade-out switching;
4. Support image display enhancement on brightness and contrast;
5. Support double-window display for arbitrary roaming among PIP, POP and window location;
6. Support arbitrary frame size zooming (The window is adjustable point by point, able to be reduced to a pixel);
7. Support the motion compensation to eliminate picture tailing;
8. Support the noise reduction processing to reduce the noise stains;
9. Support HSD video signal input (8 channels, SDI optional), audio input (4 channels) and audio output (1
channel);
10. Support the maximum output resolution of 2560×1536;
11. Support the keyboard lock function to prevent wrong operation of the field personnel after construction
debugging;
12. Support to save and call five scene modes;
13. Support shortcut settings (smart settings) of the navigation;
14. The international 1.5U standard height can facilitate handling and installation;
15. Support wireless remote control corresponding to the buttons on the front panel one by one, with the
interface specifically as follows (See the front panel structure for details):

Kystar KS800 2K HD Big LED Display Video Processor
Multi-Window Processor
6
III. Technical specifications
The video processor has integrated the latest patented video processing technology, able to manage the video
conversion of arbitrary format input and corresponding format output as well as process and enhance such video
signals as CVBS (composite video), HDMI, VGA (RGB) and DVI-D to meet customers’ application requirements.
The detailed specifications are as follows:
Compound (BNC input)
Number of Inputs
3
Supported Standards
PAL/NTSC
Signal Level
1Vpp±3db (0.7V Video+0.3v Sync )
75Ω terminal interface
HDMI input
Number of Inputs
1
Supported Standards
HDMI 1.3 , EDID 1.3
Signal Level
1Vpp±3dB (0.7V Video+0.3v Sync )
75Ω terminal interface
VGA(DB15 input)
Number of Inputs
2
Interface form
Standard DB15 socket
Supported Resolution
VGA-UXGA
Signal Level
R, G, B, Hsync,Vsync:0 to1Vpp±3dB (0.7V Video+0.3v Sync )
75Ω terminal interface
Black level: 300mV Sync-tip: 0V
DVI Input
Number of Inputs
1
Input interface form (Connector)
Standard DVI-D socket
Supported Resolution
SMPTE: 625/25 PAL, 525/29.97
NTSC, 625/50p PAL, 525/59.94p
NTSC, 1080P60,1080i50, 1080i59.94/60, 720p50 and
720p59.94/60
VESA: 800×600@60Hz,1024×768@60Hz,1280×768@60Hz,
1280×1024@60Hz,1600×1200@60Hz,1920×1080@60Hz
Signal Level
TMDS level, single pixel input, 165MHZ bandwidth
Standard
DVI 1.1

Kystar KS800 2K HD Big LED Display Video Processor
Multi-Window Processor
7
DVI Output
Number of Outputs
2
Interface form
Standard DVI-D interface
Supported output resolution
1024×768@60Hz,1280×1024@60Hz
1366×768@60Hz,1440×900@60Hz
1600×1200@60Hz,1680×1050@60Hz
1920×1080@60Hz,1920×1200@60Hz
1536×1536@60Hz,2560×1536@60Hz
Signal level
TMDS level, 165MHZ bandwidth
Auxiliary
“CE” standard certification
BS EN 55013:2001+A1:2003+A2:2006
BS EN 61000-3-2:2006+A2:2009
BS EN 6100-3-3:2008
BS EN 55020:2007
BS EN 6006:2002+A1:2006+A11:2008
Computer control
RS232
Power supply
85-264V 2A IEC-3 power supply interface
Work environment
0°C~45°C
Storage environment
10% to 90%
Product warranty
3-year-long limited warranty

Kystar KS800 2K HD Big LED Display Video Processor
Multi-Window Processor
8
IV Work schematic diagram
LED led screen
Transmitter card
Video processor
Desktop Laptop STB Camera DVD

Kystar KS800 2K HD Big LED Display Video Processor
Multi-Window Processor
9
V. Panel structure
Front panel
(1) POWER - Device switch, OFF (Power OFF), ON (Power ON)
(2) LCD - Text display screen, able to display the menu, parameters and other information
(3) (13) WIN1, WIN2 –Window 1 and Window 2, click on the main menu to set the frame parameters
(4) (5) (6) CV1~3 –Keys for compound signal channels
(7) HDMI- Key for HD multimedia channel
(8) PIP –Key for double-window shortcut setting
(9) MODE –User mode call
(10) MENU –Main Menu
(11) OK –Enter key
(12) ADJUST –Key for increase/decrease; press down and it can act as an Enter key
(14) (15) VGA –Key for analog signal channel
(16) DVI –Key for digital signal channel
(17) SDI –Serial digital interface
(18) OUT - Switching among black screen, blue screen and normal
(19) PART –Partial/Full View switching
(20) Navigation key - User navigation mode, acting as a step length adjuster in time of data regulation
(21) Arrow mark - Backspace key
(22) FIR - Infrared sensing

Kystar KS800 2K HD Big LED Display Video Processor
Multi-Window Processor
10
Back panel
(1) COM -1-------------------------------------------- Host PC software interface
(2) SDI--------------------------------------- SDI signal input interface for high-definition cameras, etc.
(3) HDMI------------------------------------ HDMI signal input interface for laptops, etc.
(4) DVI-------------------------------------- DVI signal input interface for desktops, etc.
(5)(6) VGA--------------------------------- VGA signal input interface for laptops, etc.
(7)(8)(9) CV-1/2/3------------------------- Compound signal input interfaces for cameras, etc.
(10)(11) DVI-OUT1/2-------------------- DVI output to connect transmitter cards, etc.
(12) Power port -----------------------------220V power port
(13)(14) CARD-1/2--------------------- Transmitter card slot, able to accommodate transmitter cards (with built-in
5V power supply line provided)

Kystar KS800 2K HD Big LED Display Video Processor
Multi-Window Processor
11
VI. Wiring and installation
Wiring diagram
Installation steps
1. First of all, it should be ensured that the graphics card can directly control the transmitter card and the led
screen can display images normally when the video processor is not used;
2. Then complete wiring as shown in the diagram, connect the DVI interface of the graphics card to the DVI-IN
port of the video processor and then connect the DVI-OUT port of the processor to the transmitter card;
3. After correct wiring is ensured, power on to enable the video processor.
Note: To facilitate customers’ flexible and convenient operation, the processor can accommodate the transmitter
card, namely, the transmitter card can be installed in the processor and powered on by the processor, which thus has
eliminated the limitation that the transmitter card must be powered on by a desktop. The installation method is
detailed as follows:
①Remove the anchorage corner on the transmitter card;
②Unscrew and pull out the knobs on the rear panel, and then remove the temporary baffle;
③In the processor, there will be a four-wire small plug reserved corresponding to the wire slot on the
transmitter card; connect them and fix the transmitter card to the video processor;
④Fit the drawer box again in place and then just short-circuit the upper and lower DVI interfaces.
Install
Signal source
DVI line
Cable
LED screen

Kystar KS800 2K HD Big LED Display Video Processor
Multi-Window Processor
12
VII. Settings
Full-screen
The setting method depends on the following four kinds of circumstances:
1. Atransmitter card has one frame enabled;
2. Atransmitter card has two frames enabled;
3. Two transmitter cards have one frame enabled;
4. Two transmitter cards have two frames enabled.
Here follow the detailed method for debugging under such four kinds of circumstances.
1. One transmitter card has one frame enabled;
Step 1: Click on “MENU” to enter the “Main MENU” interface.
Note: Turn the knob and you can select different functions; click “OK” to confirm the selected function.
Step 2: Click “Device Mode” to enter the interface for device mode options and select “Copy Mode”.
Step 3: Click “OK” to enter the “Out Format” interface, and if the led screen pixels are fewer than 1920 x 1080,
select the first item “Not Change” but if the led screen pixels are more than 1920 x 1080, select the second item
“Change” to enter the “Out Format” interface and then select a resolution larger than the on-screen pixels.
Device Mode
Copy Mode
★Split Mode
Monitor Mode
Press OK to next

Kystar KS800 2K HD Big LED Display Video Processor
Multi-Window Processor
13
Step 4: Click “OK” to enter the “Panel Para” interface and input the actual on-screen pixels of the screen width
and height respectively.
Note: The numerical value can be changed as follows:
1) You can use the knob to adjust it (leftward to decrease while rightward to increase) with the adjustment step
size changed by means of
2) Directly enter the numeric key to complete changes.
Step 5: Click “OK” to return to the “Main Menu” interface and select “Save”.
Step 6: Select “Mode 1”, click “OK” and it will prompt “Saved Successfully”. That’s all for device debugging.
Save mode
★【Mode 1】
Mode 2
Mode 3
Mode 4
Mode 5
Note
Out Format
Current Format
1920×1080
★【Not Change】
Change
Press OK to next
Panel Para
H Size 1920 Step×1
V Size 1080
Press OK to next

Kystar KS800 2K HD Big LED Display Video Processor
Multi-Window Processor
14
2. One transmitter card has two frames enabled;
Step 1: Click on “MENU” to enter the “Main MENU” interface.
Note: Turn the knob and you can select different functions; click “OK” to confirm the selected function.
Step 2: Click “Device Mode” to enter the interface for device mode options and select “Copy Mode”.
Step 3: Click “OK” to enter the “Out Format” interface, and if the led screen pixels are fewer than 1920 x 1080,
select the first item “Not Change” but if the led screen pixels are more than 1920 x 1080, select the second item
“Change” to enter the “Out Format” interface and then select a resolution larger than the on-screen pixels.
Step 4: Click “OK” to enter the “Panel Para” interface and input the actual on-screen pixels of the screen width
and height respectively.
Copy Mode
★Split Mode
Monitor Mode
Press OK to next
Device Mode
Out Format
Current Format
1920×1080
★【Not Change】
Change
Press OK to next

Kystar KS800 2K HD Big LED Display Video Processor
Multi-Window Processor
15
Note: The numerical value can be changed as follows:
1) You can use the knob to adjust it (leftward to decrease while rightward to increase) with the adjustment step
size changed by means of
2) Directly enter the numeric key to complete changes.
Step 5: Click “OK” to return to the “Main Menu”. Click the button “PIP” on the front panel and the interface
“Layout” will appear; turn the knob to select “POP” and click “OK”.
Note: Select “PIP”, click “OK” and a red square will appear behind “PIP”, which indicates that it has been
successfully selected; after selected, it will not jump to the “Main Menu” interface automatically and you need to
click on “MENU” to return to the “Main Menu” interface.
Step 6: Click the “MENU” button on the front panel, select “Scaler” in the “Main Menu” to enter the “Image 1
Para” interface and then you can set the location and size of the first image.
Panel Para
H Size 1920 Step×1
V Size 1080
Press OK to next
Layout
★POP
【PIP】■
SINGLE

Kystar KS800 2K HD Big LED Display Video Processor
Multi-Window Processor
16
Step 7: Click the “WIN2” button on the front panel to enter the “Image 2 Para” interface and you can enter the
location and size respectively of the second image.
Note: After the “Image 1 Para” has been entered, you do not need to click “OK” but just click “WIN2” to enter
the “Image 2 Para” interface; after the “Image 2 Para” has been entered, then click “OK”.
Step 8: Click “OK” to return to the “Main Menu” interface and then select “Save Mode”.
Step 9: Select “Mode 1”, click “OK” and it will prompt “Saved Successfully”. That’s all for device debugging.
Image 1 Para
H Pos 0
V Pos 0
H Size 0
V Size 0
Image 2 Para
H Pos 0
V Pos 0
H Size 0
V Size 0
Save Mode
★【Mode 1】
Mode 2
Mode 3
Mode 4
Mode 5
Note

Kystar KS800 2K HD Big LED Display Video Processor
Multi-Window Processor
17
3. Two transmitter cards have one frame enabled;
Step 1: Click on “MENU” to enter the “Main MENU” interface.
Note: Turn the knob and you can select different functions; click “OK” to confirm the selected function.
Step 2: Click “Device Mode” to enter the interface for device mode options and select “Split Mode”.
Step 3: Click “OK” to enter the “Out Format” interface, and if the led screen pixels are fewer than 1920 x 1080,
select the first item “Not Change” but if the led screen pixels are more than 1920 x 1080, select the second item
“Change” to enter the “Out Format” interface and then select a resolution larger than the on-screen pixels.
Step 4: Click “OK”to enter the “Out 1 Setup”interface and you can enter the
width and height of the LED screen loaded in the transmitter card connected with
DVI-OUT1.
设备模式
Device Mode
Copy Mode
★Split Mode
Monitor Mode
Out Format
Current Format
1920×1080
★【Not Change】
Change
Press OK to next

Kystar KS800 2K HD Big LED Display Video Processor
Multi-Window Processor
18
Note: The numerical value can be changed as follows:
1) You can use the knob to adjust it (leftward to decrease while rightward to increase) with the adjustment step
size changed by means of
2) Directly enter the numeric key to complete changes.
Step 5: Click “OK”to enter the “Out 2 Setup”interface and you can enter the
width and height of the LED screen loaded in the transmitter card connected with
DVI-OUT2.
Step 6: Click “OK”to return to the “Main Menu”interface and select “Save”.
Step 7: Select “Mode 1”, click “OK”and it will prompt “Saved Successfully”.
That’s all for device debugging.
Out 2 Setup
H Size 1024 Step×1
V Size 1080
Press OK to next
Out 1 Setup
H Size 1024 Step×1
V Size 1080
Press OK to next
Save Mode
★【Mode 1】
Mode 2
Mode 3
Mode 4
Mode 5
Note

Kystar KS800 2K HD Big LED Display Video Processor
Multi-Window Processor
19
4. Two transmitter cards have two frames enabled;
Step 1: Click on “MENU” to enter the “Main MENU” interface.
Note: Turn the knob and you can select different functions; click “OK” to confirm the selected function.
Step 2: Click “Device Mode” to enter the interface for device mode options and select “Split Mode”.
Step 3: Click “OK” to enter the “Out Format” interface, and if the led screen pixels are fewer than 1920 x 1080,
select the first item “Not Change” but if the led screen pixels are more than 1920 x 1080, select the second item
“Change” to enter the “Out Format” interface and then select a resolution larger than the on-screen pixels.
Step 4: Click “OK”to enter the “Out 1 Setup”interface and you can enter the
width and height of the LED screen loaded in the transmitter card connected with
DVI-OUT1.
设备模式
Device Mode
Copy Mode
★Split Mode
Monitor Mode
Out Format
Current Format
1920×1080
★【Not Change】
Change
Press OK to next

Kystar KS800 2K HD Big LED Display Video Processor
Multi-Window Processor
20
Note: The numerical value can be changed as follows:
1) You can use the knob to adjust it (leftward to decrease while rightward to increase) with the adjustment step
size changed by means of
2) Directly enter the numeric key to complete changes.
Step 5: Click “OK”to enter the “Out 2 Setup”interface and you can enter the
width and height of the LED screen loaded in the transmitter card connected with
DVI-OUT2.
Step 6: Click “OK” to return to the “Main Menu”. Click the button “PIP” on the front panel and the interface
“Layout” will appear; turn the knob to select “POP” and click “OK”.
Out 2 Setup
H Size 1024 Step×1
V Size 1080
Press OK to next
Out 1 Setup
H Size 1024 Step×1
V Size 1080
Press OK to next
Layout
★POP
【PIP】■
SINGLE
Table of contents
Other Kystar Media Converter manuals