Kyungnam Machine Company KN-1248-G3 User manual

MANUAL OF CAGE WELDING MACHINE
MODEL: KN-1248-G3
MAKER:
135 SEONGJU-RI,WONGOG-MYEON
ANSEONG-CITY,KYUNGGI-DO,KOREA
TEL.:82-31-656-5385 FAX.:82-31-656-5386
E-mail:[email protected]
EXPORTER: BM TRADING COMPANY
R00M#3304.KOREA WORLD TRADE CENTER
159 SAMSUNG-DONG,KANGNAM-KU
SEOUL135-729,KOREA
TEL.:82-2-551-2716 FAX.:82-31-272-2470
E-mail:[email protected] or [email protected]

CONTENTS
1.OPERATION PANEL DIAGRAM
2.ELECTRIC COMPONENTS DIAGRAM
3.PANEL DIAGRAM
4.FUNCTION OF CONTROL PANEL SWITCH
5.TOUCH PANEL FUNCTION
6.CHECK POINTS BEFORE PRODUCTION
7.CHANGE PRODUCT SPECIFICATION
8.HOW TO MAKE CAGES
9.PROXIMITY SWITCH FUNCTION
10.ERROR DISPLAY
11.REPLACE SPARE PARTS
12.MACHINE SPECIFICATION
13.WEARING PARTS
14.ELECTRIC SEQUENCE
15.TOUCH PANEL MANUAL - www.lsis.biz
17.TZ4ML(TEMPERATURE CONTROLLER MANUAL) -www.autonics.com
18.AC FREQUENCY DRIVE MANUAL(LS) - www.lsis.biz
19.P.L.C. MANUAL(LS) - www.lsis.biz


4. FUNCTION OF CONTROL PANEL SWITCH
1.Main Power ON/OFF : Press bottom of wheel to be locked, and locking with a key for repair
or inspection.
2.TOUCH PANEL: Touch Panel must be turned on before operating the machine to check or entry
various datas.
.
- If turn on main power "ON", PLC and Touch Panel is power "ON".
TOUCH PANEL displays main screen as follow;
- Touch POWER ON bar to turn on power and
display READY for operation.
- Sometimes, display EMERGENCY INFORMATION.
- Select language from SELECT OF LANGUAGE.
ENGLISH is selected basically.
- After select one language, it stays forever before
changing another language.
- Display present pipe type and specification.
- Touch DRIVE SCREEN to make same pipe w/same datas.
- TOTAL COUNTER displays total cages made accumulated.
3.AMP METER: Display the current electric motors power, except welding AMP.
All motors are driving with 20~25A.
4.WELDING AMP: Display welding current consumption.
Depending on the welding status, current will be increased or decreased.
5.WATER TEMP: Coolant temperature is displayed.
- If coolant temperature is over setting temperature, emergency stop is displayed
and the machine is stopped. - Then, please check the motor and cooling fan.
- Cooling fan can start running at set up temperature.
- More information, please refer to separated manual.
1
2
3 5
4
6 7
8910

6. WELDING CURRENT: Display digit number for welding current.
- Setting digit shows when adjust SLOW or FAST welding current.
During AUTO operation, display SLOW current for slow welding area (Spigot + Bell) and
display FAST current for fast welding area (Barrel).
Note: Setting is 0~40, Max. 30 is recommended.
7. WELDING TIME: Display welding time of 1 spot adjusted by welding time dial switch.
- Basic value is m Sec.
- Setting : 0~65 m Sec.
Note: Depending on spiral wire diameter and drum speed, adjust welding time.
Longer welding time is helpful for good welding, but jumping one point with bad welding.
Down Side
- CAGE RECEIVER UP/DOWN ; Adjusting toggle switch for height of 2 receiving rollers according to
cage diameter. It is moving up/down as long as pushed switch, but stop
by touch of top/bottom proximity switch (Safety Switch)
- POWER ON/ POWER OFF ; Power "ON" or "OFF", except P.L.C. and TOUCH PANEL.
- TOUCH PANEL can power "ON", but can not power "OFF".
- POWER OFF button can turn off power.
- When POWER OFF or EMERGENCY STOP button pushed, TOUCH PANEL display
EMERGENCY STOP in red lit on EMERGENCY STOP INFORMATION column.
- WIRE DRUM ON/OFF - Push button for turning WIRE DRUM(Turn Table = KN-2AS) ON or OFF.
- If turn on machine with WERE DRUM in OFF or speed lever touched the limit
switch, machine is stopped with WIRE DRUM ERROR on EMERGENCY
STOP INFORMATION is lit in red color. and air cylinder is OPEN and AUTO running
is stopped.
- Turn table has ON / OFF switch on the front box.

1 2 3 4
- TRANSFER F/W , B/W ; For moving center drum forward or backward. It works as long as the
button is pushed. During AUTO operation, it does not works.
- TRANSFER forwarding is stop at position 2 and backward is stop at position 3.
- If TRANSFER touch position 1 or 4, TRANSFER stop moving and
TRANSFER/BELL POSITION ERROR (on EMERGENCY STOP INFORMATION)is
lit in red, then push "POSITION ERROR MOVE" button and move center
drum forward (stopped at position 4) or backward (stopped at position 1).
- During TRANSFER F/W or AUTO operation is stopped at position 2, actual
value is 50 and encoder value "0", but - digit is displayed due to
acceleration phenomenon. Encoder value display 46780585.
- BELL EXPAND/REDUCE : BELL EXPAND for larger diameter. BELL REDUCE for smaller diameter.
- It works as long as the button is pushed. During the AUTO operation,
this button does not work. Also, this button is not work, unless TRANSFER
is backward completely.
- Safety proximity switch is attached at end of
BELL EXPAND and end of BELL REDUCE.
- If this switch is touched, TRANSFER/BELL POSITION
ERROR(on EMERGENCY STOP INFORMATION screen) is
lit in red, and EXPAND or REDUCE is stopped.
Then push "POSITION ERROR MOVE" button to move
BELL inside.
POLE F/W, B/W : For moving POLE forward or backward. It works as long as the button is pushed,
it is works during AUTO operation.
- POLE F/W is touched proximity switch, value is "0 and POLE ENCODER is "0"
RESET : All most errors are released by pushing RESET button, except TRANSFER/BELL POSITION
ERROR. If not release ERROR by this RESET button, it should be realeased by manual
button.
Bell expand stop
Emergency Bell reduce stop
Emergency

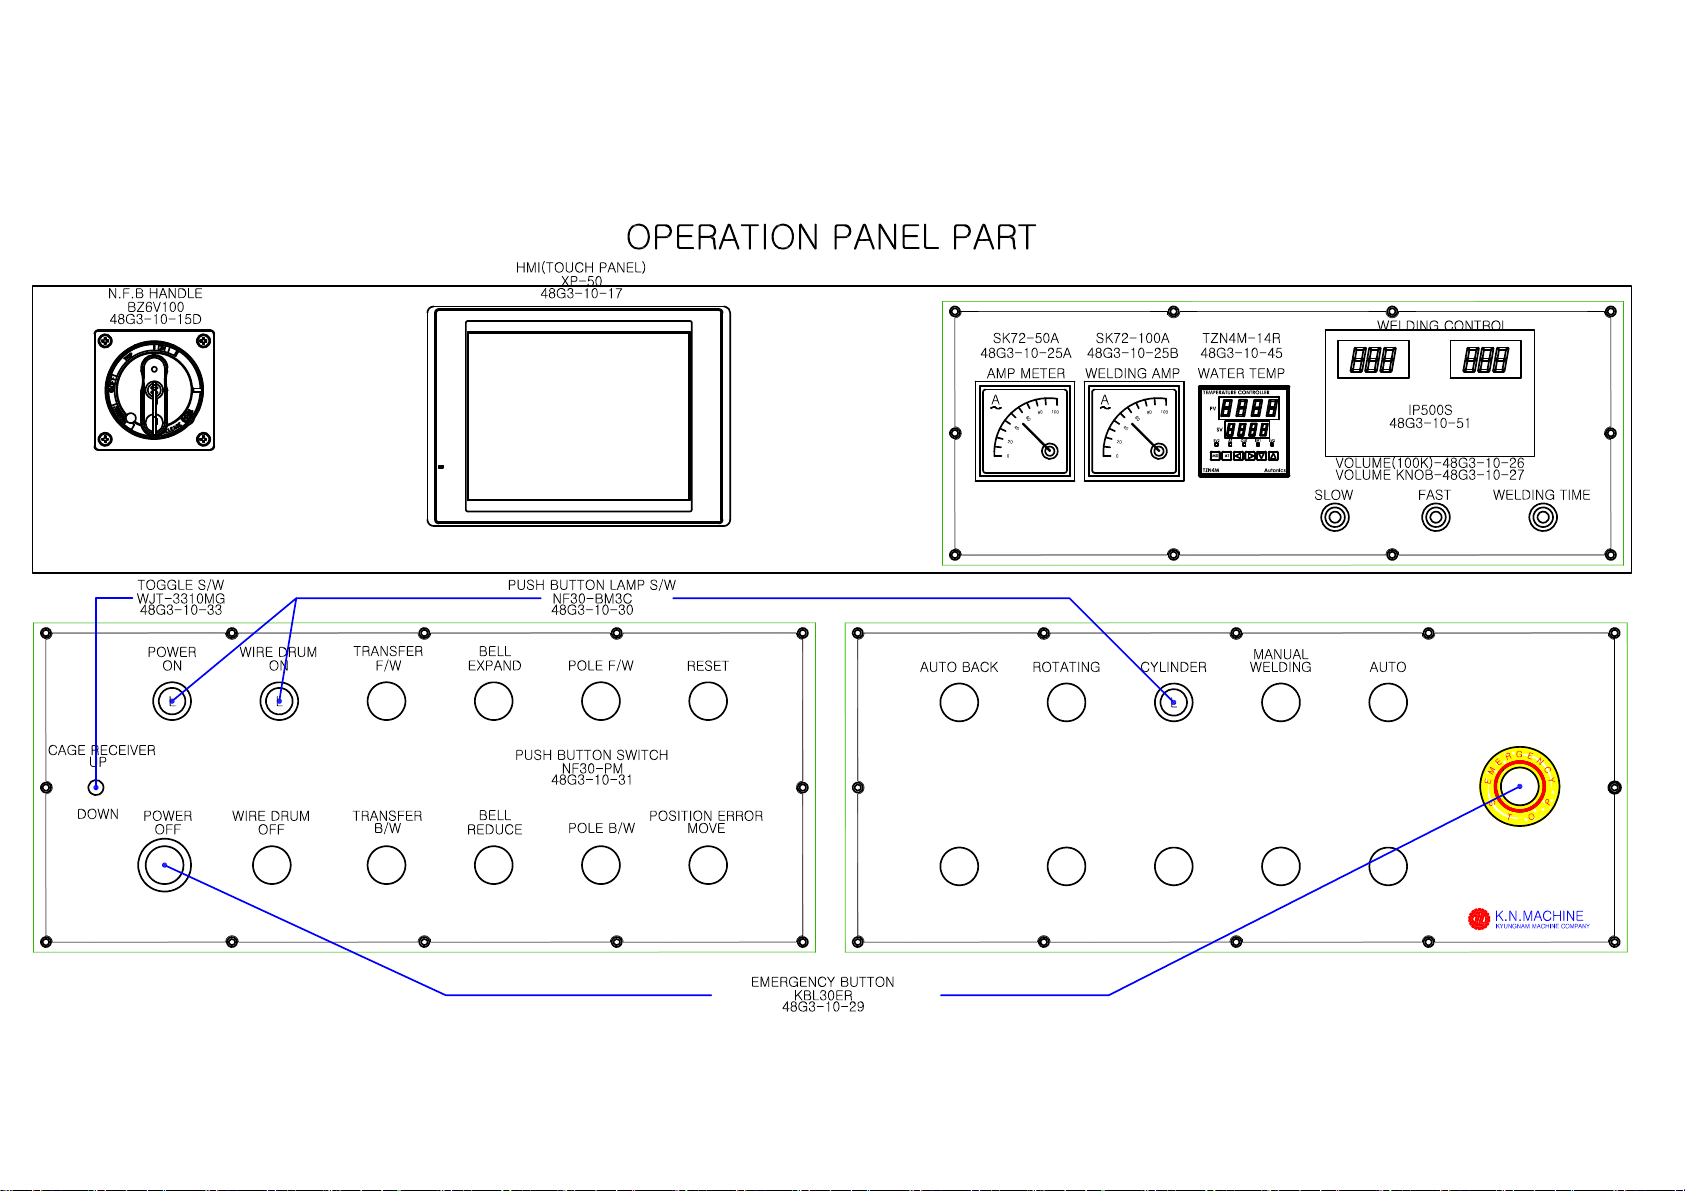
POSITION ERROR MOVE : In case of TRANSFER/BELL POSITION ERROR, push this button.
- TRANSFER or BELL is positioned out of Max./Min. position.
Push POSITION ERROR MOVE button together with TRANSFER
F/W, B/W, BELL EXPAND or BELL REDUCE to move it inside.
※ Note: In case BELL POSITION ERROR, BELL expands or reduces,
if push POSITION ERROR MOVE button with BELL EXPAND or
BELL REDUCE button. Please check the position visually before
pushing button.
AUTO BACK : After moving center drum, BELL expand or POLE forward, push this button
to reduce BELL and POLE backward completely at initial position automatically.
ROTATING : Rotate the drum clockwise manually as long as button pressed
- During the AUTO operation, it is not works.
CYLINDER OPEN/CLOSE: Pole CYLINDER closes to fix up a spiral wire for welding.
- During CYLINDER is closed, BELL REDUCE and POLE B/W is not works.
- Press CYLINDER button to open and press it again to close.
- After 10 seconds CYLINDER opened, BELL REDUCE and POLE B/W will moves.
- After CYLINDER closed, push AUTO button, but CYLINDER open and machine
is stop if TURN TABLE is "OFF". Reset and TURN TABLE should be "ON".
MANUAL WELDING : Manual weld 1 point until setting welding time to secures a spiral wire
to be welded on longitudinal wire firmly. Push it longer time, but weld
with set time.
AUTO: This button pressed, 1 cycle of operation will be done automatically and stop after
drum turning 1 revolution.
- Before pressing AUTO button, check all set up data are correct.
※ During AUTO running operation, do not push any other button.
※ After CYLINDER closed, push AUTO button, but CYLINDER open and machine
is stop if TURN TABLE is "OFF". Reset and TURN TABLE should be "ON".
※ Before start AUTO running, please check TURN TABLE is "ON"
EMERGENCY STOP: If EMERGENCY STOP switch is pressed during the automatic operation,
all functions except TURN TABLE are stopped, and EMERGENCY STOP ON
(on EMERGENCY STOP INFORMATION of TOUCH PANEL) is lit.
- Release EMERGENCY STOP button, and press RESET button.

- This operator buttons have same function as panel button.
- This button is not working during the AUTO operation
- This button is working when a operator stands on the Pressure Pad.
- During a operator are standing on Pressure Pad, main panel is not
works at all, except EMERGENCY STOP button.
- FOOT SWITCH on Pressure Pad can make DRUM turning clockwise.

5. TOUCH PANEL FUNCTION
- When the power “ON”, following screen is displayed.
- Power "ON" by pressing POWER ON button on the panel
or taps POWER ON display, then ground color change
to green color and display READY.
- If error was not solved, EMERGENCY is display.
- Select menu to move to each screen.
From this screen, select pipe shape to produce.
- A-PIPE means Flush Joint (Straight) Pipe
- B-PIPE means Confined Rubber Joint Pipe.
- C-PIPE means Confined Rubber Joint Pipe (Spigot Bent)
- D-PIPE means Flush Joing (Straight) Pipe (Spigot Bent)
From this screen, select size from 12 inch to 48 inch.
- Over 36" size, IN and OUT cage for dual cages.
- KN-1248-P3 can produce all sizes mentioned here.
- Tap the SIZE to move the operation screen selected.

Following screen shows dimension for A or B pipe.
A Pipe Product Screen B Pipe Product Screen
Following screen shows dimension for C or D pipe.
C Pipe Product Screen D Pipe Product Screen

Max 6000
1234 1234
A-Pipe Product Screen
- Green color buttons from above screen can be insert digit to produce.
- Other color buttons shows present status.
Each buttons digit will be changed high or low during the operation.
- Start Ring : After push AUTO button, weld point as much as set points from 0 to 12
at same position and TRANSFER moves forward automatically.
Restart in the middle of cage, it works same as above.
- Total Length : Total length of cage up to 2,600mm.
※ Max. digit to insert is 26000.
※ This digit will be decreased as much as moved (in metric mm), and stop
TRANSFER F/W at 50 to touch Proximity Switch.
- Last Ring : During AUTO operation, TRANSFER F/W is stopped and weld points as much
as set points from 0 to 12.
- Start Slow : Starts slow Drum r.p.m. and TRANSFER F/W with pitch for distance set up.
※ Speed for DRUM, TRANSFER, BELL and POLE can not be changed randomly,
but green color button below Max. 6000 can be changed for DRUM r.p.m.
- Barrel Pitch : DRUM and TRANSFER are moving fast speed with set pitch set up.
- Barrel Size : Diameter of barrel can be set up.
※ Digit set up one time will be saved and call same digit when it will be selected.
Therefore, barrel size to be set up one time only for each size, so be sure to
check correct digit before start.

.
- Pole Position : Set up POLE position value. Be sure to check digit correctly.
※ When the Electric Rings or Copper Sheet are worn out, this value should be
smaller than new one, so move POLE position little bit forward, and set up
value same as actual value showing on right side bar (dark green)
※ Digit set up one time will be saved and call same digit when it will be selected.
Therefore, POLE position to be set up one time only for each size, so be sure
to check correct digit before start.
.
- Actual value of Drum Stop, Bell Stop, Transfer Stop, Pole Stop are showing in each bar(black)
in digit and Hz for AC Frequency drive.
※ Digit set up one time will be saved and call same digit when it will be selected.
Therefore, Barrel Size to be set up one time only for each size, so be sure to
check correct digit before start.
.
.
- DRUM bar shows Drum Stop, Drum Slow, Drum Fast, Drum CCW, Drum CW
- TRANSFER bar shows Transfer Stop, Transfer Slow, Transfer Fast, Transfer F/W, Transfer B/W.
- BELL bar shows Expand, Reduce
- POLE bar shows Pole F/W, Pole B/W.
- Max 6000 green bar(left) can be set up high speed of Drum Rotating, grey bar(right) can not
set up due to low speed of Drum Rotation fixed up.
- Max 6000 can be changed to 4000 or 5000 according to cage diameter.
※ More than 6000 can not set up for safety of machine
- Return Complete bar shows complete return of BELL, TRANSFER, POLE.
As soon as Proximity Switch touched, Yellow color change to Green color.
※ If Transfer changed Green color, but Bell or Pole is Yellow color, it will makes
STAR ERROR which should be changed Green color by push AUTO BACK button
to be backward completely.
- Wire Drum ON/OFF : Tap this bar to make Wire Drum ON or OFF.
- Cylinder ON/OFF : Tap this bar to make Cylinder ON(close) OFF(open).
- COUNTER : Shows total quantity produced for selected pipe type (A-PIPE)
If push RESET bar, digit will be "0"
- Red bar : To be changed red color according to Transfer moving and disappeared after
TRANSFER return back completely.

B Pipe Product Screen
- Green color buttons from above screen can be insert digit to produce.
- Other color buttons shows present status.
Each buttons digit will be changed high or low during the operation.
- Start Ring : After push AUTO button, weld point as much as set points from 0 to 12
at same position and TRANSFER moves forward automatically.
Restart in the middle of cage, it works same as above.
- Total Length : Total length of cage up to 2,600mm.
※ This digit will be decreased as much as moved (in metric mm), and stop
TRANSFER F/W at 50 to touch Proximity Switch.
- Barrel Length: Distance for high r.p.m of DRUM and high speed of TRANSFER
※ DRUM is turning as per set up Hz (6000/5000/4000) and TRANSFER is moving
as per set up Hz.
※ DRUM and TRANSFER will be changed to slow r.p.m/speed before 50mm from
end of Barrel Length.
- Last Ring : During AUTO operation, TRANSFER F/W is stopped and weld points as much
as set points from 0 to 12.
- Start Slow : Starts slow Drum r.p.m. and TRANSFER F/W with pitch for distance set up.
※ Speed for DRUM, TRANSFER, BELL and POLE can not be changed randomly,
but green color button below Max. 6000 can be changed for DRUM r.p.m.
- Barrel Pitch : DRUM and TRANSFER are moving fast speed with set pitch set up.

- Barrel Size : Diameter of barrel can be set up.
※ Digit set up one time will be saved and call same digit when it will be selected.
Therefore, barrel size to be set up one time only for each size, so be sure to
check correct digit before start.
- BELL Dimension: Barrel size, Bell Length, Bell Size should be set up correctly, otherwise
proper cage can not be made.
- Bell Length: Distance of BELL start expand and end of expand.
※ During AUTO operation, BELL expand is stop when BELL Expand Stop P/X
Switch touched or end of Bell Length.
- Bell Size: Max. size of BELL Expanded. ※ Be sure exact diameter of Bell.
- Leg Length: Last length of straight Bell. Transfer stops at 70 agaist 120 Set up value
because copper ring length and last welding distance is 50mm. .
- Pole Position : Set up POLE position value. Be sure to check digit correctly.
※ When the Electric Rings or Copper Sheet are worn out, this value should be
smaller than new one, so move POLE position little bit forward, and set up
value same as actual value showing on right side bar (dark green)
※ Digit set up one time will be saved and call same digit when it will be selected.
Therefore, POLE position to be set up one time only for each size, so be sure
to check correct digit before start.
- Actual value of Drum Stop, Bell Stop, Transfer Stop, Pole Stop are showing in each bar(black)
in digit and Hz for AC Frequency drive.
.
- DRUM bar shows Drum Stop, Drum Slow, Drum Fast, Drum CCW, Drum CW
- TRANSFER bar shows Transfer Stop, Transfer Slow, Transfer Fast, Transfer F/W, Transfer B/W.
- BELL bar shows Expand, Reduce - POLE bar shows Pole F/W, Pole B/W.
- Max 6000 can be changed to 4000 or 5000 according to cage diameter.
※ More than 6000 can not set up for safety of machine
- Return Complete bar shows complete return of BELL, TRANSFER, POLE.
As soon as Proximity Switch touched, Yellowow color change to Green color.
※ If Transfer changed Green color, but Bell or Pole is Yellow color, it will makes
STAR ERROR which should be changed Green color by push AUTO BACK button
to be backward completely.
- Wire Drum ON/OFF : Tap this bar to make Wire Drum ON or OFF.
- Cylinder ON/OFF : Tap this bar to make Cylinder ON(close) OFF(open).
- COUNTER : Shows total quantity produced for selected pipe type (A-PIPE)
If push RESET bar, digit will be "0"
- Red bar : To be changed red color according to Transfer moving and disappeared after
TRANSFER return back completely.

C Pipe Product Screen
- Green color buttons from above screen can be insert digit to produce.
- Other color buttons shows present status.
Each buttons digit will be changed high or low during the operation.
- Start Ring : After push AUTO button, weld point as much as set points from 0 to 12
at same position and TRANSFER moves forward automatically.
Restart in the middle of cage, it works same as above.
- Total Length : Total length of cage up to 2,600mm.
※ This digit will be decreased as much as moved (in metric mm), and stop
TRANSFER F/W at 50 to touch Proximity Switch.
- Barrel Length: Distance for high r.p.m of DRUM and high speed of TRANSFER
※ DRUM is turning as per set up Hz (6000/5000/4000) and TRANSFER is moving
as per set up Hz.
※ DRUM and TRANSFER will be changed to slow r.p.m/speed before 50mm from
end of Barrel Length.
- Last Ring : During AUTO operation, TRANSFER F/W is stopped and weld points as much
as set points from 0 to 12.
- Start Slow : Starts slow Drum r.p.m. and TRANSFER F/W with pitch for distance set up.
※ Speed for DRUM, TRANSFER, BELL and POLE can not be changed randomly,
but green color button below Max. 6000 can be changed for DRUM r.p.m.
- Spigot Size : Spigot expand before 50mm before end of Start Slow Length, after Spigot
Expand change to high speed for barrel length.
※ Speed for DRUM, TRANSFER, BELL and POLE can not be changed randomly,
but green color button below Max. 6000 can be changed for DRUM r.p.m.
- Barrel Pitch : DRUM and TRANSFER are moving fast speed with set pitch set up.

- Barrel Size : Diameter of barrel can be set up.
※ Digit set up one time will be saved and call same digit when it will be selected.
Therefore, barrel size to be set up one time only for each size, so be sure to
check correct digit before start.
- BELL Dimension: Barrel size, Bell Length, Bell Size should be set up correctly, otherwise
proper cage can not be made.
- Bell Length: Distance of BELL start expand and end of expand.
※ During AUTO operation, BELL expand is stop when BELL Expand Stop P/X
Switch touched or end of Bell Length.
- Bell Size: Max. size of BELL Expanded. ※ Be sure exact diameter of Bell.
- Leg Length: Last length of straight Bell. Transfer stops at 70 agaist 120 Set up value
because copper ring length and last welding distance is 50mm. .
- Pole Position : Set up POLE position value. Be sure to check digit correctly.
※ When the Electric Rings or Copper Sheet are worn out, this value should be
smaller than new one, so move POLE position little bit forward, and set up
value same as actual value showing on right side bar (dark green)
※ Digit set up one time will be saved and call same digit when it will be selected.
Therefore, POLE position to be set up one time only for each size, so be sure
to check correct digit before start.
- Actual value of Drum Stop, Bell Stop, Transfer Stop, Pole Stop are showing in each bar(black)
in digit and Hz for AC Frequency drive.
.
- DRUM bar shows Drum Stop, Drum Slow, Drum Fast, Drum CCW, Drum CW
- TRANSFER bar shows Transfer Stop, Transfer Slow, Transfer Fast, Transfer F/W, Transfer B/W.
- BELL bar shows Expand, Reduce - POLE bar shows Pole F/W, Pole B/W.
- Max 6000 can be changed to 4000 or 5000 according to cage diameter.
※ More than 6000 can not set up for safety of machine
- Return Complete bar shows complete return of BELL, TRANSFER, POLE.
As soon as Proximity Switch touched, Yellowow color change to Green color.
※ If Transfer changed Green color, but Bell or Pole is Yellow color, it will makes
STAR ERROR which should be changed Green color by push AUTO BACK button
to be backward completely.
- Wire Drum ON/OFF : Tap this bar to make Wire Drum ON or OFF.
- Cylinder ON/OFF : Tap this bar to make Cylinder ON(close) OFF(open).
- COUNTER : Shows total quantity produced for selected pipe type (A-PIPE)
If push RESET bar, digit will be "0"
- Red bar : To be changed red color according to Transfer moving and disappeared after
TRANSFER return back completely.

D Pipe Product Screen
- Green color buttons from above screen can be insert digit to produce.
- Other color buttons shows present status.
Each buttons digit will be changed high or low during the operation.
- Start Ring : After push AUTO button, weld point as much as set points from 0 to 12
at same position and TRANSFER moves forward automatically.
Restart in the middle of cage, it works same as above.
- Total Length : Total length of cage up to 2,600mm.
※ This digit will be decreased as much as moved (in metric mm), and stop
TRANSFER F/W at 50 to touch Proximity Switch.
- Barrel Length: Distance for high r.p.m of DRUM and high speed of TRANSFER
※ DRUM is turning as per set up Hz (6000/5000/4000) and TRANSFER is moving
as per set up Hz.
※ DRUM and TRANSFER will be changed to slow r.p.m/speed before 50mm from
end of Barrel Length.
- Last Ring : During AUTO operation, TRANSFER F/W is stopped and weld points as much
as set points from 0 to 12.
- Start Slow : Starts slow Drum r.p.m. and TRANSFER F/W with pitch for distance set up.
※ Speed for DRUM, TRANSFER, BELL and POLE can not be changed randomly,
but green color button below Max. 6000 can be changed for DRUM r.p.m.
- Spigot Size : Spigot expand before 50mm before end of Start Slow Length, after Spigot
Expand change to high speed for barrel length.
※ Speed for DRUM, TRANSFER, BELL and POLE can not be changed randomly,
but green color button below Max. 6000 can be changed for DRUM r.p.m.
Table of contents
Popular Industrial Equipment manuals by other brands

PASCO
PASCO TD-8577 instruction manual

Amber
Amber M32 Installation & maintenance manual

Spirax Sarco
Spirax Sarco EasiHeat Installation and maintenance instructions

Endress+Hauser
Endress+Hauser Deltabar S PMD75 Special Documentation

Graco
Graco Xtreme-Duty 25A598 Operation and Parts

HydraMaster
HydraMaster Clutch Drive System 4.8 SV Owner's Guide and Maintenance Logs