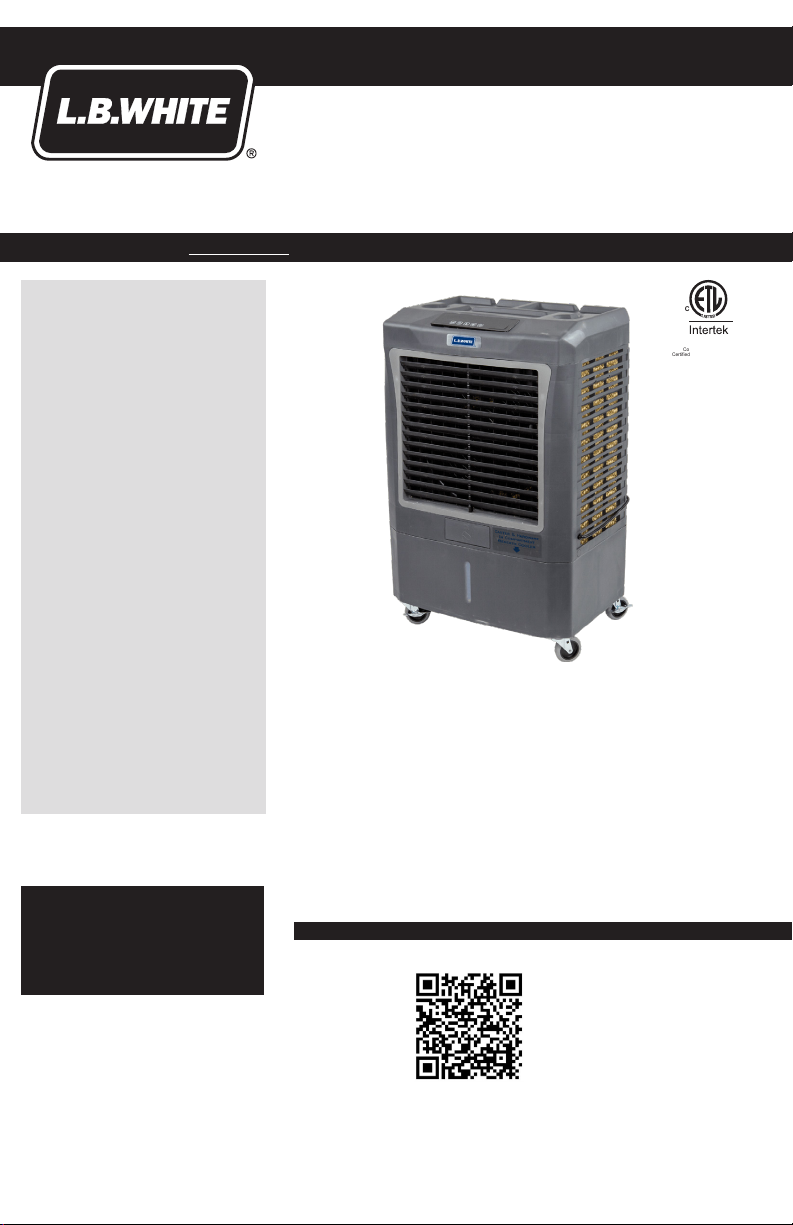
L.B. White PC-31 Manual

Attention
Do not return this item to the place
of purchase unless instructed to do
so by customer support
If you should nd any missing
parts, any loose, or dislodged
items or have any questions please
call us rst. We have parts and
expert support that can help you.
We value your business and are
here to help. We can ship any
replacement or warranty parts to
you quickly so your mobile cooler
can keep you cool.
www.lbwhite.com
SCAN THIS
with your smartphone or
visit http://www.lbwhite.com
to view.
WORLD PROVIDER - INNOVATIVE CLIMATE SOLUTIONS
411 Mason Street, Onalaska, WI 54650 • 800-345-7200 • 608-783-5691 • 608-783-6115 (fax) • www.lbwhite.com
Evaporative cooling works on the principle of heat absorption
by moisture evaporation. Simply put, heat is removed from
the air as water evaporates. You feel this principle in action
when you step out of a swimming pool or shower and feel
cool as water evaporates from the surface of your skin. Your
evaporative cooler works on the same principle. The fan pulls
hot outside air through the wet cooling pads, where the air is
cooled by evaporation and then discharged from the cooler.
PC-31
PORTABLE EVAPORATIVE COOLER
Owner’s Manual and Instructions
View this manual online at www.lbwhite.com
* Requires an app like QR Droid
for Android or for iPhone
SEE ASSEMBLY
INSTRUCTIONS
INSIDE
5001002
Conforms to UL STD,507
Certified to CSA STD,C22.2 No.113
CUS
CM

Evaporative Cooler
www.lbwhite.com
Owner’s Manual • Evaporative Cooler
2
TABLE OF CONTENTS
Contents ................................................................................................................................3
Inspection ..............................................................................................................................3
Operating Instructions ..........................................................................................................3
Key Operational Points ..........................................................................................................4
Safety Rules ..........................................................................................................................5
Cooler Setup and Operation ..................................................................................................5
Connecting to a power supply ...............................................................................................6
Cooler Maintenance ..............................................................................................................7
Cleaning Cooler and Pads .....................................................................................................8
Removal of the Back Panel ...................................................................................................8
Draining the Cooler Tank .......................................................................................................9
Removal and Replacement of Cooling Media .......................................................................9
Pump Maintenance and Replacement ................................................................................10
Float Valve Replacement or Adjustment ..............................................................................10
Troubleshooting Guide ........................................................................................................11
Warranty Policy....................................................................................................................14

Evaporative Cooler
Owner’s Manual • Evaporative Cooler
3
GENERAL HAZARD WARNING
USE ALL PRECAUTIONS AND DISCONNECT FROM POWER SOURCE BEFORE PERFORMING
ANY MAINTENANCE.
Inspection
After unpacking your evaporative cooler, carefully inspect for any damage that may have occurred
during transit. Inspect for loose, missing or damaged.
Operating Instructions
Evaporative cooling works on the principle of heat absorption by moisture evaporation. Simply put,
heat is removed from the air as water evaporates. You feel this principle in action when you step
out of a swimming pool or shower and feel cool as water evaporates from the surface of your skin.
Your evaporative cooler works on the same principle. The fan pulls hot outside air through the wet
cooling pads, where the air is cooled by evaporation and then discharged from the cooler.
CONTENTS TOOLS / MATERIALS NEEDED:
Evaporative Cooler (1) Drill with #2 Phillips bit
Hardware Bag (1) OR
Casters (4) Phillips head screwdriver
Contents
Product Specs
Variable Airow Delivery 3,100 / 2,400 / 1,850 CFM
Cooling Area 950 S.F.
Water Reservoir 10.3 Gallons
Motor 1/5 H.P. 115 V 3 Speed
Dimensions 38”H x 24”W x 16”D
Weight 45 lbs.

Evaporative Cooler
www.lbwhite.com
Owner’s Manual • Evaporative Cooler
4
1. Your cooler must be positioned in front of an open window or door if it is to operate effectively.
2. Always ensure that there is another open window or door through which the air can exhaust from the room.
3. Ensure the lter is kept clean throughout the summer season.
4. At the end of each day run your cooler on FAN ONLY for 30 minutes to dry out the lter.
5. Prior to putting your cooler away for winter, always:
a. Drain the tank and wipe out clean.
b. Clean the lter
c. Reassemble and run on FAN ONLY for 30 minutes to dry out the lter.
Location! Location! Location!
Having completed assembly of your cooler, position the unit with its back to an open window or door. This will
allow fresh air to be drawn through the cooler and exhausted from the room. Constant air change is essential
and part of the fresh air benet from evaporative air cooling.
This cooler is equipped with an automatic shut off feature for the pump if the unit runs out of water.
Key Operational Points

Evaporative Cooler
Owner’s Manual • Evaporative Cooler
5
1. Read and follow all instructions, cautions, and warnings. Failure to do so could result in personal injury,
death or property damage.
2. Unit must be in the OFF position and UNPLUGGED from power receptacle before performing any
maintenance.
3. Make sure the electrical power source conforms to the requirement of the evaporative cooler(s) as well as
local codes. The power requirement for the PC-31 is 115v, 2.8 amps.
4. To reduce the risk of re or electrical shock, do not expose electrical connections to water.
5. Do not touch electrically live components.
6. Adequate ventilation is required. When used in enclosed spaces, it is recommended to open a door or
window to draw fresh air in.
7. Assure that all power cords do not come in contact with any sharp edges, hot surfaces or chemicals. Im-
mediately replace any damaged parts.
Starting and using the cooler
Cooler Setup and Operation
PC-31 is pre-assembled and ready to operate. Simply remove the packaging and then carefully remove the
unit from the box. Install Casters. Lock the 2 locking wheels before lling and turning on fan to keep the cooler
from moving from the air velocity.
NOTICE: the cooling pad will have a slight odor when it is new. This is normal. It will dissipate after a period
of time depending on the use time. Draining the tank often during the break-in period will help
speed this up. (See draining tank in section 5)
Filling Cooler or Connecting to Water Supply
Move the cooler to an area where it can be lled
Manual ll method
The cooler can be lled via the front ll door by hose or bucket. Using the water ll indicator to monitor water
level, simply depress the ll door and the spring lock will release and open it. To close, simply push it closed
and locked.
Safety Rules

Evaporative Cooler
www.lbwhite.com
Owner’s Manual • Evaporative Cooler
6
Auto ll connections
Connect to a water supply using a garden hose or coil hose, or a direct water line. Simply attach hose adaptor
(supplied with cooler) to the oat valve nipple protruding from cooler. Verify water tight connections by visually
examining the hose connection
CAUTION: Water inlet pressure should be limited to a maximum 50 PSI. If valve is overcome, install a
pressure reducer (25 PSI) on nipple rst. (It can be obtained at hardware stores in irrigation
section.) Hose bib needs only be opened slightly to supply water to oat valve and the cooler only
needs to be about half lled when in auto ll conguration. The oat is already set to that level.
Connecting to a power supply
Plug the cooler into any 115 volt power supply. It is permissible to use extension cords when needed. If there
is no power to the unit, reset the GFCI.

Evaporative Cooler
Owner’s Manual • Evaporative Cooler
7
Using the Control Switches
Swing Button - Press to operate oscillation motor to swing the air left to right.
Timer Button Lit when engaged - Press to select the desired timer selection, cooler will stop running all features
when selected time expires.
Pump Button - Pump will function continually when this light is lit.
Fan Button - Fan: Low / Medium / High
Power Button – If Green light, all functions will be able to operate. Red light, all control functions will be off.
Main power control. When the power is turned to the “OFF” position, the other controls will
not work.
Remote Control
The remote-control functions:
1) Power
2) Fan speed
3) Swing
4) Pump
5) Timer
To replace the battery, slide the back panel of the remote-control down to release it. Remove old battery and
replace with CR 2025 round battery.
Cooler Maintenance
For best operation and long useful life the following maintenance and cleaning procedures should be followed.
WARNING
DO NOT remove back panel with cooler running.
12
3
4
5 5

Evaporative Cooler
www.lbwhite.com
Owner’s Manual • Evaporative Cooler
8
Cleaning Cooler and Pads
At regular intervals your evaporative cooler should be shut down and disconnected from power supply. The
water tank should be drained of dirty water and sprayed out with fresh water and relled. The more you do
this the better it will work and less calcium will develop on pads or other surfaces. You may spray through
the cooling pads to wash them out and allow water to deposit in the tank to be drained away. The removable
panel and media pad can be sprayed out on the ground to clean pad. Use light pressure when spraying pads.
NEVER spray pads with water while cooler is operating and fan is running. This can cause damage to motor
and will void the warranty.
Removal of the Back Panel
(Disconnect power supply before this procedure.)
Unscrew the screws at top of back panel (3). Lift panel up and pull out at the bottom. Then slide panel out of
the cabinet. You will now have access to the pump, oat valve and water distributor spreaders.

Evaporative Cooler
Owner’s Manual • Evaporative Cooler
9
Draining the Cooler Tank
Unscrew drain cap from drain assemble and drain away water. You may tip the unit carefully to the drain side to help
drain all the water out.
Removal and Replacement of Cooling Pad
The cooling pads are made from a special resin impregnated craft paper specially designed for evaporative cooling.
They will last many years if maintained properly and water quality is maintained. It is not necessary to remove the
pads to clean them.
Inspect the pads for deposits of calcium on the air entering side. If the ute cells are clogged or the pad is very heavy
it may be time to change the media. New cooling pad can be purchased where you bought the cooler. Follow these
steps for replacing the pads.
1. With access panel removed, simply pull off the pad retainer disc from the pad pin. Older models may have a
pushed on pin that will need to be pulled away using pliers to grasp disc and pull away. Be careful not to break the
pin although the new pads will come with new pins and disc. The newer models will have a threaded disc that will
unscrew from the pin
2. With disc removed, remove the pins from the pads and carefully remove pads from the xed side mounting frame.
Then do the same for the back panel or panels.
3. Cooling pads are made with a 45/45 ute and can be installed either side to the frame. Just make sure the
distribution pad that is xed to the top of the new media pad is at the top. This allows water get onto the top of the
pad evenly. The installation of the pads is opposite of the removal, install the pad, insert pins and install the
retaining disc.
4. Reinstall the back panel and you are ready to use the cooler again.

Evaporative Cooler
www.lbwhite.com
Owner’s Manual • Evaporative Cooler
10
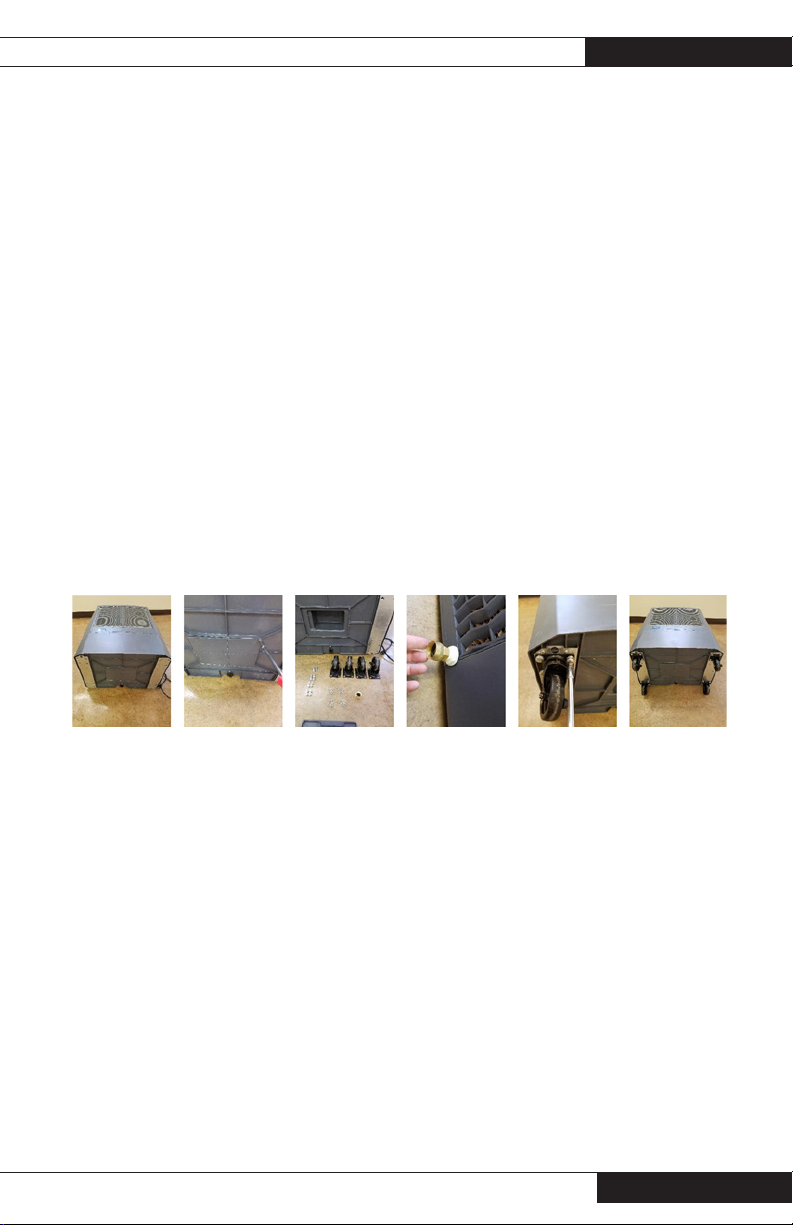
Pump Maintenance and Replacement.
(Disconnect power supply before this procedure.)
The submersible pump is mounted inside the tank to the bottom with a retention bracket. While you are cleaning
the cooler the pump may be removed and the strainer cap on the bottom of pump can be cleaned of debris. If
pump has failed and needs replacing follow these steps:
1. Remove retention bracket.
2. Remove the switch control panel from the top of cooler, by inserting a small screwdriver into the tap slots and
pop loose.
3. The pump is connected to the control via the white plastic clip. Disconnect the pump clip and feed the plastic
clip through the control box into the cooler.
4. The pump cable is connected to the cooler by twist clips that are mounted in the side of the corner between
the left pad and the front of cooler. You may have to remove that pad to get to the clips. Also there may be
cable ties holding cable to the motor mounting bracket. Remove the pump from cooler when cable is free.
5. Reinstall the new pump in reverse. Being sure to reconnect the cable in the twist ties and secure the cable
in a manner of which it stays clear of fan blade when cooler is running. Reattach the pump clip in the control
box and reinstall the control panel in its place. Be sure not to pull any other wires loose from control switches
when you have panel loose.
6. Reinstall the control panel into the cabinet making sure it is seated.
Float Valve Replacement or Adjustment:
(Disconnect power supply before this procedure.)
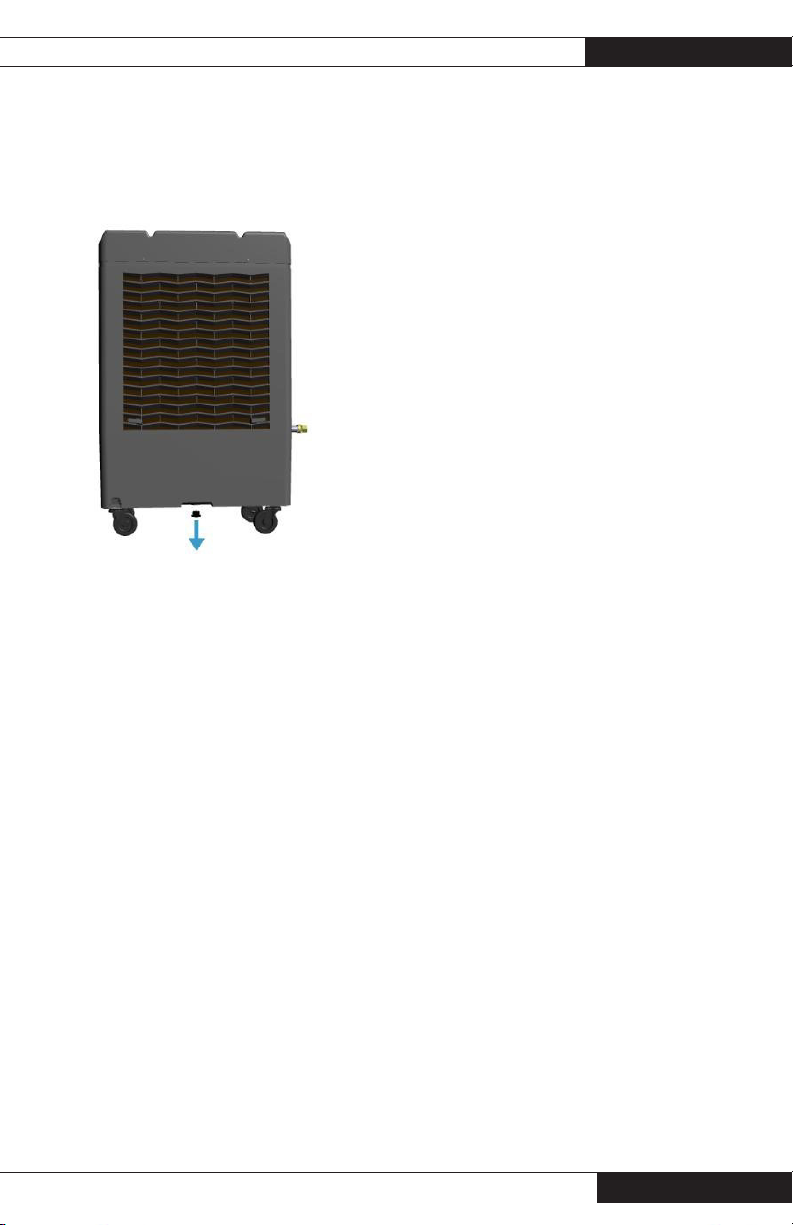
The oat valve is mounted to the left side of cooler if you are facing the front grill. It is held in place by the
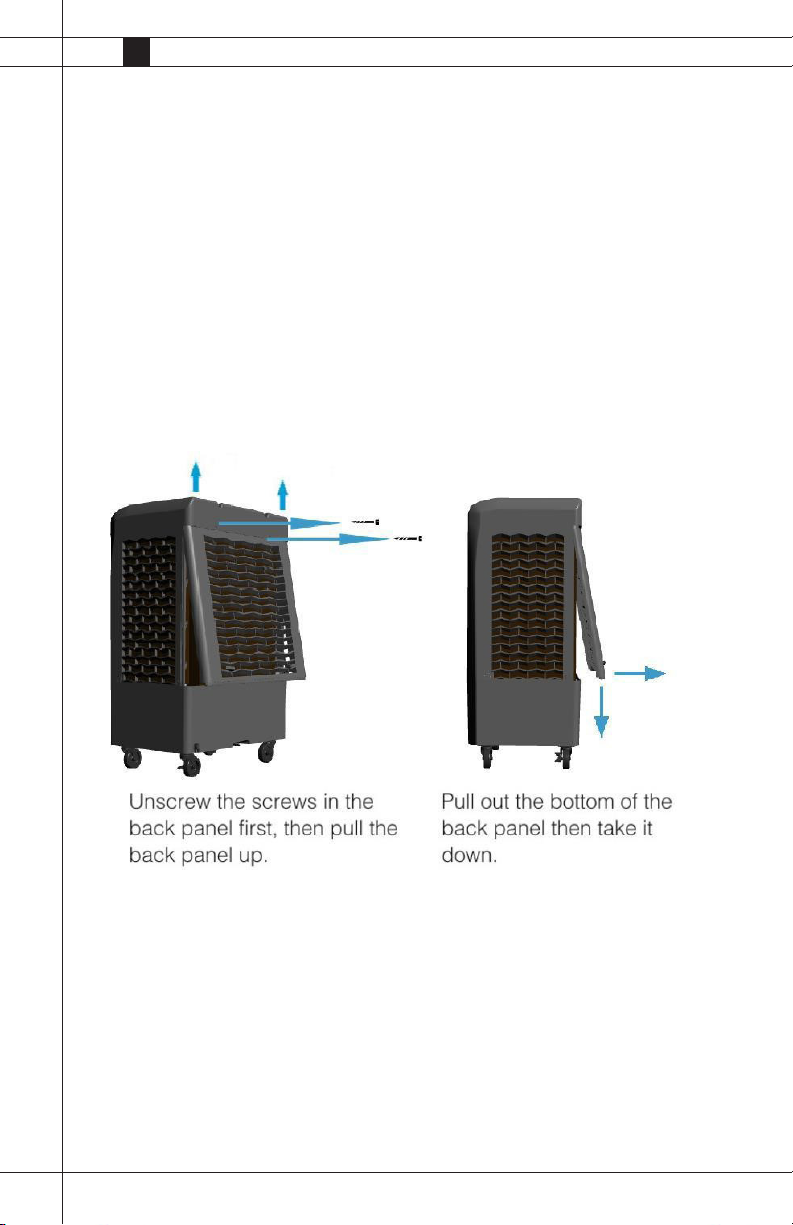
retaining nut that is visible from the outside. The rubber washer is between the nut and cabinet. The rear panel
will have to be removed to adjust the oat (if the water level is too high or too low) or remove and replace a oat
that has failed to shut of water supply. Note: Be sure that the PSI of the supply water is within the 50 PSI spec.
before determining the oat has failed.
1. The oat valve can be purchased where you purchased your cooler.
2. Remove any hose adapters attached to the oat valve nipple.
3. Remove the rear panel assembly as instructed in Section 5.
4. Remove the oat valve retaining nut and rubber washer. Remove oat valve from cabinet.
5. Reinstall the oat valve in reverse. Set the valve adjustment to around 60 degrees for best results.

Evaporative Cooler
Owner’s Manual • Evaporative Cooler
11
Troubleshooting Guide
PROBLEM CAUSE / REMEDY
Cooler fails to work at all Check that the unit is plugged properly.
Check the POWER switch, push it to “ON”.
The TIMER switch is “OFF”, turn it to “ON”.
Make sure cooler is not plugged into a tripped GFIC outlet. If so, reset
GFCI or move to non GFCI outlet.
Cooler does not pump Pump is not activated. Push the PUMP switch to “ON”.
Water level is low. Fill with water and make sure pump is activated.
Be sure the pump and pump hose is clear of debris.
Pump may be defective. Replace pump.
Fan does not operate Check that unit is plugged properly.
Check the POWER switch, push it to “ON”.
If connected to a GFCI outlet, check if it is tripped.
Troubleshoot rotary switch.
Replace motor capacitor.
Louver does not operate Louver does not move. Louver switch. Position to “ON”.
Check Oscillator motor for proper placement and operation.
Water leakage Check the cap of the drain assembly, make sure it tightened.
Inspect tank for cracks or breakage
Make sure cooler is level.
Check media pads for buildup allowing water out on outside of pad
frame -- change media if needed.
If water is coming out fan, check for leaks in water distribution hoses
and/or leaks at hose connections to spreaders
Be sure there is at least 4 inches of space for rear panel free from wall
or other obstruction. This could make the side panels release water to
airstream due to increased air velocity through the sides.
Spreaders may have scale buildup allowing water to pool and spill over
into airstream---Clean spreaders.

Evaporative Cooler
www.lbwhite.com
Owner’s Manual • Evaporative Cooler
12
Service Parts Identification Schematic

Evaporative Cooler
Owner’s Manual • Evaporative Cooler
13
Item Description Service Part
1Caster
Caster WITH Lock
2 Drain Plug
3 Water Tank
4Water Level Sensor
5Tank Frame
6 Rigid Media 674194
7Media Panel
8Rear Panel
9 Rear Rigid Media 674194
10 Water Distributor
11 Top Cover
12 Control Panel
13 Distributor
14 Water Diverter
15 Oscillator Motor
16 Fan Blade
17 Motor Bracket
18 Motor
19 Front Frame
20 Oscillator Rib
21 Grill
22 Water Filling Door
23 Float Valve
24 Pump 674195
25 Display
26 Bottom Cover

Each new cooler is warrantied to be free from defects
in material or workmanship for one full year from the
date of original purchase. If a component is found to
be defective in this one year period, it will be repaired
or replaced with a new or refurbished product at the
option of the factory.
Should a warranty issue arise, please contact the
dealer from whom the fan was purchased. A Return
Material Authorization (RMA) number is required for
all returns.
What is not covered by the warranty:
1. Malfunctions resulting from misuse, negligence,
alteration or lack of necessary maintenance.
2. Loss of time, inconvenience, use of product or
other consequential damages due to defects.
3. Return transportation costs. All return transporta-
tion costs are the responsibility of the purchaser.
Damaged Shipments:
We are not responsible for damaged shipments or
shortages resulting from carrier mishandling. Notify
your carrier’s ofce immediately to le a claim. Keep
damaged goods and containers for inspection until
advised by the carrier as to disposal.
Returns:
All items must be returned with all original parts and
packaging. Additional charges may apply for any missing or
damaged parts.
The customer must re-package and ship their item(s) back
to the manufacturer at their own expense.
No freight cost/shipping cost will be re-funded to the
customer.
The customer needs to provide us with the tracking number
of the shipment.
Upon receipt of the product, including original parts and
packaging, we may issue a full refund for the product or
may repair or replace the item with a new or refurbished
product.
If our returns department nds that the item is not defective,
you may be responsible for additional shipping costs as
well as a 10-30% re-stocking fee.
Contact your local L.B. White dealer for replacement parts
and service. You may also call the L.B. White Co., LLC at
1-800-345-7200, for assistance, or email us at
Be sure that you have your heater model number and
conguration number when calling.
Warranty Policy
Service
WORLD PROVIDER - INNOVATIVE
CLIMATE SOLUTIONS
411 Mason Street, Onalaska, WI 54650
800-345-7200 • 608-783-5691
608-783-6115 (fax)
www.lbwhite.com
150-132796 REV.A

Attention
No devuelven este tema al lugar de
compra a menos que se lo indique
Customer Support
Si encuentre cualquier piezas
faltantes, sueltos, o descolocados
o tiene alguna pregunta por favor
llámenos primero. Tenemos las
piezas y el apoyo de los expertos
que pueden ayudarle. Valoramos
su negocio y están aquípara
ayudarle y puede enviar cualquier
sustitución o de piezas a nosotros
para que tu móvil refrigerador se
pueda mantener fresco.
www.lbwhite.com
SCAN THIS
with your smartphone or
visit http://www.lbwhite.com
to view.
WORLD PROVIDER - INNOVATIVE HEATING SOLUTIONS
411 Mason Street, Onalaska, WI 54650 • 800-345-7200 • 608-783-5691 • 608-783-6115 (fax) • www.lbwhite.com
El enfriamiento por evaporación funciona a través de la absorción
de calor por evaporación de la humedad. En pocas palabras, el
calor se elimina del aire como el agua se evapora. Usted siente
este principio en acción cuando se sale de una piscina de natación
o de la ducha y se siente fresca como el agua se evapora de la
supercie de la piel. Su enfriador evaporativo funciona de la misma
manera. El ventilador extrae el aire exterior caliente a través de las
almohadillas de refrigeración húmeda, donde el aire se enfría por
evaporación y luego se descarga desde el enfriador.
INSTRUCCIONES DE INSTALACIÓN
View this manual online at www.lbwhite.com
* Requires an app like QR Droid
for Android or for iPhone
Ver instrucciones
de montaje en el
interior
5001002
Conforms to UL STD,507
Certified to CSA STD,C22.2 No.113
CUS
CM
PC-31
Refrigerador Portátil

Refrigerador Portátil
www.lbwhite.com
Refrigerador Portátil
2
TABLE OF CONTENTS
Contenido..............................................................................................................................3
Inspección .............................................................................................................................3
Operating Instructions ...........................................................................................................3
Puntos clave del funcionamiento...........................................................................................4
Normas de seguridad ............................................................................................................5
Conguración y Funcionamiento del enfriador......................................................................5
Enfriador de llenado o la conexión al suministro de agua.....................................................6
Conexión a una fuente de alimentación ................................................................................7
Cooler Maintenance ..............................................................................................................8
Enfriador y almohadillas de limpieza.....................................................................................8
Extracción del panel posterior ...............................................................................................9
Vaciar el tanque del enfriador................................................................................................9
Extracción y sustitución de Xel50 medio de refrigeración..................................................10
El mantenimiento y reemplazo de la bomba .......................................................................10
Sustitución de la válvula de otador o ajuste ......................................................................11
Tabla solución rápida...........................................................................................................12
Garantí de fabricación .........................................................................................................14

Refrigerador Portátil
3
GENERAL HAZARD WARNING
Utilice todas las precauciones y desconéctelo de la fuente de alimentació antes de realizar
cualquier operación de mantenimiento.
Inspección
Despué de desembalar el refrigerador evaporatorio, inspeccione cuidadosamente por cualquier
daño que pueda haber ocurrido durante el tránsito. Inspeccione para ojas, dañadas o faltantes..
Operating Instructions
La refrigeración por evaporación funciona sobre el principio de la absorción de calor por la
evaporación de la humedad. Sencillamente, se extrae el calor del aire cuando el agua se evapora.
Se sienta este principio en acción cuando salga de una piscina o ducha y se sienta frío cuando el
agua se evapora de la supercie de la piel. Su refrigerador evaporativo funciona según el mismo
principio. El ventilador extrae calor del aire exterior a través de las almohadillas de refrigeración
húmeda, donde el aire se enfría por evaporación y luego se descargan desde el refrigerador.
CONTENDIO HERRAMIENTAS/MATERIALS:
El refrigerador evaporatorio (1) Talad ro con #2 Felipe bit
La bolsa de tornilleria (1) OR
Ruedas (4) Phillip’s destornillador de cabeza
Contenido
Especificaciones del producto
Suministro De Flujo De Aire Variable 3,100 / 2,400 / 1,850 CFM
Área de Enfriamiento 950 S.F.
Reserva De Agua 10.3 Gallons
Motor 1/5 H.P. 115 V 3 Speed
Dimensiones 38”H x 24”W x 16”D
Peso 45 lbs.

Refrigerador Portátil
www.lbwhite.com
Refrigerador Portátil
4
1. El refrigerador debe colocarse delante de una puerta o de una ventana abierta para que funcione de forma
ecaz.
2. Asegúrese siempre de que hay otra ventana abierta o puerta por la que el aire se escape de la habitación.
3. Asegúrese de que el ltro se mantiene limpio durante toda la temporada de verano.
4. Al nal de cada jornada, ejecute su refrigerador en el ventilador sólo durante 30 minutos para secar el ltro.
5. Antes de poner su refrigerador lejos para el invierno, siempre:
a. Vaciar el depósito y limpiar limpia.
b. Limpie el ltro
c. Volver a montar y ejecutar el ventilador sólo durante 30 minutos para secar el ltro.
Ubicación! Ubicación! Ubicación!
Habiendo terminado el montaje de su refrigerador, coloque la unidad con su vuelta a una ventana abierta o
puerta. Esto permitirá que el aire fresco que se aspira a través del radiador y agotado desde la habitación. Cam-
bio de aire constante es esencial y parte del aire fresco se benecian de enfriamiento de aire por evaporación.
Recuerde que su refrigerador se ha diseñado para funcionar incluso si se ejecuta fuera del agua. No habrá
causado daño a la bomba si se agota el enfriador de agua.
Puntos clave del funcionamiento

Refrigerador Portátil
5
1. Lea y siga todas las instrucciones, precauciones y advertencias. El no hacerlo podría resultar en lesiones
personales, muerte o daños a la propiedad.
2. Asegúrese de que la fuente de alimentació eléctrica cumple con el requisito de que el refrigerador
evaporatorio(s), asícomo de códigos locales.
3. Para reducir el riesgo de descarga eléctrica, instalar sólo en un circuito protegido con un interruptor de
circuito de falla a tierra (GFCI).
4. Para reducir el riesgo de incendio o descarga eléctrica, no exponga las conexiones eléctricas al agua.
5. No toque los componentes eléctricamente activo.
6. Se requiere ventilació adecuada.
7. Asegurarse de que todos los cables de alimentació no entran en contacto con los bordes alados, super-
cies calientes o productos químicos. Reemplace inmediatamente las piezas dañadas.
8. La unidad debe estar en la posición de apagado y desenchufado de la toma de corriente antes de realizar
cualquier trabajo de mantenimiento.
9. Este aparato no estádiseñado para su uso por personas (incluidos los niños) con capacidades físicas, sen-
soriales o mentales disminuidas, o la falta de experiencia y conocimiento, a menos que sean supervisados
o instruidos acerca del uso del aparato por una persona responsable de su seguridad. Los niños deben
ser supervisados para asegurar que no jueguen con el aparato.
Arrancar y Usar el Enfriador
Configuración y Funcionamiento del enfriador
Los enradores son pre-montados y listos para ser operados. Simplemente retire el embalaje y, a continuación,
retire con cuidado la unidad de la caja. Instale las ruedas como en el diagrama 3. Bloquear las 2 ruedas de blo-
queo antes de llenar y encender el ventilador para mantener el enfriador se traslade desde la velocidad del aire.
Aviso: la Media pad tendrá un ligero olor cuando es nuevo. Esto es normal. Se disipará después de un periodo
de tiempo dependiendo del uso del enrador. Vacíe el depósito a menudo durante el periodo de des-
canso para ayudar la aceleración deeste proceso. (Ver VACIADO DE DEPÓSITO en la sección 5)
Normas de seguridad

Refrigerador Portátil
www.lbwhite.com
Refrigerador Portátil
6
Enfriador de llenado o la conexión al suministro
de agua
Mueva el radiador a un área donde puede llenarse
Método de relleno manual
El refrigerador puede ser llenado a través de la manguera de llenado por la puerta delantera o la cuchara.
Utilizando el indicador de llenado de agua para monitorear el nivel del agua, simplemente oprima la
puerta de llenado y ábrala. Para cerrar, simplemente empújela cerrada hasta que sea bloqueada.
Conexiones de llenado automático
Conectarse a un suministro de agua con una manguera de jardín o manguito de bobina (suministrado por el
cliente), o una línea de agua directa. (Piezas de conexión directa se puede obtener en cualquier ferretería.)
Simplemente conecte el adaptador de la manguera (suministrado con el enfriador) a la válvula de otador pezón
que sobresale del enfriador. Vericar conexiones estanca por examinar visualmente la conexión de la manguera
Precaución: La presión de entrada de agua debe limitarse a un máximo de 50 PSI. Si la válvula está superado,
instalar un reductor de presión (25 PSI) en el pezón en primer lugar. (puede obtenerse en las
tiendas de hardware en riego sección.) Manguera sólo necesita ser levemente entreabierta para
abastecer de agua a la válvula de otador y el refrigerador sólo necesita ser aproximadamente la
mitad lleno cuando en Conguración de relleno automático. el otador está ya establecida para ese
nivel.
Table of contents
Languages: