LA Fitness TORNADO User manual


Snec,
FrameConstructor : Heavysteeltube
provideq
stableoperation
and
. duration
B-raking
system Patented
high-class
precise
inner
magnetic
system
Tensioncontrol : Five-levelmanualcontrol
differentiates
'
ligtnessandheaviness
Transmissiontype : Anti-tension
polyester
band(string)
Flywheel : 7.5KGs/OD250mm.Operatingsilentlyand
smoothly
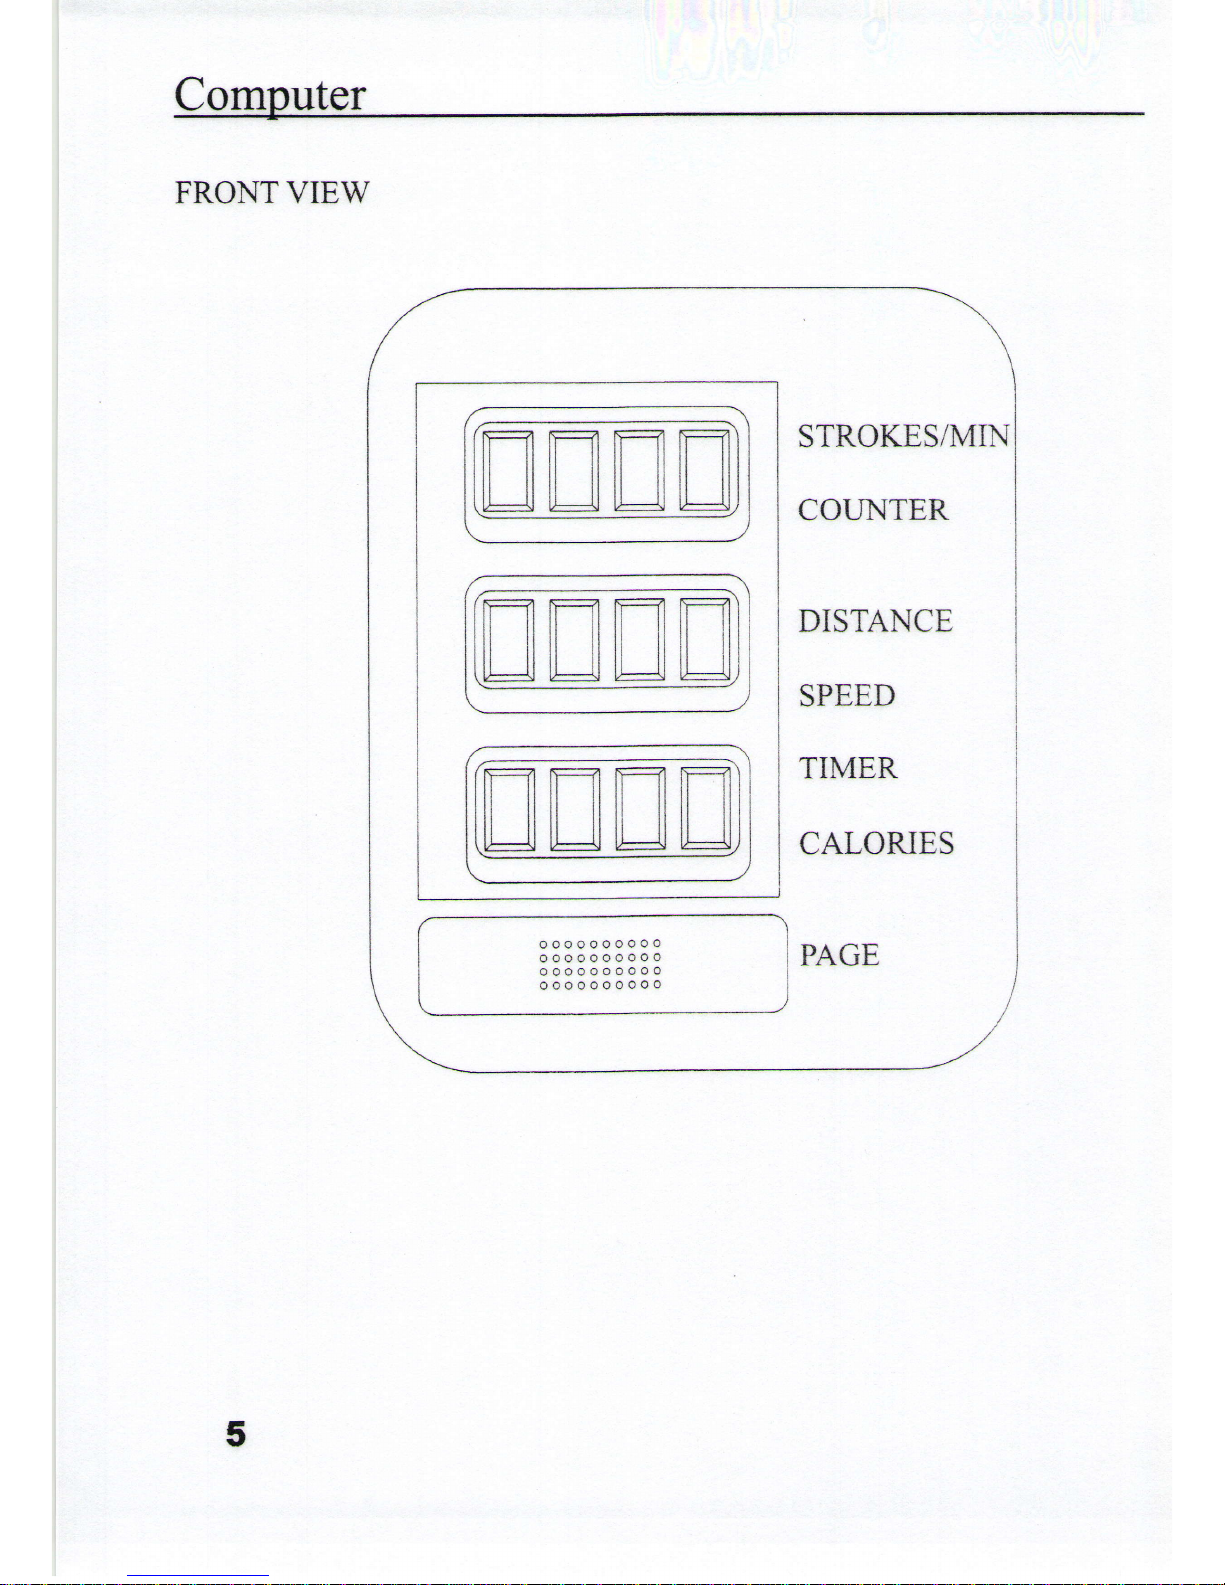
LCDdisplay : Threewindows,singlekey
with sixfunctions
-strokes/min,
counter,distance,speed,
timer,
calorie
s
Handlebar : Comfortable
hand
grip
Seat
slide : Large
steel
tube
provides
stableandsmooth
movement
: Largeand
comfonable
PI"J
seat
easytomove
back
and
fonh
Pedal : Largedouble
pedalwith safety
strap
Storage : Fastfolding
design
- easyforstorage
Exercise
direction : Two-waydesign
provides
avarietyofsport
types
Fullassemblysize | 226
cmx48
cm
x56
cm
Moving : The
product
isequipped
withlargewheel
for
easy
movlng
Seat

Index
Components
& Hardwares l-2
Assembly
& Operation
Instructions. 3-4
5*8
9
10
1l
t2-r3
t4
l5
Computer
FoldingInstruction
Unfold
Instruction
Bodv
Position
Attention
Exploded
PartsListDrawing

Components
#2
Sliding
railx I
#l
Mainframe
x I
#4
Middle
base
stand
x I
r-1l-l
| | I- I
ttt-l
EJ l"___.:J
#19
Computer
x I
(Battery
x I included,
manualx 1)
I
tft
Pedal
x 2
-
#34
axle
set
ofpedal
x I
#9
PUseatx I
Instruction
manual
x 1

Hardwares
#32
Lock
pin
x I
Wrench
x I Allenkey
x2
#33
Wagon
boltx 2
#49
Washerx 2
QQ
#46
Nutx2
2

Instructions
Assembly
themiddle
base
stand(#4)
' using
the wagon
screw(#33),
washer(#49)
and
nut(#46)
toput
together.(picture
1)
Assembly
the
seatcushion(#9)
' first
put
seat
cushionontop
of
the
wheels
set(#10)
'use
screw(#29)
to
put
together.
(picture
2)
**Please
remember
the
magnet
(which
fixedon
the
wheelset(#1O))must
towardto theChain
cov€r.
t*
(picture
1)
Connect
the
computer
cable(#37)
and
sensor
wire(#2O)
first.
(picture
3-1)
(picfure
2)
(Picture
3)
Assembly
the
pedal{#1}
' first
put
tube(#36)
onthe
axle(#34)
and
putrnthe
pedal
hole
ontheaxle
and
the
otherside
too,
thenouttube(#36)
on
theother
side,
and
putthe
other
pedal
(#7)
onand
put
washer(#48)
, thenlockthescrew(#35).
Follow thesame
instructions
ontheother
side,
putin lock
pin(#32)last.(picture
3)
3
(Pichrre
3-1)

eration
Instructions
Before
installing
the
computer,
first
connect
one
sideofthe
computer
sensor
in the
other
side
ofrectangular
hold,
than
push
the
computergently
into
the
rectangular
hole,
make
sure
allsides
are
securely
putinto
the
rectangular
hole,
nowthe
installation
of the
computer
is
finished.
(picture
4)
When
operation
the
tensionknob,
the
rotate
button
will appearnumbers
I-5
andaincrease
anddecrease
symbol,
turning
left isdecrease
and
rightis
increase,
thereforethe
smaller
the
numberthe
smallertheresistanceis,
thelarger
the
numberthelarger
the
resistance
is.The
number
of the
triangle
index
can
beadjusted
according
topersonal
needs.
(picture
5)
,-r--;)\ \
/ \A
/ \ !t'\
/\
tl
,nl
'ri I
\ -/
\/
\r ^u/
\e/,^ .<ev/
tqguE-/ I
(picture
4)
(Picture
5)
4

n
LOmDUter
FRONTVIEW
mmmm
mmmm
mmmm
STROKESA{IN
COLINTER
DISTANCE
SPEED
TIMER
CALORIES
oooooooooo
oooooooooo
oooooooooo
oooooooooo PAGE
5

n
Uomputer
FLIT
ICTIONS
AND OPERATIOITtrS
:
MODE
OR
FUr.{CTroNS ACTTONT
Auto
onloff
& AutoStart/Stop Aslong
as
the
wheel
isinmotion,
the
computer
isinaction.
If there
is
no
moving
within
256
seconds,
computer
will turnit offautomatically.
STR0KES/MIN The
strokes/min
function
will display
onthe
first
display.
DISTANCE Thedistance
function
will display
on
the
second
display
TIMER The
elapsed
time
will display
on
rhe
third
display.
COIINTER Thecounter
will display
total
counr
since
the
last
time
the
unit
was
reser.
SPEED Thespeed
funcrion
will display
on
rhe
second
display.
CALORIES The
Calories
function
will display
on
the
third
display.
KEYFLNCTIO}.{:
PAGE:
l. Press
the
Page
button
will changethe
functions
from
STROKESA{IN,
DISTANCE,
TIMER,
COTINTER.
SPEED
and
CALORIES.
2.Pressing
the
button
forover
3seconds,
allfunctional
values
will
rest
tozero.
6

Computer
I
HOW
TOREMOVE
BATTERY:
l. Take
offthe
deadbattery
byinserting
andtrvisting
ascrewdriverinthe
slot
ofbattery
housing
ontheback
case
(see
illustration).
2. Replace
lpcsSize-AA
or
UM-3
battery
intothebattery
housing.
3. Batterymust
becorrectly
positionedandmakesurethebatteryspring
is
properly
contacted
withbattery.
4. Whenever
remove
thebattery
will erase
allfunctional
datas.
5. Thebattery
life isapprox.
I year
under
normalusage.
6. If thedisplay
isillegible
or
only
partial
segment
appeared,
please
take
out
thebattervand
waitfor 15
seconds,
then
reinstallit.
7

f1
Lomputer
SPECIF'ICATIONS:
FLINCTIONi
SPEED 0.I.99.9
MPHIKPH
DISTA}-ICE A.l-999.9
OR
0.01
-99.99
Km
or
Miles
TIMER 00:00-99:59
STROKES/MIN5-199
COLTNTER | -999
CALORIES a.L-999.9
DISPLAY LIQUID
CRYSTAL
TYPE
CONTROLLER 4BII ICHIP
MTCROPROCESSOR
SENSOR MAGNETIC,NON-CONTACT
POWER
SOURCE REQUIRES
OhIEPIECE
OF
I.5VSIZE-AA
OR
UM-3.
OPERATNG
TEMPERATUREo'C
-
+4ot (32"F_lo4.F,)
STORAGETEMPERATURE -20"c-
+5ot (-4'F-
122"F)
I

Folding
Instructions . -. .. ---
Folding
instructions:
(1)First
slowly
pullupthe
sliding
rail.
(Picture
6)
(2)
Then
pullout
thelock
pin.
(Picture
6)
(Picture
6) il (5)
t (3)
(3)Before
folding
the
sliding
rail,first
foldrearsupport
stand
towards
inside,(Picrure
7)
(4)Then
put
the
sliding
railvertically
against
the
main
frame.
(Picture
7)
(5)Lastly,
putin thelockpin.(Picture6)
*Please
donot
putfingers
inthe
holes
when
folding
in case
of injury.
)r'.
I
(Picture
7)

Unfoldinstructions
(3)
r------=-=
Unfold instructions:
(
1)
First
take
out
thelock
pin.(Picture
9)
(2)
Thenput
down
the
sliding
rail.
(Picture
8)
(3)
Fold
rear
support
stand
outwards.
(Picfure8)
*Please
donotputfingers
inthe
holes
whenputting
the
sliding
raildown
\/\
]=z=
(4)Slowly
pullthe
slidingrailupwards.
(Picture
9)
(5)Then
putin the
lockpinandthe
iscompleted.
unfolding process
(Picture
9)
(Picture
8)
(Picture
9)
(4
f
it (1
(5)
{o

Bod Position
(l) The
correct
way
touse
themagnetic
rowing
machineistofirstsit
with
bothknees
bended,
bodyslightly
lean
backwards
and
stretch
bothanns
tograb
handles.
(Pictures
l0)
(Picture
10)
(2)Thenmove
bodybackand
use
legs
topushforward,
use
anns
topull
towards
breast
$icture 11).Toavoid
getting
hurt,
don'tletboth
knees
firmly attached
anddon't lean
yourback
toobackwards.
Goback
to thestarting
position
and
continue
thisaction.
t1 (Picture
Il)

Attention
Warning:
Before
using
the
magnetic
rowing
machine,
please
advise
personal
doctor
and
have
a
physic
examination
if necessary.
Regular
and
strict
exercising
habits
must
first gain
doctor's
permission,
if there
are
any
uncomfortable
matters
while
using
the
magnetic
rowingmachine,
please
stop
immediately
and
consult
doctor
again,
it isvery
important
touse
the
magnetic
rowing
machine
correctly.
Please
read
manual
carefully
before
using
the
magnetic
rowing
machine.
Whilethe
magnetic
rowing
machine
isinuse
orwhiletaking
arest,
it is
necessary
tokeep
children
away
fromthe
magnetic
rowing
machine.
Pleasewear
appropriate
clothingwhileexercising,
forexample,
sportswear
and
sportsboots
etc.Donotwear
loose
clothingin case
it might
get
sfuck
in
machinewhile
exercising.
Make
sureali screws
onthe
magneticrowingmachine
istightened,
term
maintenance
can
protect
the
magneticrowing
machine
tobein good
condition.
Before
Use:
Howto
usethe
magneticrowing
machine
toexercise
depends
onone's
body
condition.
If you
havenot
exercised
foralong
period
oftime
or
you
areoverweight,
then
youshould
startslowlS
then
slowlyincrease
the
amountoftime
vouexerciseevery
week.
12

Attention
At first,
maybe
youonlyneed
acouple
ofminutes
to accomplish
thetarget
you
haveset
foryourself,
then,
youwill have
tospend
sixtoeight
weeks
to
improve
yourphysical
condition.
If younsedto spend
morethanthis
amount
of time,please
donotfeeldepressed,
theimportant
thingisthat
exercise
shouldbebased
onyourownschedule
andeventually
attain
the
goalof exercising
thirfyminutes
each
time.
Thebetter
yourphysical
condition
is,
the
tougher
your
goal
setting
exercising
timeshouldbe.
It is
important
tokeepthe
following
inmind:
* It isalways
important
toconsult
a
doctorbefore
starting
your
exercising
plan
orbeginning
your
training.
Letthe
doctor
examine
an
actual
exercising
schedule
according
toyour
training
and
diet
plan.
* Follow
your
own
and
the
doctors
progressand
keepon
moving
forward
according
toactualsituations.
* Follow
theexercising
plan
that
has
been
set
incoordination
withother
aerobic
exercises,
forexample,
walking,
jogging,
swimming,
dancing,
riding
bicycles.
..etc.
* It isnecessary
todrink
alotofwater
whileexercising,
the
largeamount
ofwater
thathas
been
lost
during
excessive
exercise
mustbe
re-supplied
afterwards
inorder
toavoid
dehydration.
Avoid
drinking
cold
water,
water
at
room
temperature
isbest.
* Take
pulse
rates
at
alltimes.
If there
isn'tan
pulse
meter,
letthedoctor
instruct
you
touse
a
watch
oruse
your
neck
totake
your
pulse,then
according
toyour
age,
set
your
heartbeat
goal
foryour
own
age'
n Surgeon
doctor
association
thinks
thatthe
lackofexercise
isasign
v ofdanger
inyour
health.
o
{3

,4,
ft e-tr)
\\\
u\\
I
I
I
I
I
I
I
I
I
J
sl
'El
dl
t'{ |
€l
€l
a)I
'cl
ol
EI
XI
HI

Parts
List
Description QT}
Part#Description QTY ?art#
IMainFrame 1
I
I26 Screw
forRearStand I
2Sliding
Rail 1)'7
LI Screw 1
aRear
Suppot
Stand 1?R Screw /
A
-t Middle
Base
Stand I29 Screw
for seat 4
5Left
Chain
Cover Ii30 Screw 5
6RightChain
Cover 4
Ia'l
J1 Sleeve
Tube a
J
IPedal a
La4
)L Lock
Pin 1
1aa
3) Wagon
Bolt L
8Magnetic
System aA
J_T AxleofPedal I
l.
9PUseat 1
10 lSeat
SuPPort 135 Screw a
L
1i Slidine
Wheel 636 Sieeve
Tube L
131 Computer
cable 1
t2 Pull
handles 238 Screw
for cover '7
13 Handle
cap r||
L
An l^ F
39 lScrew
lor cover a
J
'lA
l4t Foamerip I40 lsct.* for
cover | 1
15 Fix wheel 1
I
I4l lstt** for
Tension
Knob 1
I
16 Bottom
Wheel 1*-.r--_-
42 lhns Nvlon
Nut 1
1-1
II Top
Wheel 143 lUt0 F{ylon
}'{ul 2
r8 Tension
Knob
IAA
-t-t Mtl? Nylon
Nut 1
19 Computer 1-l M8 lt{ut 6
2A Sensor
wre I46 Screw
}-{ut /
11
/-L End
Cap
forSliding
Rail
*l 41 cap 2
22 Rear
Stand
caP
73 MovingWheel
CaP 1
;
+
48 MBwasher
(big) J
49 M8 washer
(small) z
24 Rubber
stop 1
I
-I 50 M
l0 washer A
+
25 Plastic
cover
forwheel
set
t5
Table of contents
Other LA Fitness Home Gym manuals