Laguna Tools PL1220 User manual

MLC122040
pl1220 Laser Machine Owner’s Manual

Laser Type Water cooled CO2 sealed laser, 10.6µm wavelength
Laser Power 40 Watt
Work Envelope 12″L x 20″W (cm: 30.5, 50.8)
Max Material Thickness 3/4" (1.9 cm)
Max Material Thickness Bottomless Innite
Engraving Speed 0-500mm/s
Cutting Speed 0-500mm/s
Laser Output Control 0-100% Set by Software
Min. Engraving Size 1mm x 1mm
Highest Scanning Precision 4000 DPI
Locating Precision ≤+0.01mm
Controlling Software Ruida RDWorks
Graphic Format Supported DST PLT BMP DXF DWG AI LAS, etc.
Color Separation Yes
Working Environment 32º – 104 º F , Humidity 5-95%
Phase 1 PH
Voltage 110V
Motor Type 2 x steppers
Motor Spec 4.0 AMP (1-8°)
Cycle 50HZ or 60HZ (auto switching)
Full Load Amperage 14.5 AMP .
Switch Type Automatic shut off
Power Cord IEC320-C13 to NEMA 5-15P
Power Plug Included NEMA 5-15P
NEMA Breaker Recommendation 15 AMP
Pl1220 Laser Machine SPECIFICATIONS
MLC122040
© 03/2018, Laguna Tools, Inc.
The information contained in this publication was correct at the time of print. In the interest of continuous innovation, we reserve the right to change specications, design or included equipment without no-
tice or obligation. No part of this publication may be reproduced, transmitted, or translated into any language in any form by any means without our written permission. Errors and omissions may be current.
© 2018, Laguna Tools, Inc
All rights reserved.
See back cover for dimesnional drawings
Foot Print (LxW) 30"L x 40"W (cm: 76.2, 101.6)
Overall Dimensions (LxWxH) 30"L x 40"W x 9"H* (cm: 76.2, 101.6, 22.9)
Shipping Dimensions (LxWxH) 1 of 2: 35”L x 42”W x 16”H. 2 of 2: 16”L x 42”W x 19”H.
Net Weight (No Accessories) 150 Lbs. (68.04 Kgs.)
Shipping Weight 230 Lbs. (104.3
Venting: Outlet Dia. 1 x 6"
Venting: CFM Min. Req. 300 CFM
Sound Emissions 55 dBA
*Machine needs 27.5” (69.9 cm) height clearance to open lid.

PL1220 Laser, MLC122040
Table of Contents
© 03/2018, Laguna Tools, Inc. 3
Table of Contents
Table of Contents.................................................................................3
Video Libraries .....................................................................................3
Warranty & Registration.......................................................................4
About This Manual ...............................................................................5
1. Safety ..........................................................................................5
1.1 Intended Use..........................................................................5
1.2 Risks to Operator...................................................................5
1.3 Operator Rules.......................................................................5
1.4 Prohibited Materials...............................................................6
1.5 General Shop & Tool Safety..................................................6
1.6 Regulation Rulings.................................................................7
2. Machine Maps.............................................................................8
2.1 Location of Safety Stickers....................................................8
2.2 External Map..........................................................................9
2.3 Internal Map.........................................................................10
2.4 Controls Map........................................................................11
2.5 Connections Map.................................................................12
3. Set-Up Procedures....................................................................14
3.1 Product Overview.................................................................14
3.2 Hardware Set-Up.................................................................14
3.2.1 Receiving and Unboxing............................................14
3.2.2 Ventilation (Exhaust/Fume Extraction) Set-Up...........15
3.2.3 Water Chiller Set-Up..................................................15
3.2.4 Air Pump Set-Up........................................................16
3.2.5 Machine Set-Up.........................................................16
3.2.6 Connections....................................................................17
3.2.7 Confirmation of Proper Set-Up Test...............................18
4. Software Installation..................................................................19
4.0 Connect PC to Laser Machine.............................................19
4.1 Install RDWorks as a Stand-alone Program........................20
4.2 Install RDWorks as a Plug-In Print Driver (Advanced)........22
5Adjustments & Maintenance Work............................................23
5.1 Focal Lens Adjustment........................................................23
5.2 Cutting Strategies................................................................23
5.3 Changing or Cleaning the Focal Lens.................................24
5.4 Mirror Assembly Adjustments..............................................24
5.5 Checking for Mirror Alignment.............................................25
5.6 Mirror Alignment Procedure.................................................26
5.7 Laser Tube Installation........................................................27
5.8 Leveling the machine...........................................................28
Appendix 1: Maintenance Schedule ..................................................29
Appendix 2: Troubleshooting.............................................................30
Appendix 3: PL1220 Specifications Sheet.........................................31
Appendix 4: CO2 Laser Machine Settings for RDWorks ...................33
Appendix 5: Wiring Diagram..............................................................34
Appendix 6: Exploded Parts...............................................................35
Video Libraries
We work hard to offer a large library of videos for each and every product that we sell. This list is on-going and subject to change without notice.
To access these videos, please navigate to the product page, the video library, or the Laguna Tools YouTube Channels with
the following QR codes or web links.
YouTube
https://www.youtube.c
om/user/LagunaTools
/videos
Product Page
https://lagunatools.co
m/cnc-laser/co2-
lasers/pl1220-
portable-laser/
Video Library
https://lagunatools.co
m/videos/
When a video is available for certain sections
or jobs in this manual, the following video
callout plat will be present. Use this with a
QR code reader or follow the link to access
the video.
A VIDEO IS Available!
Laguna PL:12|20 Laser
Setup Video
https://www.youtube.com/
watch?v=uvE8NCl9mnE

PL1220 Laser, MLC122040
Warranty & Registration
4 © 03/2018, Laguna Tools, Inc.
Thank you!
Welcome to the Laguna Tools® group of discriminating woodworkers.
We understand that you have a choice of where to purchase your machines
and appreciate the confidence you have in the Laguna Tools® brand.
Through hands-on experience, Laguna Tools®is constantly working hard to
make innovative, precision products. Products that inspire you to create works
of art, are a joy to operate, and encourage your best work.
Laguna Tools®
Imagination, Innovation, and Invention at Work
Warranty & Registration
Every product sold is warranted to be free of manufacturers’ defective
workmanship, parts, and materials. For any questions about this
product, the intended use or what it was designed for, customer
service, or replacement parts, please contact our customer service
department: Laguna Tools® Customer Service
2072 Alton Parkway, Irvine, California 92606, USA
1-800-332-4049
customerservi[email protected]
www.lagunatools.com/why/customer-service/
8AM. to 5PMPST, Monday through Friday
For warranty claims or to report damage upon receiving – please
reach out to our warranty department:
Laguna Tools® Warranty Service
2072 Alton Parkway, Irvine, California 92606, USA
1-949-474-1200
customerservi[email protected]
www.lagunatools.com/rpolicies/warranty
8AM to 5PM PST, Monday through Friday
Registration
To prevent voiding this warranty, all products
sold must be registered within thirty (30)
days of receiving the product. Registering
the product will enable the original purchaser
to receive notifications about important
product changes, receive customer service,
and be able to file a warranty claim against
defective workmanship, parts, or materials.
Who Is Covered
The applicable warranty covers only the initial purchaser of the product
from the date of receiving the product. To file such claims, the original
purchaser must present the original receipt as proof of purchase.
What Is Covered
The warranty covers any defects in the workmanship of all parts and
materials that make up the machine unless otherwise specified. Any
part, determined by Laguna Tools®, to have a defect will be repaired or
replaced (and shipped), without charge. The defective item/part must be
returned to Laguna Tools®with the complaint and proof of purchase in
the original packaging that it was received in. In the event the item/part
is determined to be not covered by this warranty, the customer will be
responsible for the cost to replace the item/part and all related shipping
charges.
Warranty Limitations
This limited warranty does not apply to natural disasters, acts of terrorism,
normal wear and tear, product failure due to lack of maintenance or
cleaning, damage caused by accident, neglect, or lack-of inadequate dust
collection. The warranty may be voided against proof of misuse/abuse,
damage caused where repair or alterations have been made or attempted
by others, using the product for purposes other than those described as
intended use (unless with consent by Laguna Tools®), modification to the
product, or use with an accessory that was not designed for the product. It
is the responsibility of the user to understand basic woodworking
machinery settings and procedures and to properly maintain the
equipment in accordance with the standards provided in this manual.
Length of Warranty
All new machines and optional accessories sold through an authorized
dealer carry a two-year warranty effective the date of receiving the
product. Machines sold for either commercial or industrial use have a one-
year warranty. Wearable parts like throat plates, bandsaw guides, etc.,
have a ninety-day warranty.
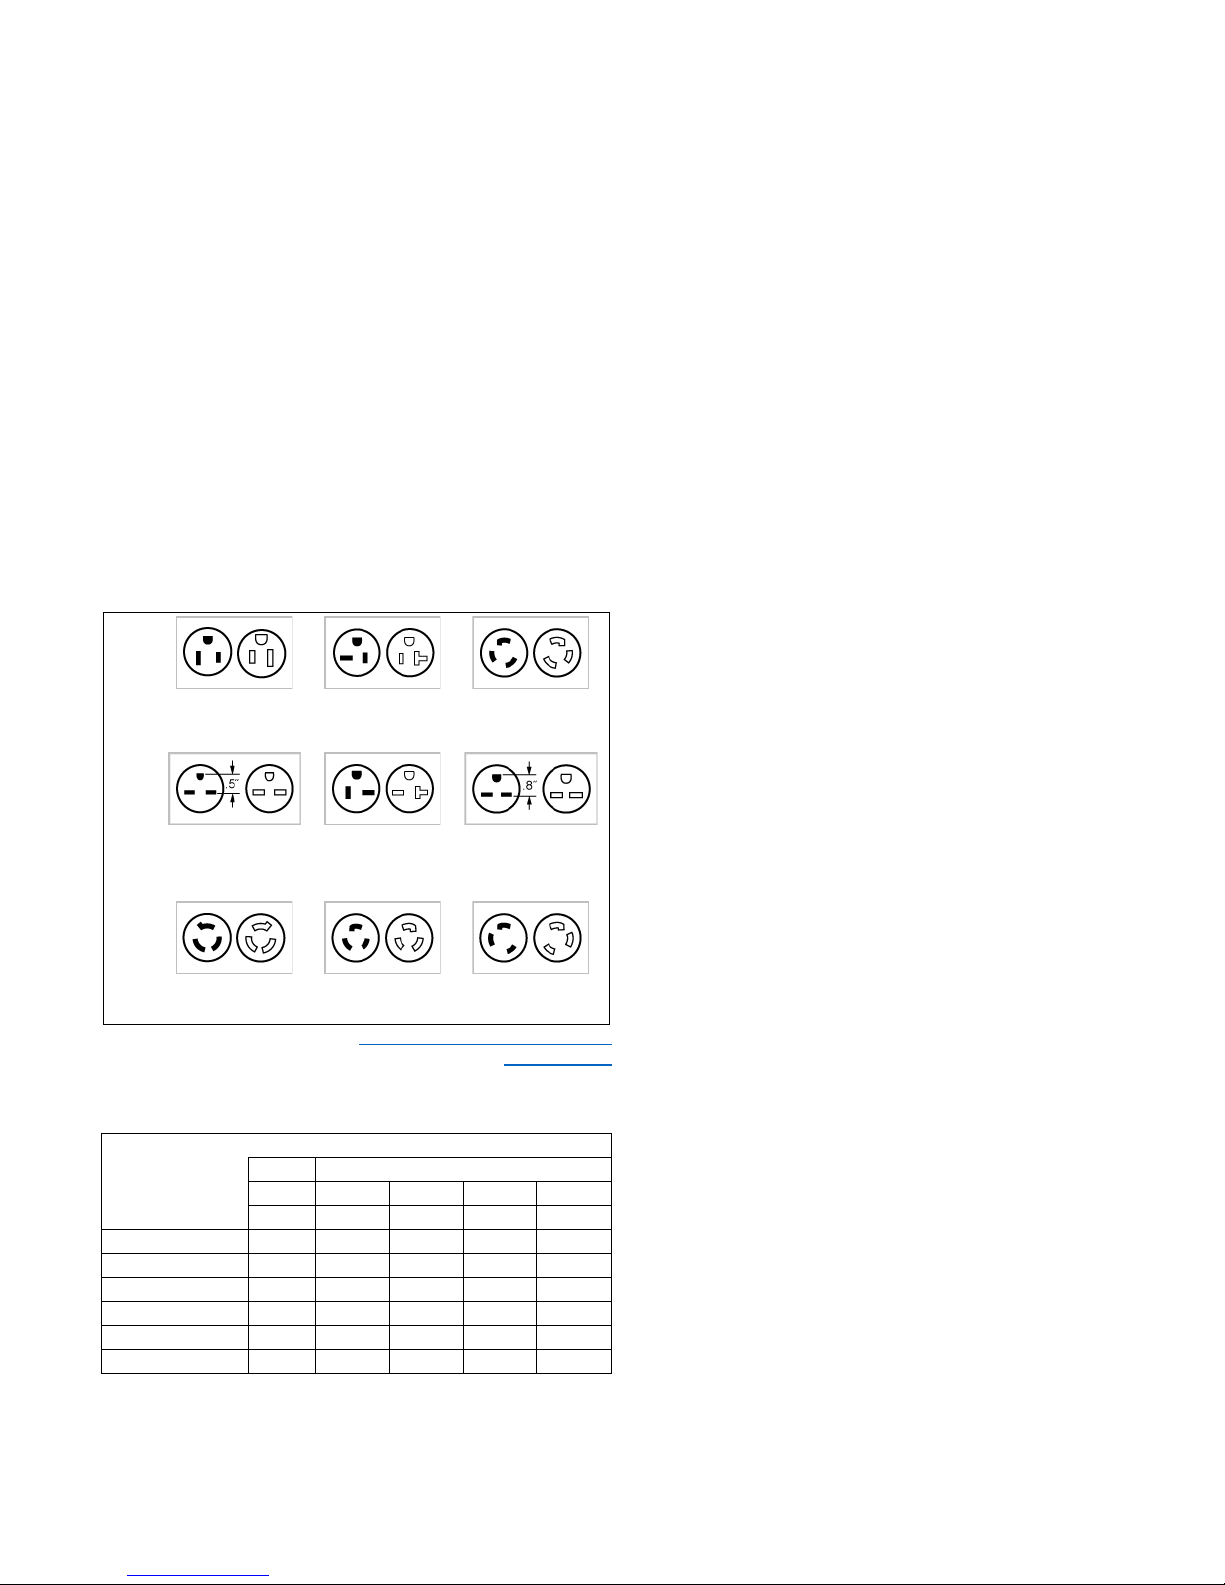
Table A-1 Warranty Lengths
2 Year – New Machines Sold Through an Authorized Dealer
2 Year – Accessories Sold as Machine Options (excluding blades)
1 Year – Machines Sold for Commercial or Industrial Use
1 Year – Blades and Accessories outside of Machine Options
90 Days – Wearable Parts
Aside from being free of defects upon receiving, consumable parts, like
cutters and abrasives, are not covered by this warranty unless otherwise
stated by Laguna Tools®. These parts are designed to be used at the
expense of the operator and are available for replacement or inventory
purchase. The determination of a consumable part will be made on a
case-by-case basis by Laguna Tools®.
Shipping Damage
Laguna Tools®is not responsible for damage or loss caused by a freight
company or other circumstances not in the direct control of Laguna
Tools®. All shipping-related claims for loss or damage goods must be
made to Laguna Tools within twenty-four hours of delivery.
How to Receive Support
To file a warranty-claim please contact the warranty department at
1-949-474-1200. To receive customer service or technical support
please contact the customer service department at 1-800-332-4094.
Parts, under warranty, are shipped at the expense of Laguna Tools®
either by common carrier, FedExground services or similar method.
Technical support to install replacement parts is primarily provided by
phone, fax, email, or the Laguna Tools Customer Support Website.
Register Here!
https://lagunatools.co
m/policies/warranty/

PL1220 Laser, MLC122040
About This Manual
© 03/2018, Laguna Tools, Inc. 5
About This Manual
This manual is intended to thoroughly cover the setup, maintenance,
and proper adjustments of the product. Aside from the proceeding
general safety considerations, this manual DOES NOT cover the
techniques that are possible with the product nor the appropriate
safety precautions necessary. There are organizations with published
safe practices, techniques, and proper operation of this product.
Power Tool Institute
www.powertoolinstitute.com
ANSI Safety Standards
www.ansi.org
NFPA Fire Safety
www.nfpa.org
Occupational Safety and Health Administration
www.osha.gov
In addition to safe and proper operation of the machine, it is also
important to understand the materials that willbe used with the
machine. It is 100% the operator’s responsibility to understand the
materials, and those related safety precautionsnecessary for safe
practice. All material safety data sheets (MSDS) are, by law, available
from the manufacturer of the material.
Any suggestions or comments about this manual are highly
appreciated. Please email us at manuals@lagunatools.com.
SECTIONS OF THIS MANUAL
Safety – Covers general safety, tool specific safety, intended use,
operator rules, risks to operator, specific instructions or do-not do’s,
and regulation rulings.
Machine Maps – Functional maps of the product that define
components main function and use. This section should not serve as
a parts list, as the parts list (exploded view) is Appendix 6.
Setup – Procedures and explanations of proper setup.
Adjustments – Procedures andexplanations of proper adjustments.
Appendices – All other items:Maintenance, Troubleshooting,
Exploded Parts, User guides, specification sheets and wiring
diagrams.
CALLOUTS IN THIS MANUAL
WARNING: Indicates a possible threat that could result in serious
injury or death to the operator and/or bystanders as well as cause
severe damage to the machine.
USE CAUTION: Indicates a possible threat that could result in injury
and/or unwarrantable damage to the machine.
TECH TIP: Indicates a technical tip that can help the action, process,
or procedure described. A QR code will be present when applicable
content is available.
NOTICE: Indicates important information to the reader about
questionable subject, objects of importance, or to explain alternative
methods or options.
1.
Safety
This machine was developed and built in accordance with rigorous
and continuous testing and therefore conforms to industrial safety
regulations and standards. Certain safety precautions are necessary
to minimize the injury risksinherent in the use of this product.
1.1
Intended Use
The PL1220 Laser Marking Machine has been design solely for
engraving, marking, cutting, and sintering materials that are safe and
nonvolatile as described by the material safety data sheet (MSDS).
It must not be used to process materials that emit a toxic biproduct,
are unstable, produce a degrading by-product, or leave a residue on
the machine.
If there is any concern related to the application you are intending to
use this tool for, DO NOT proceed until you have contacted Laguna
Tools®and have been advised on the correct application of the
product.
1.2
Risks to Operator
•Risk of fire when processing flammable workpieces.
•Risk of electrical shock when any doors or panels are removed,
while machine is connected to power.
•Risk of burn when aligning laser mirrors, depending on method.
•Risk of laser beam burn if operated when interlocks are
defeated (door open), without the focal lens in place, or with
reflective workpieces.
•Risk of health impairments due to the inhalation of airborne
particles and toxic fumes.
1.3
Operator Rules
•At all times, this machine must be operated with a water-
cooling system, venting system, and an air assist system.
Before every use, check that all systems are working and
properly adjusted prior to turning on the laser machine.
•Never leave the machine running unattended.
•Do not process materials that emit a toxic biproduct, are
unstable, produce a degrading byproduct, or leave a residue on
the machine.
•At all times, there must be a chemical fire extinguisher within
close range of the machine.
•Personnel who have not received any prior training are
prohibited from operating the machine. Reading and
understanding the owner’s manual shall serve as training.
•Only distilled or deionized water is to be used with the water
cooling system.
•Never operate the machine with the interlocks defeated, or any
of the panels or doors removed.
•Never open any access panels when the machine is connected
to the power source.
•Never operate the machine without the focal lens in place.
•Never modify this machine in any way.
•Always use proper personal protective equipment when using
this machine.
•Maximum continuous use is 5 hours.
•Safe operating temperature is from 10 to 33 degrees Celsius.

PL1220 Laser, MLC122040
Safety
6 © 03/2018, Laguna Tools, Inc.
1.4
Prohibited Materials
The following materials are not permitted to be used with any CO2
laser processing machine. This list is not a complete list and there
may be other materials that can harm the operator and the machine.
Table 1-1 Do not cut list
Material
Danger
PVC (Polyvinyl Chloride)
Vinyl
Artificial Leather
Harmful toxic gas harmful to the
operator and bystanders.
Acidic by-product harmful to lens and
machine components.
Polycarbonate (Lexan)
Epoxy
Fiberglass
Resin
Harmful toxic gas harmful to the
operator and bystanders.
Acidic by-product harmful to lens and
machine components.
Material Properties resist laser
cutting/engraving.
ABS
Toxic gas harmful to the operator and
bystanders.
Acidic by-product harmful to lens and
machine components.
Material Properties resist laser
cutting/engraving.
HDPE
Very Flammable.
Acidic by-product harmful to lens and
machine components.
Polystyrene (Styrofoam)
EPS
Polyurethane Foam
Polypropylene Foam
Extremely Flammable.
Acidic by-product harmful to lens and
machine components.
This material has been reported to
cause several fires by processing with
a laser machine.
1.5
General Shop & Tool Safety
READ ALL SAFETY CONSIDERATIONS. Failure to follow this set of
guidelines can result in unwarranted damage to the machine and serious
injury to the operator and/or bystanders.
1.5.1 Work Area
KEEP ALL CHILDREN AND UNTRAINED PERSONS AWAY FROM THE
MACHINE. Do not allow bystanders to touch the machine or power cord.
Only the operator should be in the work area.
KEEP WORK AREA CLEAN. A cluttered area can limit the range of motion
needed by the machine and cause serious injury to the operator or damage to
the machine.
MAKE SURE THE WORK AREA IS CHILD-PROOF AND UNACCESIBLE TO
UNTRAINED PERSONS. Use padlocks where possible to secure the machine
and keep all machines unplugged when not in use.
DO NOT KEEP OR PLACE TOOLS IN OUTDOOR, DAMP, OR
DANGEROUS ENVIRONMENTS. Never operate the tool under wet or damp
conditions; there is a serious risk of electrical shock. Do not use the tool in the
presence of flammable liquids or gasses.
1.5.2 Personal Safety
KNOW YOUR MACHINE. Read and understand the owner’s manual and
labels affixed to the tool. Learn its application and limitations as well as the
specific potential hazards peculiar to this tool.
DRESS PROPERLY. Do not wear loose clothing or jewelry. Do not wear
gloves that can be caught in any part of the machine. Tie up or wear
protective coverings to contain long hair.
USE THE APPROPRIATE SAFETY GOGGLES. Some machines require
additional face shielding or light shielding than offered by safety goggles
alone. Know your machine and the proper personal protective equipment
(PPE) to use.
USE EAR PROTECTION. Some machines operate at very high noise levels.
To prevent harm, be sure to use ear protection always.
GUARD AGAINST ELECTRIC SHOCK. Prevent all bodily contact with
grounded surfaces and parts of the machine that pose electrical threats.
DO NOT OVERREACH THE CUTTER HEAD, BLADE, OR PROCCESSING
POINT. DO NOT STAND ON THE MACHINE. Serious injury can occur from
mishandling this tool. Keep proper footing on the floor.
AVOID ACCIDENTAL STARTING. Make sure the tool is in the OFF position
prior to plugging it in.
KEEP GUARDS IN PLACE. Machine parts like riving knifes, blade guards,
cutter-head guards, feather boards, push sticks, panels or doors, etc., are
designed to minimize possible injury. Keep those parts in place during
operation.
DO NOT RELY ON GUARDS. The operator of this tool is 100% responsible
for his/her own safety. The guards and safety components sold with this
machine are not enough to ensure safety.
BE ALERT ALWAYS AND GIVE 100% OF YOUR ATTENTION TO THE
OPERATION OF THIS TOOL. Failure to do so can result in serious injury to
both the operator and bystanders.
CHECK FOR DAMAGED PARTS. Before every use of this tool, make sure
the machine and any components of the machine are not damaged orat the
risk of being damaged. If a damaged part is discovered, stop immediately and
put the machine out of service until the part is replaced. Parts can be ordered
directly from Laguna Tools at: 1-800-332-4049.
1.5.3 Tool Use
USE THE CORRECT TOOL FOR THE JOB. Know the limitations and
capabilities of your new purchase by reviewing the Intended Use section of
this manual.
DO NOT FORCE TOOL. The tool is designed to operate at a certain feed rate
determined by the cutter. Forcing the workpiece beyond that rate will do an
inadequate job and may cause damage to the machine orharm to the
operator.
SECURE THE WORK PIECE. For all woodworking and metalworking
applications, the workpiece should be secured correctly by the operator using
appropriate clamps and vises. Always use a clamp or vise when available.
NEVER LEAVE TOOL RUNNING UNATTENDED. Do not leave the tool until it
comes to a complete stop. When it will be unattended, unplug the tool.
KEEP CUTTERHEADS AND BLADES SHARP. Never operate this machine
with unsharpened (dull) cutter heads or blades. Operating under these
conditions greatly increases the chance of kickback and overloads.
FEED DIRECTION. If feed rate is applicable, then there is only one direction
of feed rate for the tool. Do not force the workpiece in the wrong feed
direction.
USE ONLY LAGUNA TOOLS OR COMPATIBLE AND MARKED
REPLACEMENT PARTS. All others may cause damage or harm.
USE ONLY MANUFACTURER-RECOMMENDED ACCESSORIES. Some
accessories may cause damage or harm.
ALL REPAIRS SHOULD BE DONE BY TRAINED REPAIRMEN. Contact
Laguna Tools or a competent repair service.

PL1220 Laser, MLC122040
Safety
© 03/2018, Laguna Tools, Inc. 7
1.5.4 Electrical
DISCONNECT THE POWER FIRST. Always disconnect the machine from
power supply BEFORE adjusting, changing tooling, or servicing it.
USE A QUALIFIED ELECTRICIAN FOR ALL ELECTRICAL CONNECTIONS.
Failure to do so may result in damage to the tool and/or electrical shock to the
operator and bystanders.
NEVER TOUCH ANY TERMINALS OR BARE WIRE WITH HANDS OR
TOOLS. Check for frayedwires frequently.
POWER PLUGS. The machine may not come with a power plug because of
the variance in power receptacles. Consult with a local electrician prior to
purchasing a power plug. The following table should only serve as a guideline
to choosing the appropriate power plug.
BREAKER/AMP SERVICE/FUSES. The machine is designed to be used with
circuit breaker depending on the machine power supply specifications,
National Electric Code (NEC), and National Electrical Manufacturing
Association (NEMA). A general recommendation for this service has been
stated in the specifications section of this manual. You must consult with a
local electrician to ensure a proper service.
Table 1-2 Plugs and Receptacles
100-
125V
125V AC
15 Amps
5-15
125V AC
20Amps
5-20
125V AC
30 Amps
L5-30
200-
250V
250V AC
15 Amps
6-15
250V AC
20 Amps
6-20
250V AC
30 Amps
6-30
250V AC, 15 Amps,
L6-15
250V AC, 20
Amps, L6-20
250V AC, 30 Amps,
L6-30
Taken from mcmaster.com – see https://www.mcmaster.com/#electrical-
plugs/=1anpo5w
Table 1-3 Extension Cord Lengths
A.W.G CORD SIZE
TOOLS AMPERAGE
RATING
VOLTS
CORD LENGTH IN FEET
120
25
50
100
150
240
50
100
200
-
3-6
18ga.
16ga.
16ga.
14ga.
6-8
18ga.
16ga.
14ga.
12ga.
8-10
16ga.
14ga.
12ga.
12ga.
10-12
14ga.
14ga.
12ga.
10ga.
12-16
14ga.
12ga.
-
-.
16-20
12ga.
12ga.
-
-
EXTENSION CORDS. Consult with or use a qualified electrician prior to sizing
extension cords for use with this machine. Repair any damaged extension
cords when discovered. Table 1-3 should only serve as a guideline to
choosing the appropriate extension cord.
USE AN APPROPRIATE EXTENSION CORD THAT IS WIRED FOR
GROUNDING. Some extension cords only have two wires, which does not
allow for grounding.
GROUNDING. In the event of a malfunction, properly grounding the tool
provides a path for electric charge to dissipate in a safe manner. Make sure all
grounded connections are making good contact to grounded and conductive
pathways.
DO NOT MODIFY THE PLUG. Do not remove any of the prongs attached to
the proper plug for the machine.
ALLWAYS USE A HARDWIRED GROUND FOR DUST COLLECTION AND
SIMILAR MACHINES THAT GENERATE A STATIC CHARGE. Especially
with dust collection tools, the static charge generated could result in an
explosion orfire. If you can see a static charge build up (fine dust orthogonal
to tube or surface) or sense one by a small shock – STOP and make sure all
grounding connections are properly installed and making proper contact.
1.6
Regulation Rulings
1.6.1 Voltage: Before connecting thistool to a powersupply(receptacle, outlet, etc.)
make sure that the voltage supplied isthe same that is specifiedon the nameplate of
the tool. Also make sure that the power supply is equipped with the appropriate breaker
and plug according to yourlocal electrical code. IF IN DOUBT, DO NOT PLUGIN THE
MACHINE. Using this tool with a voltage different than that stated on thenameplate can
damage theelectrical components ofthis machineand any such damage willnot be
covered by a warranty.
1.6.2 Proposition 65 Warning of Harmful Exposure: Some dust created by power
sanding, sawing, grinding, drilling and other construction activities contains chemicals
known to cause cancer, birth defectsor other reproductive harm. Some examplesof
these chemicals are:
Lead from lead-based paint.
Crystalline silica from bricks, cement, and other masonry products.
Arsenic and chromium from chemically treated lumber.
Your riskof exposure varies, depending on how often you do this type ofwork. To
reduce yourexposure to these chemicals, work in a well-ventilated area and work with
approved safety equipment, such as face or dust masks thatare specificallydesigned
to filter out microscopic particles.
1.6.3 Fire Warning: Useextreme caution when cutting flammable materials such as
woodor acrylic.Keep the machine clean byfollowing the suppliedmaintenance
schedule and always have a fire extinguisherready to extinguish a fire. Takeextreme
caution when cutting acrylicmaterials as they are more volatile than other materials.
NEVER LEAVE THE MACHINE RUNNING UNATTENDED.
1.6.3 Federal Communications Commission Statement Warning - This equipment
has been tested and found to comply with the limits fora Class A digital device,
pursuant topart 15 of the FCCRules. These limits are designed to provide reasonable
protection against harmful interference when the equipment is operated in a commercial
environment. This equipment generates, uses, and can radiate radio frequency energy
and, if not installed and used inaccordance with the instruction manual, maycause
harmful interference to radio communications.Operation of this equipment in a
residentialarea islikelyto cause harmful interference in which case the user willbe
required to correct the interference at his own expense.
The tools sold by LagunaTools are safewhen used properly, as described by The
American National Safety Institute, the UL Standardsof safe tool use, and the IEC
standards ofsafe tool use.Laguna Tools isin no way responsiblefor injury or death
that occurswhile using this product. YOUR PERSONAL SAFTEY IS 100% YOUR
RESPONSIBILITY AND USINGTHIS PRODUCT REQUIRES 100% OF YOUR
ATTENTION.

PL1220 Laser, MLC122040
Machine Maps
8 © 03/2018, Laguna Tools, Inc.
2.
Machine Maps
2.1
Location of Safety Stickers
KEY
A. Machine Plate
B. Rules/Safety Sticker
C. Laser Classification 3A
D. Open Lid Laser
Classification 4
A: C: D:
B:
B
C
C
A
D
C

PL1220 Laser, MLC122040
Machine Maps
© 03/2018, Laguna Tools, Inc. 9
2.2
External Map
KEY
A. Frame
B. Lid with Viewing Window
C. Removable Bottom
D. Removable Side Panel
E. Emergency Stop
F. Power Switch
G. Controller & Display
H. 4” Fume Port
I. PC-USB Connection Input
J. USB Flash Drive Input
K. Ethernet Connection
Input
L. Circuit Breaker
M. Power Connection Input
N. Distilled Water Inlet
O. Distilled Water Outlet
P. Compressed Air Inlet
Q. Standby Alarm Input
R. Chiller Alarm Input
S. Removable Rear Panel
Also See:
ConnectionDiagram
Appendix 6: Exploded Parts
DESCRIPTION AND PURPOSE
A. Frame – Also called the enclosure, the frame encloses the laser
beam and all internal components.
B. Lid with Viewing Window – Thelid is hinged on two dampening
rods that hold the lid in place when open. It is equipped with
sensors to detect when the laser is running.
The laser beam will not fire with the lid in the open position.
C. Removable Bottom – The bottom can be placed into the laser
Chassis or removed for cleaning and maintenance.
D. Removable Side Panel – Used to enclose the laser beam.
Can be removed to service the machine.
E. Emergency Stop – To be used to stop the machine at any point
in time during operation. The switch must then be rotated and
unlocked prior to restarting the machine.
F. Power Switch – Used to turn the machine on and off.
G. Controller & Display – The controller used has many functions
and features and works in collaboration with the software
package RDWorks. See the Controls and Software Machine
Map sections to further explore them and get started.
H. 4” Fume Port – The fume port is to be used with 4” metal
ductwork and a blower or fume extractor to vent the machine.
I. PC-USB Connection Input – Used to connect the machine to
a PC or other device to transfer work files to the machine.
A PC can also be connected to the machine to transfer machine
data to the RDWorks Software on the PC.
J. USB Flash Drive Input – Used to transfer job files via USB flash
drive (AKA memory card).
K. Ethernet Connection Input – Used to connect the machine to
a network to transfer work files.
L. Circuit Breaker – Used to protect the lasers electrical
components and operator from electrical malfunctions.
The breaker included with the machine is a 2P C10 10 Amp
breaker.
M. Power Connection Input – To be used with an IEC320-C13
to NEMA 5-15P power cord to give power to the machine.
The same cable is used to connect the chiller unit to a power
source.
N. Distilled Water Input – To be used with the supplied ¼” silicon
water hose to supply water from the chiller output connection to
the laser tube. The laser will not fire without water circulating
through the laser tube.
O. Distilled Water Output – To be used with a ¼” silicone water
hose to take water from the laser back to the chiller input
connection.
P. Compressed Air inlet – Used with an air hose and included air
pump to supply air to the workpiece through the laser head.
The air supply keeps the path for the laser beam open and free
of debris.
Q. Standby Alarm Input – This is an optional plug that is not
used with the PL1220 Machine.
R. Chiller Alarm Input – To be used to connect the chiller alarm
circuitry and the laser tube. The alarm willsound when water
cannot be supplied to the laser tube and the laser willnot fire.
S. Removable Rear Panel – Houses electrical components, can
be removed to service the machine.
A
B
C
D
I
E
F
G
H
J
K
L
M
N
O
P
Q
U
S

PL1220 Laser, MLC122040
Machine Maps
10 © 03/2018, Laguna Tools, Inc.
2.3
Internal Map
KEY
A. Laser Tube
B. Laser Tube Mount
C. Beam Mirror
D. Y-Axis Motor
E. X-Axis Motor
F. Y-Axis Motor Driver
G. X-Axis Motor Driver
H. 24 V Power Supply
I. Controller Computer
J. Work Area
K. Gantry
L. Laser Head
M. Connection Input Panel
N. Laser Power Supply
O. Chassis
Also See:
ConnectionDiagram
Appendix 6: Exploded Parts
DESCRIPTION AND PURPOSE
1. Laser Tube – Used in conjunction with the laser power supply to
emit a laser beam.
2. Laser Tube Mount – Mounts the laser tube and is adjustable to
align the laser and the beam mirrors.
3. Beam Mirror – Used to change the direction of the beam. There
are three mirrors in total to direct the laser beam to the work
piece.
4. Y-Axis Motor – Drives the gantry along the linear rails to control
the laser beam coordinates on the workpiece.
5. X-Axis Motor – Drives the gantry along the linear rails to control
the laser beam coordinates on the workpiece.
6. Y-Axis Motor Driver – Uses user input parameters to control
the rotation direction and speed of the Y-axis motor.
7. X-Axis Motor Driver – Uses user input parameters to control
the rotation direction and speed of the X-axis motor.
8. 24 V Power Supply – Converts AC input power to 24V DC
power to run the electrical components of the laser. The beam
has a separate power supply (N).
9. Controller Computer – Converts user input parameters to
mechanical output. The computer unit controls the motor drives
and laser output.
10. Work Area – The area in which the laser head can travel.
11. Gantry – Allows the laser head to be translated to any position
in the work area.
12. Laser Head – Consists of a mirror to direct the beam to the
work piece, a focal lens to concentrate the laser beam, and
a casing to adjust the position of the focal lens and enclose the
beam. The laser head also mounts the red dot indicator as well
as the air inlet tube. The user can adjust the mirror position, red
dot location, and air inlet direction. The recommended focal
lens is documented on the specifications sheet.
13. Connection Input Panel – Mounts all connections needed to
operate the machine. See External Machine map for description
of connections.
14. Laser Power Supply – Converts 110V/220V (50/60Hz) AC
input power to 20,000V DC power to produce a laser beam.
C
A
B
C
D
E
I
J
K
L
K
J
L
H
I
M
O
N
G
F
H

PL1220 Laser, MLC122040
Machine Maps
© 03/2018, Laguna Tools, Inc. 11
2.4
Controls Map
KEY
Jog Y axis forward or
move up cursor
Jog Y axis reverse or
move down cursor
Jog X axis right or move
right cursor
Jog X axis left or move
left cursor
Show entries in interface
Stop Work or Escape a
menu
Validate the change
Set the relative origin
Samples frame size
Start or Pause work
Enter file manager
Set maximum laser
power of current layer
Set minimum laser power
of current layer
Set speed of current
layer
Pulse laser control
Reset controller
Also See:
RDWorks V8 User Manuals, available at
https://lagunatools.com/resources/product-
manuals/
DESCRIPTION AND PURPOSE
Graph Display Area: To display the whole file’s track and display the
running track.
Running Parameters: To display the running file’s file number,
speed, max power, etc.
Coordinates: To display the current coordinate of X, Y and Z axes.
Graph Layer Parameters: To display the layers’ information of the
current file, such as max or min power, speed, etc. When system is
idle, double click the layer. Then users can change the layer’s
parameters and the changes will be saved.
Running Progress Bar: To display the progress bar of the current
running file.
Running Status: To display the current status of the machine, such
as Idle, Run, Pause, Finish, etc.
Working Number: To accumulate the work number of the current
file.
File Destination: To display the dimension of the current file.
Net Status: To display the connecting statusof the Ethernet.
Z/U
Esc Enter
Origin Frame
Start-
Pause
Speed
Pulse
Reset
Max-
Power
Min-
Power
File
Z/U
Esc
Enter
Origin
Frame
Start-
Pause
File
Max-
Power
Min-
Power
Speed
Pulse
Reset

PL1220 Laser, MLC122040
Machine Maps
12 © 03/2018, Laguna Tools, Inc.
2.5
Connections Map

PL1220 Laser, MLC122040
© 03/2018, Laguna Tools, Inc. 13

PL1220 Laser, MLC122040
Set-Up Procedures
14 © 03/2018, Laguna Tools, Inc.
3.
Set-Up Procedures
3.1
Product Overview
NAME
Advertised Name
PL1220 Portable Laser
SKU(S)
MLC122040
UPC
650434695541
Certifications
CE, FDA
STANDARD FEATURES
Cooling, venting, and air solutions included & ready to run
Able to engrave any surface with open-bottom design
RDWorks software package
Red dot pointer
Advanced safety features
Shielded roller bearings
Precision linear rails
Compact industrial design
For full specifications
see Appendix 3: PL1220 Specifications Sheet
Table 3-1: PL1220 unboxing inventory
PART NUMBER
ITEM DESCRIPTION
NOTES
Q
PL1220 Laser Machine
1
PLC122040-22
Exhaust Blower
1
PLC122040-23
Water Chiller
1
PLC122040-24
Air Pump
1
PLC122040-54
Air Pump Tubing
1
PLC122040-55
Water Chiller Tubing
2
PLC122040-57
Chiller Alarm Cable
1
PLC122040-58
IEC320-C13 to NEMA 5-15P
Power Cord
One for chiller,
one for PL1220.
2
PLC122040-59
Ethernet Cable
1
PLC122040-60
USB CABLE
1
PLC122040-61
Ducting
4”
2
PLC122040-62
USB Thumb Drive &
RDWorks Software
1
PLC122040-63
Hardware Kit
1
PLC122040-64
Manual
1
For full parts see Appendix 6: Exploded Parts
DESCRIPTION
The PL1220 can be used to engrave, mark, and cut a variety of materials. It is sold as a turnkey package, with everything included to run the
machine, straight out of the box. All that isneeded is a PC to run the included RDWorks software package.
3.2
Hardware Set-Up
A VIDEO IS AVAILBLE!
Laguna PL:12|20 Laser
Setup Video
https://www.youtube.com/
watch?v=uvE8NCl9mnE
Summary of Steps:
3.2.1 Receiving and Unboxing
3.2.2 Check Inventory/Gather Tools
3.2.3 Ventilation (Exhaust/Fume Extraction) Set-Up
3.2.4 Water Chiller Set-Up
3.2.5 Air Pump Set-Up
Additional Parts and Tools Required for Set-up:
•Distilled Water, 9 Liters (~3 Gallons)
•Computer (See specifications sheet for requirements)
•Flat head screwdriver
•Power Strip with Surge Protector (optional)
WARNING: To avoid set-up problems, to prevent potential damage
to the machine, and to prevent injury,read through the entire set-up
section prior to proceeding.
WARNING: Do not connect to a power supply until the set-up is
complete. Do not perform any of the following steps, installations, or
adjustments with the machine connected to a power source unless
directed to do so.
USE CAUTION: The machine is heavy and requires at least two
people to lift it into position.
NOTICE: All shipping related claims for loss or damage goods must
be made to Laguna Tools within twenty-four hours of delivery.
3.2.1
Receiving and Unboxing
If any damage has occurred during shipment, note the damage on
the bill of lading or refuse the shipment. Immediately call the dealer
store, or Laguna Tools, where the machine was purchased.
Unboxing Procedure
1. Prepare Work Space. An open work space of 30” x 40” or
greater is required to place the PL1220 machine on. There
should also be adequate space for the chiller, air pump, and
ventilations system.
2. Pry off the lids of both crates. The larger of the two crates
contains the laser machine, the smaller contains the
accessories. To remove the crate lid, pry up the metalfastener
clip with a flat head screwdriver and remove.
3. Use two persons to carefully place the machine on table top.
4. Remove all contents of both boxes and prepare for set-up.

PL1220 Laser, MLC122040
Set-Up Procedures
© 03/2018, Laguna Tools, Inc. 15
3.2.2
Ventilation (Exhaust/Fume Extraction) Set-Up
The machine must be ventilated during operation. You willneed 3
band clamps, 2 ducting coilsor other duct-work, the blower unit, and
a flathead screwdriver to fasten the clamps.
Figure 3-1: Set-up Diagram for Blower Unit
Exhaust inlet
Exhaust outlet
Set-up Procedure
1. Connect the exhaust intake to the rear of the laser machine
with 1 (of 2) ducting coils.
2. Fasten the ducting coils together with the included band
clamps.
3. Connect the exhaust outlet to the second ducting coil with
a band clamp.
4. The exhaust must, safely and legally, take the fumes from
the laser machine away from any individuals who could
inhale the fumes.
NOTICE: It is a good idea to use a power strip with an on/off switch
to give power to all components at the same time,
and to turn the machine (systems) on and off easily.
WARNING: Do not connect to a power supply until the set-up is
complete. Do not perform any of the following steps, installations, or
adjustments with the machine connected to a power source unless
directed to do so.
WARNING: The fan can tip over if not fastened to a base.
NOTICE: The use of an indoor fume extractor can be very helpful in
isolating and control the fumes emitted from laser cutting and
engraving.
3.2.3
Water Chiller Set-Up
You will need 7 liters of distilled or deionized water, the water chiller
tubing, the alarm cable, and one of the power cables.
Figure 3-2: Set-up Diagram for Chiller Unit
Water Inlet, and Cap
On/Off Switch and DRO of Temperature
Alarm Cable Connector
IEC320-C13 Receptacle
Inlet, to be connected to laser machine outlet
Outlet, to be connected to laser machine inlet
Set-up Procedure
1. Place the chiller in its location.
2. Unscrew the cap [A] and fill the unit with 7 liters of water.
There is no fill limit, so measure it out before filling.
3. Connect the water inlet to the machine outlet according to
the connection diagram.
4. Connect the water outlet to the machine inlet according to
the connection diagram.
5. Connect the alarm cable to the laser machine [C].
6. Do not connect to power until set-up is complete.
NOTICE: The chiller will leak water out the inlet and outlet ports, so
use caution when moving.
WARNING: Do not connect to a power supply until the set-up is
complete. Do not perform any of the following steps, installations, or
adjustments with the machine connected to a power source unless
directed to do so.
USE CAUTION: Only use deionized or distilled water. (Tap water or
bottled water has minerals in it that will affect the performance and
life of the laser tube.) DO NOT USE ANY TYPE OF CHEMICAL
COOLANT.
A
B
A
B
C
D
E
F
A
B
D
C
E
F
B
A

PL1220 Laser, MLC122040
Set-Up Procedures
16 © 03/2018, Laguna Tools, Inc.
3.2.4
Air Pump Set-Up
The air pump needs to supply air to the nozzle to direct fumes away
from the focal lens. To install, you will need the air pump, the quick
set adapter, and a ¼” air hose.
Figure 3-3: Set-up Diagram for Air Pump
Air Pump Adapter Insert
Quick Set Adapter
¼” Air Hose
Power Cable
Set-up Procedure
1. Screw the quick set adapter into the air pump adapter insert.
2. Press in the ¼” air hose.
3. Do not connect to power until set-up is complete.
WARNING: Do not connect to a power supply until the set-up is
complete. Do not perform any of the following steps, installations, or
adjustments with the machine connected to a power source unless
directed to do so.
NOTICE: Make sure the air hose fits all the way into the adapter. The
connection should leak very slightly – this is normal.
NOTICE: It is a good idea to use a power strip with an on/off switch
to give power to all components at the same time, and to turn the
machine (systems) on and off easily.
3.2.5
Machine Setup
After the machine has been moved to where it will be used, remove
the zip ties on the belts and install the exhaust adapter. You will need
tools to remove the zip ties, and an Alan key to install the adapter.
Figure 3-4: Set-up Diagram for Laser Machine
Zip Ties
Fume Extraction Adapter Location
Power Switch
Interlock Sensor
Set-up Procedure
1. Remove all zip ties [A] from the Belts and Laser Head
Assembly. There is one on each belt to prevent movement in
transit, and one on the laser head assembly.
2. Install the Fume Extraction Adapter [C] on the rear of the
machine with the included Alan keys.
WARNING: Do not give power to the machine until setup is
complete. The machine will not turn on without the chiller running.
NOTICE: The laser will not fire if the door is open. The switch
detecting an open door located at [E].
USE CAUTION: Be careful not to cut or nick the belts when
removing zip ties.
A
B
C
D
A
B
C
D
A
D
B
C
A
B
D
A
A
C

PL1220 Laser, MLC122040
Set-Up Procedures
© 03/2018, Laguna Tools, Inc. 17
Fig 5-5: Connections Diagram. See Section 2.5 Connections Map for full page.
3.2.6
Connections
1. With the power stillunplugged, make allconnections according to
the connection diagram. Make sure water and air connections
are not leaking.
a. Exhaust System: Use a flat head screwdriver to install
the Exhaust Ventilation system to the machine.
NOTICE: You will need to remove the rear panel in step 3
to verify connections. Only loosely attach the ducting.
b. Cooling System: Press fit the rubber water hoses from
the cooling system (water chiller) to the laser machine.
c. Air Pump: Press fit the air hose from the air pump to
the machine.
2. Remove the rear panel.
NOTICE: The panel can be opened with all connections made.
3. With panel removed, check that all systems are working by
powering them on individually. Do not give power to the laser
machine during this check.
a. Exhaust System: Maker sure the ducting is installed
and will not come loose. Make sure the fan will not tip
over.
b. Cooling System: With the rear panel removed, water in
the chiller, and all connections made, give power to the
chiller and make sure there are no leaks or faulty
connections. Confirm that the water is flowing from
right to left (towards the first mirror). Perform the “pinch
test”: Pinch any line from the chiller to the laser and
make sure the alarm sounds.
c. Air Support System: Ensure that air is flowing to the
laser head assembly.
4. Give power to the machine and all components.
5. Hardware Setup Complete
WARNING: Make sure that the power supply matches the machine’s
requirements as stated on the plate. The PL1220
is prewired for 110V but can be converted to 220V.
Please call Customer Support for instructions.

PL1220 Laser, MLC122040
Set-Up Procedures
18 © 03/2018, Laguna Tools, Inc.
3.2.7
Confirmation of Proper Set-Up Test
It is now possible to place a sample workpiece in the work area and
pulse the machine to test that the laser is aligned and working
properly.
1. Place sample in work area
2. Jog the laser head above the sample test piece.
3. Fire the laser machine by pushing the pulse command.
WARNING: Make sure to remove all zip ties located on the belts prior
to jogging the laser head.
TROUBLESHOOTING:
Machine will not turn on:
Make sure the circuit breaker (on rear of machine) is flipped, and that
the Emergency Switch is not engaged.
Machine turns on, but Laser will not fire:
Make sure door is closed.
Remove rear panel and confirm that water is flowing toward the first
mirror. Laser will not fire if reversed.
Laser fires but does not process the work piece:
See section 7.1 and section 7.3. Confirm that the focal lens is installed
correctly. Confirm the correct focal spacing is set.
Unplug all systems and remove the protective panels.
Confirm that nothing is blocking the laser beam path.
See section 7.4-7.8. Re-align mirrors, starting with the laser tube.

PL1220 Laser, MLC122040
Software Installation
© 03/2018, Laguna Tools, Inc. 19
4.
Software Installation
A VIDEO IS AVAILBLE!
Laguna PL:12|20 Laser
Setup Video
https://www.youtube.com/
watch?v=uvE8NCl9mnE
NOTICE: For techniques on how to use the RDWorks software suite,
or manipulate work files, please refer to the Ruida RDWorks V8
software manual available at:
https://lagunatools.com/resources/product-manuals/
RDWORKS PASSWORD: rd8888
RDWorks is adaptable and can be installed as a stand-alone
program, or as an ad-in to a design program like AutoCAD or Adobe
Illustrator. The following guide will go through the procedure of
installing each individually.
No matter which configuration of RDWorks is chosen to operate the
laser machine, it is advised to first connect the laser machine with the
computer that will be manipulating files, just like one would do with
an inkjet printer. The operator could, however, choose to put work
files on a USB thumb driver and transfer them to the laser machine,
but the Laser machine parameters (things like work area and mirror
configurations) must to be synced with the softwareto preserve
ratios and other parameters set by the onboard controller. The
easiest way to sync this information is by connecting the PC to the
laser machine via the included USB connector.
Confirm these software settings if choosing to not connect to a PC
(intending to only transfer files via USB thumb drive):
Table 4-1: Work Area Settings
Setting
Selection
Notes
Units
mm
Laser machine preset to mm.
Page Width
500mm
Config>page_settings>
Page Height
300mm
NOTICE: The standalone setup is recommended for new users and
is the easiest way to get started with the Laser Machine.
NOTICE: You must connect the laser machine to a computer to read
the factory preset parameters on the Ruida controller.
NOTICE: Design programs may not be compatible with the newest
versions of RDWorks and vice versa.
4.0
Connect PC to Laser Machine
To sync machine settings (4.1.3), you will need to connect the PC to
the Laser Machine. The RDWorks software can also control the
laser, start projects, and manage files directly from a PC by
connecting the Laser Machine.
Connecting Via USB (recommended for quick start)
1. Use the USB to USB connection cable from the PC to the Laser
Machine.
Connecting Via Ethernet (recommended forlong term use)
1. Follow the Connection Diagram to connect the Laser Machine
to the router that your PC is using to connect to the Internet.
This includes connecting the Ethernet cable from the laser
machine to the router.
2. Set the IP address of the Laser machine by hitting the Z/U
button on the Ruida controller and navigating to IP config+
x9
3. Set the IP address to any known value. Use 10.10.100.10 if
confused.
TECH TIP: Every device (computer, router, laser machine) has
a unique IP address. By completing step 3, you are establishing
an address so that other devices can connect to it.
4. Set the Gateway to the IP address of the Internet Router used.
NOTICE: This IP address can be found on the bottom or side of
the router. If not, please contact the router manufacture.
5. Connect the PC to the now available Laser machine network
with the known IP address of the laser machine (10.10.100.10)
NOTICE: The PC will not send any notification that the Laser is
connected. If the connection is not true, you will see this message
from RDWorks when trying to run a command:
Fig 4-1: Communication Error
NOTICE: If you plan to use the laser machine with a USB stick only,
it is still recommended that the RDWorks software (on PC) is initially
synced to the factory preset machine settings.
TROUBLESHOOTING:
Cannot connect: Make sure the laser machine is powered on and
functional, and make sure that RDWorks v8 is installed and running
on the connecting computer.
Cannot connect via Ethernet: Make sure that the Laser machine is
connected to an available Ethernet port on the router. With Ethernet
connected, turn the router off, wait 20 seconds, and then turn the
router back on.
Enter

PL1220 Laser, MLC122040
Software Installation
20 © 03/2018, Laguna Tools, Inc.
4.1
Install RDWorks as a stand-alone program (Recommended)
Installing this version of RDWorks will allow the operator to utilize the
RDWorks software package to create or edit work files and send
them to the laser machine to be executed. This isthe easiest way to
get started in laser machining and is recommended for beginner
operators.
NOTICE: Please refer to the RDWorks v8 software manual for
software-related guidance aside from this initial setup.
Summary of Steps:
4.1.1 Download RDWorks or connect USB Thumb-Drive.
4.1.2 Install RDWorks
4.1.3 Sync Machine Settings with RDWorksV8
4.1.3 Sync Machine Settings with RDWorksV8 (alternative
method)
4.1.1 Download RDWorks or connect USB Thumb-Drive.
To install the software, insert the included USB thumb drive into a
USB port on your computer.
NOTICE: Alternatively go to https://lagunatools.com/design-software-
resources/machine-software-posts/ and download the installer:
Figure 4-2: https://lagunatools.com/design-software-
resources/machine-software-posts/
4.1.2 Install RDWorks
Figure 4-3: Installation Icons
Figure 4-4: Installation Welcome Screen
.zip file from online download
Folder containing .exe file to install RDworks
RdworksSetup.exe file. Run to install RDworks.
RDworks application launcher icon
Install Procedure
1. If the file was downloaded,unzip the .zip file [A] and run the
.exe file [C] in the unzipped folder [B] to a known location.
2. Run the RdworksSetup.exe file and follow the on-screen
setup instructions.
3. Select “LaserWork” as the Type and then select the Origin,
and units that you wish to use. NOTICE: Other “types” are
only compatible with certain software packages. For
example, CorelDraw_Laser will install a plugin into the
CorelDraw software package. See Section 4.2
4. Install.
TROUBLESHOOTING:
Cannot Unzip the downloaded file: You must use a file extractor
software program (like 7-sip, winzip, or WinRar) to perform this task.
Cannot locate RdworksSetup.exe: Check the C: drive. On
Windows, open:
file explore>This_PC>Windows (C:)>RDWorksV8
Cannot run the RdworksSetuep.exe file: Depending on the version
of Windows installed, the operator may need to run the program as
the administrator. To do this, right click rdworkssetup.exe and select
“Run as Administrator”
The Program will not install: Make sure that the “Type” is
Laserwork. Make sure that “Install”rather than “install USB driver” is
selected.
A
B
C
D
D
C
B
A
Other manuals for PL1220
1
This manual suits for next models
1
Table of contents
Other Laguna Tools Measuring Instrument manuals