Lampo FAFLAT30WRGB User manual

Code POWER Volt
(V) LED Finitura Colore Led Viewing
Angle IP Value
FAFLAT30WRGB
30W 200-265V SMD bianco RGB 120° IP 65
FAFLAT50WRGB
50W 200-265V SMD bianco RGB 120° IP 65
SERIE FARI LED
ISTRUZIONI FARI LED
SICUREZZA
INSTALLAZIONE
DATI TECNICI
• L’installazione e la manutenzione devono essere eseguite solo da personale qualicato.
• Rispeare il grado di protezione IP65: il faro non può essere immerso in acqua.
• In caso di roura del vetro, sostuire il prodoo.
• Togliere sempre la tensione prima di eseguire l’installazione o la manutenzione.
• Non smontare o manomeere il prodoo per evitare shock elerici.
• Collegare il faro alla messa a terra.
• Conservare il presente foglio di istruzioni.
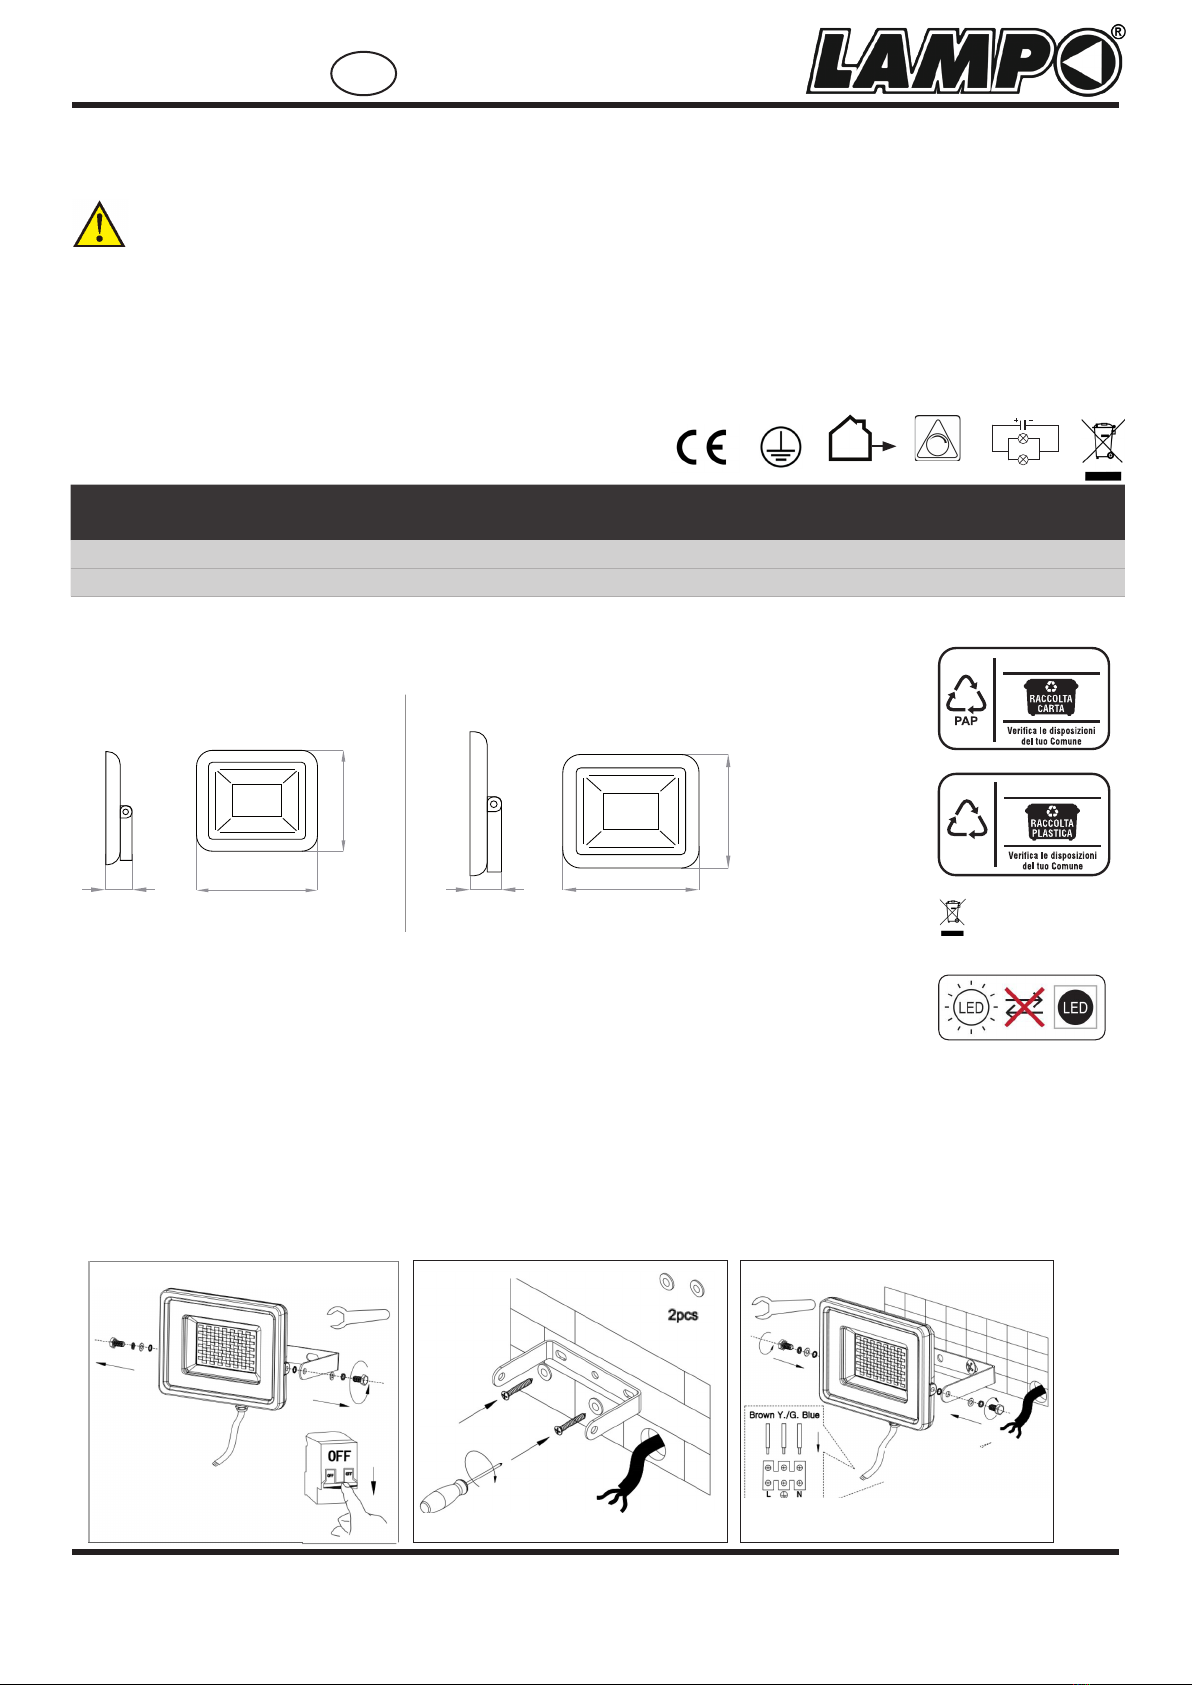
1. Togliere tensione.
2. Non montare il faro su superci soggee a vibrazioni.
3. Rimuovere la staa dal faro smontando le apposite vi (vedi g.1).
4. Ulizzare la staa per segnare i fori da eseguire sul muro. Forare il muro nelle posizioni segnate.
5. Fissare la staa al muro con vi idonee (non incluse) (vedi g.2).
6. Rimontare la staa al faro, regolare l’inclinazione desiderata e stringere i bulloni (vedi g.3).
7. Collegare il cavo di rete al cavo del faro mantenendo la protezione IP65 con conneore ≥IP65 (non
incluso nella confezione)
8. Accendere l’alimentazione generale.
www.lampolighng.com
parallelo
outdoor
g.1 g.2 g.3
made in p.r.c.
ITA
dimmerabile
32 mm 35 mm
193 mm 233 mm
141 mm
163 mm
Versione 30W Versione 50W SCATOLA
21
LDPE
SACCHETTO
04
il simbolo indica che il prodotto
non deve essere smaltito come
rifiuto non selezionato ma deve
essere inviato a strutture di
raccolta sparate per il recupero e il
reciclaggio
Il presente foglio istruzioni va conservato per future consultazioni. Assicurarsi di leggere e comprendere le istruzioni prima dell’installazione.

FLOODLIGHT SERIE
FLOODLIGHT LED INSTRUCTIONS
SAFETY
INSTALLATION
• Installaon and maintenance must only be performed by qualied personnel.
• Respect IP65 protecon: the headlamp can not be immersed in water.
• If the glass breaks, replace it with a new product.
• Always switch o the power before installing or servicing.
• Do not disassemble or tamper with the product to avoid electrical shocks.
• Connect the oodlight to the ground.
• Keep this instrucon sheet.
1. Turn o the power
2. Do not mount the oodlight on surfaces subject to vibraon.
3. Remove the bracket from the oodlight removing the appropriate screws (see g.1).
4. Use the bracket to mark the holes to be made on the wall. Drill the wall in the marked
posions. Fix the bracket to the wall with suitable screws (not included) (see g.2).
5. Mount the bracket to the oodlight , adjust the desired inclinaon and ghten the bolts (see g.3).
6. Connect the mains cables to the oodlight cables keeping the IP65 protecon with ≥IP65
connector (not included)
7. Turn on power
www.lampolighng.com
g.1 g.2 g.3
made in p.r.c.
Code POWER Volt
(V) LED Finish Colore Led Viewing
Angle IP Value
FAFLAT30WRGB
30W 200-265V SMD bianco RGB 120° IP 65
FAFLAT50WRGB
50W 200-265V SMD bianco RGB 120° IP 65
TECHNICAL DATA
parallelo
outdoor
dimmerabile
ENG
32 mm 35 mm
193 mm 233 mm
141 mm
163 mm
Versione 30W Versione 50W
30W version 50W version
the symbol indicates that the
product must not be disposed
of as unsorted waste but must
be sent to separate collection
facilities for recovery and recycling
BOX
21
check the provisions
of your municipality
LDPE
BAG
check the provisions
of your municipality
04
This instrucon sheet have to be kept for future consultaons. Be sure to read and understand the instrucons before installaon.

SERIE FARI LED
www.lampolighng.com
ITA
The key-press functions are shown in the below table
Manual of RF remote controller
Brightness rise
(Eight grading total)
Brightness drop
(Eight grading total)
Close
load output
Open
load output
Static red Static green Static blue Static white
Static orange Static
light green
Static
dark blue
16 color
jumpy change
Static
deep yellow
Static
cyan
Static brown Flash
on and off
Static
yellow
Static
light blue
Static pink 7 color
fade change
Static
light yellow
Static
pale blue
Static purple 3 color
jumpy change
(MAX. Distance:50m )
made in p.r.c.
MANUALE DEL TELECOMANDO RF
MANUAL OF RF REMOTE CONTROLLER
Le funzioni dei tas sono descrie nella seguente tabella
The key-press funcons are shown in the below table
Brightness adjustment
(Eight grading total)
Switching on and o
Sta�c Blue
Sta�c Red
Sta�c Green
Sta�c White
Sta�c Orange
Sta�c Light Green
Sta�c Dark blue
Sta�c Deep Yellow
Sta�c Yellow
Sta�c Cyan
Sta�c Brown
Sta�c Light Blue
Sta�c Pink
Sta�c Light Yellow
Sta�c Pale Blue
Sta�c Purple
16 colour
Jumpy Change
FLASH
OF and OFF
7 colour
Fade Change
7 colour
Fade Change
3 colour
Fade Change
ENG

SERIE FARI LED
www.lampolighng.com
ITA
made in p.r.c.
CODIFICA/DECODIFICA DEL TELECOMANDO RF
Coding/Decoding the RF Remote control
ENG
Distanza massima: 50m
MAX. Distance: 50m
Premere per 3S: Codica
Press 3S: Code
Premere per 3S: Decodica
Press 3S: Decode
1. Togliere tensione all’impianto. / Turn OFF the main power.
2. Ridare tensione all’impianto. / Turn ON the main power.
3. Eseguire questa procedura per “Codicare” o “Decodicare” il telecomando.
Press the following buons to “Code” or “Decode” the remote control.
Il telecomando è codicato di fabbrica, funziona solo con il proprio telecomando.
Per modicare questa impostazione procedere come soo indicato:
The remote control is coded at the factory, it only works with your own remote control.
To change this seng, proceed as follows:
This manual suits for next models
1
Other Lampo Floodlight manuals