LANPARTE LA3D2 User manual

LA3D2
DETACHABLE WIRED CONTROL GIMBAL
3-Axi s H andheld Gimbal for Sports Cameras
USER MANUAL
HONGKONG LANPARTE TECHNOLOGY LIMITED
Email:[email protected]
Tel:+86-0769-81889368
Fax:+86-0769-85841828
ADD:NO.39, 2nd Xin’an road
Changan Town, Dongguan, Guangdong, China
www.lanparte.com LA3D2 manual
Contact us for further questions!

1
Appearance and Design
1
Attention !
Make sure to install the camera before turning on the power
M3 locking screw
Camera holder Camera
power charging port
GoPro standard
mount
(1/4 thread hole inside)

Joystick
Modeindicator
Modebutton
Power
indicator
Powerbutton
USB port for setting
and firmware upgrade
2 pcs 18350 Li-ion batteries
2
3-Axis handheld gimbal head
2
Serial No. Item Name QTY
Gimbal handle
18350 Li-ion battery
Handle extender
Wired control cable(1.5m)
Micro USB cable (For camera powering)
Micro USB cable (For battery charger)
Battery charger
Item list
1/4-20 thread hole 3

3.1
3Battery Instructions
3.2
45
Scenario 1 Scenario 2
NOT OK
Scenario 3Scenario 4
(with extender tube)
OK
(with extender tube)
OK
*Please note that the nominal voltage of the gimbal is 7.4V
Each 18350 & 18650 battery is 3.7V. Therefore, the gimbal MUST operate on a
maximum of TWO batteries.
Batteries must be combined as per below scenarios:
Battery installation:
Unscrew the battery compartment cap and install two 18350 batteries; or add the handle
extender and install two 18650 batteries (install the positive end first)
NOT OK
Extending the tube to
install 2pcs 18650 batteries.
Make sure to attach extender before
installing the 18650 batteries.
Handle extender
*Ensure that the pins are in contact
with each other before tightening the locking knob.
*Same process to
connect the wired control cable
Turn clockwise
to lock
Turn counter
clockwise to open
Gimbal Installation
Gimbal Installation
Align the contacts on the
handle and gimbal head and align
white dots and turn clockwise.

Operation
4
Powering on/mode switch
4.1
67
4.2
Gimbal head turns in 180°
4.3
Power button Mode button
Zero point
Double-tap the POWER button to enter portrait mode. Repeat the double-tap to switch
back to landscape mode.
Portrait vertical mode:
180°
A. Before turning on the power, make sure the white line aligns with the middle line.
B. To power on the gimbal, hold the power button for 2 seconds until the power indicator
turns on. The gimbal is now in STANDBY mode.
Operation modes- Hold the MODE button for 4 seconds. The gimbal will stabilize the
sports camera and enter Mode 1, Follow Mode. Quickly double-tap the mode button to
enter Mode 2.Quickly triple-tap to enter Mode 3.Single-tap to return to Mode 1.
Turn on the gimbal and enter Mode 1. Tap the power button once and the
gimbal head will rotate 180°.

Mode
button Single-tap
Double-tap Red
Green
Blue
89
Operating mode and Axis status
Function/Mode switching
6
Function Activating By Remarks
Control
Button
Power on Press Power button for 2
seconds.
The power indicator
will blink.
Standby/ Operation
mode switching
Mode
button
In standby mode, press the Mode
button for 4 seconds; Press the
Mode button for 4 seconds to
revert back to standby mode
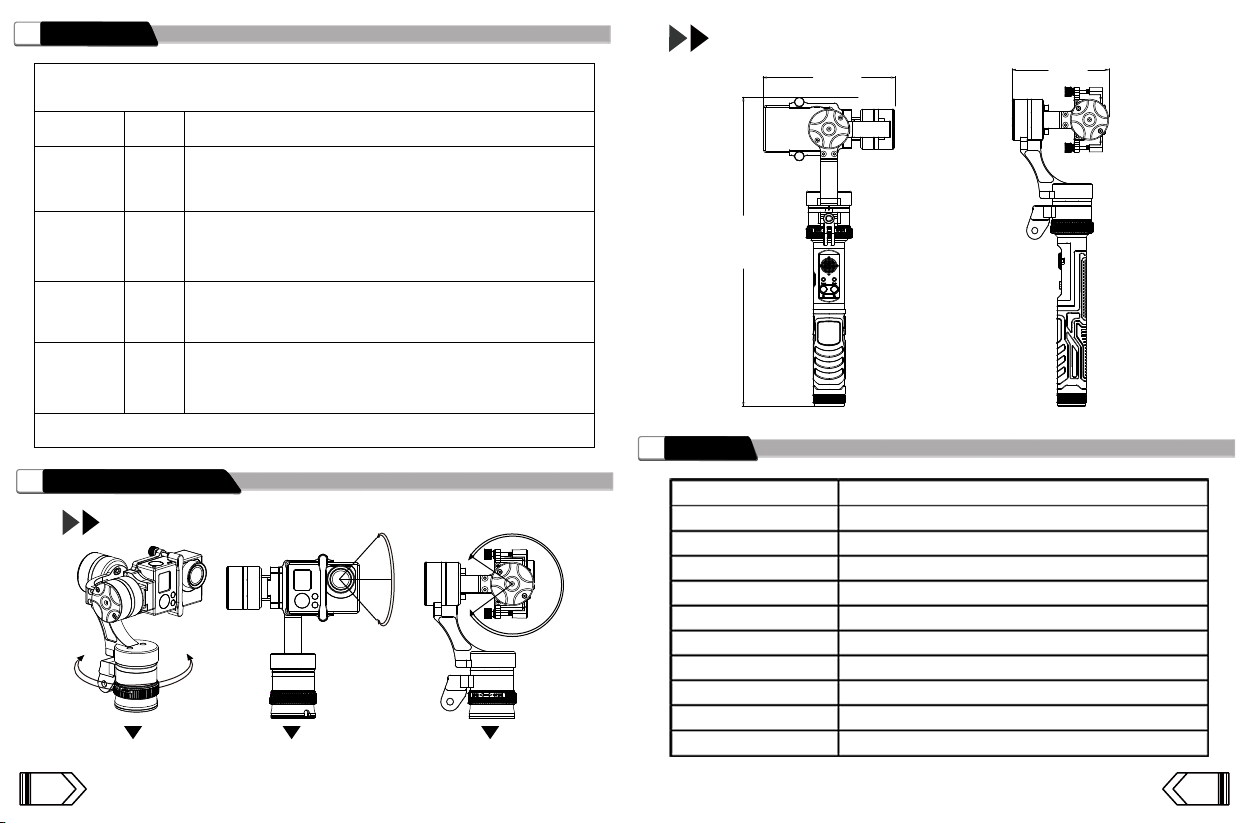
180° rotation
function
Power
button
While the gimbal is stabilized, tap
the Power button once. Tap the
Power button to rotate back to the
original position.
The gimbal must be
horizontally even (Yaw)
before 180° rotation; the
portrait mode and 360°
panorama function are not
available when rotated 180°.
Power
button
Portrait mode Power
button
Double-tap Power button while in
Operation mode; Repeat to return
to landscape mode.
360° panorama Power
button
Power
button
Power off
Triple-tap the Power button while
in Operation mode
The gimbal must be
horizontally even (Yaw)
before 180° rotation; this
function will only work when
holding the gimbal upright.
Press the Power button for 2
seconds
Power Display
7
Mode Switching
5
Power Indicator Status Indicator Status
75%-100%
50%-75%
25%-50%
Below 25%
Light blinks 4 times, 1 sec/time, repeat after 5 sec
Light blinks 3 times, 1 sec/time, repeat after 5 sec
Light blinks twice,1 sec/time, repeat after 5 sec
Light blinks continuously.
*Note: For better performance, change the battery when the power is below
25%. Otherwise low battery will begin to affect the stability of the gimbal.
Charger
8
Rechargeable battery
Model: 18350/18650 Li-ion battery
Capacity: 900mAh/2600mAh
Charging time: 3h/8h
Li-ion battery charger
lnput: DC 5V/80mAh
Output: DC 4.2V/400mAh x 2
Charging Indicator
(Green light will appear once
the battery is fully charged)
Micro USB 5V
Power input
*Note: 18350 battery charger can be charged by using smartphone charger, power bank
or any PC with a USB port.
Axis
Mode Pitch(Tilt) Roll Yaw(Pan)
Mode1
Mode2
Mode2
Following Following
Following
Locked
LockedLocked
LockedLocked Locked
Modes
Mode1
Mode2
Mode3
Control
Button
Mode
button
Mode
button Triple-tap
Push the joystick left and right to
adjust the Roll.
Push the joystick left and right to
adjust the Roll; up and down to
adjust the Pitch (Tilt).
Push the joystick left and right to
adjust the Yaw (Pan); up and
down to adjust the Pitch (Tilt).
Direction Control
Mode
Indicator
How to activate
(in Operation mode)

10 11
Standby Mode
9
Gimbal Basic Parameters
10
Size of Gimbal
Item Parameter
Operating voltage
Operating current
Pitch angle
Roll angle
Yaw angle
Battery operating time
Operating Temperature
Net weight
Product Dimension
Package Dimension
6.5V - 12.6V
Standard 120mA
± 90
± 25
± 310
Standard 2h
-10~ 40
345g(w/o battery and sports camera)
300.4 * 205.4 * 92.4(mm)
21 *17 *18(cm)
Parameter
11
Rotation Angles
620°
Yaw Roll Pitch
Weight : 345g
(w/o battery and sports camera)
50° 180°
117mm 93mm
274mm
Press the power button for 3 second to enter into standby mode. Then
power indicator blinks green while mode indicator blinks blue.
Activating By
Control
Button
Parameter
Name
Note: Please make sure the gimbal stay balance before calibration.
Parameter
for GoPro
4/5 UP
Under standby mode, press UP on the joystick for 5 seconds.
The mode indicator will blink red for uploading. The indicator
will blink blue upon completion and then the gimbal will return
to standby mode.
Parameter
for Sony
Action Cam RIGHT
LEFT
DOWN
Under standby mode, press RIGHT on the joystick for 5 seconds.
The mode indicator will blink green for uploading. The indicator
will blink blue upon completion and then the gimbal will return to
standby mode.
Under standby mode, press LEFT on the joystick for 5 seconds.
The mode indicator will blink green to enter into calibration. The
indicator will then blink red upon completion.
Under standby mode, press DOWN on the joystick for 5 seconds.
The mode indicator will blink red and all the settings will restore
to factory default. The indicator will blink blue upon completion
and then the gimbal will return to standby mode.
Sensor
calibration
Factory
reset

Wired control cable
12
Standard 1/4 thread
underneath
*1/4 thread hole on the bottom for use with common accessories.
Wired control
12
Table of contents
Other LANPARTE Camera Accessories manuals
Popular Camera Accessories manuals by other brands

Hama
Hama Trekking Duo 160 Ball operating instructions

Nikon
Nikon TTL instruction manual

Aquatica Digital
Aquatica Digital AQUATICA A300 instruction manual

Hoppecke
Hoppecke 5 OPzV 250 Installation, commissioning and operating instructions

dji
dji T20 user guide

laerdal
laerdal Resusci Baby QCPR installation guide

Videotec
Videotec MAXIMUS MPX instruction manual

Fantasea
Fantasea FRX100 VA instruction manual

Westcott
Westcott 1040 Setup instructions

Olympus
Olympus Camedia B-HLD10 instructions

Photonic Universe
Photonic Universe AGM-DC-2V300AH instruction manual

Moog
Moog EXO GeminEye Installation and operation instructions