LAS 11790 User manual

1
DE Anhänger Deichselbox
Art.-Nr. 11790
Übersicht
Bestimmungsgemäßer Gebrauch
Lieferumfang
Spezikationen
Sicherheitshinweise
Bedienungsanleitung
Wartung und Pege
Kontaktinformationen
WARNUNG
Lesen Sie die Bedienungsanleitung vor Inbetriebnahme sorgfältig durch und beachten Sie alle Sicherheitshinweise!
Nichtbeachtung kann zu Personenschäden, Schäden am Gerät oder Ihrem Eigentum führen!
Bewahren Sie die Originalverpackung, den Kaufbeleg sowie diese Anleitung zum späteren Nachschlagen auf!
Prüfen Sie vor Inbetriebnahme den Inhalt derVerpackung auf Unversehrtheit und Vollständigkeit!
Bestimmungsgemäßer Gebrauch
Die Deichselbox wird auf die Deichsel (V-Deichsel oder Vierkant-Zugrohr) von PKW-Anhängern montiert. Die Deichselbox ist nicht für die
Montage auf runden Zugrohren geeignet. Sie dient zur Aufbewahrung und zum Transport von Spanngurten, Ladungssicherungsnetzen,
Werkzeug, Feuerlöscher und ähnlichem Zubehör.
Lieferumfang
1 Deichselbox mit zwei Schlüsseln
4 Schrauben mit Sechskantkopf, M8 x 140
4 Muttern M8
4 Unterlegscheiben
4 Blechlaschen 109 x 25 x 6 mm [mm], Bohrungsabstand: 84 mm
1 Gebrauchsanleitung
Spezikationen
Außenmaße: 56 x 25 x 27 [cm]
Innenmaße: 48 x 18 x 24 [cm]
Volumen: 23 l
Eigengewicht: 3,750 kg
Maximale Größe des Deichselprols: 125 x 70 [mm] (Höhe x Breite)
Sicherheitshinweise
1. Halten Sie Kinder fern und lassen Sie Kinder dieses Gerät nicht bedienen!
2. Benutzen Sie dieses Produkt nur für die dafür vorgeseheneVerwendung!
3. Manipulieren oder zerlegen Sie das Gerät nicht!
4. Verwenden Sie zu Ihrer eigenen Sicherheit ausschließlich Zubehör oder Ersatzteile, die in der Anleitung angegeben sind, oder deren
Verwendung durch den Hersteller empfohlen wird!
5. Bohren Sie niemals Löcher in die Zugdeichsel Ihres Anhängers.
6. Beachten Sie die Stützlast Ihrer Anhängerkupplung beim Beladen der Deichselbox.
7. Schließen Sie die Deichselbox vor Fahrtantritt immer ab.
Bedienungsanleitung
Montage:
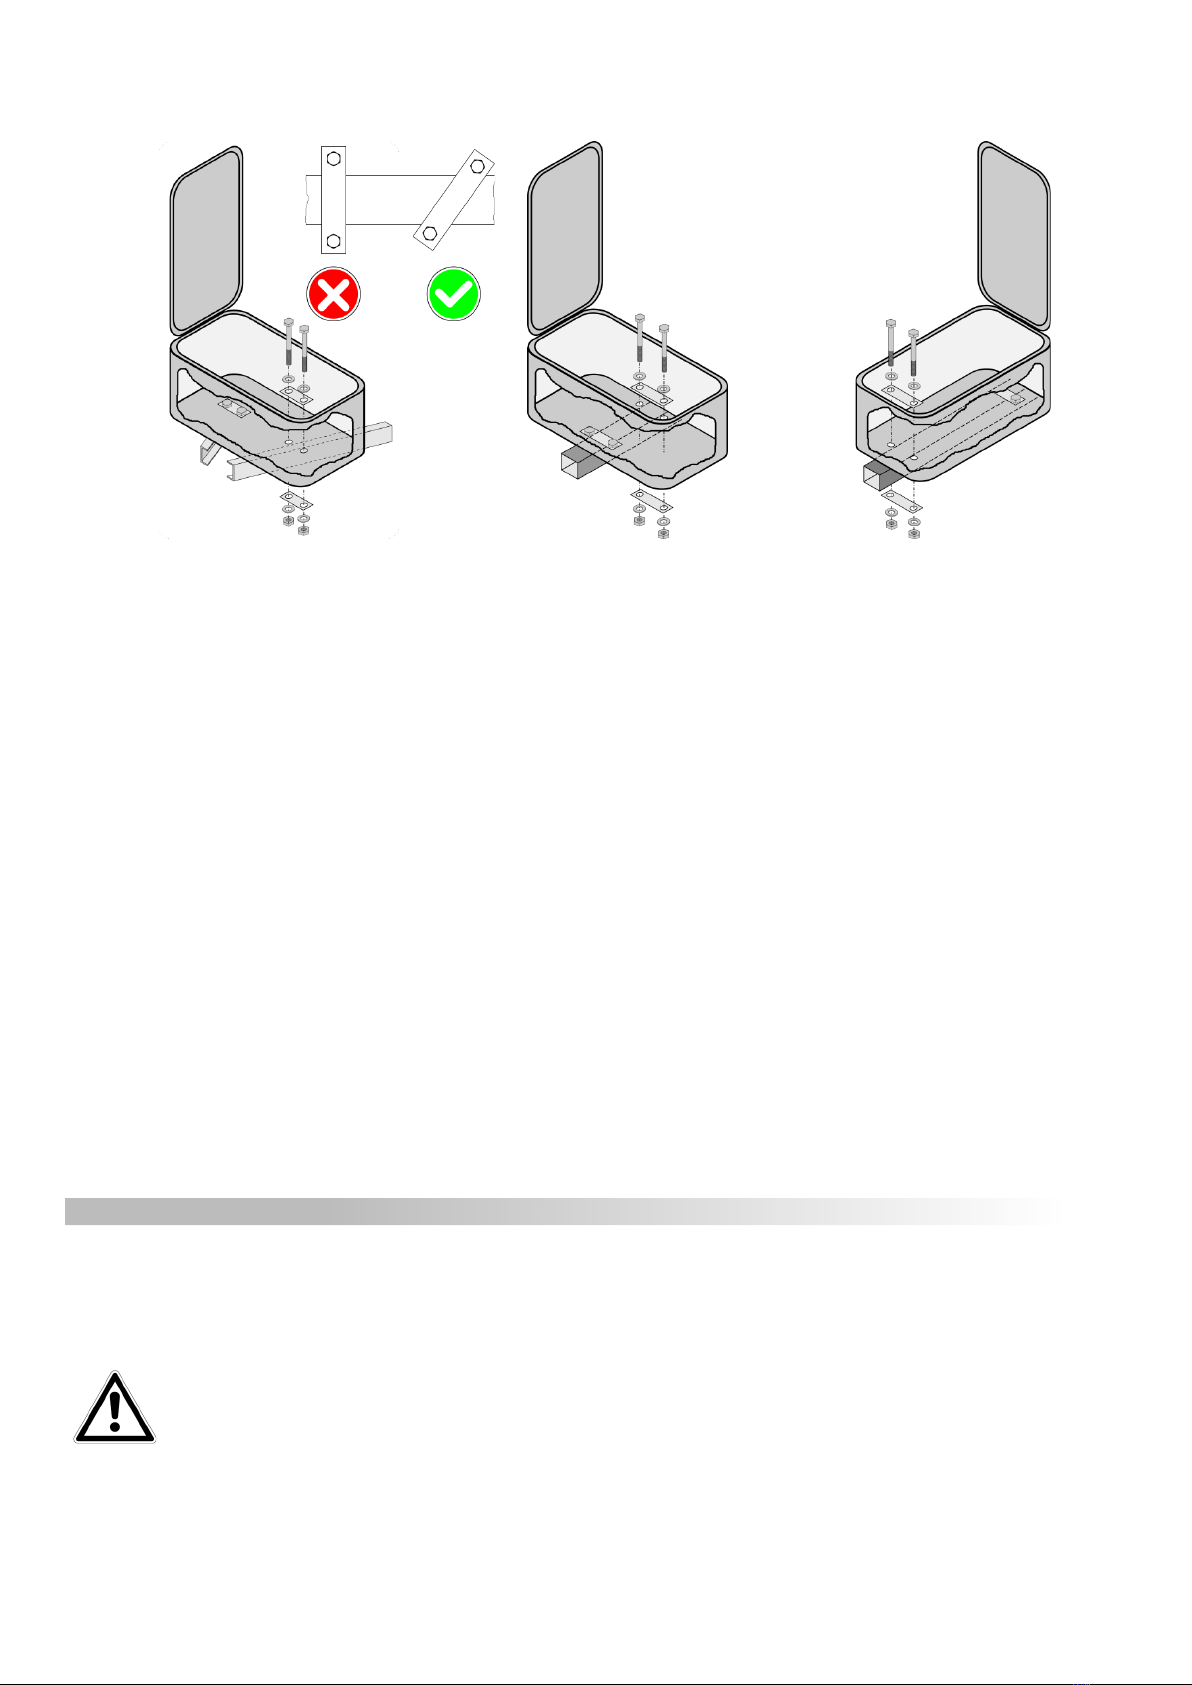
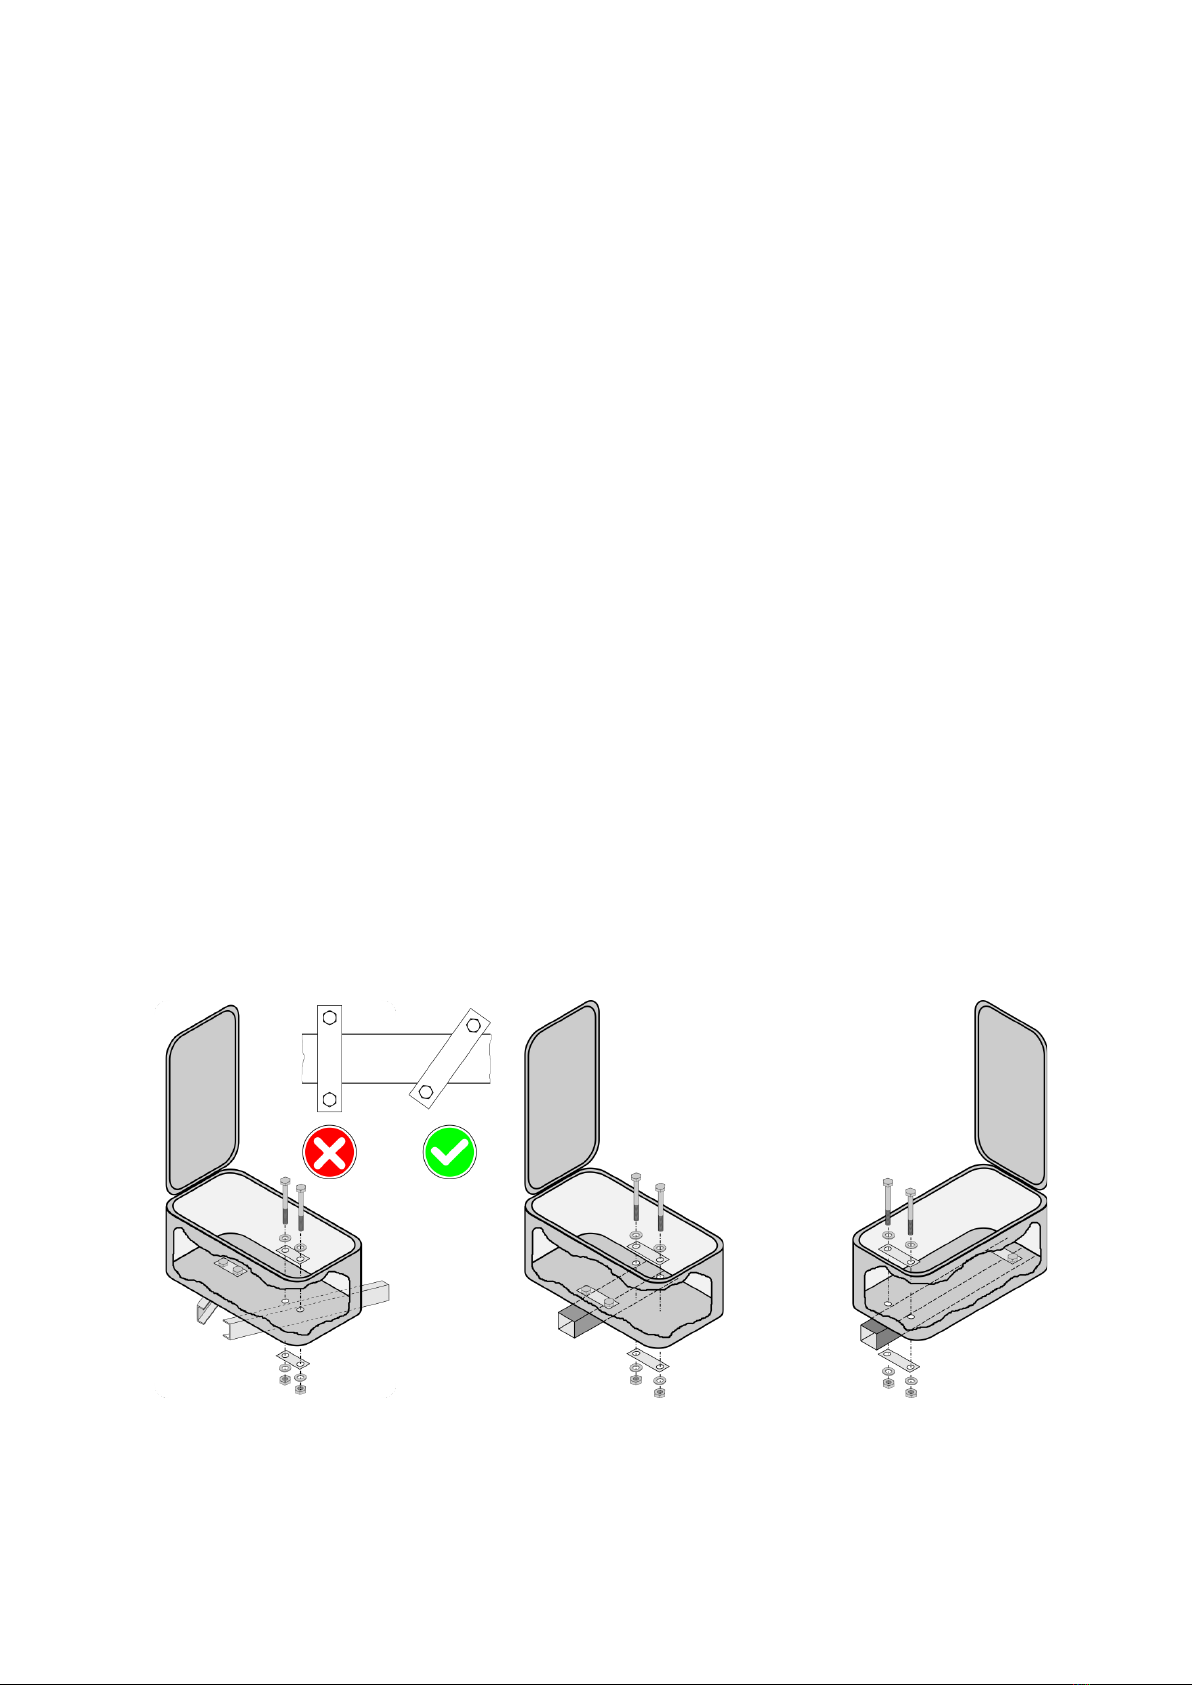
Stellen Sie die Deichselbox auf die Deichsel Ihres Anhängers. Suchen Sie eine geeignete Position für die Deichselbox, es dürfen keine Begren-
zungsleuchten oder Reektoren abgedeckt werden, der Handbremshebel und die Stützradkurbel müssen frei zugänglich bleiben. Achten Sie
auch darauf, daß sich der Deckel der Box ganz önen läßt.Wenn Sie eine Position für die Deichselbox festgelegt haben, markieren Sie am Boden
der Box die Stellen, an denen die Löcher für die Befestigungsschrauben gebohrt werden. Die Befestigungsschrauben müssen sich jeweils rechts
und links, möglichst nah, neben den Prolen der Deichsel benden. Nehmen Sie die Deichselbox von der Deichsel Ihres Anhängers ab, und
bohren Sie die Löcher für die Befestigungsschrauben. Setzen Sie die Box wieder an die ausgewählte Stelle. Legen Sie in der Deichselbox je eine
Blechlasche über zwei Löcher. Stecken Sie die Schrauben mit Unterlegscheiben durch die Löcher der Blechlaschen und des Boxbodens. Stecken
DE GB FR NL SI

2
Sie die anderen Blechlaschen von unten auf die Schrauben und setzen Sie die Unterlegscheiben und Muttern an, aber ziehen Sie diese noch nicht
fest. Richten Sie Box aus und ziehen danach die Schrauben fest. Ihre Deichselbox ist jetzt einsatzbereit.
Montage auf einerV-Deichsel Montage auf einemVierkant-Zugrohr quer / längs
Wartung und Pege
Die Deichselbox selbst ist wartungsfrei und bedarf abgesehen von einer gelegentlichen Reinigung mit einem weichen, trockenenTuch keinerlei
Pege.Verwenden Sie auf keinen Fall aggressive Reinigungsmittel oder chemische Lösungen, da ansonsten die Oberächen beschädigt werden
könnten.
Schmieren Sie das Schloß gelegentlich mit Graphit oder einem harzfreien Kriechöl.
Hinweise zum Umweltschutz
Bitte entsorgen Sie dieses Gerät über dieWertstotonne oder die öentlichen/kommunalen Sammelstellen.
Die Materialien sind recycelbar. Durch Recycling, stoiche Verwertung oder andere Formen der Wiederverwendung von Altgeräten leisten Sie
einen wichtigen Beitrag zum Schutz unserer Umwelt!
Kontaktinformationen
EAL GmbH
Otto-Hausmann-Ring 107
42115Wuppertal
Deutschland
Telefon: +49 (0)202 42 92 83 0 Telefax: +49 (0)202 2 65 57 98
Internet: www.eal-vertrieb.de E-Mail: info@eal-vertrieb.com
GB Trailer tow-bar-mounted box, lockable
Item number 11790
Overview
•Properuse of the product • Scopeof delivery •Specications•Safety notes•Operatinginstructions•Maintenanceandcare• Contactinformation
WARNING
Read the operating instructions through carefully prior to initial use and observe all of the safety notes!
Not observing such may lead to personal injury, damages to the device or your property!
Store the original packaging, the receipt and these instructions so that they may be consulted at a later date!
Prior to initial use check the contents of the packaging to ensure that they are in perfect condition and complete!
Proper use of the product
Thetow-bar-mounted box is attachedtothe tow-bar(V-shapedor squaretie-rod) of a car.The tow-bar-mountedboxis notsuitable for attaching
to round tie-rods. It can be used for storage and for the transportation of lashing straps, load securing nets, tools, re extinguishers and other
similar accessories.

3
Scope of delivery
1 tow-bar-mounted box with two keys
4 screws with hexagonal head, M8 x 140
4 nuts M8
4 washers
4 metal brackets 109 x 25 x 6 [mm], drilling distance: 84 mm
1 Instructions for use
Specications
External dimensions: 56 x 25 x 27 [cm]
Internal dimensions: 48 x 18 x 24 [cm]
Volume 23 litres
Dead weight: 3.750 kg
Maximum size of tow-bar prole: 125 x 70 [mm] (Height xWidth)
Safety notes
1. Keep children away and do not allow children to operate this device!
2. Only use this product as intended!
3. Do not manipulate or dismantle the device!
4. For your own safety, only use accessories and spare parts that are stated in these Instructions or are recommended by the manufacturer!
5. Never drill holes in the tow-bar of your trailer.
6. Observe the support load of your trailer coupling when loading the tow-bar-mounted box.
7. Always lock the tow-bar-mounted box before starting your journey.
Operating instructions
Assembly:
Place the box on the tow-bar of your trailer. Locate a suitable position for the tow-bar box, no tail lights or reectors may be covered, and the
hand brake lever and the support wheel crank must be freely accessible. Pay attention to ensure that the lid of the box can be opened fully.When
you have determined the position for the tow-bar box, mark the base of the box with the positions required to drill the holes for the xture
screws.The xture screws must be positioned on right and left and as close to the proles of the tow-bar as possible. Remove the tow-bar-moun-
ted box from the tow-bar of your trailer and drill the holes for the xture screws. Place the box back in the selected position. In the box, place a
metal bracket over two of the holes. Insert the screws, with washers, through the holes of the metal bracket and the base of the box. Fit the other
metal bracket from below onto the screws and add the washers and nuts, but do not tighten yet. Align the box and then tighten the screws.Your
tow-bar-mounted box is now ready for use.
Mounting on aV-shaped tow-bar Mounting on a square tie-rod crosswise / lengthwise
Maintenance and care
The tow-bar box itself is maintenance free and does not need any maintenance with the exception of occasional cleaning with soft, dry cloth.
Do not use aggressive cleaning agents or chemical solutions since otherwise the surfaces will be damaged.
Lubricate the lock occasionally with graphite or a resin-free penetrating oil.

4
Notes regarding environmental protection
Please dispose of this device via the recycling bin or the public/municipal collection points.
The materials can be recycled. You make an important contribution to protecting our environment by recycling, material utilisation or other
forms of reusing waste equipment!
Contact information
EAL GmbH
Otto-Hausmann-Ring 107
42115Wuppertal
Germany
Telephone: +49 (0)202 42 92 83 0 Fax: +49 (0)202 2 65 57 98
Internet: www.eal-vertrieb.de Email: info@eal-vertrieb.com
FR Boite pour timon de remorque, verrouillable
Réf. art. 11790
Vue d‘ensemble
• Utilisation conforme • Contenu de la livraison • Spécications • Consignes de sécurité • Mode d‘emploi • Entretien et nettoyage • Contact
AVERTISSEMENT
Lisez attentivement le mode d‘emploi avant la mise en service et respectez toutes les consignes de sécurité !
Tout non-respect de ces consignes peut entraîner des dommages corporels, endommager l‘appareil ou vos biens !
Conservez l‘emballage d‘origine en lieu sûr, de même que le bon d‘achat et ce mode d‘emploi an de pouvoir le
compulser à tout moment !
Vériez l‘intégrité et l‘intégralité du contenu de l‘emballage !
Utilisation conforme
La boite de timon se monte sur le timon (timon en V ou tube de traction à quatre pans) d‘une remorque de voiture particulière. La boite de
timon n‘est pas prévue pour être montée sur le tube de traction. Elle sert à conserver et à transporter des sangles de serrage, lets de sécurité de
transport, outils, extincteurs et autres accessoires.
Contenu de la livraison
1 Boite de timon avec deux clés
4 Vis avec tête à six pans, M8 x 140
4 Écrou M8
4 Rondelles
4 Languette de tôle 109 x 25 x 6 mm [mm], distance entre les trous : 84 mm
1 Mode d‘emploi
Spécications
Dimensions extérieures : 56 x 25 x 27 [cm]
Dimensions intérieures : 48 x 18 x 24 [cm]
Volume 23 l
Poids net : 3,750 kg
Dimensions maximales du prolé du timon : 125 x 70 [mm] (hauteur x largeur)
Consignes de sécurité
1. Tenez les enfants à distance et ne les laissez pas utiliser cet appareil !
2. Utilisez cet appareil uniquement pour l‘usage pour lequel il a été conçu !
3. Ne traquez pas l‘appareil et ne le désassemblez pas !
4. Pour votre sécurité, utilisez exclusivement des accessoires ou pièces de rechange indiqué(e)s dans les instructions ou dont l‘usage est re-
commandé par le fabricant !
5. Ne percez jamais de trou dans le timon de votre remorque.
6. Faites attention à la charge d‘appui de votre attelage de remorque lors du chargement de la boite du timon.
7. Fermez la boite du timon avant le départ.
Mode d‘emploi
Montage :
Placez la boite du timon sur le timon de votre remorque. Trouvez une position adéquate pour la boite du timon qui ne recouvre pas les feux de

5
position ou les réecteurs. Le frein à main et la manivelle de la roue doivent être accessibles.Veillez à ce que le couvercle de la boite puisse s‘ouvrir
complètement. Une fois la position de la boite du timon déterminée, marquez le fond là où se trouveront les trous pour les vis de xation. Les
vis de xation doivent se trouver à droite et à gauche, le plus près possible du prolé du timon. Retirez la boite du timon de votre remorque et
percez des trous pour les vis de xation. Reposez la boite à l‘endroit choisi. Dans la boite du timon, posez une languette de tôle sur deux trous.
Placez les vis avec rondelles à travers les trous de la languette de tôle et du fond de la boite. Introduisez d‘autres languettes de tôle du dessous
sur les vis et placez les rondelles et écrous, mais ne les serrez pas encore. Placez la boite et serrez ensuite les vis fermement. La boite du timon de
remorquage est désormais prête à l‘emploi.
Montage sur un timon enV Montage sur un tube de traction côté / longueur
Entretien et nettoyage
La boite de timon ne nécessite aucun entretien mis à part un nettoyage occasionnel avec un chion blanc et sec. N‘utilisez en aucun cas des
produits de nettoyage agressifs ou de solutions chimiques, sans quoi la surface du produit pourrait être endommagée.
Graissez la serrure occasionnellement à l‘aide de graphite ou d‘huile pénétrante sans acide.
Consignes pour la protection de l‘environnement
Veuillez vous débarrasser de cet appareil dans des conteneurs pour matériaux recyclables ou auprès des services de collecte publics/communaux.
Les matériaux sont recyclables. En eet, grâce au recyclage, à l‘utilisation de matières ou d‘autres formes de réutilisation d‘appareils usagés, vous
contribuez favorablement à la protection de notre environnement !
Contact
EAL GmbH
Otto-Hausmann-Ring 107
42115Wuppertal
Allemagne
Téléphone : +49 (0)202 42 92 83 0 Fax : +49 (0)202 2 65 57 98
Internet: www.eal-vertrieb.de E-mail : info@eal-vertrieb.com
NL Disselbox voor aanhangers, afsluitbaar
Art.nr. 11790
Overzicht
• Reglementair gebruik • Leveringsomvang • Specicaties • Veiligheidsvoorschriften • Gebruiksaanwijzing • Onderhoud en verzorging
• Contactinformatie
WAARSCHUWING
Lees de gebruiksaanwijzing voor de ingebruikname aandachtig door en neem alle veiligheidsvoorschriften in acht!
Het niet naleven ervan kan letsel, schade aan het product of uw eigendom veroorzaken!
Bewaar de oorspronkelijke verpakking, het aankoopbewijs en de gebruiksaanwijzing om deze later te kunnen
raadplegen!
Controleer de inhoud van de verpakking voor de ingebruikname eerst op beschadigingen en volledigheid!
Reglementair gebruik
De disselbox wordt op de dissel (V-dissel of rechthoekige trekstang) gemonteerd van aanhangers van personenauto‘s. De disselbox is niet
geschikt voor montage op ronde trekstangen. De box kan worden gebruikt voor opslag en transport van spanbanden, ladingnetten, gereed-

6
schappen, brandblusapparaten en andere accessoires.
Leveringsomvang
1 disselbox met twee sleutels
4 bouten met zeskantkop, M8 x 140
4 moeren M8
4 tussenringen
4 metalen strips 109 x 25 x 6 mm [mm], gatafstand: 84 mm
1 gebruiksaanwijzing
Specicaties
Buitenafmetingen: 56 x 25 x 27 [cm]
Binnenafmetingen: 48 x 18 x 24 [cm]
Inhoud 23 l
Eigengewicht: 3.750 kg
Max. grootte van het disselproel: 125 x 70 [mm] (hoogte x breedte)
Veiligheidsvoorschriften
1. Houd dit product buiten het bereik van kinderen en laat ze het product niet bedienen!
2. Gebruik dit product uitsluitend voor het doel waarvoor het is bestemd!
3. Manipuleer of demonteer het product niet!
4. Gebruik voor uw eigen veiligheid uitsluitend toebehoren of reserveonderdelen die in de gebruiksaanwijzing staan vermeld of waarvan het
gebruik door de fabrikant wordt aanbevolen!
5. Boor nooit gaten in de dissel van uw aanhangwagen.
6. Houd rekening met de verticale belasting van de aanhangerkoppeling bij het beladen van de disselbox.
7. Sluit de disselbox altijd af voordat u gaat rijden.
Gebruiksaanwijzing
Montage:
Plaats de disselbox op de dissel van uw aanhangwagen. Zoek een geschikte plek voor de disselbox. Lampen en reectoren mogen niet worden
afgedekt, de hendel van de handrem en de hendel van het steunwiel moeten vrij toegankelijk blijven. Zorg er ook voor dat de deksel van de box
volledig geopend kan worden. Als u de juiste plek voor de disselbox hebt bepaald, markeert u op de bodem van de box de punten waar de gaten
voor de bevestigingsschroeven worden geboord. De bevestigingsschroeven moeten links en rechts, liefst zo dicht mogelijk, naast de proelen
van de dissel worden geplaatst. Verwijder de disselbox van de dissel van uw aanhangwagen en boor de gaten voor de bevestigingsschroeven. Zet
daarna de box weer op de gekozen plek. Plaats in de disselbox een metalen strip op elk van de dubbele gaten. Steek de bouten met ringen door
de gaten van de metalen strips en de bodem van de box. Steek de andere metalen strips aan de onderkant op de bouten, plaats de tussenringen
en moeren, maar draai deze nog niet vast. Lijn de box uit en draai daarna de bouten vast. Uw disselbox is nu klaar voor gebruik.
Montage op eenV-dissel Montage op een vierkante trekstang dwars/overlangs
Onderhoud en verzorging
De disselbox zelf is onderhoudsvrij en vereist, afgezien van een incidentele reinigingsbeurt met een zachte, droge doek, geen onderhoud.
Gebruik nooit agressieve schoonmaakmiddelen of chemische oplossingen waardoor het oppervlak beschadigd zou kunnen raken.
Smeer het slot af en toe in met graet of harsvrije kruipolie.

7
Informatie over de bescherming van het milieu
Lever dit product aan het einde van de levensduur in bij een daarvoor bestemde, gemeentelijke inzamelplaats.
De materialen kunnen worden gerecycled. Door recycling of andere vormen van hergebruik van oude producten levert u een belangrijke bijdrage
aan de bescherming van ons milieu!
Contactinformatie
EAL GmbH
Otto-Hausmann-Ring 107
D-42115Wuppertal
Duitsland
Telefoon: +49 (0)202 42 92 83 0 Telefax: +49 (0)202 2 65 57 98
Internet: www.eal-vertrieb.de E-mail: info@eal-vertrieb.com
SI Škatlo za vlečni drog prikolice, možnost zaklepanja
Št. art. 11790
Pregled
• Pravilna uporaba • Obseg dobave • Obseg dostave •Varnostni napotki • Navodila za uporabo •Vzdrževanje in nega • Kontaktne informacije
OPOZORILO
Pred začetkom uporabe pozorno preberite navodila za uporabo in upoštevajte vse varnostne napotke!
Neupoštevanje lahko povzroči telesne poškodbe, škodo na napravi ali na vaši lastnini!
Shranite originalno embalažo, račun ter navodila za poznejšo uporabo!
Pred prvo uporabo preverite vsebino embalaže, če je neoporečna in popolna!
Pravilna uporaba
Škatlo za vlečni drog namestite na vlečni drog (V-drog ali oglata vlečna cev) prikolic za osebna vozila. Škatla za vlečni drog ni primerna za
montažo na okrogle vlečne cevi. Predvidena je za shranjevanje in transport napenjalnih trakov, mrež za zavarovanje tovora, orodja, gasilnih
aparatov in podobnih dodatkov.
Obseg dobave
1 škatla za vlečni drog z dvema ključema
4 vijaki s šestrobo glavo, M8 x 140
4 matice M8
4 podložke
4 pločevinaste sponke 109 x 25 x 6 mm [mm], razmik izvrtin: 84 mm
1 navodila za uporabo
Obseg dostave
Zunanje mere: 56 x 25 x 27 [cm]
Notranje mere: 48 x 18 x 24 [cm]
Prostornina: 23 l
Lastna teža: 3,750 kg
Največja velikost prola vlečnega droga: 125 x 70 [mm] (višina x širina)
Varnostni napotki
1. Otrokom ne dovolite v bližino in jim ne dovolite, da uporabljajo pripomoček!
2. Izdelek uporabljajte samo za to predvideno uporabo!
3. Naprave ne spreminjajte ali jo razstavljajte!
4. Zaradi lastne varnosti uporabljajte samo dodatke ali nadomestne dele, navedene v navodilih ali čigar uporabo je priporočil proizvajalec!
5. V vlečni drog svoje prikolice nikoli ne vrtajte lukenj.
6. Pri natovarjanju škatle za vlečni drog upoštevajte nosilnost priklopa prikolice.
7. Pred začetkom vožnje zaklenite škatlo.
Navodila za uporabo
Montaža:
Škatlo postavite na vlečni drog vaše prikolice. Poiščite primeren položaj za škatlo, ki ne sme prekrivati zasenčenih luči ali odsevnikov, ročica ročne
zavore in podpornega kolesa pa morata biti nemoteno dostopni. Pazite, da bo pokrov škatle mogoče povsem odpreti. Ko izberete položaj za

8
škatlo na vlečnem drogu, na dnu škatle označite mesta, na katerih boste izvrtali luknje za pritrdilne vijake. Pritrdilni vijaki morajo biti desno in
levo čim bližje poleg prolov vlečnega droga. Snemite škatlo z vlečnega droga prikolice in izvrtajte luknje za pritrdilne vijake. Ponovno namestite
škatlo na izbrano mesto. Prek dveh lukenj v škatli položite po eno pločevinasto spono. Vtaknite vijake s podložkami skozi luknje pločevinaste
spone in dna škatle. Druge pločevinaste spone nataknite s spodnje strani na vijake ter namestite podložke in matice, vendar jih še ne zategnite.
Poravnajte škatlo in nato zategnite vijake.Vaša škatla za vlečni drog je sedaj pripravljena.
Montaža naV-vlečni drog Prečna/vzdolžna montaža na oglato vlečno cev
Vzdrževanje in nega
Škatla sama ne potrebuje vzdrževanje in glede na občasno čiščenje z mehko, suho krpo ne potrebuje nobene nege. Nikakor ne uporabljajte
agresivnih čistil ali kemičnih raztopin, ker lahko te poškodujejo površino.
Ključavnico občasno namažite z gratom ali oljem brez smole.
Napotki za zaščito okolja
Izdelek odstranite v zabojnik za recikliranje ali ga odnesite na javno/komunalno zbirališče odpadkov.
Materiale je mogoče reciklirati. Z recikliranjem, obnovo snovi ali drugimi oblikami ponovne uporabe starih naprav ogromno prispevate k zaščiti
našega okolja!
Contact information
EAL GmbH
Otto-Hausmann-Ring 107
42115Wuppertal
Germany
Telephone: +49 (0)202 42 92 83 0 Fax: +49 (0)202 2 65 57 98
Internet: www.eal-vertrieb.de Email: info@eal-vertrieb.com
© EAL GmbH, 11790, April 2016
Other manuals for 11790
1
This manual suits for next models
2
Table of contents
Languages:
Popular Storage manuals by other brands

Seagate
Seagate ST3000DM002 product manual

Seagate
Seagate Exos X 4006 Series Hardware installation and maintenance guide

Rocstor
Rocstor ROCPORT 9CX 320GB Quick installation guide

Freecom
Freecom Mobile Drive Specifications

Fujitsu
Fujitsu ETERNUS DX60 S3 Configuration guide

Monster
Monster OVERDRIVE THUNDERBOLT quick start guide

Western Digital
Western Digital WD15NPVT Product specifications

Seagate
Seagate Constellation ST4000NM0023 product manual

Toshiba
Toshiba MQ01ABD025 overview

OCZ
OCZ VERTEX 2 - DATASHEET 2 datasheet

Seville Classics
Seville Classics UltraGuard UltraHD Extra-Wide Mega Storage... Assembly instructions

RCT Power
RCT Power DC 8.0 Setup