LaserPro Venus User manual

NOTICE
For Firmware (V1.1 and later version), when under the
Single File Mode, the file can be repeated if you choose
to redo it. After the work is completed, the machine
will be back to the “STOP” status. The same file will
be processed again if you press the “START” key again.
One thing that has to take into consideration is that the
file size has to be smaller than 15.9 MB (if memory
buffer for your machine is 16 MB) or 63.9 MB (if the
memory buffer you have is 64 MB). If you choose to
start with a new file, you would have to press the “DEL
FILE” button twice to clear out the memory. Then the
machine will be ready to receive new data again.

2
Content
UNPACKING
QUICK MENU
LENS and MANUAL FOCUS GAUGE
I. INTRODUCTION
Principles of CO2Laser ---------------------------------- 7
Safety ------------------------------------------------------- 7
Front View ------------------------------------------------- 9
Back View ------------------------------------------------- 10
Motion System -------------------------------------------- 11
II. RECOMMENDED CONFIGURATION
Computer--------------------------------------------------- 13
Scanner ----------------------------------------------------- 13
Software ---------------------------------------------------- 13
III. HARDWARE INSTALLATION
Cabling Connection--------------------------------------- 14
Exhaust Vent----------------------------------------------- 15
IV. SOFTWARE INSTALLATION---------------------- 16
V. OPERATION
Environment ----------------------------------------------- 17
Flexible Utility of Your Memory Buffer--------------- 17
Multiple File Mode / Single File Mode ---------------- 18
Start to Operate-------------------------------------------- 19
Control Panel ---------------------------------------------- 20
Software Operation -------------------------------------- 39
VI. BASIC MAINTENANCE ------------------------------ 50
VII. TROUBLE SHOOTING ------------------------------- 53
APPENDIX
I. Specification
II. Tip for 3D Application

3
UNPACKING
Caution:
! The weight of LaserPro VENUS is about 32 kg (70 ponds).
! Please save the original shipping carton in case any returning service is needed.
! Please inspect what you have received from the shipped carton by comparing
with the following listed items.
I. Unpacking inspection
Your package should contain the following items:
ITEM QUANTITY
Cleaning Set
cottonswab
lenscleaner
lens tissue (lint free)
1pack
1
1
1.5” Manual Focus Gauge (blue color) 1
AC Power Cord 1
Print Port Cable 1
LaserPro VENUS Driver 1
Mirror (for Mirror#2, #3) 1
Engraving Samples 1pack

4
QUICK MENU
1. Connect air exhaust system.
2. Setup computer and connect with engraving system properly.
3. Turn ON host computer system.
4. Install the Venus Driver. (for the first time use only)
5. Use Windows-based program (such as CorelDRAW, PhotoShop, PhotoPaint,
Illustrator, CASmate, Signlab, EasySign, AutoCAD, etc.) to operate with the
engraver.
6. Turn ON engraver. The working table moves down 50mm approximately and
the lens carriage moves to the home position (upper left corner) after system
initialization.
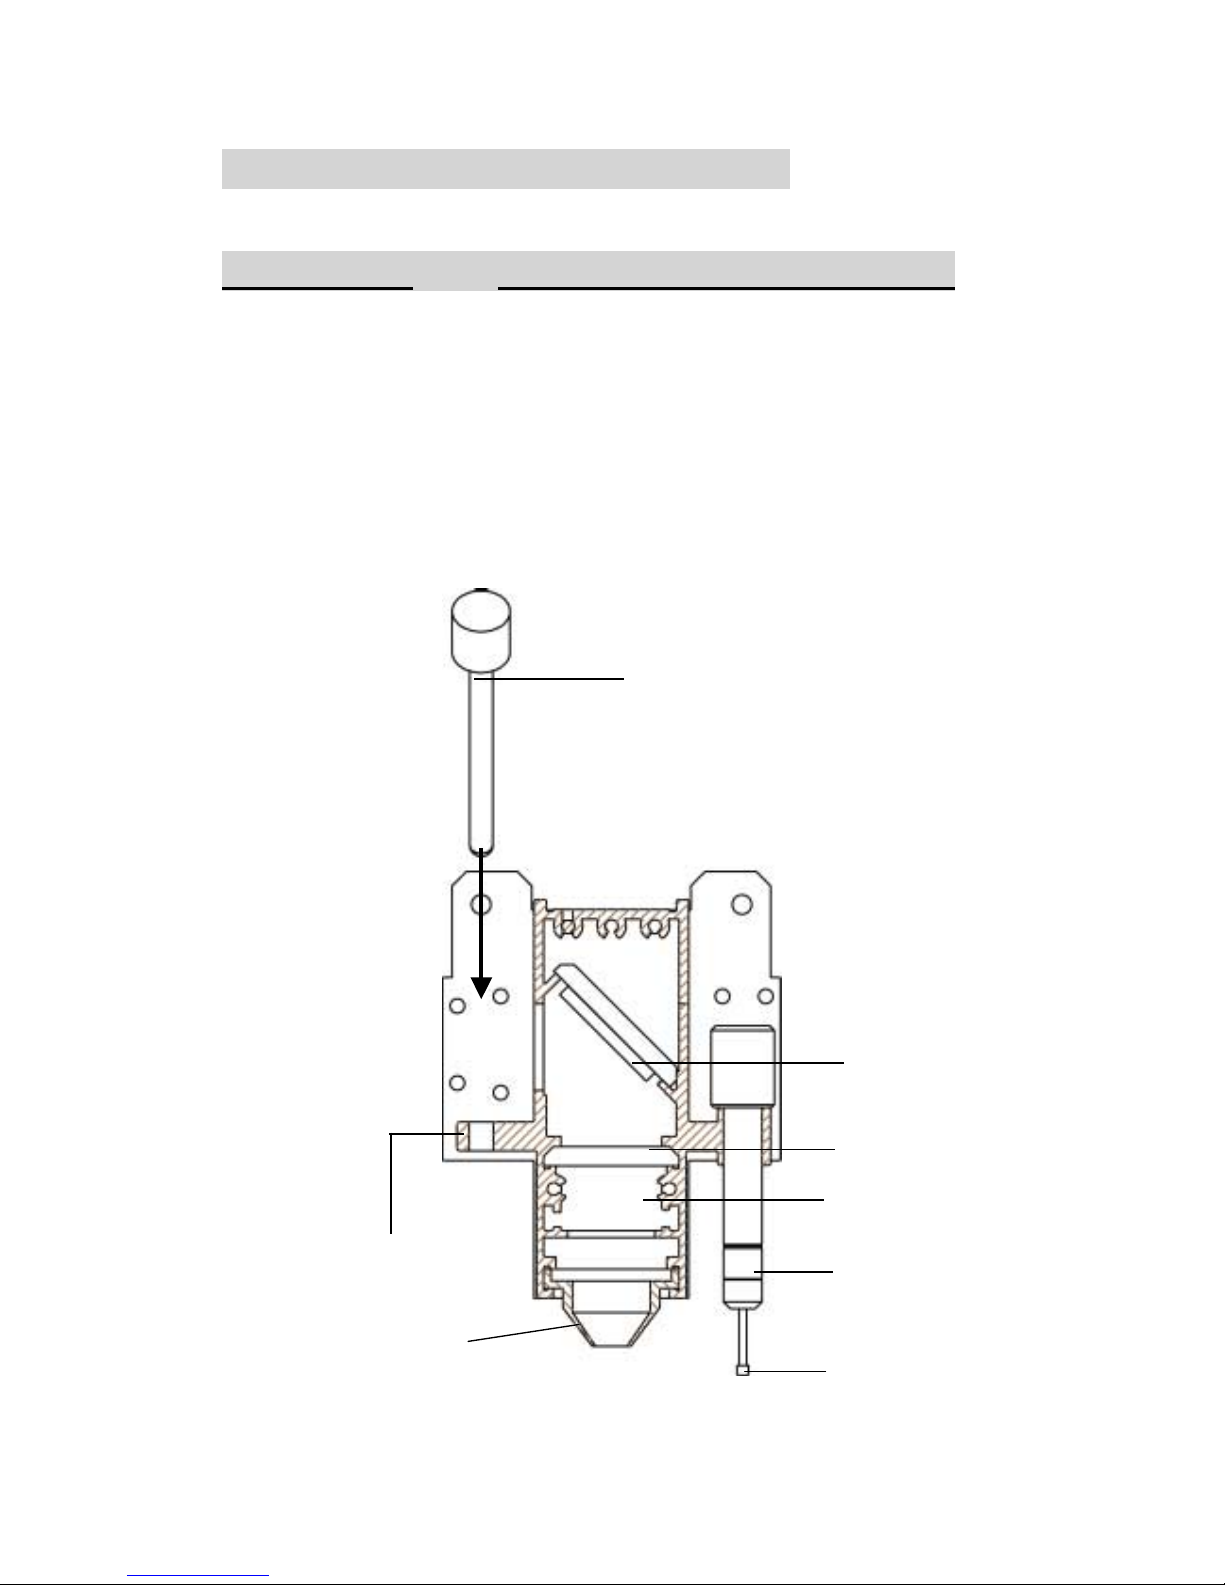
7. Auto-focusing: under STOP status, put work-piece on the table, move X-axis
(Please refer to Fig. 3) and carriage by arrow keys to locate the lens carriage
above the engraving material (holding carriage by hands for prompt moving is
acceptable under STOP condition but not recommended). Press
AUTO FOCUS the table will move up then down to the focal position
automatically.
8. The following is an example by using CorelDRAW V.7.0.
Layout Page Setup Set from Printer, choose Portrait
OK Edit desired file (picture etc.) File Print
Properties Options,choose desired Mode (refer to Fig. 8) then set
up proper resolution, power and speed OK Print
File name is shown on LCD then press START/STOP button.
(Please refer to page 14, Start to Operate, for detail operation in different
mode selection)
NOTICE:
1.When operating with CorelDRAW V.8.0, please choose Landscape for Page
Setup when X > Y; choose Portrait when X < YO.K..
2. When using the available artworks from the Clipart of CorelDRAW, to prevent
the hidden vector lines shown on your engravings. Please do as follows:
CorelDRAW, choose file from Clipart Bitmaps Convert to
Bitmap ClickColor then choose Grayscale Ok
3.In order to match Venus driver’s color. Make sure your CorelDRAW V.8.0 or
V.9.0 the ‘Calibrate colors for display ‘ is disable. Please follow the steps:
Tools Options Global Color Management
Disable ‘Calibrate colors for dis
p
la
y
‘ OK.

5
NOTE:
! If the memory buffer is set up in Single file mode, under START condition,
the engraver will start to engrave/cut upon receiving a file. While if the
memory buffer is set up in Multiple File mode, receiving at least one
complete file then press START/STOP to start a job (refer to page 14, Start
to Operate).
! Choices of DPI must be the same for both editing and printing out a file.
! Turn on the air exhausting system before engraving.
! The maximum loading weight of working table is 5 kg.
! When engraving at 3D mode or cutting materials that easily caught on fire,
such as acrylic, wood or paper, it is advised to have air compressor turned
on to prevent flame.

6
LENS and MANUAL FOCUS GAUGE
Focal Length MatchedColor
LENS MANUAL FOCUS GAUGE
1.5” Standard Purple Blue (same as 2.0”)
2.0” Option Blue Blue
2.5” Option Gold Gold
Manual Focus
Gauge Holder
Insert to the hole
of the holder for
manual focusing
Mirror
Lens 2.0, 2.5
Slot position for
Lens 1.5 only
Auto Focus Gauge
Focal-Sharp™
Manual Focus Gauge
Figure of Focus Carriage
Focus Probe
NOZZLE

7
I. INTRODUCTION
Principles of CO2Laser
LASER is a Light Amplification by Stimulated Emission of Radiation.
A CO2laser works by exciting the molecules of a carbon dioxide gas mixture.
To engrave, the beam is focused through a lens. The intensive beam can vaporize
the surface of the material leaving an engraved image or, in some cases, cutting
through the material.
Safety
The safety rating of Class 1 by CDRH means that the laser beam is enclosed in a
cabinet and has safety interlock mechanisms to protect the operator from
injury. While when a class 1 laser system equipped with a red dot pointer which
allows you to position laser beam, the safety rating turns into Class 3a due to the red
beam is laser light. A few extra safety precautions; namely, avoid placing your eyes
in the red beam path, is required.
! Precaution
1. Do not attempt to modify or disassemble the laser system at any time.
2. Wear appropriate safety goggles especially when engraving with mirrors
or coated metals such as enameled brass and anodized aluminum..
3. Good ventilation is required to remove odors and vaporized materials to the
outside of the building or structure. An exhausted system is recommended.
4. Invisible intensive laser radiation may cause physical burns or sever eye
damage. Always read the manual and caution labels carefully before operation.
5. Do not work with reflective metals, heat sensitive surfaces or other materials
that may produce toxic substances, such as PVC and Teflon.
6. A fire extinguisher should be available on hand at any time.
7. Never leave the machine unattended during operation.
8. Follow the recommendations for maintaining and cleaning your system. Not
only will this enable you to engrave efficiently, it will ensure that your
machine runs safely as well.

8
Fire Precaution
1.When engraving at 3D mode or cutting materials that easily caught on fire,
such as acrylic, wood or paper, it is advised to have air compressor turned
on to prevent flame.
2.If cutting table, or honey comb table, is used for cutting purpose, do not leave
any material underneath, as when material at top is cut through, the material at
below will be burned easily due to trapped heat.
3.It is not encouraged leaving the cutting job unattended, especially with
materials mentioned above.

9
Fig. 1 Front View
Control Panel
Top Door Power on/ off Switch

10
Disassemble
to maintain
#1 mirror.
Please refer to the
right layout.
Laser
source
inside
Fig. 2 Back View
Unscrew and
remove the
panel.
Unscrew and
remove the
dust prevention
box.
Unscrew and
pull out
#1 mirror
carefully
without
touching the
surface of the
mirror.
VIII.
tep
VII.
VI.
t
NOTE: Please refer to Fig. 21&22 and follow the
instruction for the basic maintenance of mirror.
fuse &
Ports
Air inlet
connect to air
compressor
Turn clockwise to
decrease the air flow
and counterclockwise to
increase the air flow.
Press the ring to
pull out the air
tube.
Air Flow
Fixer
Air Flow
Adjuster

11
-7-
#4 Mirror Inside
Fig.3 Motion System I
Choose air exhausting direction
either from back of the table or
through the holes on working
table. Adjuster in middle position
can exhaust air both backward
and downward.
I. Dust Prevention Box (#2 Mirror
inside)
Y-axis
#3 Mirror & Holder
Release the Screw to
Pull Out the Mirror
Focal-Sharp™
II. Auto-focus
Manual Focus
Gauge Holder
X-axis
III. Y-axis
Motor
IV. Dust
Bearing Track
X-axis Motor
Air Flow Adjuster
#4 Mirror Inside

12
Dust Collecting
Plate
Release the Screw to
Low down the plate
-8-
V. Hole
Dust Partition
Motion System II
The diameter of the object
in this circle must be less
than 45 mm

13
II. RECOMMENDED CONFIGURATION
1. Computer: Your PC must be sufficient to equip with Window 95 at least.
WerecommendthespecificationofPCforbetterworkas
below:
CPU Pentium at least
DRAM 32 MB RAM or up
FDD One 3.5" 1.44 MB floppy
HDD 1.2 GB Hard Drive or up
SVGA 15" Super VGA Monitor
★★On Board Parallel Mode(Setup from PC BIOS):
SPP—Preferred Mode
ECP—Cable length less than 1.8meters
2. Scanner
Flat Bed
Minimum resolution: 200 DPI
3. Software
GCC driver (designed under Window 95 or higher level)
Windows Window 95 or higher
CorelDRAW 7.0 Version or up
Any program that can output HPGL commands

14
III. HARDWARE INSTALLATION
Caution:
! Turn all equipment off before making any
connection.
! Check the plug of the power cord to see if it matches the wall outlet. If not,
please contact your dealer.
Cabling Connection:
1. Insert the power cord (male) into a well grounded power outlet.
2. Plug the other end (female) into the engraver. The engraver has been designed to
switch from 100~240 VAC automatically.
3. The engraver can communicate with a computer through either a serial (RS-232C)
or a parallel port (Centronics).
Power on/off
Switch
15AMP resetable
fuse
Parallel Interface
Connector
3AMP resetable fuse
AC Power
Connector
Fig. 4
Serial Interface
Connector

15
! Parallel Transmission
Connect a parallel cable to the engraver (parallel port) then to the parallel port
of the host computer.
Caution:
Never use a mechanical switch box when a second printer port is required.
The electrical surges can cause damage to the computer and the engraver.
! Serial Transmission
If you are using IBM PC, PS/2 or their compatibles, connect the supplied
RS-232C cable to the engraver (serial port) then to the serial port of the host
computer.
! Interface for Macintosh
To operate the engraver with a Macintosh computer (e.g. Power Mac), you
need a MAC modem cable (DIN8 to DB25) as an adaptor to connect to the
RS-232C cable.
II.ExhaustVent
2 or 4 inch
diameter
flexible hose
Fig. 5
Seal
Clip

16
IV. SOFTWARE INSTALLATION
Install LaserPro VENUS printer driver for windows 95/98
Power On, click START
→
→→
→choose Settings and click Printers
→
→→
→Double click Add printer and start Add printer wizard
→
→→
→Next step
→
→→
→Choose Local and click Next step
→
→→
→choose Have disk and click Next step
→
→→
→Insert the VENUS Driver disk properly into the floppy drive then click OK
→
→→
→choose the port where your laser system is connected and click Nextstep
→
→→
→name your system or bypass
→
→→
→choose the driver to be default printer
→
→→
→Next step
→
→→
→select No when asked to print a test page and click Finish
Now the LaserPro VENUS printer driver is installed completely. Don't forget to take
the GCC driver disk from the floppy drive and store in a safe place.

17
V. OPERATION
Environment
! A clean, well-ventilated room with a temperature of 15℃~ 25℃(60℉~78℉)
(Strongly suggested the temperature of 25℃) and a relative humidity between
30% and 40%, as an office type environment.
! Stable floor isolated from vibration.
! Avoid from unstable voltage supply.
! Short path for an effective air exhaust.
! Have a fire extinguisher available at any time.
Flexible Utility of Your Memory Buffer.
The standard memory buffer size of Venus is 16M and can be expanded to 64 M
(32M SIMM x 2). You can choose Multiple file mode with limited memory to save
files and re-call them for constant applications. Or, you can choose Single file mode
to get an unlimited data output while still keep files that you saved before under
multiple file conditions. However, the file sent under Single file mode will not be
saved. In other words, every time you want to engrave this file, you have to re-send
again from the host computer.

18
Am I in Multiple File mode or Single File mode now?
Power ON
NOTE: 1. ** means default or current setting.
2. AUTO FOCUS and all other function keys should be operated under
STOPcondition.
3.NEXT FILE and DELETE keys are invalid under Single file mode.
Single /1 File
Ok: ENTER
Change: △
△△
△or ▽
▽▽
▽
LaserPro VENUS
Firmware VX.X
Copyright 200X
Initializing
Please wait
Set memory buffer?
Yes: ENTER
End operation: Esc
Z init/AF position?
Table moves down
about 50mm.
Press FUNCTION key.
Press ENTER key
Multiple /100 Files **
Ok: ENTER
Change: △
△△
△or ▽
▽▽
▽
or

19
Start to Operate
Press
FUNCTION
key for further
setting
selection
Single file status
Under STARTcondition
Upon the receipt of files, start to
engrave/cut
LaserPro VENUS
Firmware VX.X
Copyright 200X
Initializing
Please wait
Table moves down about 50mm automatically
File:
Speed: %
Power: %
DPI: File:
Speed: % 00:00
Power: % STOP
DPI:
Multiple file status
Under STOP
condition
Press START/STOP,
turn to STOP condition
File: # xfile name
Speed: xx.x % 00:00
Power: xx % PPI: xxxx
DPI: xxx xxxK Send a new file
from host computer
then press
NEXT FILE
to show the file
name on LCD.
Press
NEXT FILE
to get a desired
file
Press
START/STOP
to en
g
rave/cut
File: # xfile name
Speed: xx.x % 00:00
Power: xx % PPI: xxxx
DPI: xxx xxxK
Power ON

20
START/STOP
! Single File Mode:
Turn on power, VENUS is under START condition and ready to receive a file. LCD
shows as follows:
Upon the receipt of a file, VENUS starts to engrave/cut immediately. When a job is
done, LCD will show the working time such as 100s means 100 seconds.
Press START/STOP key, turn the engraver to STOP condition. LCD shows as
File:
Speed: %
Power: %
DPI:
File: file name
Speed: xx % 01:10
Power: xx % STOP
DPI: xxx
Control Panel
IX. Fig. 6
Table of contents
Popular Cutter manuals by other brands

EINHELL
EINHELL TE-TC 620 U Original operating instructions

Parkside
Parkside PPKS 35 B3 Operation and safety notes translation of the original instructions

Nothern Industrial tools
Nothern Industrial tools 426245 owner's manual

Alamo Industrial
Alamo Industrial Hydraulic Flex Wing Cutter Falcon 10 - 15 parts manual

Bosch
Bosch GOP 12V-28 Professional Original instructions

Panasonic
Panasonic EY4542LN2M operating instructions