Lava Xolo X900 User manual

user guide

PAge : 2contents
contents
contents ..........................................................................................2
1 Getting Started............................................................................................. 4
1.1 Your Phone .................................................................................4
1.2 Phone Buttons ............................................................................5
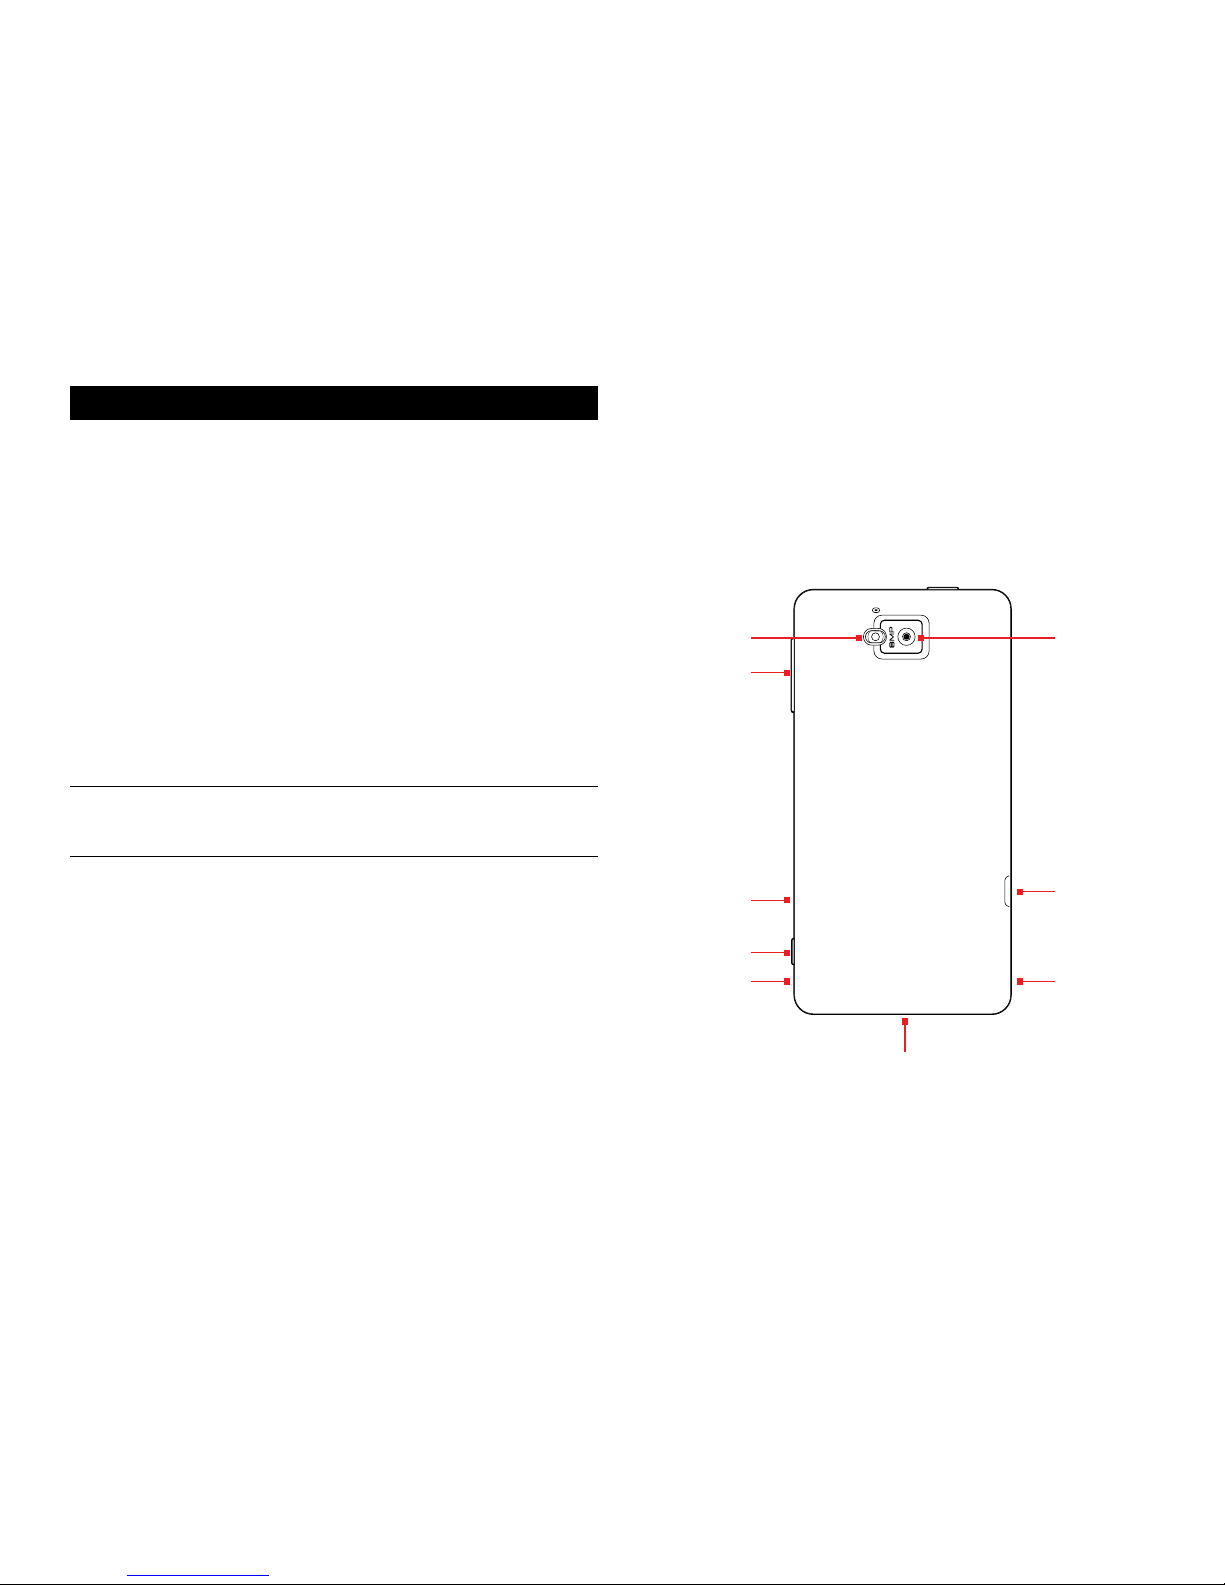
1.3 Phone Slots, Ports & Jacks...........................................................5
1.4 Charge the Battery.......................................................................6
1.5 Insert Micro-SIM Card .................................................................6
1.6 Using the Headset.......................................................................7
1.7 Turn on the Phone.......................................................................7
1.8 Set up Your Phone.......................................................................7
1.9 Sleep & Wake ............................................................................7
1.10 Touchscreen .............................................................................8
1.11 Tips on using the touchscreen ....................................................8
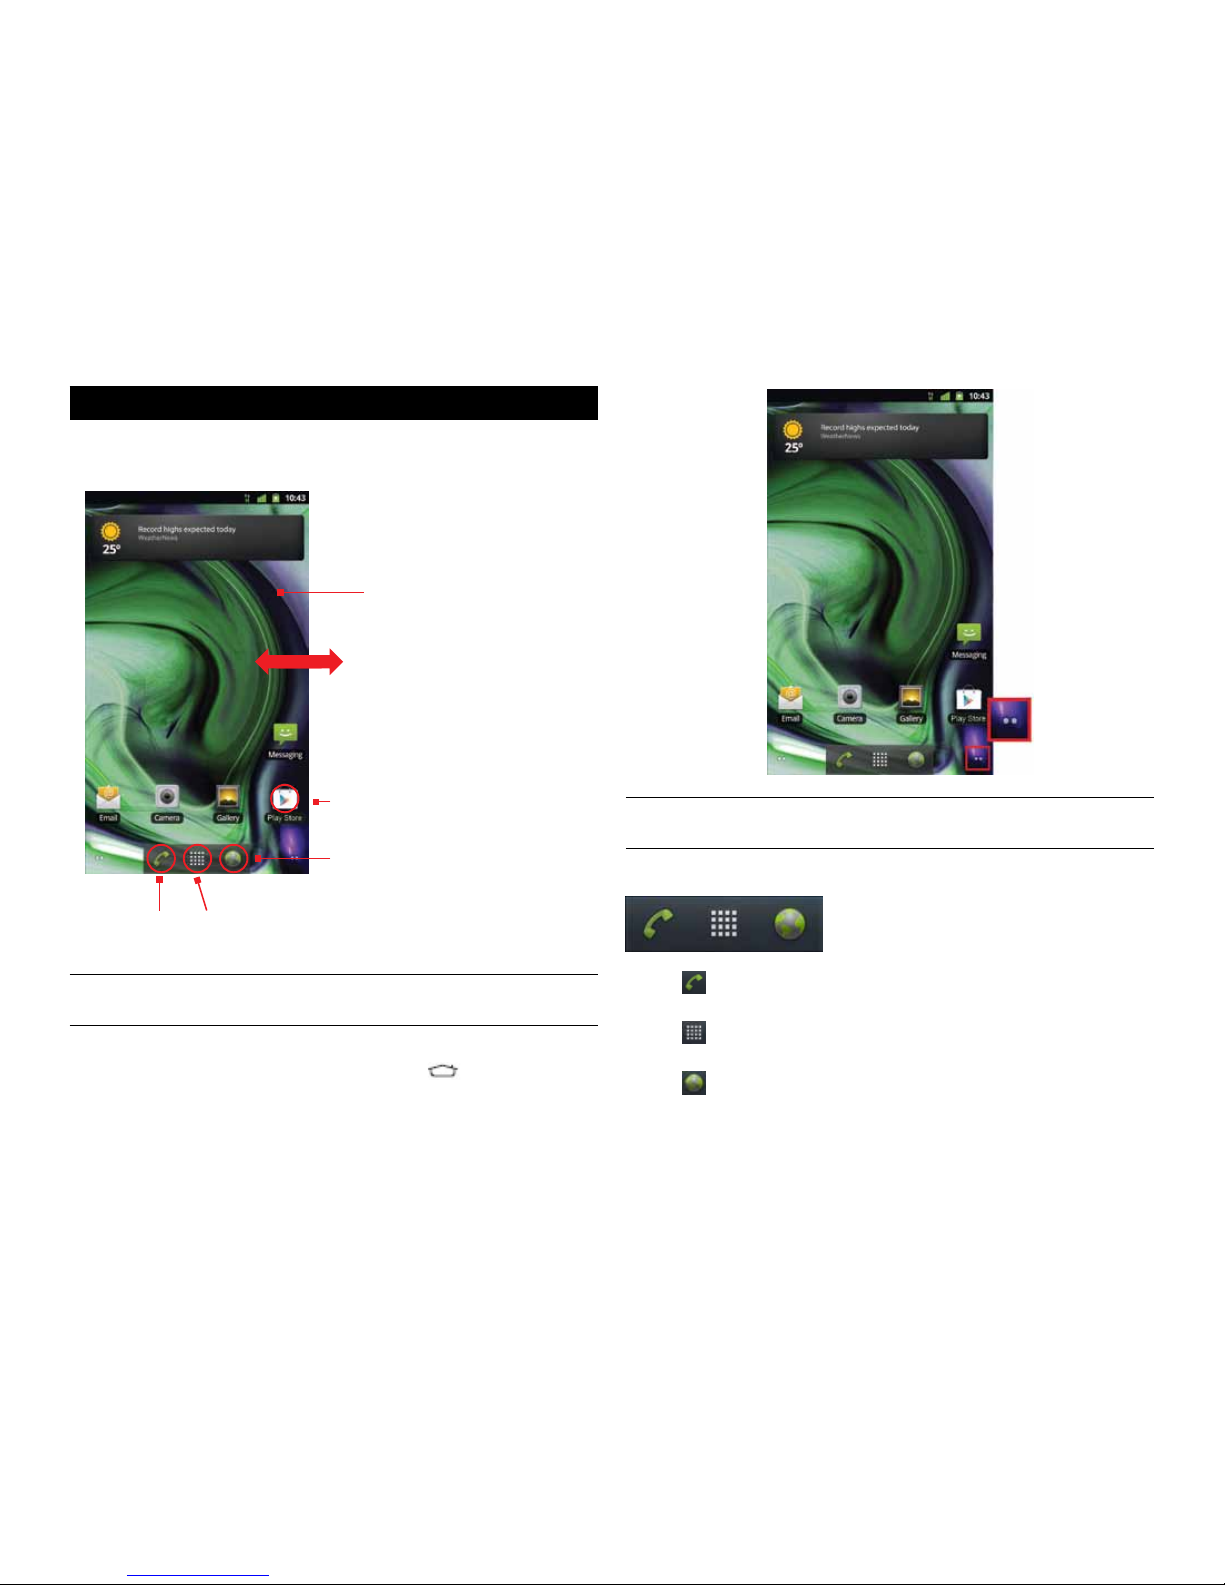
2 Home Screen & Basic Features..................................................................... 9
2.1 Customizing Your Home Screen ..................................................10
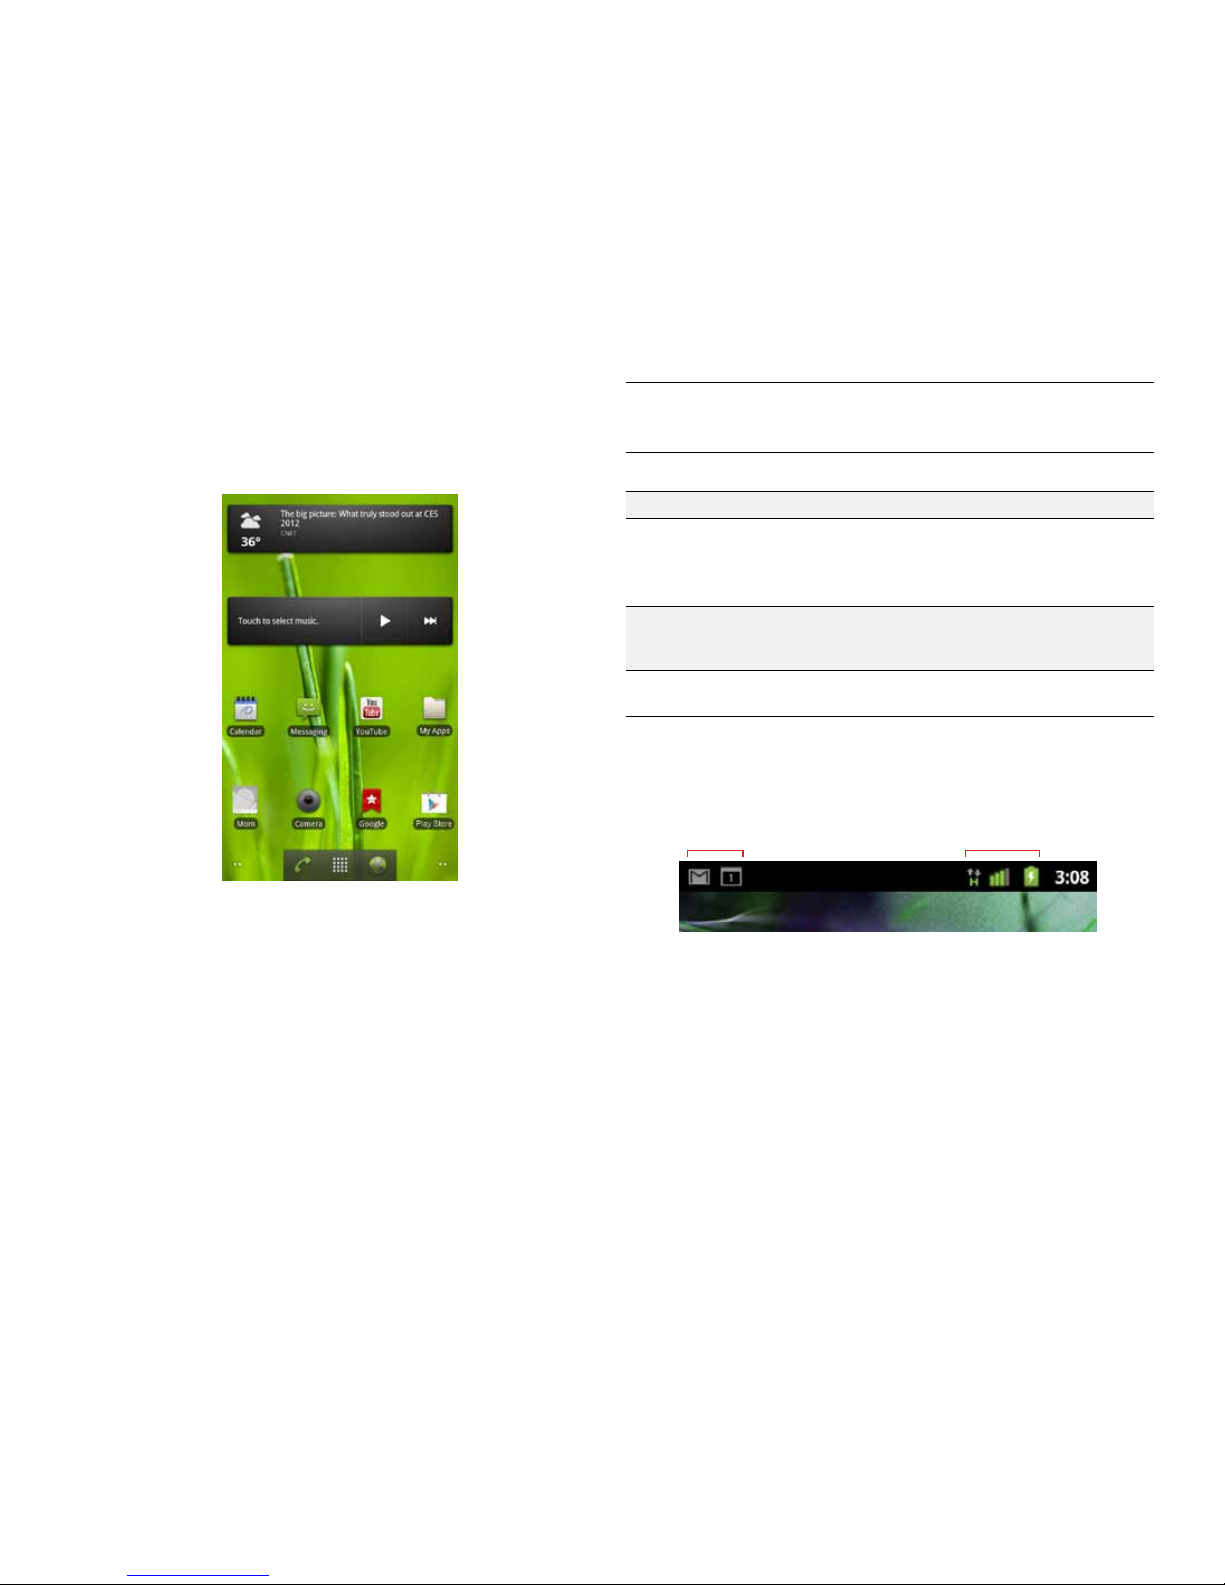
2.2 Status & Notification Icons.........................................................10
2.3 Search .....................................................................................12
2.4 Securing your Phone..................................................................13
2.5 Using the App Launcher ............................................................14
2.6 Using the Play Store..................................................................14
3 Onscreen Keyboard Basics ......................................................................... 15
3.1 Suggestions and Auto-Complete..................................................15
3.2 Swype Keyboard........................................................................16
4 Making & Answering Calls ......................................................................... 17
4.1 Using the Phone Tab .................................................................17
4.2 Answering & Rejecting Calls .......................................................19
4.3 Using the Call Log Tab...............................................................20
4.4 Using the Contacts Tab..............................................................21
4.5 Import contacts from your Micro-SIM card ..................................22
4.6 Quick Contacts..........................................................................23
4.7 Contact Settings........................................................................23
4.8 Using the Favorites Tab..............................................................24
5 Sending & Receiving Messages.................................................................. 25
5.1 Sending messages.....................................................................25
5.2 Managing Messages...................................................................26
5.3 Message Settings ......................................................................26
6 Take Photos & Videos ................................................................................ 28
6.1 Change Picture & Video Settings.................................................29
6.2 View Your Pictures & Video.........................................................31
7 Browsing the Web...................................................................................... 33
7.1 Bookmarks, Most Visited & History..............................................34
7.2 Using multiple browser windows .................................................34
7.3 Set Your Home Page..................................................................34
7.4 Changing Browser Settings.........................................................34
8 Playing Music............................................................................................ 36
8.1 Playback Screen........................................................................36
8.2 Working with Playlists ................................................................37
8.3 Managing Music on Your Phone ..................................................37
9 Connections .............................................................................................. 38
9.1 Using Wi-Fi .............................................................................38
9.2 Wireless Bluetooth®Connection ..................................................38
9.3 Transfer Files between your Phone & Computer ...........................39
9.4 Connecting to Virtual Private Networks ........................................40
9.5 Sharing Your Phone’s Data Connection ........................................40
10 Accounts................................................................................................. 42
11 Email ...................................................................................................... 43
11.1 Working with Accounts.............................................................45
12 Calendar ................................................................................................. 46
12.1 Viewing Your Events.................................................................46
12.2 Storing & Displaying Calendars .................................................47
12.3 Changing Calendar Settings......................................................48
13 gmail ...................................................................................................... 49
13.1 Gmail Settings ........................................................................50
14 Other Phone Functions ............................................................................. 51
14.1 Updating Software...................................................................51
14.2 Downloads..............................................................................51
14.3 Managing applications .............................................................51
14.4 Clock .....................................................................................52
14.5 Calculator...............................................................................53
15 Changing Phone Settings.......................................................................... 55
15.1 Wireless & Networks Settings ...................................................55
15.2 Call Settings ...........................................................................57

PAge : 3contents
15.3 Sound settings........................................................................57
15.4 Display Settings ......................................................................58
15.5 Location & Security Settings ....................................................58
15.6 Applications settings ...............................................................58
15.7 Accounts & Sync Settings ........................................................59
15.8 Privacy Settings ......................................................................59
15.9 Storage settings ......................................................................59
15.10 Language & Keyboard Settings ...............................................60
15.11 Accessibility Settings.............................................................60
15.12 Date & Time Settings.............................................................60
15.13 About Phone.........................................................................60
16 Troubleshooting....................................................................................... 61

PAge : 41.0 getting stArted
1.1 Your Phone
1 getting stArted
Congratulations on your new phone purchase.
This guide will help you to quickly come up to speed on the important
features of your phone.
Keep in mind your phone has:
•Fast Processor: Featuring the 1.6GHz Intel®Atom™Processor that enables
fast web browsing, super-responsive apps, and effortless multi-tasking, so
that enjoying the things you love to do has never been easier.
•Intelligent Camera: Featuring an advanced 8MP HD camera that lets you
capture images quickly - up to 10 photos a second - so you’ll never miss the
best shot, even in challenging environments.
•Great Entertainment: Easily create and share superb HD-quality video, and
with super-smooth playback, your phone becomes a personal theatre you
can take with you anywhere. Maximize your entertainment experience by
projecting your smartphone screen to your HD TV through an HDMI cable.
NOTE: Screen images and icons are simulated for the purpose of this guide.
Actual displays may vary. Instructions in this guide may change depending on
the software version on your device.
USB/Power Port
Rear-Facing
Camera
Flash
HDMI Port
Speaker
Volume
Micro-SIM
Card Tray
Camera Button
Speaker

PAge : 51.0 getting stArted
1.2 Phone Buttons
Buttons Press to go back to the previous screen or to close a
menu or dialog box.
Press to display actions and settings specific to the
current screen.
Press to return to the center panel of the Home
screen.
TIP: Press and hold to display shortcuts to your most
recently-used apps.
Press to run search your phone and the web. See
Search for more information.
Power button Press and hold to turn your phone on. To turn the phone
off, press and hold then follow the instructions onscreen.
When your phone is on, press to wake your phone or put it
into sleep mode.
Volume Press on the top to increase the volume or on the bottom
to decrease the volume.
TIP: Press either top or bottom to silence an incoming call.
Camera button Press and hold to switch to the camera.
TIP: When in the camera app, press to take a picture, or to
start and stop recording a video.
1.3 Phone slots, Ports & JAcks
3.5 mm
audio jack
Plug in headphones or other audio device.
USB/Power port Connect USB cord to phone and power adapter to charge
the phone.
NOTE: You can plug the USB cord to phone and connect
to your PC.
Micro-SIM
card tray
Remove or replace micro-SIM card, using the provided
SIM eject tool to open the tray.
HDMI port Plug in HDMI cable and connect to TV or other electronics
to transmit HD images.
Speaker
Microphone
(Do not cover)
Search
Front-Facing
Camera
Back
Menu Home
3.5 mm Audio JackPower Button

PAge : 61.0 getting stArted
1.5 insert Micro-siM cArd
If your micro-SIM card is not already installed in your phone, follow these
procedures to insert a micro-SIM card.
To insert the micro-SIM card:
1. Open the micro-SIM card tray with the included SIM eject tool.
2. Insert the micro-SIM card into the tray, making sure that it matches the
illustration on the tray.
3. Push the tray back into the phone.
1.4 chArge the BAtterY
Before using your phone for the first time, charge the phone for eight hours.
To charge the battery:
1. Attach one end of the USB cord to the phone’s micro-USB port and the
other end to the plug.
2. Plug the phone into the wall.
1.4.1 BAtterY tiPs
For the best battery life, let your battery drain down to 20% or less (indicated
by an orange battery icon in the status bar) before recharging, and do not
leave your phone plugged in after it is fully charged.
To make your charge last as long as possible:
•Change the screen timeout rate and display brightness
(see Display Settings).
•Disable Wi-Fi and NFC when not in use (see Wireless & Networks Settings).
NOTE: Use SIM eject tool only as indicated.
Connect
this end to
phone’s
USB port.
Connect this end
to plug.
Plug into wall.
1. Insert SIM eject tool
into hole to open tray.
2. Insert Micro-SIM card
into tray.
3. Push tray back
into phone.
SIM eject tool

PAge : 71.0 getting stArted
To turn the phone off:
•Hold down the power button and touch Power Off.
1.8 set uP Your Phone
The first time you turn on your phone, you will be stepped through all of the
settings for configuring your phone. Doing so will allow you to set up your
contacts easily.
1.9 sleeP & WAke
When your phone is on, you can put the phone in sleep mode and lock your
phone. Your phone will also go into sleep mode if left idle, to save battery life.
You can wake and unlock your phone when you’re ready to use it.
To put the phone in sleep mode:
•Briefly press the power button.
Your phone goes into sleep mode, without disrupting any running
application, download, or phone call.
1.6 using the heAdset
You can use your headset to listen to music or make phone calls.
To use the headset:
1. Plug the headset into the audio jack on your phone.
2. Place the earbuds in your ears and position the microphone so that it picks
up your voice (if you’re making a call).
TIP: Use the button near the right earbud to mute and unmute the
microphone.
1.7 turn on the Phone
To turn on the phone:
•Hold down the power button to turn the phone on.
TIP: One press puts your phone into Sleep mode. Pressing and holding allows
you to choose Silent mode or Airplane mode.
Hold down the power button to
turn the phone on.
Hold down the power button,
then touch Power off to turn
the phone off.
RL

PAge : 81.0 getting stArted
1.10 touchscreen
Use your fingers on the touchscreen to perform actions, open objects, slide
the screen, and more.
Below are the different ways of interacting with your touchscreen.
•Drag: Touch and hold an object then drag the object to a new location. For
example, drag any icon on the Home screen to a new location.
•Double-touch: Quickly touch the screen twice to zoom in when using the
Gallery or on zoomed-out Browser pages. For example, double-touch a news
site to zoom in on the text.
•Pinch: When using Gallery or zoomed-out Browser pages, place two fingers
on the screen at once, then move your fingers together to zoom out or move
them apart to zoom in. For example, pinch your fingers apart to zoom out of
a news site in the Browser.
•Slide: Quickly move your finger from one edge of the screen to the opposite
edge to scroll the display up, down, left or right. For example, quickly move
your finger from the left side of the Home screen to the right to scroll the
Home screen to a different panel.
•Touch: Touch an object on the screen to select or open it. For example,
touch on the Home screen to open the Phone app.
•Touch and hold: Touch an object on the screen and continue to hold it to
reveal other options. For example, touch and hold an empty spot on the
Home screen to reveal options for adding items to the screen.
1.11 tiPs on using the touchscreen
•Do not use sharp tools, such as pens or a stylus, on the touchscreen—these
might scratch the screen.
•Do not allow the touchscreen to come in contact with other electrical
devices. Electrostatic discharges can cause the touchscreen to malfunction.
•Do not allow the touchscreen to get wet. The touchscreen may malfunction
in humidity or when exposed to water.
•For the best performance, remove the screen protection film before using
the device and tap the screen with your fingertip.
NOTE: If you press the power button for too long, you’ll see the power off
menu.
To wake the phone:
1. Press the Power button.
2. Place your finger on and slide it all the way to the right.
3. Your phone’s screen will resume display.
NOTE: If your phone is secured, you must enter your password, pin, or pattern
to wake it. See Securing Your Phone for more details.
TIP: You can silence or unsilence your phone by sliding to the left after
waking your phone.
When the phone is in sleep
mode and you want to wake
the phone, press the power
button and then drag the
lock to the right.

PAge : 92.0 hoMe screen & BAsic FeAtures
TIP: The dots at the bottom of the screen indicate which one of the five
panels is displayed.
To quickly access your phone’s main functions:
•Touch to make a call. For more information on calling, see Making &
Answering Calls.
•Touch to choose an app from the App Launcher. For more information
on apps and the App Launcher, see Using the App Launcher.
•Touch to browse the web. For more information on browsing the web,
see Browsing the Web.
2 hoMe screen & BAsic FeAtures
The Home screen is a gateway to all of your phone’s applications and
features, and displays whenever you turn on your phone.
TIP: To move any icon, touch and hold the icon, then drag it to a
new location.
To open the Home screen:
•Open the Home screen at any time by pressing the button.
The Home screen is split into five panels, with the center panel displayed
when the Home screen opens.
To scroll the Home screen:
•Slide the screen to the left or right.
Slide left or right to see
more panels.
Touch to open the
App tray.
Touch to make
a call.
Touch to browse
the web.
Touch and hold an empty
spot to add shortcuts and
widgets, or to change
the wallpaper.
Touch an app to open it.

PAge : 102.0 hoMe screen & BAsic FeAtures
TIP: Rearrange items on your screen by touching and holding them and then
dragging them to a new location. You can also delete them by touching and
holding and then dragging them to the trash.
You can perform the following actions with folders.
To open a folder Touch the folder.
To add items to a folder Drag an item on your Home screen into the
folder.
NOTE: You cannot put shortcuts in a
contact folder.
To remove items from a
folder
Touch and hold an item in the folder,
then release it on the Home screen or on
the trash icon.
To rename a folder Open a folder, then touch and hold the title bar
and enter a new folder name.
2.2 stAtus & notiFicAtion icons
The status bar at the top of the screen displays important information about
your phone.
•Notification icons tell you about new and ongoing events, such as a new
email or ongoing download.
•Status icons tell you about critical phone functions, such as battery life and
signal strength.
2.1 custoMizing Your hoMe screen
You can easily customize your Home screen—adding and removing items,
organizing items into folders, and changing the background picture
(or wallpaper).
To customize your Home screen:
•Touch and hold an empty space on the Home screen, then touch the type of
item you want to add and follow the prompts.
The following types of items are available:
•Shortcuts are links to your favorite items, such as apps, web pages, contacts,
and so on.
•Widgets are apps that run directly on your Home screen, such as a music
player, newspaper, or clock.
•Folders behave like a desktop folder, helping you organize your contacts and
other items.
•Wallpaper is static or animated background images for your screen.
Notification icons Status icons

PAge : 112.0 hoMe screen & BAsic FeAtures
2.2.1 stAtus icons
Below are the status and notification icons you can expect to see.
NOTE: Installed apps may use their own unique notification icons.
Connected to mobile
network Speakerphone on
Mobile network in use Vibrate mode
Mobile network strength Ringer silenced
Roaming Phone microphone muted
No signal Battery very low
No micro-SIM card
installed Battery low
Connected to Wi-Fi network Battery partially drained
Bluetooth wireless
technology on Battery full
Connected to wireless
product featuring
Bluetooth technology
Battery charging
Airplane mode GPS on
Alarm set Receiving location data from
GPS
To open the notifications panel:
•Drag the status bar to the bottom of the screen.
To respond to a notification:
•Touch a notification in the panel to open its application. For example,
touching a new email notification opens the Email app’s inbox.
To clear notifications:
•Open the notifications panel and touch Clear at the top right.
Ongoing notifications, such as active downloads, will remain on the list.
To close the notifications panel:
•Drag the status bar back to the top of the screen.
Touch a notification to
respond.
Touch to clear notifications.
Drag down to
display notifications.

PAge : 122.0 hoMe screen & BAsic FeAtures
2.3 seArch
Search on your phone and on the web with the built-in Search function.
To run a search:
1. Press .
2. Type a search term. As you type, Search displays matching results.
3. Touch a matching result to open it, or press to search the web.
TIP: Touch the icon next to a result to enter that result as search text.
TIP: Find items in a search-enabled app, such as Email or Music, by opening
the app and pressing .
To narrow your search:
•Touch and specify where to search (for example, search only Contacts or
Messaging app).
TIP: You can specify which applications are available for search by touching
the options icon in the corner of the chooser and selecting which apps
to search.
2.2.2 notiFicAtion icons
New text or
multimedia message
Call in progress
Problem with text
or multimedia
message delivery
Call in progress using a
Bluetooth headset
New voicemail Missed call
Upcoming event Call on hold
Data syncing Call forwarding on
Problem with sign-in or
sync
Song playing
USB storage full Uploading data
Open Wi-Fi
network available
Downloading data
Phone connected via
USB cable
Download/install finished
Phone sharing its
data connection via
USB tethering
Connected to or disconnected
from virtual private network
(VPN)
Phone sharing its data
connection as a Wi-Fi
hotspot
Carrier data threshold
approaching or exceeded
USB tethering and
Wi-Fi hotspot
Application update available
More notifications System update available

PAge : 132.0 hoMe screen & BAsic FeAtures
2.4 securing Your Phone
You can configure your phone to require a password, pin, or pattern in
order to turn it on or wake it up. Securing your phone can help keep its
contents private.
To secure your phone:
1. From the Home screen, press Settings Locations & security.
2. Touch Set up screen lock to secure your phone or Change screen lock to
change the current security lock.
3. Select one of the following settings:
•None disables screen locking.
•Pattern lets you draw a custom pattern to unlock your phone.
•PIN lets you use a 4 to 16 digit number combination to unlock
your phone.
•Password lets you use a 4 to 16 digit password to unlock your phone.
NOTE: Once you have selected a lock for your phone, you will need to enter
this lock each time you turn on or wake up your phone.
2.3.1 seArch settings
You can change the default Search settings.
To change Search settings:
•From the Search screen, press Search Settings.
Search Show web suggestions: Show suggestions as you type.
Searchable items Select which applications to search by default.
NOTE: Only the selected applications will display and
be searched within the Search application.
Clear shortcuts Erase previously searched-for results.
NOTE: Saving your previous searches makes it easy
to return to a frequently searched-for item.

PAge : 142.0 hoMe screen & BAsic FeAtures
2.6 using the PlAY store
Almost any app you can imagine is available for purchase (and often for free)
in the Play Store.
To use the Play Store:
•Touch , then touch .
Search or browse for apps. You’ll be able to confirm that you want to purchase
an app, and see the permissions it requires, before installing it on your phone.
TIP: Google Play Store can only be used when Google account is activated.
2.5 using the APP lAuncher
Apps are small programs that add features to your phone. Many apps come
preinstalled, and additional apps can be purchased in the Play Store.
You can use the App launcher to easily access all of your installed apps.
To use the app launcher:
•Touch , then touch an app to open it.
To add an app shortcut to the Home screen:
•Touch and hold an app. Once the Home screen displays, drop the app
onto an empty spot on the Home screen.
TIP: Use the doubleTwist™
app to seamlessly transfer
your songs, photos, and other
personal media from your PC to
your phone.
2. Touch an app to open it.
1. Touch to open the App tray.

PAge : 153.0 onscreen keYBoArd BAsics
onscreen keYBoArd oPtions
While using the onscreen keyboard, the following options are available.
Switch keyboard display Touch the ?123 key to enter numbers and
symbols, or the ABC key to enter letters.
To see additional symbols while in
symbol display, touch the ALT key.
Capitalize the next letter Touch to capitalize the next letter
you enter.
Touch again to turn CAPS LOCK on.
Delete text Touch to erase the last
character entered.
Touch and hold to continuously
erase characters.
Change keyboard language If your keyboard has multiple languages
enabled, slide your finger across the
spacebar to change which language the
keyboard uses. See Language & Keyboard
Settings for information on enabling
multiple languages.
3.1 suggestions And Auto-coMPlete
The keyboard includes suggestions and auto-complete to make entering long
words easy.
3 onscreen keYBoArd BAsics
The onscreen keyboard lets you use your touchscreen to dial numbers, type
emails, enter URLs, and more.
To use the Onscreen Keyboard:
•Touch any text field to display the onscreen keyboard, then touch the
characters on the keyboard to enter text.
TIP: Move the insertion point by touching where you want to enter text.
To view the keyboard in landscape orientation:
•Turn your phone sideways to rotate the keyboard, making it larger and easier
to use.
To close the onscreen keyboard:
•Press .

PAge : 163.0 onscreen keYBoArd BAsics
3.2 sWYPe keYBoArd
Swype(TM) is a powerful tool that lets you ‘swipe’ your finger across the
keyboard to spell out and enter words.
Swype and Android Keyboard cannot both be enabled simultaneously.
To select your keyboard:
1. From the Home Screen, press Settings Language & Keyboard
Swype Select input method.
2. Touch Swype or Android Keyboard to select the desired input method.
NOTE: To learn more about Swype, follow the tutorial under Settings
Language & Keyboard Swype.
To turn on suggestions and/or auto-complete:
•From the Home Screen, press Settings Language & keyboard
Android Keyboard, then select Show Suggestions or Auto-complete.
To use the suggestions feature:
1. Begin entering text in a text field or message.Your phone displays
suggested words and punctuation directly above the keyboard.
2. Touch a suggested word or punctuation mark to enter it, or drag the display
to the right to see more suggestions.
TIP: Touch the spacebar after entering a word to append a period.
TIP: Change the keyboard language from the Home Screen by pressing
[settings button image] Settings Language & keyboard Select
language, then selecting desired language.
To use the auto-complete feature:
•Touch the spacebar (or any punctuation mark) to enter the highlighted word.
3.1.1 user dictionArY For suggested Words
You can modify the dictionary which the onscreen keyboard uses to
suggest words.
To add a word to the user dictionary:
1. Type a word. The current word is highlighted in white at the left of the
suggested word list.
2. Touch and hold the word to add it to the user dictionary.
For information on editing and deleting words in the user dictionary,
see Language & Keyboard Settings.

PAge : 174.0 MAking & AnsWering cAlls
4.1 using the Phone tAB
The Phone app’s Phone tab lets you make and manage calls.
To make a call:
1. From the Home screen, touch .
2. Touch the numbers on the dial pad to dial a number, using to make
corrections.
3. Touch to dial the number.
NOTE: For international calls, first touch and hold 0to enter +and then dial
the number.
NOTE: You can switch to any application without ending the call. Return to
the phone screen by expanding the notifications bar and touching .
4 MAking & AnsWering cAlls
The Phone app allows you to make calls and easily store and find
your contacts.
You can move between the phone dialer, call history, contacts, and
favorites by touching the tabs at the top of the Phone app.

PAge : 184.0 MAking & AnsWering cAlls
4.1.1 Working With MultiPle cAlls
You can make another call while on a call.
To add a call:
•While on a call, touch Add Call and dial another number.
To move between calls:
•Touch .
•To merge calls into a conference call:
•Touch Merge Calls to join two or more calls together into a single
conference call.
The following actions are available while you are on a call.
To hold a call Touch Hold to hold or resume the current call.
To mute a call Touch Mute to mute or unmute the call.
To use speakerphone Touch Speaker to turn speakerphone on or off.
Warning! To avoid damage to your hearing, do not
hold the phone against your ear when speakerphone
is turned on.
To use a Bluetooth
headset
Touch Bluetooth to automatically transfer your calls
to a connected Bluetooth headset. See Wireless
Bluetooth Connection for more information.
To end a call Touch

PAge : 194.0 MAking & AnsWering cAlls
4.2 AnsWering & reJecting cAlls
When you receive a call, you will see the following screen.
To accept a call:
•Slide to the right.
If you are already in a call, that call will be placed on hold while you answer
the new call.
To reject a call:
•Slide to the left.
The rejected call will automatically be directed to your voicemail.
The following options are available when on a conference call.
To drop a
participant
Touch Manage, then touch .
To talk privately
to a participant
Touch Manage, then touch . When you are done
talking privately, touch Merge Calls to add the participant
back to the conference call.
To end the call Touch to end the conference call and disconnect
all callers.
4.1.2 VoiceMAil
When you receive voicemail, a voicemail notification icon ( ) appears in
the notifications panel.
To check voicemail:
•Within the Phone app, touch .
TIP: You can also open the notifications panel and touch the
voicemail notification.

PAge : 204.0 MAking & AnsWering cAlls
The following options are available from the call log.
To see more details Touch an entry.
To call the entry Touch .
To send a text
message
Touch the entry to see more details, then touch
Send Text Message.
For more information on messaging, see Sending &
Receiving Messages.
To add to contacts Touch the entry to see more details, then touch
Add to Contacts.
For more information on adding contacts, see Using
the Contacts Tab.
To remove an entry
from the call log
Touch and hold the entry, then touch
Remove Call from Log.
To remove all entries
from the call log
Press Clear Call Log.
4.3 using the cAll log tAB
The call log lists calls you have made, missed, and received. It also lets you
call entries, send messages, and add caller information to contacts.
To use the call log:
•From the Phone app, touch the Call Log tab.
Table of contents
Other Lava Cell Phone manuals