LAVAL UNDERGROUND SURVEYS LUS-DVR User manual
L A V A L U N D E R G R O U N D S U R V E Y S
LUS-DVR
OPERATION MANUAL
LAVAL UNDERGROUND SURVEYS
2476 North Bundy Drive, Fresno Ca. 93727
Phone 559-251-1396 · Fax 559-251-2096
www.lavalunderground.com

Table of Content
Description of Equipment ............................................................................................................... 1
Keyboard Use and Charging ............................................................................................................ 1
Keyboard Functions......................................................................................................................... 2
Getting Started................................................................................................................................ 3
Menu Structure............................................................................................................................... 3
Play Video .................................................................................................................................... 3
View Snapshots............................................................................................................................ 4
Overlays....................................................................................................................................... 4
File Management......................................................................................................................... 5
Setup............................................................................................................................................ 6
Helpful DVR Tips.............................................................................................................................. 8
WARRANTY...................................................................................................................................... 9

Page 1
Description of Equipment
The Digital Video Recorder (DVR) records video and audio to USB storage media and can
capture snapshot images on-the-fly without interrupting recording. It has an internal real-time
clock with battery backup that provides date and time information. Videos and snapshots are
saved to a folder called DCIM on the USB devices. The DCIM folder is created if not present.
The videos are recorded as .ts files and the snapshots are .jpeg files. File names are
automatically generated by the real-time clock. The video bit rate can be tailored to match the
user requirements and storage capacity.
Text overlays reflecting current date and time can be applied to appear in the recorded video.
A single line of user defined text comments can be overlaid in the video. There are 5 user
entered custom text lines.
The DVR has an internal 16GB USB storage device. This internal memory will store at least 8
hours of video. There is a USB jack on the panel for an external storage device. There is no
limit on capacity of the USB storage devices; however, the devices need to be FAT 32 format.
The DVR will simultaneously record to both the internal and external USB storage devices.
When either internal or external memory becomes full, an on-screen message will prompt
the user to address the capacity of the internal or external memory before the recording
option will resume.
There is also a USB jack on the panel for plugging in a standard PC-type USB keyboard. A
wireless mini keyboard is supplied with the DVR. There is a black ‘receiver’ for the provided
mini keyboard inserted in a USB space on the control unit. It will have two letters on it that
correlate with the mini keyboard. Without the receiver plugged into the control unit, the
keyboard will not be able to function. NOTE: the keyboard and its USB receiver are paired and
cannot be mixed with another set.
Keyboard Use and Charging
The internal battery is a non-replaceable Polymer Lithium-ion type. If no keys are pressed for
more than 3 minutes, the keyboard goes into Sleep Mode. Because of Sleep Mode, the
keyboard’s battery will last many hours and even many days on one charge. The battery will
retain a charge in Sleep Mode from 500 to 700 hours. To re-charge the battery, plug the
charging cable into the keyboard and into any standard USB jack. The charging cable can be
plugged into the RCAM panel to charge the battery and simultaneously operate the keyboard;
however, the keyboard receiver must be plugged in to either the RCAM panel or the female-
Page 2
USB jack on the charging cable. The Green Power LED will flash when the battery power is low.
The Red Battery LED will light up when the keyboard is being properly charged.
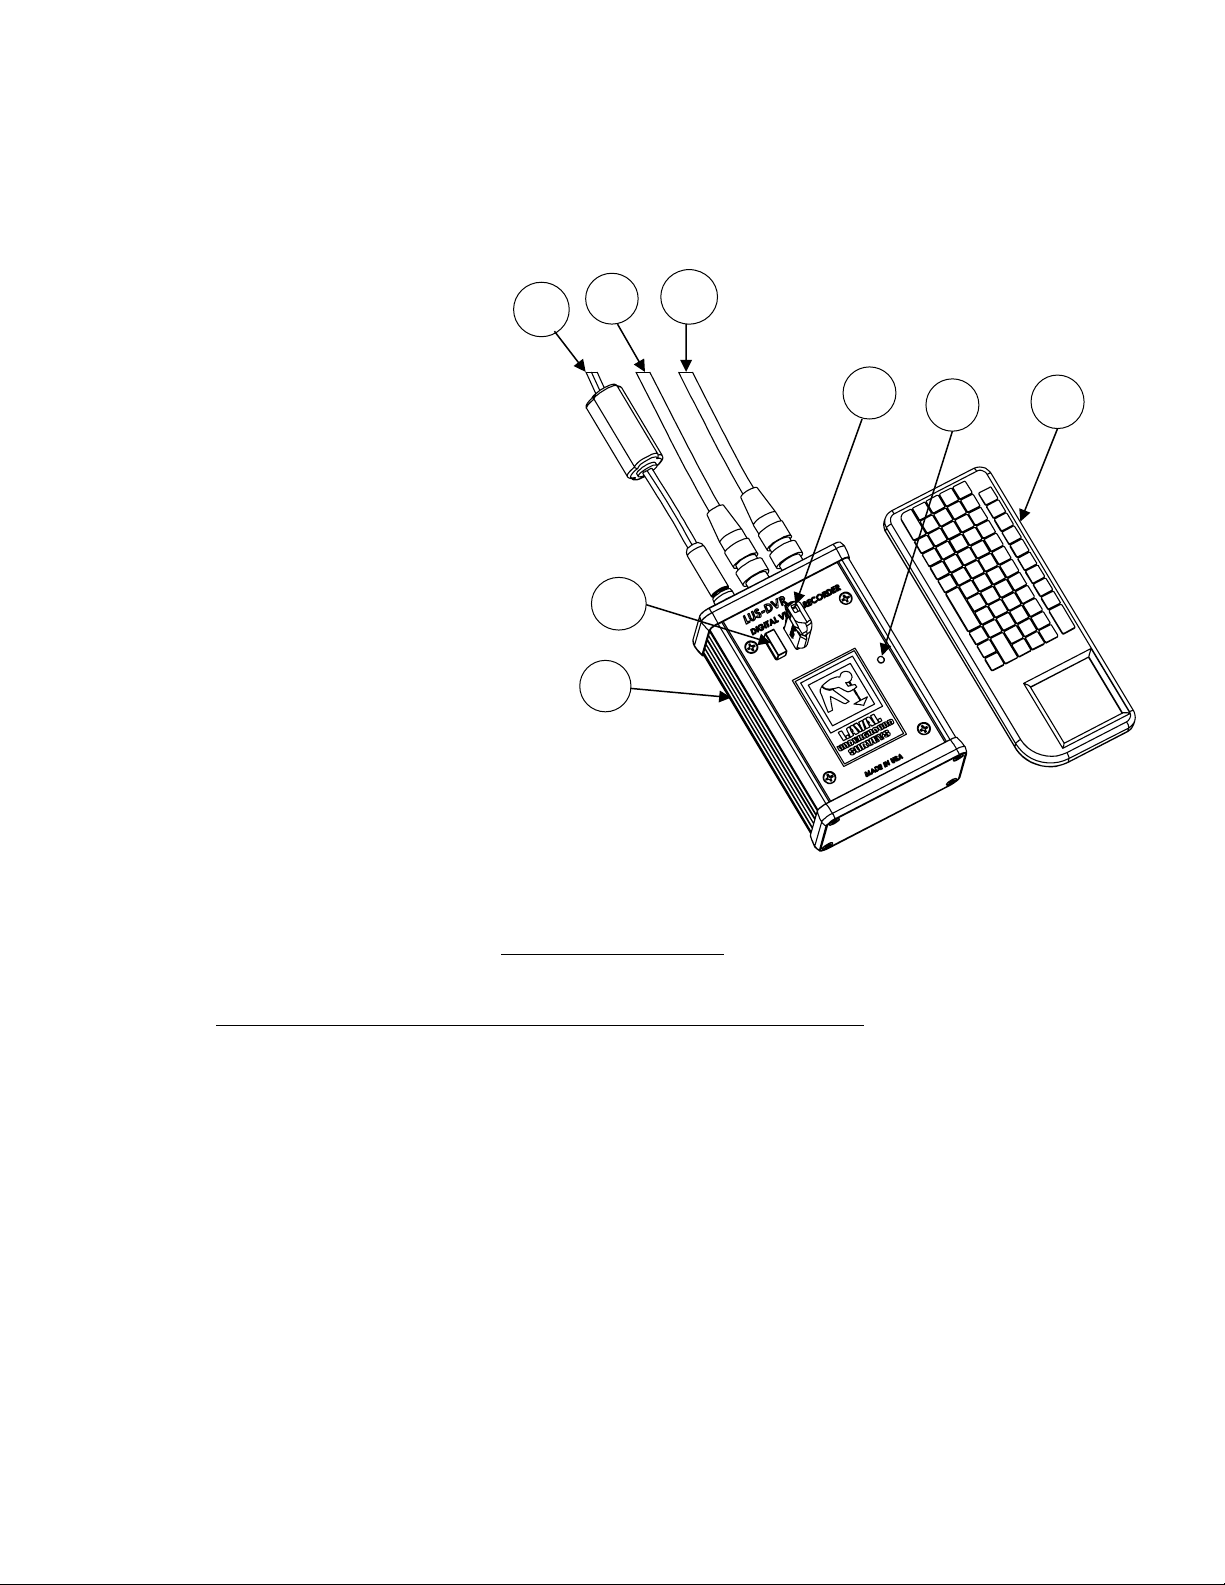
1. DVR Housing
2. Keyboard USB Receiver
3. 9 VDC Power Adapter
4. Video In BNC Cable
5. Video Out BNC Cable
6. External Memory USB
7. Power Light Indicator
8. Wireless Keyboard
Keyboard Functions
Key Function
Enter or Space Bar Menu or OK
Up Arrow Rewind Playback or Move Text Up
Down Arrow Fast Forward Playback or Move Text Down
ESC (Escape) Stop/Finalize Recording, Menu Back, or Playback Stop
RRecord Start or Pause Recording
SSnapshot
PPause Record or Playback
Figure 1
1
2
3
4
5
6
8
7

Page 3
Keyboard LED Indicators Meaning
YELLOW RF Signal ON=Transmitting
RED Battery Cable plugged in: ON=charging
OFF=Fully charged
GREEN Power ON=Power on, OFF=Sleep Mode, FLASHING=Low Power
WHITE CAPS LOCK ON=Caps Lock Active, OFF=Caps Lock Inactive
The DVR is controlled using the keyboard and an on-screen menu system. After initial power-
up, press the Space Bar or the Enter key to bring up the Top Menu. Then again, press the Space
Bar or Enter key to go into one of the Sub Menus.
Getting Started
To start a recording press R. Press Ra second time to pause a recording, before pressing Ra
third time to resume recording again to create one continuous video. To stop and finalize
recordings press ESC. Finalization can take up to 2 minutes for long recordings. It is important
to note that powering down before stopping/finalizing the recording can result in losing the
recording. A maximum video length of 1.5 hours is recommended to manage file size. Press S
at any time to take a snapshot image of the video. To add a text overlay before recording see
the Overlays Section on page 4.
Menu Structure
Top Menu:
Play Video
View Snapshots
Overlays
File Management
Setup
Help With Keys
Play Video
Play from internal
Play from external
If only the internal device is present, the files list from the internal device is displayed.
File selection is made using the up and down arrow keys. Pressing Enter or Space starts
playback.

Page 4
View Snapshots
Behavior is similar to “Play video”
Overlays
Primary Overlay
Allows selection of the size of the text from either 8x14 or 16 x 16. You can also
select OFF which turns off the text display. The default setting is 16 x 16.
Setup Primary Overlay
Text
Allows selection of which text is displayed from date only, time only, time and
date, custom text 1, custom text 2, custom text 3, custom text 4, or custom text
5. The default setting is time and date.
Custom Text
Allows the user to enter up to 5 custom text comment lines. Each line has a
maximum of 40 characters.
Date Format
Allows selection of the format of the date display. The default setting is MM –
DD –YYYY.
Time Format
Allows selection of the format of the time display. The default setting is 24 hour
format in HH: MM : SS.
Background
Allows selection of the background of the text from Black, Transparent, 50%
black, or 75% black.
Move Up, Move Down, Move Left, Move Right
Allows the text to be moved on the screen.
Secondary Overlay
Allows selection of Title overlay, Coded overlay, Extra overlay, or off.

Page 5
Setup Title/Coded/Extra Overlay
Edit Text
Allows the user to edit the preloaded text
Load
Allows the user to edit text that has been saved.
Save
Allows the user to keep any changes to the text.
Text Size
Allows selection of the size of the text from either 8x14 or 16 x 16. You can also
select OFF which turns off the text display. The default setting is 16 x 16.
Background
Allows selection of the background of the text from Black, Transparent, 50%
black, or 75% black.
Move Up, Move Down, Move Left, Move Right
Allows the text to be moved on the screen.
File Management
Copy video from internal
Copy video from external
Copy snapshots from internal
Copy snapshots from external
Delete files from internal
Delete files from external
Rename files on internal
Rename files on external
If only the internal device is present, the external choices will not be shown.

Page 6
Setup
Set Date/Time
This setting allows for setting up the battery backed-up real-time clock. The real-time
clock is used to automatically generate file names for saved video files and snapshots.
There is also an option of having the date/time overlay present in recorded video and
snapshots.
Video
Video Standard
Allows selecting between NTSC and PAL video formats.
Interpolate
Turning interpolation on gets rid of motion artifacts at an expense of some vertical
resolution loss. The default setting is ON.
Video Bit Rate
Determines the compression level of recorded video. The higher the bit rate, the
higher is the quality, the more space is required on the storage device. The selection
is from 1000kbps to 5000kbps. The default setting is 3500kbps. At the default
setting of 3500kbps, a minimum of 8 hours can be recorded onto a 16GB storage
device.
Playback Seek
Adjust the amount of the time skipped when using Rewind and Fast Forward
functions. Default is 10.
Snapshot Quality
Determines the compression level of snapshot. The higher the quality, the more
space is required on the storage device. The available settings are 97 (best) down to
50. Default is 90.
Snapshot Overlay
Turning on this setting allows the text overlay to be shown in Snapshots. Default is
On.

Page 7
Recording Format
Determines the video format .ts or .mp4. Default is .ts, because there is no loss of
data in the event of recording interruption, such as a loss of system power.
Record Storage Device
Allows the selecting the recording destination devices: internal, external, or both. The
default setting is BOTH.
Set Language
Language can be set to English, French, German, Portuguese, or Spanish for the DVR
menus only. Default is English.
System Information
Displays various system information, including firmware version, detected storage
devices with free space available and allows system parameters to be reset, saved and
loaded as follows.
Reset System Parameters
Resets all the parameter settings to Basic default settings. This option restores the
DVR back to the Laval Underground Surveys factory settings.
Save System Parameters
Saves all the parameter settings to USB memory storage. Only use this option if you
wish to change the factory settings from Laval Underground Surveys.
Load System Parameters
Loads all the parameter settings from USB memory storage. This option restores the
DVR back to the saved settings.
Turn WiFi on
Setting allows streaming video over an unsecured network with a WiFi adapter when set
up and turned on, for more information on how to set up please contact Laval.

Page 8
Helpful DVR Tips
•Press ESC to stop all recordings, playbacks, and to back out of menus. Pausing a
recording and powering off will erase the unfinished recording.
•A MAXIMUM VIDEO LENGTH OF 1.5 HOURS IS RECOMMENDED.
•Turn the keyboard power off at the end of your use of the system to preserve longer
battery life.
•After 3 minutes of not using the keyboard, the keyboard goes into Sleep Mode and all
LED indicators will go out. Keys will not work until it wakes up which takes a few
seconds. After it wakes up, the Green Power LED will light and the keys will work again.
•If the unit is not operating properly, restoring the setup settings back to Laval
Underground Surveys factory settings may fix it. See “Reset System Parameters” in the
System Information section.
•Monitor available free memory for both the internal and external storage in the System
Information screen. If more space is need on the internal storage you can move files to
the external storage by copying and then deleting them.
•Stop the movement of the camera (reeling up/down or rotating) when using the
snapshot function for clearer pictures.
•Text overlays must be setup and typed in prior to the recording.
•IMPORTANT: When renaming video files, do not change or delete the file extension, the
“.mp4” or ”.ts” part of the name, as this may make the file in-accessible to the system.
All video files must have the “.mp4” or “.ts” at the end of their file name. Likewise, the
“.jpg” at the end of snapshots file names must be treated the same.
•Always keep the keyboard and its USB receiver paired together with one system, refer
to the serial codes on them in the event that they are mixed with another set.
•Larger storage devices such as external hard drives will most likely need formatting to
FAT32 to work with the DVR. Keep this in mind and test recording before going into the
field.
•Video files recorded as .ts can be converted if they are not compatible with a video
player, using a video converter. Converted files may not play back on the DVR.

Page 9
WARRANTY
LAVAL UNDERGROUND SURVEYS warrants all products and materials manufactured by it and
described herein to be free from defects in workmanship and materials for a period of one year
from date of shipment, with the exceptions of fuses, improper battery maintenance,
connectors, plugs, cable head, and the Imager.
Any article not manufactured by LAVAL UNDERGROUND SURVEYS and described herein is sold
with only such warranties as are made by the manufacturer thereof. No other warranties
expressed or implied, of merchantability, fitness for a particular purpose, or otherwise, are
made by LAVAL UNDERGROUND SURVEYS other than those set out in the immediately
preceding paragraphs.
All repairs shall be made by LAVAL UNDERGROUND SURVEYS at its factory or as otherwise
authorized by LAVAL UNDERGROUND SURVEYS in writing. All unauthorized repairs will void
warranties.
Warranty is void on any equipment that is abused, modified, or mishandled by customer.
2476 NORTH BUNDY DR.
TEL: (559) 251.1396
FRESNO, CA 93727 USA
FAX: (559) 251.2096
EMAIL: INFO@LAVALUNDERGROUND.COM
WEBSITE: WWW.LAVALUNDERGROUND.COM
Table of contents


