LaView USA 4-CH DVR User manual

Quick Start Guide
4/8/16-CH DVR

2
4/8/16-CH DVR Quick Start Guide
1. Install Hard Drive
Notice: 1. Support one or two SATA hard disk drives. Please use
manufacturer recommended hard disk drives for DVR.
2.
Please disconnect the power before connecting to other devices. Do NOT hot
plug
in/out.
Step1: Unscrew and open the top cover to connect the power and data
cables. Place the HDD onto the bottom case as Fig 1-1.
Step2:Screw the HDD as Fig 1-2.
Fig 1-1 Connect HDDFig 1-2 Screw HDD
Notice: 1. For your convenience, please connect the power and data
cables first before tightening the screw.
2.Panel Instruction
2.1 Front Panel Instruction
Index
Name
Function
1
Sign
DVR Logo Optional
2
Indicators
Power On, Network Activity, Recording Active
3
IR/Ext.IR
Receives signals from the remote control
4
Function Keys
Function keys, and the corresponding number key to switch or
exit the function keys
5
Directional keys
Directional controls: Up/Down can jump up or down. Activates the
digital input box to increase or decrease a number.
Left/Right: Switches screens
Enter: Operation confirmation
Switches to default button
Menu configuration.
6
Menu
The Main Menu function key
7
USB
USB 2.0 Ports for mouse & external device

3
4/8/16-CH DVR Quick Start Guide
Index
Name
Function
1
Sign
DVR Logo Optional
2
Indicators
Power On, HDD/Network /Alarm/RecordingActive
3
Directional
keys
Directional controls: Up/Down can jump up or down. Activates the
digital input box to increase or decrease a number.
Left/Right: Switches screens
Enter: Operation confirmation
Switches to default button
Menu configuration.
4
Function Keys
Function keys, and the corresponding number key to switch or exit
the function keys
5
IR/Ext.IR
Receives signals from the remote control
6
USB
USB 2.0 Ports for mouse & external device
7
Power key
Long press to power on/off DVR system.
2.2 Rear Panel Instruction
1 2 3 4 5 6 7 8
Rear Panel Instruction for 4CH Compact case
1 2 3 4 5 6 7 8
Rear Panel Instruction for 8CH Compact case

4
4/8/16-CH DVR Quick Start Guide
Rear Panel Instruction for 8/16CH 1U case
Rear Panel Instruction for 4/8/16CH 1U case
1
Video input
Analog video signal (BNC)input jacks
2
Video/Audio Output
Analog video/audio signal (BNC)output jacks
3
Audio input
Audio (RCA) input jacks
4
VGA
VGA output port
5
Net
RJ45 network cable connector
USB Ports
USB 2.0 Ports for mouse & external device
6
RS-485 Port
A/B RS-485 port for P/T/Z (Pan/Tilt/Zoom) Connection
7
Power input
DC 12V
8
Power switch
Turn on/off the DVR main power.
5
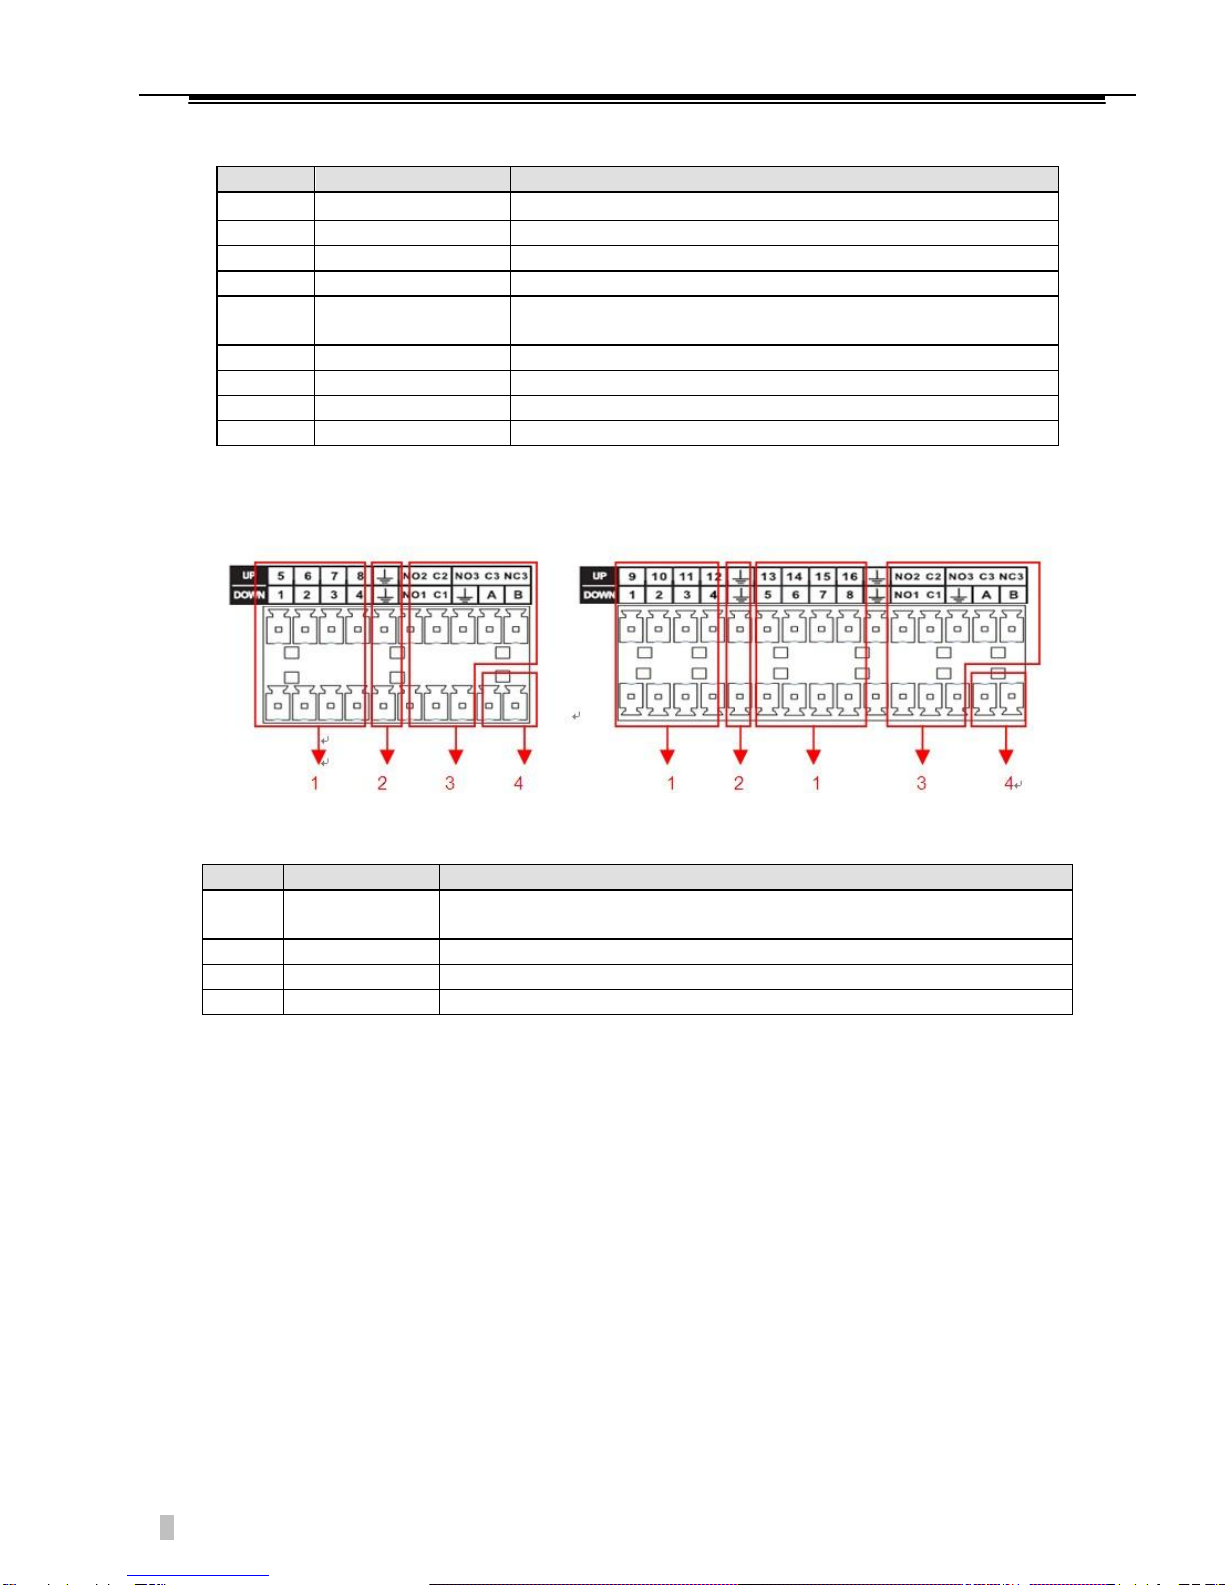
4/8/16-CH DVR Quick Start Guide
I/O Port Description
8CH I/O Ports 16CH I/O Ports
Index
Name
Description
1
Alarm input
Connection for external Alarm Peripherals(PIR Sensor, Alarm
Panel).
2
GND
Grounding.
3
Alarm output
Connection for external devices (Pezos, buzzer, siren).
4
RS-485
Communication terminal for Pan/Tilt/Zoom cameras.
Index
Name
Description
1
Video input
Composite video signal(CVBS)input interface.
2
Audio input
Audio input interface.
3
HDMI
HDMI output interface.
4
VGA
VGA output interface.
5
Video/Audio
output
Composite video/audio signal(CVBS)output interface.
6
I/O Ports
Alarm input/output, RS-485 interface.
7
USB/Network
USB2.0 and RJ-45 interface.
8
Power input
DC 12V.
9
Power switch
Turn on/off the DVR main power.

6
4/8/16-CH DVR Quick Start Guide
3. Startup & Shutdown
3.1 Startup
Step1: Connect to cameras andmonitor.
Step2: Connect to a power source.
Step3: The device will boot and a power indicator will turn on
Step4: A live view window will appear
3.2 Shutdown
You can shut down the device by using the IR remote controller and mouse.
By IR remote controller:
Step1: Press power button. This will bring up a shutdown window. The unit
will shut down by clicking “OK” button.
Step2: Disconnect the power.
By mouse:
Step1: Enter into Main Menu and select “Shut Down” icon. This will take you to
the shutdown window.
Step2: Click OK. The unit will power off shortly
Step3: After the unit powers off, you may disconnect the power
7
4/8/16-CH DVR Quick Start Guide
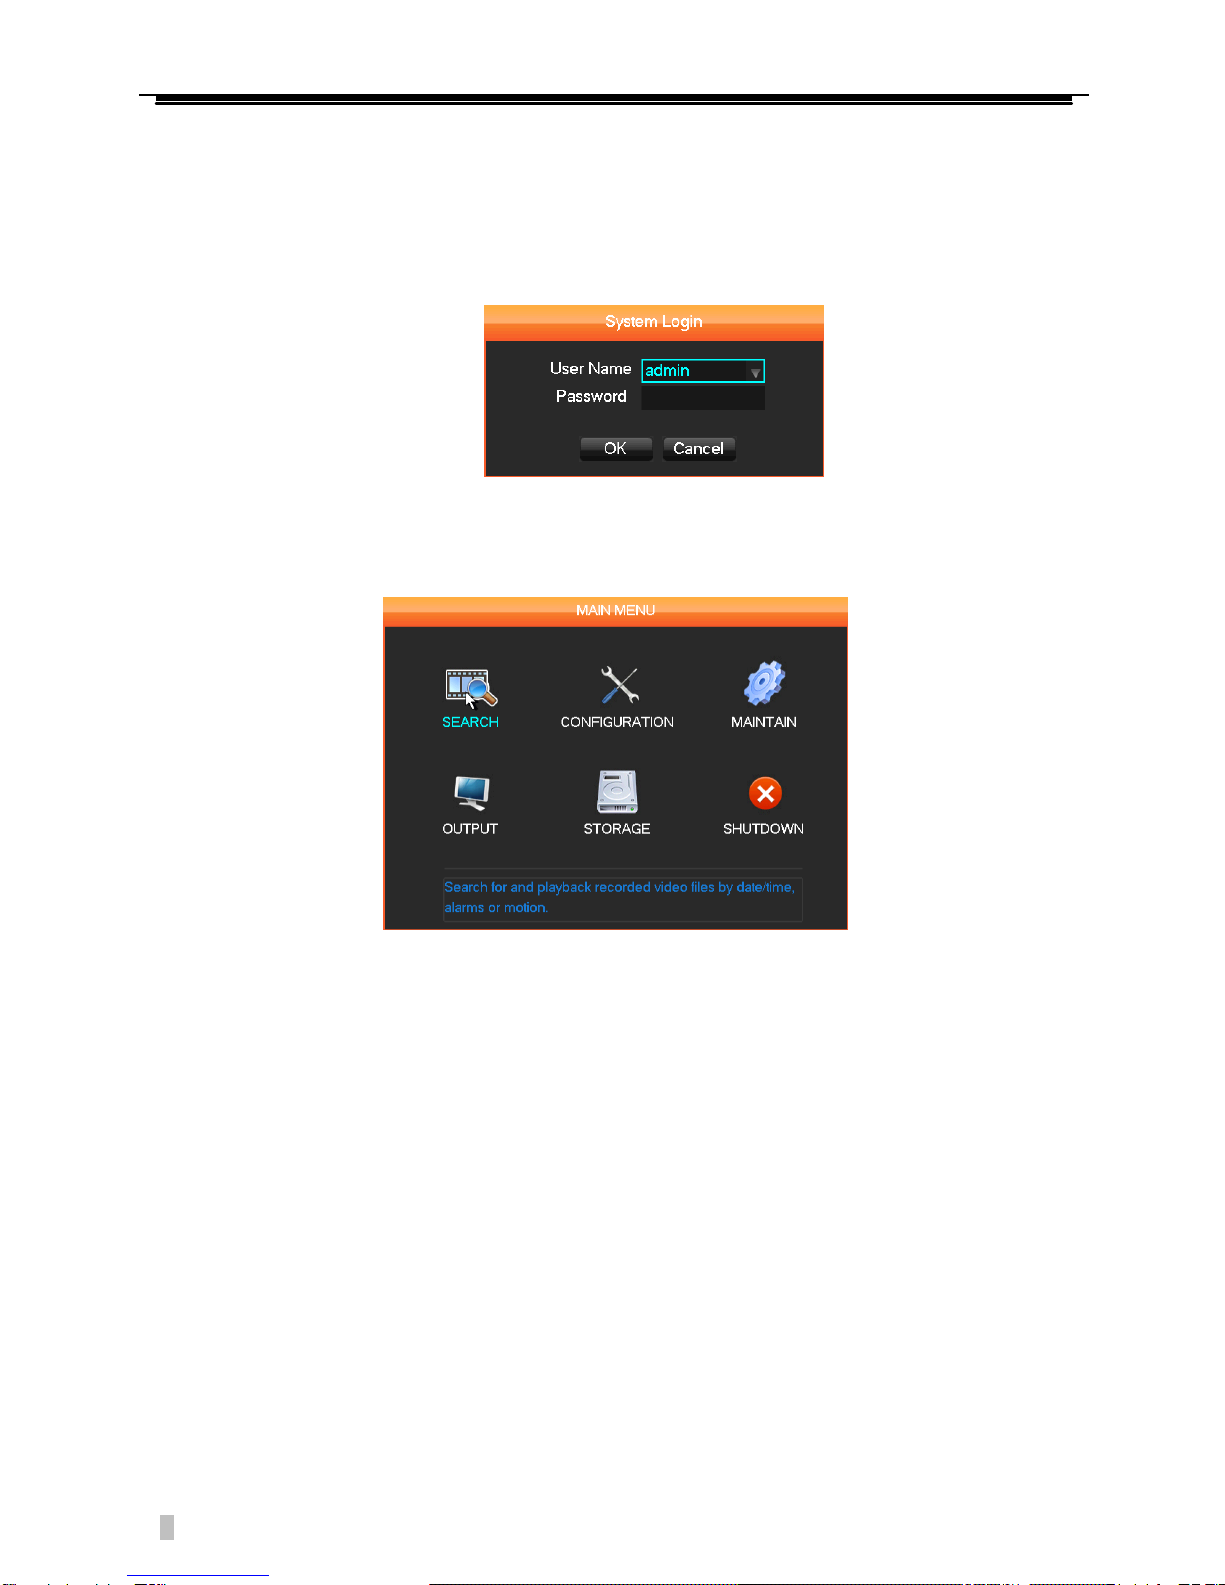
4. Login
When the DVR successfully loads, you can login to the DVR.
Press the Menu button. The Login dialogue box will appear where you will
enter the username: admin and the password: 123456
5. Main menu setup
Right click the mouse, or press Enter button on the front panel to enter into
the Main Menu. Click Setup to enter into Setup interface as shown below.
【Search】Search recordings by type, channel, time and playback.
【Configuration 】Configure recording, motion detection, abnormalities, alarm,
system, network and user management settings.
【Storage】Hard disk and backup management.
【Output】Configure P/T/Z, alarm output, serial and output modes.
【Maintenance】Display the system log information, version information, stream
statistics, and online Users. You also can reset to factory defaults
or use the automatic maintenance function.
【Shutdown】Log off the User menu, turn off the machine, restart the system, and
switch Users and all other operations.
Note: Move your cursor to a Main Menu icon and a description of the
selection will appear below the icons

8
4/8/16-CH DVR Quick Start Guide
6. Recording Setup
There are four kinds of record modes. You will need to install and format the
HDD, and set all the record parameters before recording.
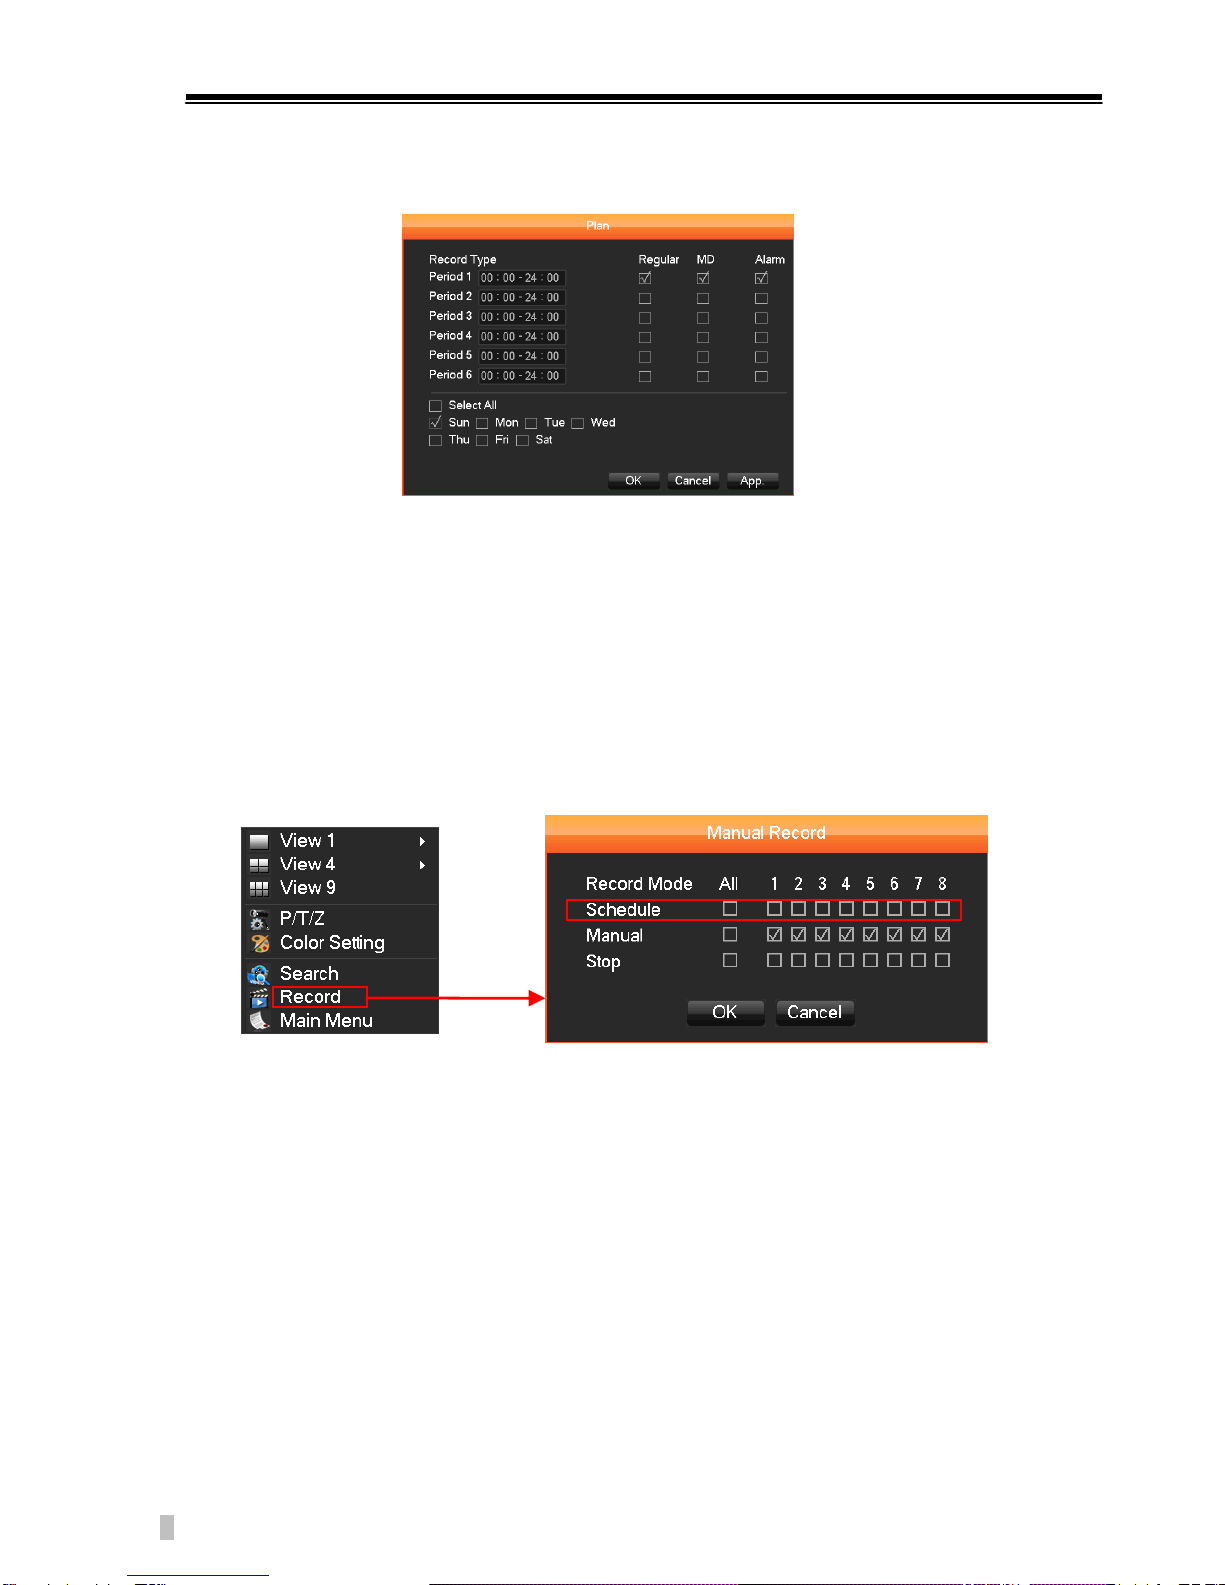
6.1 Manual Recording
A user can press REC button on the front panel after quitting system setup.
Press the button again to stop recording.
Or press REC button on the remote controller. Click it again to stop
Or right click the mouse, select “Record”, click it to enter the Record Control
interface as shown below. Select “Manual” to start recording, and select “Stop” to
stop recording.
6.2 Schedule Recording
To Setup Schedule Recording:
Step1: Select Menu Record, then click on the Record Plan tab. Refer to
the following picture.
【Channel】: Selects the video feed channel. To select a channel, click on
the arrow at the right of the selection box and a channel list will drop down.
Select the required channel.
【Green, yellow, and red represent】: Regular, MD (motion detection),
and Alarm recording modes. You can modify the recording settings for each
day listed by clicking on the 【Set 】button next to that day. A
configuration window will pop up to allow you to configure the settings.
9
4/8/16-CH DVR Quick Start Guide
【Copy】: Copy one of channel’s configurations to another.
【Set】: Pop up the setting interface for one of the listed weekdays.
Record Type: Set the recording time segments. There are up to six
configurable time segments which can be selected for recording during
each 24-hour period.
【Regular】: For normal recording
【MD】: For recording during motion detection
【Alarm】: For alarm event recording
Step2: In live view mode, click the mouse right button, select “Record”, and click
it to enter into RECORD CONTROL interface as shown below. Select “Schedule”
to start recording, and select “Stop” to stop recording.
10
4/8/16-CH DVR Quick Start Guide
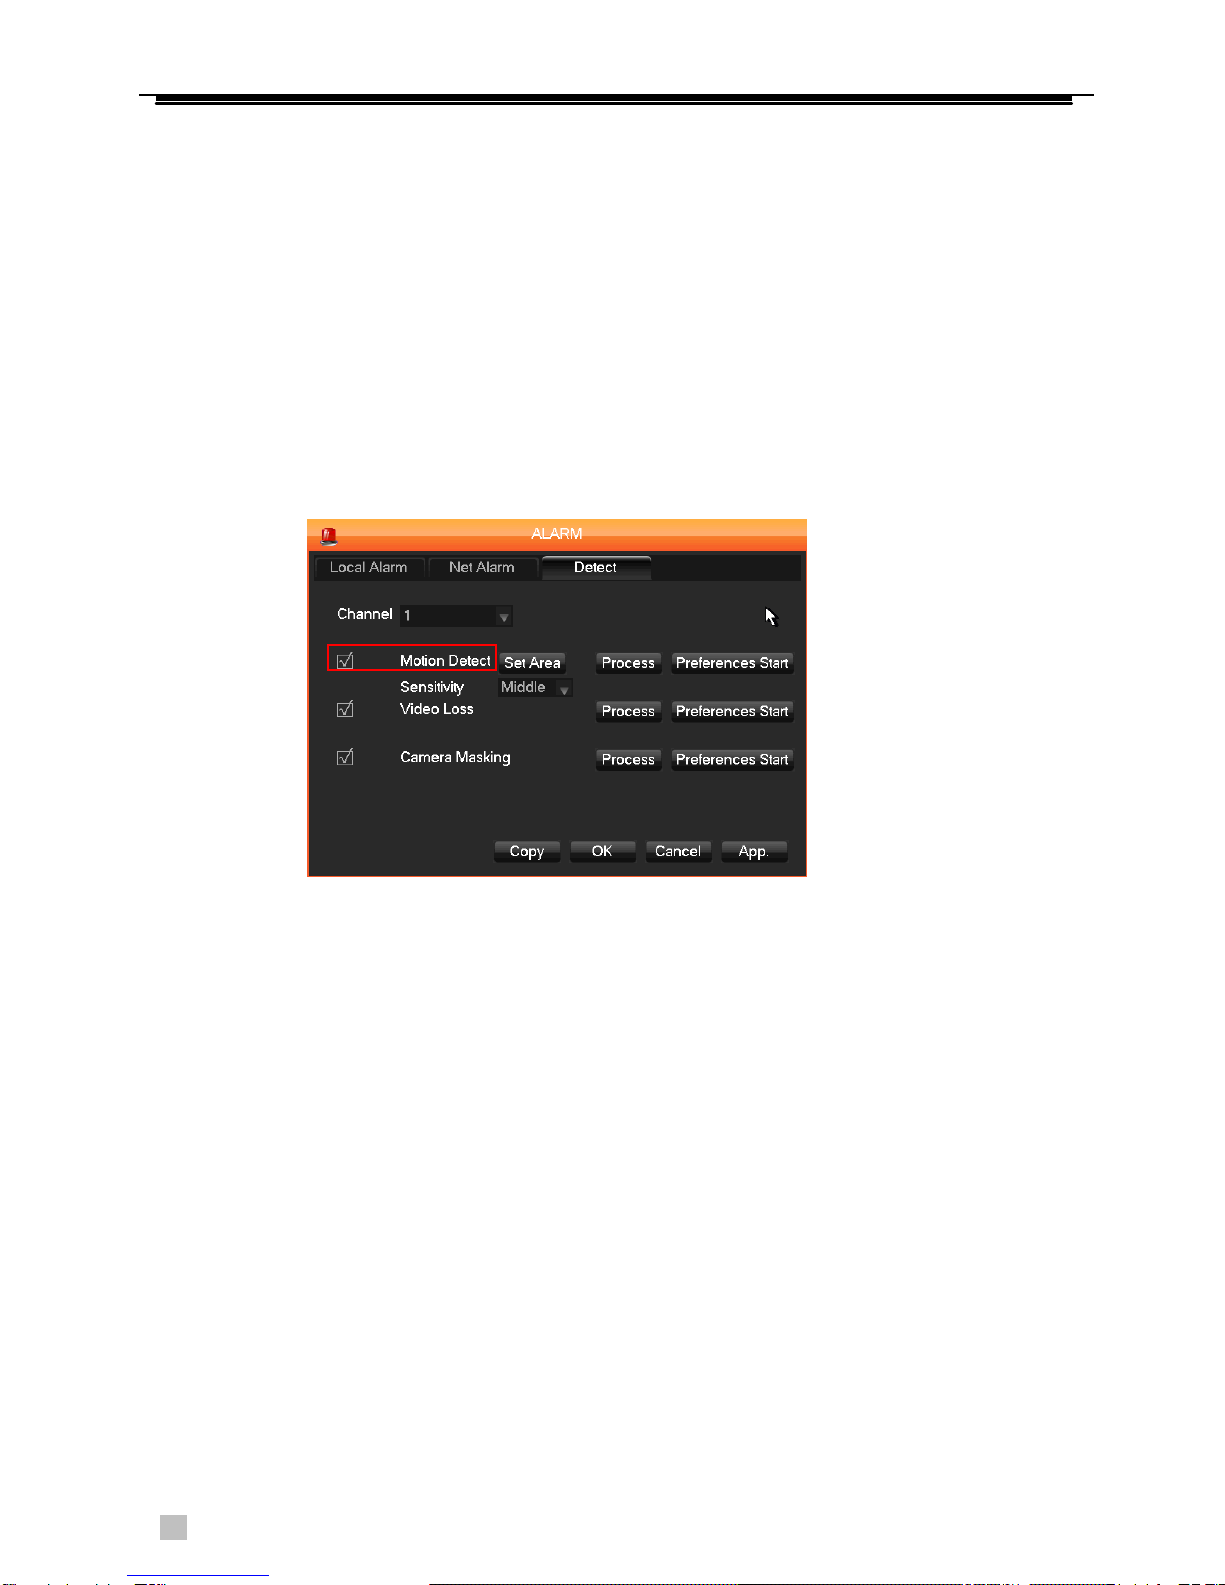
6.3 Motion Based Recording
Motion detection based recording: when motion is detected, the camera will
automatically trigger to begin recording
Step1: Enter into Menu Record -> Record Plan tab. The setup steps for schedule
for motion based recording are similar to normal schedule setup.
You can refer to 6.2 Schedule recording for details.
Step2: Enter into Menu Configuration -> Alarm Detect tab. Enable motion alarm
(Please specify to channel) and click “Set area
”and “
Sensitivity
”
to set detection
area and sensitivity. Click
“
Apply
‟
and “OK
‟
to save settings.
Step3: In live view mode, click the mouse right button, select “Record”, and click it
to enter into RECORD CONTROL interface. Select “Schedule” to start recording,
and select “Stop” to stop recording.
6.4 Sensor Alarm Based Recording
To Setup sensor Based Recording:
Step1: Enter into Menu Record -> Record plan tab. The setup steps for schedule
for alarm based recording are similar to normal schedule setup.
You can refer to 6.2 Schedule recording for details.
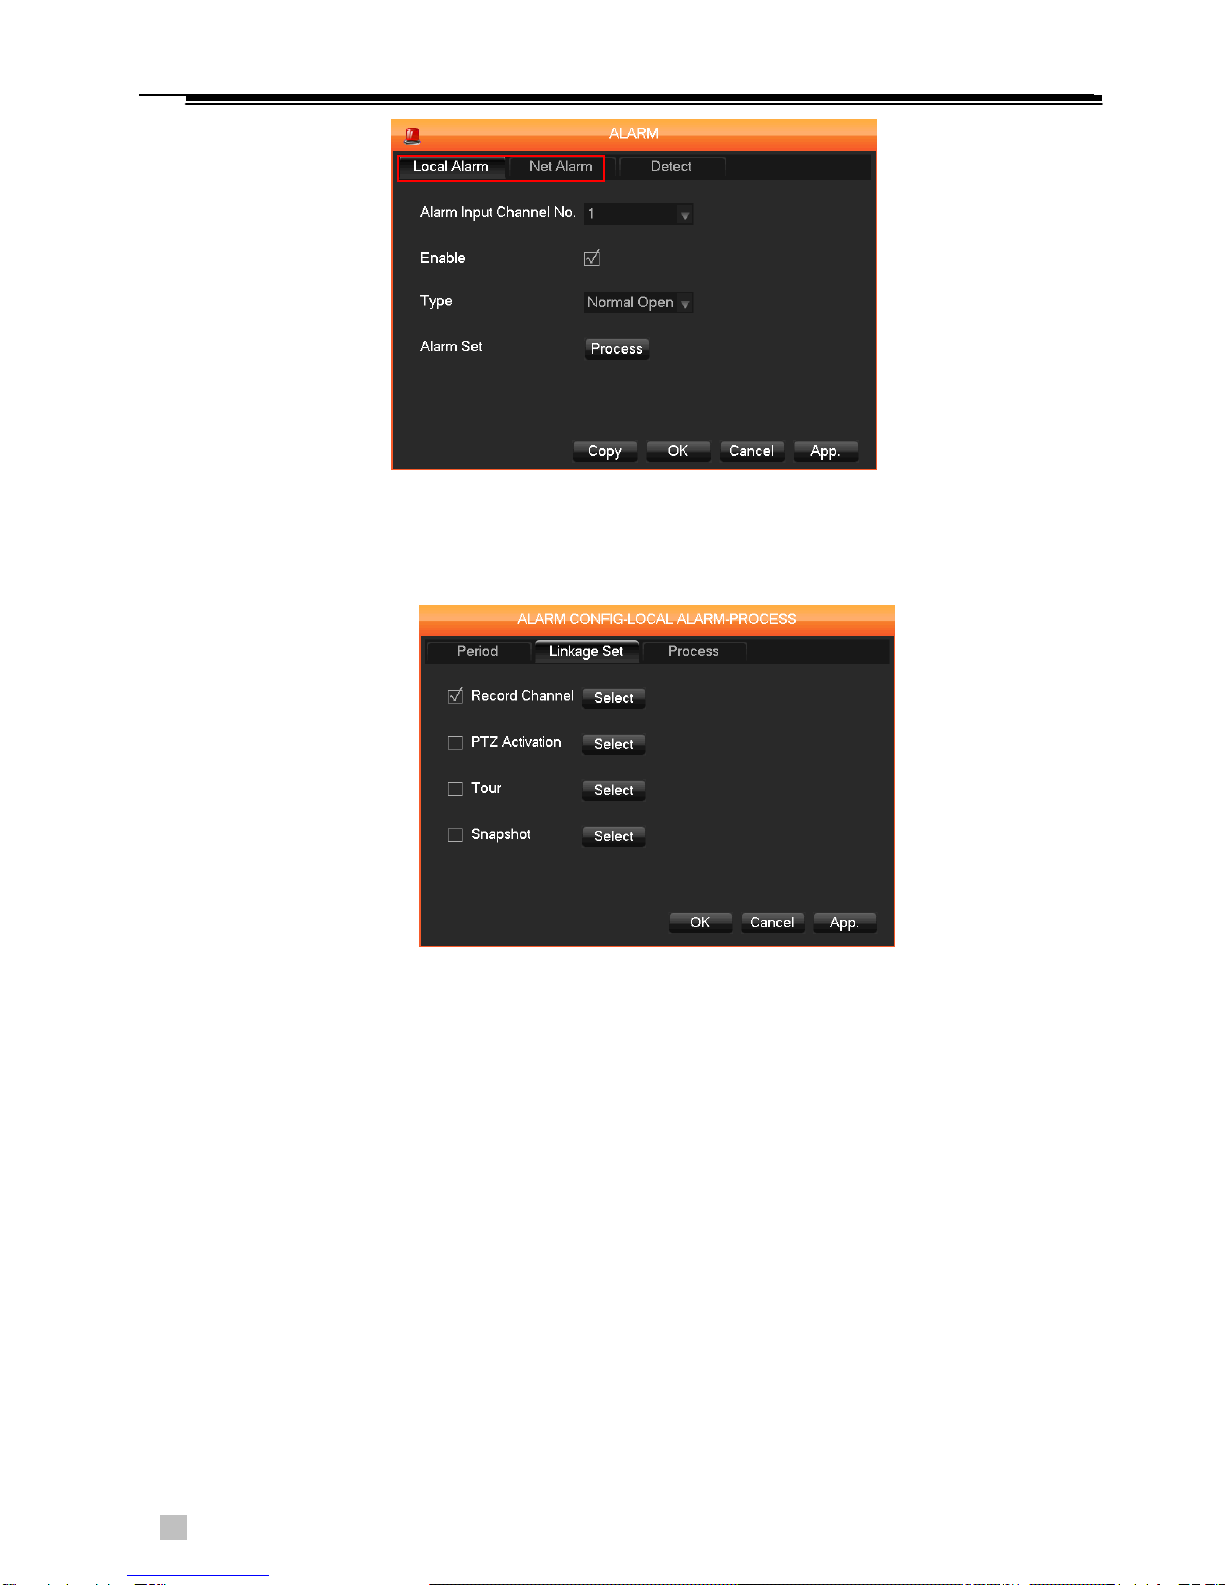
Step2: Enter into Menu Configuration -> Alarm -> Local Alarm tab. Enable
sensor alarm (Please specify to channel) and click “Type” to set Normal open or
Normal close. Click
“
Apply
‟
and
“
OK
‟
to save settings.
11
4/8/16-CH DVR Quick Start Guide
Step3: Click “Process” to set Period/ recording channel/PTZ activation etc.
Click
“
Apply
‟
and
“
OK
‟
to save settings.
Step4: In the live view mode, right click the mouse, select “Record,”
and it will bring you into Record Control interface. Select “Schedule” to start
recording and select “Stop” to stop recording.

12
4/8/16-CH DVR Quick Start Guide
7. Playback
In live view mode, right click the mouse button, select “Search,” click
to enter into playback interface as shown below

13
4/8/16-CH DVR Quick Start Guide
Playback Control description:
Key
Description
Remark
Video playback :
Fast-Forward button
During playback, pressing this key, allows you
to Fast-Forward with a number of speeds to
choose from. The Fast-Forward button can
also be used as a reverse of the Slow Motion
key.
Actual play rate is based on the
version being used.
Video playback :
Slow Motion Key
During playback, pressing this key provides a
variety of slower playback speeds to choose
from. The Slow Motion key can also be used
as a reverse of Fast-Forward.
Play/pause►/
Play/pause can also switch to normal speed
from slow motion playback.
Backward:
Backward Key
Moves the video playback a single frame
backward.
To go backwards, single click
again. To stop backward play
during normal playback, press
Rewind or single-frame
advance. Press the play
button ►/to resume normal
playback.
Manual single frame
advance
Advance video by a single frame forward or
back by clicking either │ or │ when video
is paused.
Index
Type
Description
1
Calendar
Click a specific date to call up the recording. The list is upgraded automatically.
2
Time
Select recording search start and end time.
3
Play
Playback control: stop/play, pause, fast, slow, previous/next frame when in pause
mode.
4
Recording
mode
Choose searched recording mode, including NORMAL, ALARM & MOTION.
5
Channel
Choose searched channel
6
Play
Choose to play the previous or next file; choose to play the previous or next
channel.
7
List
Choose the start time, channel, click “search”, and a list will display the results.
8
Backup
Click “ ”to choose a backup file in the file list box, click the Backup button;
to cancel a backup file, click “√” from the backup menu “√”.
9
Recording
List
The search list displays up to 128 video recordings. Choose a file and press enter
or double-click with the mouse to view a recording.File types: R—normal
recording, A—alarm recording; M—motion detection recording.

14
4/8/16-CH DVR Quick Start Guide
8. Back up
This unit supports backup by USB flash,DVD writer and USB HDD.
Connect an external USB device to one of the USB ports to back up
recordings from the DVR’s internal hard disk.
Step1:Enter into Menu -> Storage -> Backup tab.
Step2: Click “Detect” to identify the external USB device and displays the
device information.
Step3: Click`` Backup” to enter the Backup interface as shown below.
Set the start & end time, select channels and click “Add” button to
Display the searched data in the data backup list box.
Step4: Select a required file or checkmark “All”to select all data files. Click
Back up button to pop up Backup information window.
Step5: In the backup information interface, user can select save file type
``AVI”, Then click Start button to start backup.
15
4/8/16-CH DVR Quick Start Guide
9.Remote Surveillance
In order to view the DVR from a network it must be connected to a LAN/WAN
or internet. The network setup should be done accordingly.
9.1 Access DVR on LAN
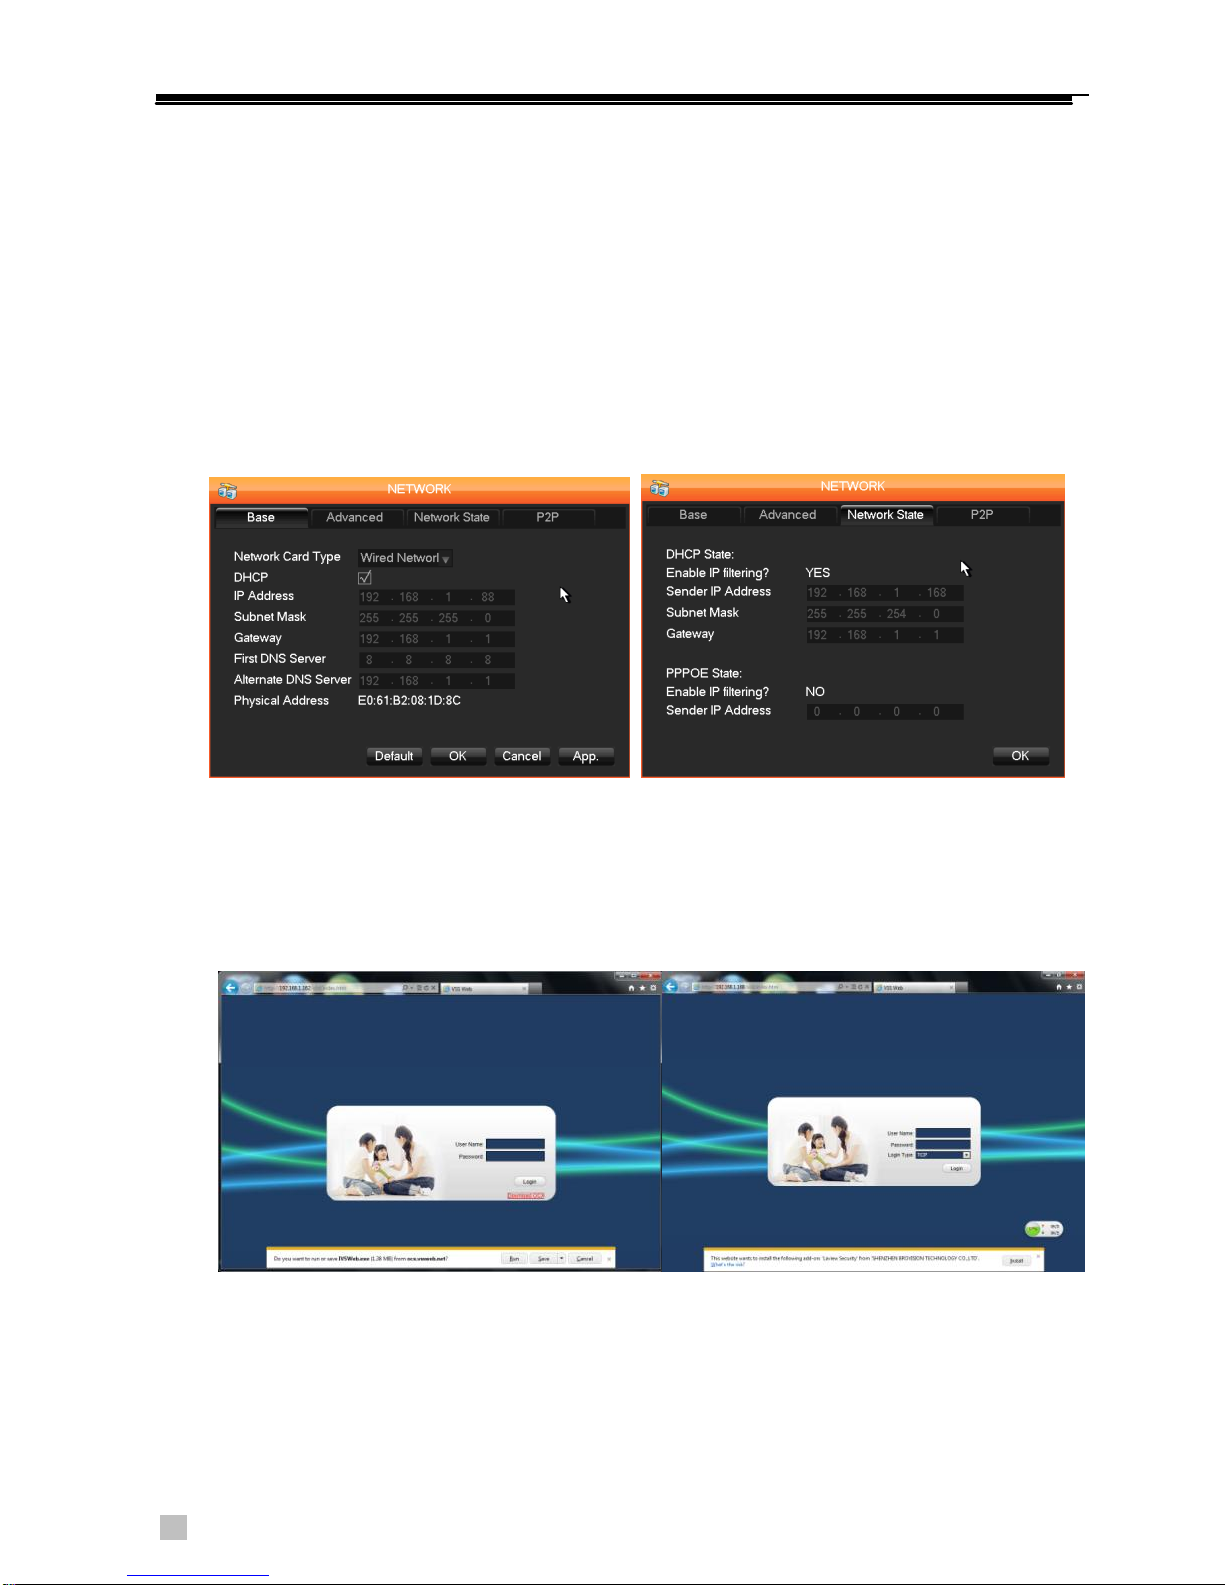
Step1: Please enter into Menu -> Configuration -> Network -> Base as shown
below.
Step2: Input IP address, Subnet, Gateway. If using DHCP, please enable
DHCP in both the DVR and the router. Enter into Menu -> Configuration ->
Network -> Network state, and user can check the network settings of the
DVR.
(Network Setup)
Step3: Enter into Record Setup to set network video parameters like
resolution, frame rate etc.
Step4: Open IE on a computer on the same network. Input the IP address
of the DVR in IE address bar and press enter. If HTTP port is not 80, add
the port number after IP address. Such as http: //192.168.1.182:10182.
Step5: IE will download ActiveX component automatically. Enter the
username and password in the subsequent window.
IE login screen
IE login screen

16
4/8/16-CH DVR Quick Start Guide
9.2 AccessDVR on WAN
1. Connect the DVR to internet through router or virtual server
Step1:Please enter into MenuConfiguration NetworkBase as shown
above.
Step2: Input IP address, Subnet, Gateway. If using DHCP, please enable
DHCP in both the DVR and the router.
Step3: Forward IP address and port number in Virtual Server setup of the
router or virtual server. Configure the firewall to allow accessing the DVR. (If
the user has enabled the UPnP function in both the DVR and router, he can
skip this step. Please refer to the relevant chapter for more details.)
Step4: Open IE browser, input IP address, or dynamic domain name and
enter. If HTTP port is not 80, add the port number after IP address or domain
name.
Step5: IE will download ActiveX automatically. Then a window pops up and
asks for user name and password. Input name and password correctly, and
enter to view.
2. Connect the DVR to Internet through PPPoE
Step1: Enter into the DVR
’
s Main Menu -> Configuration -> Network Advanced
interface to enable PPPoE and then input user name and password received
from your ISP. Next, click
„
Apply
‟
. The DVR will connect to the server and
would give a confirmation message.
Step2: If users want to utilize dynamic domain name, please apply for a
domain name in a DNS server supported by the DVR or router. Then add to
the DVR or router.
Step3: When accessing the remote interface of DVR, user can input WAN
IP/domain name to access directly (user can enter into Menu-> Configuration
-> Network -> Network state to check IP address). The browser will download
Active X control.
Step4: The following steps are the same as the connection way above.

17
4/8/16-CH DVR Quick Start Guide
9.3 Access DVR by UID (P2P)
1. Connect the DVR to internet
Step1: Please enter into Menu -> Configuration -> Network -> Base as shown
above.
Step2: Input IP address, Subnet, Gateway. If using DHCP, please enable DHCP
in both the DVR and the router.
Step3: Please enter into Menu -> Configuration -> Network -> P2P as shown
below.
Step4: Enable P2P by clicking OPEN, and click OK to finish the device
configuration.
“Enable”:Open or Close
“Device ID”:Each serial number of devices is different, this cannot be modified.
“Password”:This is generated by the system, you can change it.
“Local Port”:Default is 3000, can be modified.
“State”:Check the connect status of the device and the server.
①Online
②Offline cannot connect to Internet.
When it shows Offline, click【Ping】to check the connect status again.
Note: If the status still shows offline, please check if the network
light is on, and the device is connected or not.
18
4/8/16-CH DVR Quick Start Guide
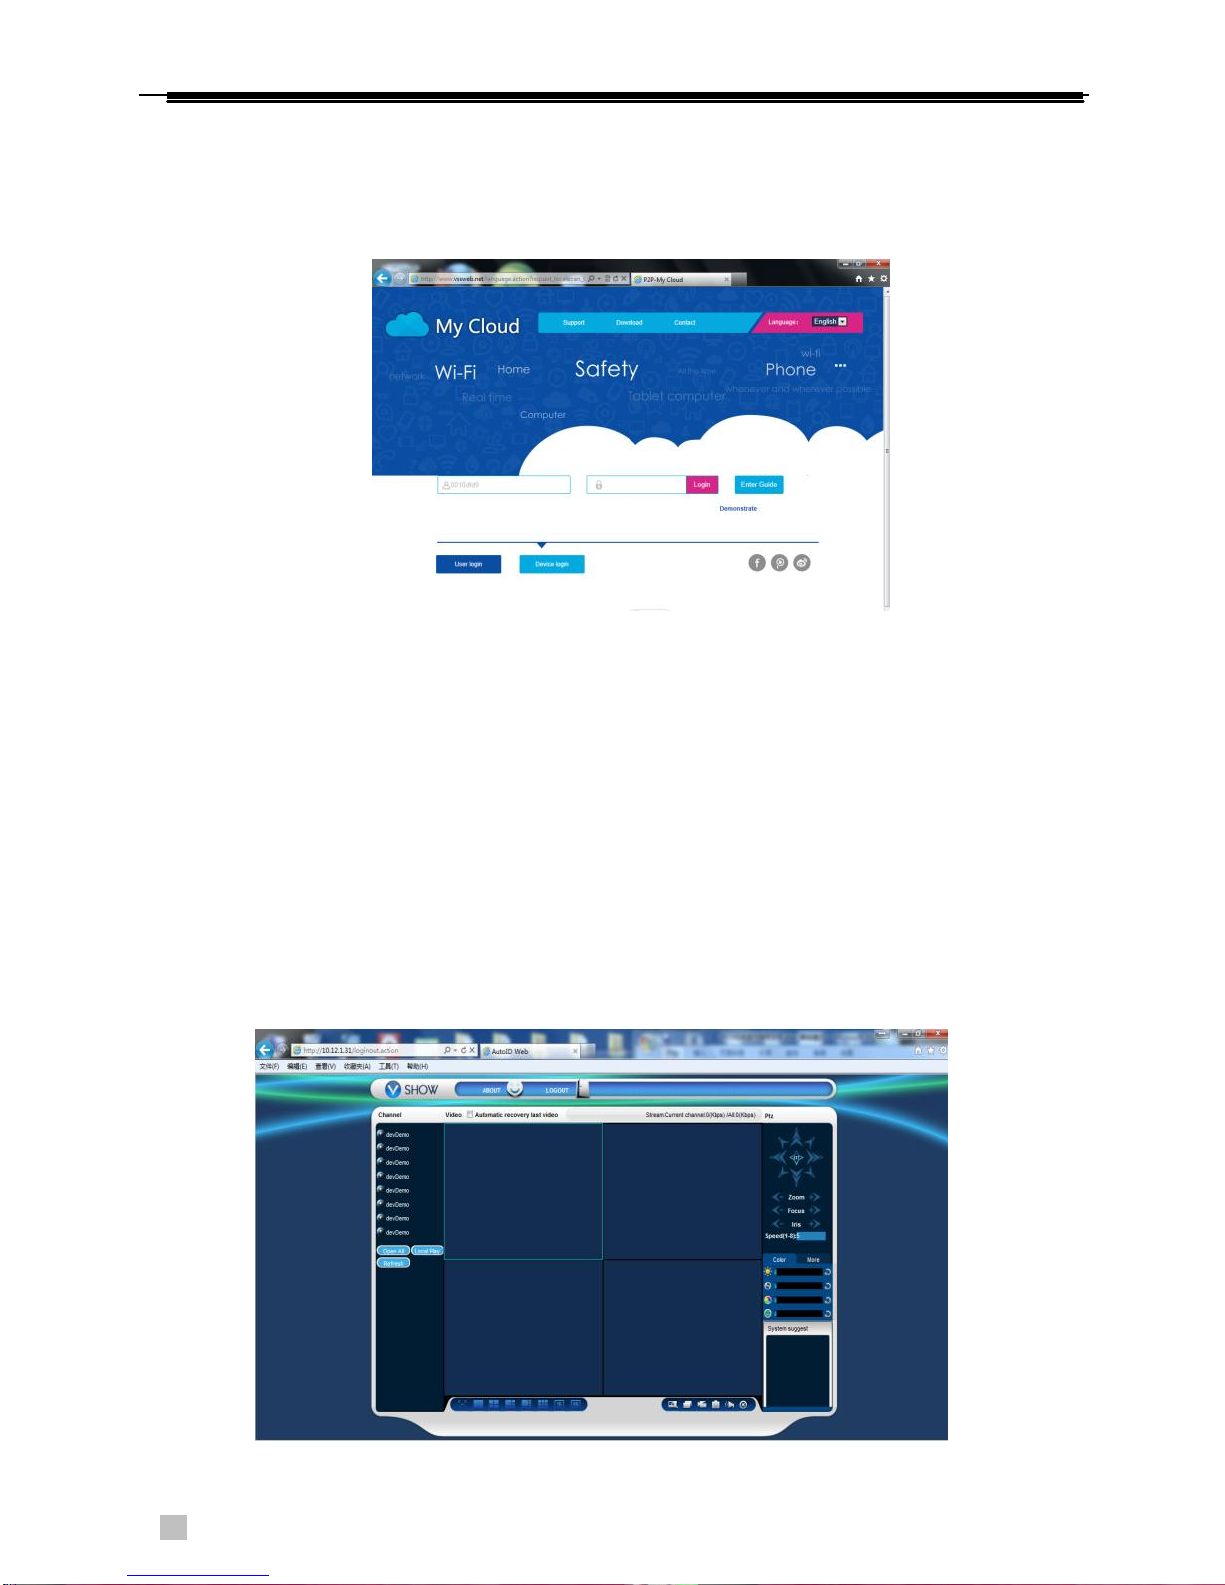
2. P2P Web Operation
Step1: Open IE browser, enter the P2P address (The IP address of the server PC,
eg: http://www.vssweb.net), and log in.
Step2: IE will download ActiveX automatically.
Note:
*If ActiveX cannot be downloaded,IE security level is high,please check
and set the security settings. (Please refer to the “P2P Web Operation
Manual” for more details)
*If users do not like to set the IE or ActiveX cannot be downloaded, they can
choose to download the ActiveX manually: click “Download” or download
“P2P.exe”from the “User login”, after downloading, double click to install.
Step3: Afterthe ActiveX is installed successfully, it can work properly.
There are two different login interfaces, User Login Interface & Device Login
Interface. When using User Login, enter username & password. When using Device
Login, enter Serial No.& password, then enter to view.
This manual suits for next models
3
Table of contents
Popular DVR manuals by other brands

Interlogix
Interlogix TruVision DVR 12 user manual

Component Solution Services
Component Solution Services REC02F User's installation guide

Scientific Atlanta
Scientific Atlanta Explorer 8000HD Start quide

Teac
Teac HDR9650TS user manual

inforce
inforce 4ch h.264 dvr user manual

HDbox
HDbox FS-9200 PVR user manual


