LaView LV-PB784F2 User manual

LaView IP Camera User Guide
1
www.LaViewSecurity.com
Contents
1. INTRODUCTION ............................................................2
2. SAFETY INSTRUCTIONS..................................................2
3. INSTALLATION...............................................................4
3.1 INSTALLATION OF BULLET CAMERAS ............................... 4
3.2 INSTALLATION OF MINI DOME CAMERAS......................... 6
3.3 INSTALLATION OF VANDAL-PROOF DOME CAMERAS ........ 10
3.4 INSTALLATION OF INDOOR DOME CAMERAS ................... 15
4. CONNECTING CABLES..................................................18
5. LOGIN MENU SYSTEM .................................................19

LaView IP Camera User Guide
2
www.LaViewSecurity.com
1. Introduction
Thanks for purchasing our product. For any question or need, welcome
contact us at any time. We will make every effort to ensure correctness
of the information contained in this manual, which may be subject to
change from time to time without prior notice.
2. Safety Instructions
1) Please comply with the power supply specifications as required for
this equipment and select the correct power supply.
2) In case that the equipment fails to operate properly, immediately
contact the manufacturer or the nearest service center, instead of
disassembling or changing it in any way on your own.
3) For cleaning of the lens, be sure to use an air blower or dedicated
lens cleaner. For cleaning of the plastic shield, use a soft and dry
cloth to wipe it. Do not use any detergent containing alcohol or
benzene.
4) Do not drop any object onto the device or Knock heavy on the
equipment.
5) Do not put the camera toward any strong light source (or lighting
lamp or sun), which may cause over-exposure or light leakage (not
due to defect of the product) and impair useful life of the camera.
6) Avoid use of the equipment in any environment other than suggest
in this manual.
7) Prevent water or any other liquid from flowing into the equipment.
8) For replacement of any part, contact the distributor in advance and
make replacement with a new one , or similar components which
have the same specification. Change any part in the device

LaView IP Camera User Guide
3
www.LaViewSecurity.com
without authorization is not permit.
Operating Environment
Power Supply
DC12V±10%
Temperature
-30℃~60℃
Humidity
10%~95%
Altitude
-60m~3000m
Atmosphere
86kpa~106kpa

LaView IP Camera User Guide
4
www.LaViewSecurity.com
3. Installation
3.1 Installation of Bullet Cameras
a. Ceiling Mounting
Expansion Bolt
Locking Screw
Insert three expansion bolts in place into the ceiling and fix the equipment
with three locking screws.

LaView IP Camera User Guide
5
www.LaViewSecurity.com
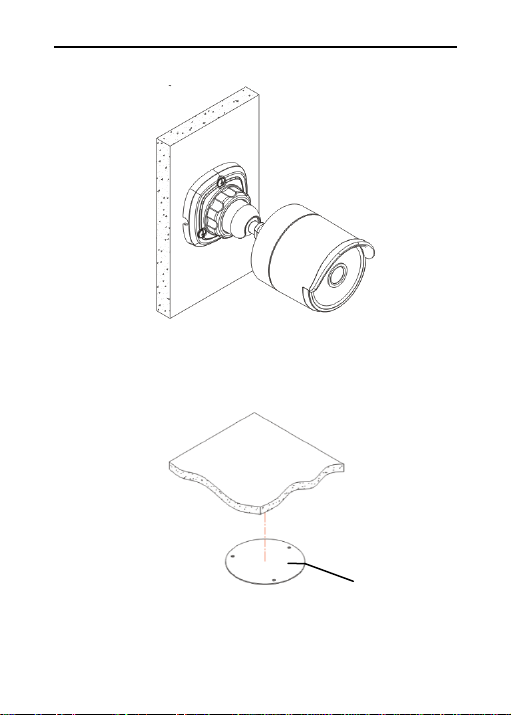
b. Wall Mounting
Completion of Installation
Insert three expansion bolts in place into the wall and fix the equipment
with three locking screws.
Expansion Bolt
Locking Screw
LaView IP Camera User Guide
6
www.LaViewSecurity.com
3.2 Installation of Mini Dome Cameras
Ceiling Mounting
Paste the sticker in place at the proper position as selected.
Setup of Sticker
Completion of Installation

LaView IP Camera User Guide
7
www.LaViewSecurity.com
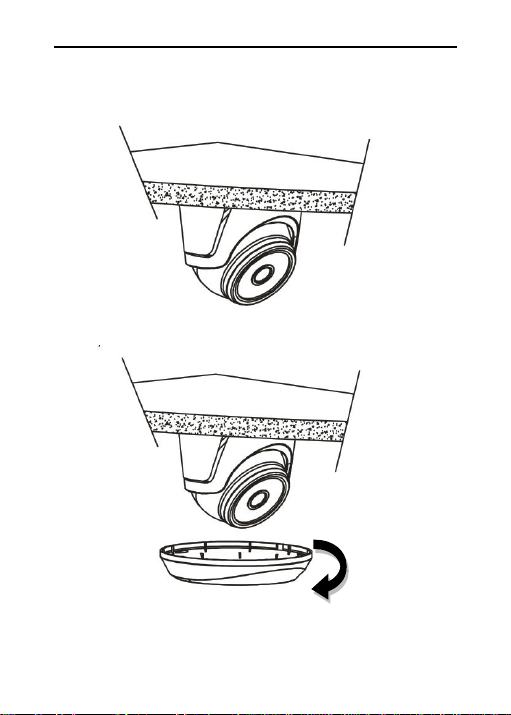
Mini Dome Camera
Collar
Remove the collar off the camera by rotating it down

LaView IP Camera User Guide
8
www.LaViewSecurity.com
Fix the pedestal by drilling locking holes around the sticker and inserting
three expansion bolts into the holes and fastening it with three locking
screws.
Expansion Bolt
Locking Screw
LaView IP Camera User Guide
9
www.LaViewSecurity.com
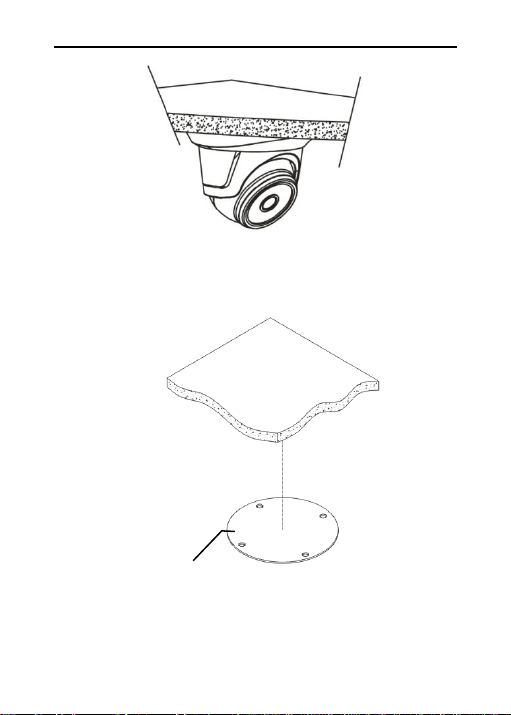
Mount the collar back by rotating it up
Adjust it to an appropriate angle.
LaView IP Camera User Guide
10
www.LaViewSecurity.com
3.3 Installation of Vandal-Proof Dome Cameras
Ceiling Mounting
Completion of Installation
Paste the sticker in place at the proper position as selected.
Setup of Sticker
Other manuals for LV-PB784F2
1
Table of contents
Other LaView IP Camera manuals


