LawnMaster TE1318W1 User manual
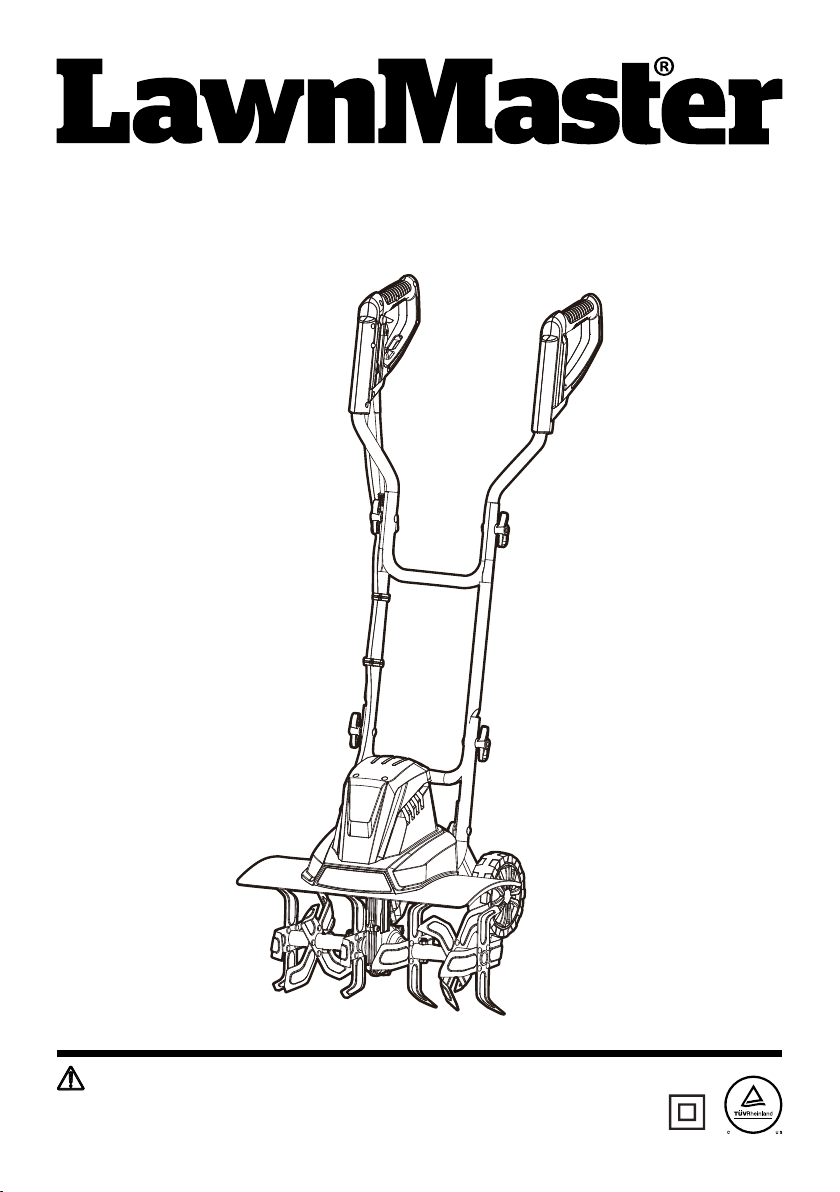
Operator's Manual
18" 13.5 Amp Tiller TE1318W1 (MODEL: WR7025-1500-13.5-450H1)
Save this manual for future reference
Read all safety rules and instructions carefully before operating this tool.

2
Section Page
TABLE OF CONTENTS
TABLE OF CONTENTS 2
SPECIFICATIONS 2
IMPORTANT SAFETY INSTRUCTIONS 3-7
SYMBOLS 8-9
KNOW YOUR TILLER 10
ASSEMBLY 11-13
OPERATION 14-16
MAINTENANCE 17-20
TROUBLESHOOTING 21
LAWNMASTER®WARRANTY 22
EXPLODED VIEW 23-24
PARTS LIST 25-26
NOTES 27-28
SPECIFICATIONS
Model
Voltage
Current
Motor Speed
Working Width
Maximum Working Depth
Number of Tines
Tine Diameter
Unit Weight
WR7025-1500-13.5-450H1
120 V ~ 60 Hz
13.5 A
390 RPM
17.7 inch (450 mm)
8.6 inch (220 mm)
6
8 inch (205 mm)
24.03 lbs (10.9 kg)

3
IMPORTANT SAFETY INSTRUCTIONS
Before any use be sure everyone using this product reads and understands all safety instructions and
other information contained in this manual.
Wear appropriate personal hearing protection during use. Under some conditions and duration of use,
noise from this product may contribute to hearing loss.
When using electric gardening appliances, basic safety precautions should always be followed
to reduce risk of fire, electric shock, and personal injury, including the following: READ ALL
INSTRUCTIONS.
GENERAL SAFETY
■ CHECK FOR DAMAGED PARTS - Before further use of the product, any part that is damaged
should be carefully checked to determine that it will operate properly and perform its intended
function. Check for alignment of moving parts, binding of moving parts, breakage of parts, mounting
and any other condition that may affect its operation. Any part that is damaged should be properly
repaired or replaced.
■ AVOID DANGEROUS ENVIRONMENTS - Don't use this product in rainy, stormy, damp or wet
locations. Do not operate in gaseous or explosive atmospheres. Motors in these products normally
spark, and the sparks might ignite fumes.
■ KEEP CHILDREN AWAY - All visitors, children and pets should stay at a safe distance from the
work area.
■ DRESS PROPERLY- Don't wear loose clothing or jewelry and wear protective hair covering to
contain long hair. They can be caught in moving parts. Use of rubber gloves and substantial
footwear is recommended when working outdoors.
■ USE SAFETY GLASSES - Wear safety glasses with side shields or goggles when operating this
product. Use face or dust mask if environment is dusty.
DOUBLE INSULATION - The tiller has double insulation. This means that all external metal
parts are insulated from the electrical supply. This is achieved by introducing an insulation layer
between electrical and mechanical parts. The double insulation guarantees you the greatest
possible safety.
■ EXTENSION CORD. Make sure your extension cord is in good condition. When using an extension
cord be sure it is heavy enough to carry the current your product will draw. An undersized extension
cord will cause a drop in line voltage resulting in loss of power and overheating.
TO REDUCE RISK OF INJURY:
CAUTION:
WARNING

4
IMPORTANT SAFETY INSTRUCTIONS
Minimum Gauge for Extension Cords (AWG)
(Using 120V Only)
■ Be aware of the extension cord while operating the tiller. Be careful not to trip on the cord. Always
guide the cord away from the tines.
■ Avoid Unintentional Starting - Don’t carry plugged-in appliance with nger on switch. Be sure switch
is off when plugging in. Don’t grasp the exposed cutting tines or cutting edges when picking up or
holding the appliance. Don’t Force Appliance - It will do the job better and with less likelihood of a
risk of injury at the rate for which it was designed. Keep hands away from tines.
■ GROUND FAULT CIRCUIT INTERRUPTER (GFCI)
■ Protection should be provided on the circuit or outlet to be used for the tiller. Receptacles are
available having built-in GFCI protection and may be used.
■ DISCONNECT UNIT from the power supply when not in use or when servicing or cleaning. Do not
leave unattended.
■ DON'T ABUSE CORD - Never carry this product by the cord or yank the cord to disconnect from the
receptacle. Keep cord from heat, oil, and sharp edges.
■ USE RIGHT APPLIANCE - Do not use this product for any job except that for which it is intended.
■ DON'T OVERREACH - Guide the tiller at a walking pace only. Keep proper footing and balance at
all times.
■ LIGHTING - Only operate your tiller in daylight or good articial light.
■ STORE IDLE UNIT INDOORS - When not in use, the tiller should be stored indoors in a dry area
Total Length of Cord in Feet (meters)
120V 25ft (7.62m) 50ft (15.24m) 100ft (30.48m) 150ft (45.72m)
Ampere Rating
AWG
More Than Not More Than
0 6 18 16 16 14
6 10 18 16 14 12
10 12 16 16 14 12
12 16 14 12 Not Recommended
■ It is possible to tie the extension cord and power cord in a knot to prevent them from becoming
disconnected during use. Make the knot as shown, then connect the plug end of the power cord into
the receptacle end of the extension cord. This method can also be used to tie two extension cords
together.

5
IMPORTANT SAFETY INSTRUCTIONS
out of children's reach.
■ MAINTAIN UNIT WITH CARE - Keep clean for best performance and to reduce the risk of injury.
Inspect extension cord periodically and replace if damaged. Keep handles dry, clean and free from
oil.
■ POLARIZED PLUGS - To reduce the risk of electric shock, this product has a polarized plug.
Polarized connections will t together only one way. Make sure that the receptacle end of the
extension cord has large and small blade slot widths. If the plug does not t fully into the extension
cord, reverse the plug. If it still does not t, obtain a suitable extension cord. If the extension cord
does not t fully into the outlet, contact a qualied electrician to install the proper outlet. Do not
change the plug on the tool or the extension cord in any way.
■ Do not operate the tiller on a slope that is too steep for safe operation. When on slopes, slow down
and make sure you have good footing. Before starting the tiller make sure the times are not touching
any object and are free to move. Grip the guide bar rmly with both hands. Never operate the tiller
with one hand.
The tiller may bounce upward and/or jump forward if the tines strike extremely hard packed soil, frozen
ground, or buried obstacles such as large stones, roots or stumps.
■ STAY ALERT - Watch what you are doing. Use common sense. Do not operate the tiller when you
are tired or under the inuence of drugs or medication.
Do not operate the tiller near underground electrical cables, telephone lines, pipes or hoses. If the
tiller strikes a foreign body, turn it off immediately, wait for the tines to stop and check for damage. If
necessary, repair before restarting. If the tiller starts to vibrate abnormally, turn it off immediately and
check for the cause. Vibration is generally a warning of trouble.
RISK OF CUT - Wear gloves and use caution when cleaning or performing maintenance on the tiller.
Always turn off the tiller, disconnect from the power supply and wait until the tines come to a complete
stop before carrying out any maintenance or repairs.
Tines do not stop immediately after the tiller is turned off.
CAUTION:
WARNING:
DANGER:
CAUTION:

6
IMPORTANT SAFETY INSTRUCTIONS
The electrical cords on this product may contain chemicals known to the State of California to cause
cancer and birth defects or other reproductive harm. Wash hands after handling.
Some dust and debris created by the use of this tool could contain chemicals known to the State of
California to cause cancer and birth defects or other reproductive harm.
Some examples of these chemicals are:
- Chemicals in fertilizers
- Compounds in insecticides, herbicides, and pesticides
- Arsenic and chromium from chemically treated lumber
Your risk from exposure to these chemicals varies, depending on how often you do this type of work.
To reduce your exposure, work in a well-ventilated area and with approved safety equipment such as
dust masks that are specially designed to lter out microscopic particles.
Training
■ Read the operating and service instruction manual carefully. Be thoroughly familiar with the controls
and the proper use of the equipment. Know how to stop the unit and disengage the controls quickly.
■ Never allow children to operate the equipment. Never allow adults to operate the equipment without
proper instruction.
■ Keep the area of operation clear of all persons, particularly small children, and pets.
■ Keep in mind that the operator or user is responsible for accidents or occurring to other people, their
property, and themselves.
Preparation
■ Thoroughly inspect the area where the equipment is to be used and remove all foreign objects.
■ Disengage all clutches and shift into neutral before starting the motor.
■ Do not operate the equipment without wearing adequate outer garments. Wear protective footwear
that will improve footing on slippery surfaces.
■ Use extension cords and receptacles as specied by the manufacturer for all units with electric drive
motors or electric starting motors.
■ Never attempt to make any adjustments while the motor is running.
Operation
■ Do not put hands or feet near or under rotating parts.
■ Exercise extreme caution when operating on or crossing gravel drives, walks, or roads. Stay alert
for hidden hazards or trafc. Do not carry passengers.
■ After striking a foreign object, stop the motor, thoroughly inspect the machine for any damage, and
repair the damage before restarting and operating the machine.
■ Exercise caution to avoid slipping or falling.
■ If the unit should start to vibrate abnormally, stop the motor and check immediately for the cause.
Vibration is generally a warning sign of trouble.
■ Stop the motor when leaving the operating position, before unclogging the tines, and when making
any repairs, adjustments, and inspections.
WARNING:
WARNING:

7
IMPORTANT SAFETY INSTRUCTIONS
■ Take all possible precautions when leaving the machine unattended. Disengage the power take-off,
lower the attachment, shift into neutral, stop the motor, and remove the key (if applicable).
■ Before cleaning, repairing, or inspecting, shut off the motor and make certain all moving parts have
stopped.
■ Never operate the machine without proper guards, plates, or other safety protective devices in
place.
■ Keep children and pets away.
■ Do not overload the machine capacity by attempting to till too deep at too fast a rate.
■ Never operate the machine at high transport speeds on hard or slippery surfaces.
■ Never allow bystanders near the unit.
■ Use only attachments and accessories approved by the manufacturer of the machine (such as
wheel weights, counterweights, and the like).
■ Never operate the tiller without good visibility or light.
■ Be careful when tilling in hard ground. The tines may catch in the ground and propel the tiller
forward. If this occurs, let go of the handlebars and do not restrain the machine.
■ Use extreme caution when reversing or pulling the machine towards you.
■ Switch on the motor carefully according to instructions and with feet well away from the tines.
■ Never pick up or carry a machine while the motor is running.
■ Do not operate the tiller while under the inuence of alcohol or drugs.
Maintenance and Storage
■ Keep machine, attachments, and accessories in safe working condition.
■ Check shear bolts, and other bolts at frequent intervals for proper tightness to be sure the
equipment is in safe working condition.
■ Always refer to the operator’s manual for important details if the tiller is to be stored for an extended
period.
■ Follow manufacturer’s recommendations for safe loading, unloading, transport, and storage of
machine.

8
SYMBOLS
SYMBOL NAME DESIGNATION/EXPLANATION
VVolts Voltage
AAmperes Current
Hz Hertz Frequency (cycles per second)
WWatts Power
min Minutes Time
Alternating Current Type of current
Direct Current Type or a characteristic of current
No Load Speed Rational speed, at no load
Class II Construction Double-insulated construction
Per Minute
Revolutions, strokes, surface speed, orbits etc.,
per minute
Wet Conditions Alert Do not expose to rain or use in damp locations.
Read the Operator’s
Manual
To reduce the risk of injury user must read and
understand operator’s manual before using this
product.
Eye Protection Wear eye protection when operating this equipment.
Ricochet Thrown objects can ricochet and result in personal injury
or property damage.
Sharp Blade Danger – Keep hands and feet away from blade.
Keep Bystanders Away Keep all bystanders at least 50 ft. away.
Some of the following symbols may be used on this product. Please study them and
learn their meaning. Proper interpretation of these symbols will allow you to operate
the product better and safer.

9
SYMBOL SIGNAL MEANING
DANGER Indicates an imminently hazardous situation, which, if not avoided,
will result in death or serious injury.
WARNING Indicates a potentially hazardous situation, which, if not avoided,
could result in death or serious injury.
CAUTION Indicates a potentially hazardous situation, which, if not avoided,
may result in minor or moderate injury.
NOTICE (Without Safety Alert Symbol) Indicates a situation that may result
in property damage.
SYMBOLS
SERVICE
Servicing requires extreme care and knowledge and should be performed only by a qualied service
technician. For service we suggest you return the product to your nearest AUTHORIZED SERVICE
CENTER for repair. When servicing, use only identical replacement parts.
SAVE THESE INSTRUCTIONS
WARNING
To avoid serious personal injury, do not attempt to use this product until you have read this Owner's
Manual thoroughly and understand it completely. If you do not understand the warnings and
instructions in this Owner's Manual, do not use this product.
Call the Toll-free Helpline (1-866-384-8432) for assistance.
WARNING
The operation of any power tool can result in foreign objects being thrown into your eyes,
which can result in severe eye damage. Before beginning power tool operation, always wear
safety goggles or safety glasses with side shields and, when needed, a full face shield. We
recommend Wide Vision Safety Mask for use over eyeglasses or standard safety glasses with
side shields. Always use eye protection which is marked to comply with ANSI Z87.1.
The following signal words and meanings are intended to explain the levels of risk
associated with this product.

10
KNOW YOUR TILLER
1
2
3
4
5
6
12
11
10
9
87
13
14
15
16
17
Components
1. Assist Handle
2. Upper Handle
3. Wing Nut (×4)
4. Middle Handle
5. Lower Handle
6. Wheel
7. Screws and Screw Bolts
8. Tine
9. Motor Support Plate
10. Motor Housing
11. Cable Clip (×2)
12. Main Handle
13. Safety Switch
14. Trigger Lever
15. Cord Retainer
16. Power Cord
17. Locking Pin
The safe use of this product requires an understanding of the information on the product and in
this Operator’s Manual as well as a knowledge of the project you are attempting. Before use of this
product, familiarize yourself with all operating features and safety rules.

11
ASSEMBLY
UNPACKING
This product requires assembly.
■ Carefully remove the product and any accessories from the box. Make sure that all items listed in
the packing list are included.
■ Inspect the product carefully to make sure no breakage or damage occurred during shipping.
■ Do not discard the packing material until you have carefully inspected and satisfactorily operated
the product.
■ If any parts are damaged or missing, call Customer Service for assistance (Toll free number 866-
384-8432).
YOU WILL NEED (ITEMS NOT SUPPLIED)
■ Suitable personal protective equipment
■ Philips screwdriver
PACKING LIST
(1) Tiller
(1) Upper Handle
(1) Middle Handle
(4) Carriage Bolts
(4) Wing Nuts
(2) Cable Clips
(2) Wheels
(2) Wheel Caps
(1) Operator’s Manual
WARNING
If any parts are damaged or missing do not operate this product until the parts are replaced. Failure to
heed this warning could result in serious personal injury.
WARNING
Do not attempt to modify this product or create accessories not recommended for use with this
product. Any such alteration or modication is misuse and could result in a hazardous condition
leading to possible serious personal injury, and will void the warranty.
12
ASSEMBLY
WARNING
Do not connect power supply until assembly is complete. Failure to comply could result in accidental
starting and possible serious personal injury.
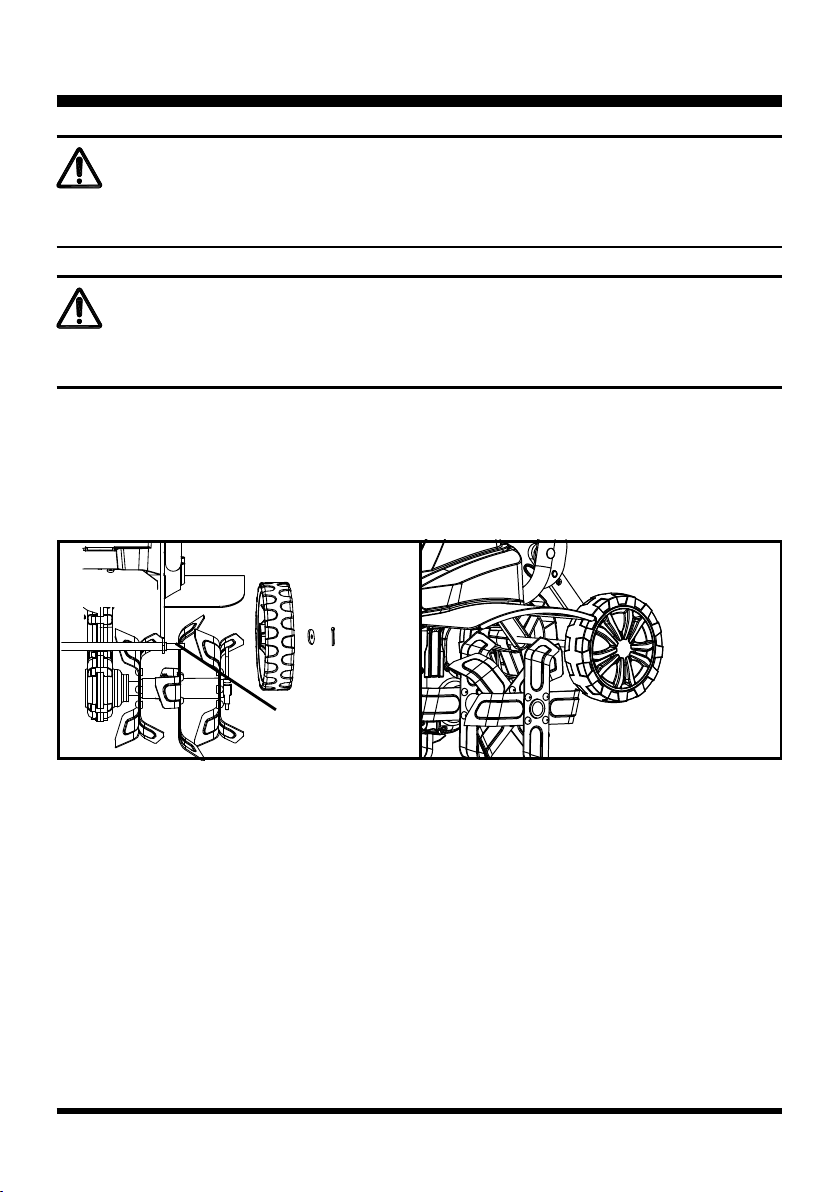
ASSEMBLING THE WHEEL
1. Remove the pre-assembled split pin and the washer from the axle of the tiller.
2. Place the wheel on the wheel holder. Secure it with the washer and split pin (Fig. 1).Then mount the
wheel cap (Fig. 2). Assembly is identical on both sides.
WARNING
Never operate the tool without the proper safety devices in place and working. Never operate the tool
with damaged safety devices. Failure to heed this warning can result in serious personal injury.
Fig. 1 Fig. 2
Axle
13
ASSEMBLY
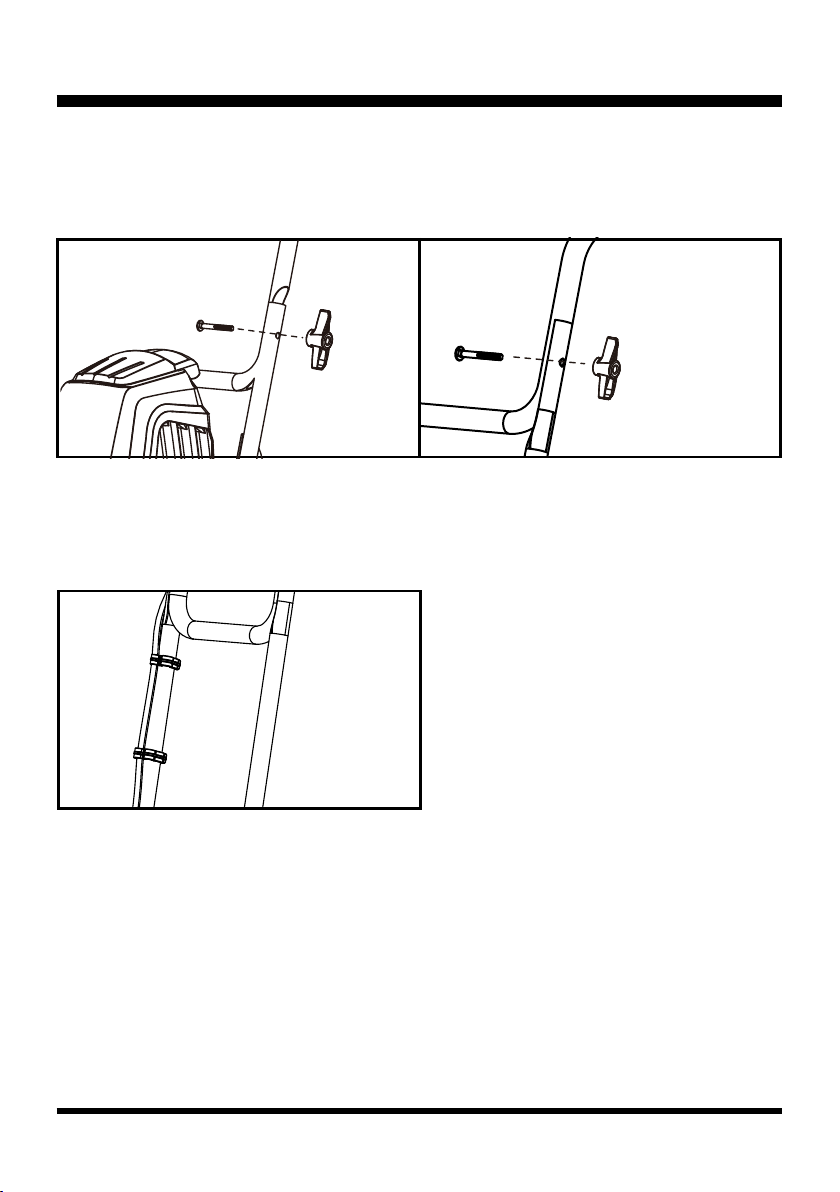
ASSEMBLING THE HANDLES
Connect the upper handle and the middle handle to the lower handle using the carriage bolts and wing
nuts (Fig. 3 & 4).
FIXING THE POWER CORD
Mount the cable and the cable clips on the right handle bar (in the working direction) by pushing them
on (Fig. 5).
Fig. 3 Fig.4
Fig. 5

14
OPERATION
WARNING
Do not use any attachments or accessories not recommended by the manufacturer of this product.
The use of attachments or accessories not recommended can result in serious personal injury.
Do not switch on the tool until it has been completely assembled. Before switching on the tool, always
check the power cord for signs of damage. Only use an undamaged power cord.
NOTE: A damaged power cord is highly dangerous!
STARTING/STOPPING THE TOOL
1. Make sure the wheel frame is raised before you start the tiller. To raise the frame, pull out the locking
pin (Step A); rotate the wheel frame upward (Step B); release the locking pin. The wheel frame will
be locked in place by the locking pin (Fig. 6 & 7).
2. Secure the extension cord into the cord retainer. The loop of the extension cord must be long
enough for the cord retainer to freely slide from one side to the other. Plug the extension cord into
the power cord plug on the tiller (Fig. 8).
3. Use the tiller for breaking sod, preparing seed beds, and for cultivating gardens and ower beds.
The tiller can also dig small holes for planting saplings or potted plants.
4. Move the tiller to the work area prior to starting the motor.
5. Hold the tiller rmly while starting. The tines will pull the tiller forward during operation.
6. Lower the tines slowly with the guide bar.
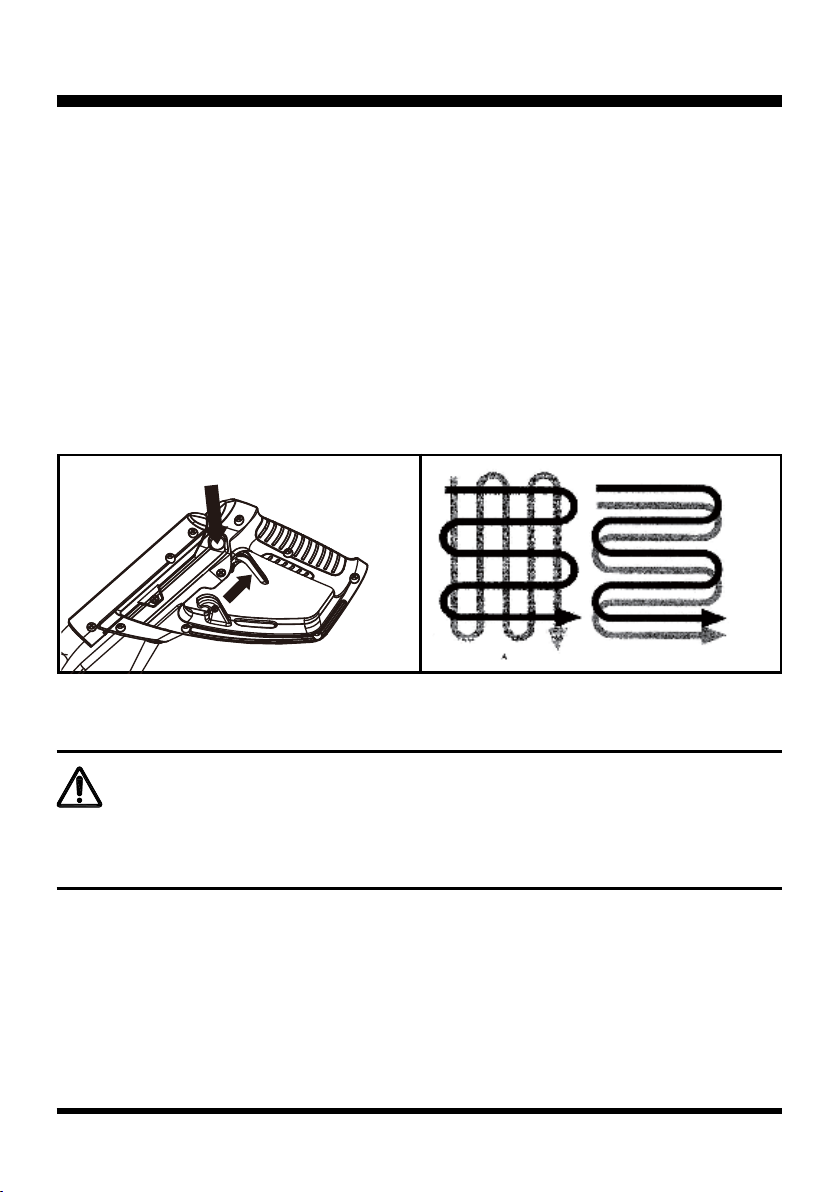
7. To start the tiller, rst press the safety switch and then pull the trigger lever up (Fig. 9). To stop the
tiller, simply release the trigger lever.
WARNING
Fig.6 Fig. 7 Fig. 8
A
B
15
B
OPERATION
8. Always ensure that a safety distance (provided by the long handles) is maintained between the
user and housing. The safe distance between housing and user given by the handle must always be
observed. Be especially careful when digging and changing direction on slopes and inclines.
9. Maintain a solid footing and wear sturdy, non-slip footwear and long trousers. Always dig along the
incline (not up and down). For safety reasons, the electric tiller may not be used to dig up inclines
whose gradient excess 15 degrees. Use special caution when backing up and pulling the implement
(tripping hazard).
TIPS FOR PROPER USE
Always guide the machine slowly and wisely forward. Dig up the area in straight lines. Let the tracks
overlap slightly to not miss any stripes to dig. Only use the machine to dig up already loosed soil.
FOR PREPARING SEED BEDS, WE RECOMMEND USING ONE OF THESE TILLING PATTERNS
Tilling Pattern A - Make two passes over area to be tilled, the second at a right angle to the rst (Fig. 10).
Tilling Pattern B - Make two passes over area to be tilled, the second overlaps the rst (Fig. 10).
Before use, remove any visible stones or other foreign bodies from the area.
CAUTION
Before moving the tiller from one area to another, switch off the motor and wait for the tines to come
to a complete stop. Be careful not to let the tines touch the ground while moving the tiller. The tines as
well as the unit itself may be damaged even if the motor is switched off.
Fig. 9 Fig.10
Ⅰ
Ⅱ

16
OPERATION
CLEARING FOREIGN OBJECTS
During operation, a stone or root could become lodged in the tines, or tall grass or weeds may become
wrapped around the tine shaft.
To clear the tines or tine shaft release the trigger lever, wait for the tines to come to a complete stop
and unplug the tiller. Dislodge or remove the foreign matter from the tines or tine shaft. To simplify
removal of tall grass or weeds from the tine shaft, remove one or more of the tines. See Tine Removal
and Installation.
ELECTRICAL CONNECTION
The electrical motor installed is connected and ready for operation. The connection complies with the
applicable provisions.
The customer’s mains connection as well as the extension cable used must also comply with these
regulations.

17
MAINTENANCE
GENERAL MAINTENANCE
WARNING
WARNING
When servicing, use only identical replacement parts. Use of any other parts may create a hazard or
cause product damage.
Always wear gloves when handling the tiller.
WARNING
Prior to all maintenance and cleaning work always switch off the tool, disconnect the plug from the
power socket and wait until the tiller is standing still.
WARNING
Do not spray water onto the tool and do not clean it under owing water. This would result in the danger
of an electric shock and the tool could be damaged.
WARNING
Before carrying out maintenance operations, disconnect power supply.
1. Before each use check the extension cord for signs of damage or ageing. Replace the cable if it is
cracked, split or otherwise damaged.
2. A worn out of damaged cutting unit should be replaced by an authorized expert.
3. Take care that all fastening elements (screws, nuts, etc.) are rmly tightened, so that you can work
safely with the electric tiller.
4. Store the electric tiller in a dry place.
5. For longer life, all screw-fastened parts, such as wheels and axles should be cleaned and
subsequently oiled.
6. Regular serving of the implement not only secures longer endurance and performance, it also

18
MAINTENANCE
contributes to an accurate and simple dig up for your bed.
7. At the end of the season, carry out a general check of the electric tiller, and remove all residue
collected. Before the start of the every season, it is absolutely necessary to check the state of the
machine. Contact our customer service if repair work is necessary.
CAUTION
Always clean the tiller after each use. Failure to carry out proper cleaning can result in damage to the
tiller or result in poor performance.
1. Keep all safety devices, air vents and the motor housing free of dirt and dust as far as possible.
2. Wipe the equipment with a clean cloth or blow it with compressed air at low pressure.
3. We recommend that you clean the device immediately each time you have nished using it.
4. Clean the equipment regularly with a moist cloth and some soft soap. Do not use cleaning agents or
solvents; these could attack plastic parts of the equipment. Ensure that no water can seep into the
device. The ingress of water into an electric tool increases the risk of an electric shock.
TINE REMOVAL AND INSTALLATION
Worn tines invite poor performance and overload of the motor. Check tines before each use. Sharpen
or replace the tine assemblies with new ones when necessary.
To remove the complete tine assemblies from the shaft, remove the screw from the shaft rst. Reverse
above steps to install tines.
1. Push the tine roller on the drive shaft of the machine. The tine roller can be mounted left or right side.
Be sure that the holes of the tine roller and the drive shaft are aligned.
2. Now the M8 screw is pushed through and secured with the M8 locking nut (Fig. 11).
3. Tighten the lock nut hand-tight using a fork wrench or ratchet with socket (the tools are not included)
(Fig. 12).
4. To remove the tine roller, proceed in reverse order.
Tilling Width Adjustable
The machine can be conveniently switched from 6 tines to 4 tines quickly, by offering working width
from 18 inches to 12.5 inches, to sufce different working condition.
To adjust the tilling width, remove the screw (Fig. 13) from the shaft rst, then remove the tines.

19
MAINTENANCE
ADDING TRANSMISSION LUBRICANT (FIG.14)
Drain screw plug is located on the right side of transmission housing. Lay the tiller on its left from
user's perspective side and clean the transmission of dirt and debris prior to removing the drain screw
plug. If necessary, remove tine assemblies to have better access to the drain screw plug. Use a 5mm
hex key to unscrew the plug. Empty the oil from the transmission. Fill with a high-quality SAE 30
weight oil, until it begins to seep out around the hole. Reinstall the drain screw plug.
Fig. 14
Fig.11 Fig. 12 Fig. 13
Screw Plug

20
MAINTENANCE
CARBON BRUSHES
In case of excessive sparking, have the carbon brushes checked only by a qualied electrician.
DANGER
The carbon brushes should not be replaced by anyone but a qualied electrician.
TRANSPORT AND STORAGE
Always disconnect the tool from the power supply before transporting and storage! Pull the lock pin.
You can now move the wheels to the lower position. Make sure that the lock pin engages again in the
lower position.
ATTENTION
The wheels must be xed in the upper position during the operation!
For storage or transport in the a limited space, proceed as follows:
Open the wing nuts until you can fold the handles forward
ATTENTION
Danger of crushing your ngers.
Now you can transport your machine with the transport handle. So you can storage the machine too.
Storage
Store the device and its accessories in a dark, dry and frost-proof place that is inaccessible to children.
The optimum storage temperature is between 5 and 30°C.
Store the electric tool in its original packaging. Cover the electric tool in order to protect it from dust
and moisture. Store the operating manual with the electric tool.
During extended periods of storage, ensure that the tiller is protected against corrosion and frost.
At the end of the season, or if the tiller is not being used for longer than a month, wipe over all metal
surfaces with an oil impregnated cloth to protect them from corrosion or spray with a ne coat of oil.
Fold the handles down, and store the tiller in a suitable place.
This manual suits for next models
1
Table of contents
Other LawnMaster Tiller manuals


