Lcaoful SL10083D User manual
INSTRUCTION MANUAL
Model# SL10083D


INSTRUCTION MANUAL
WARNINGS
Read entire booklet carefully before beginning installation and save these instructions.
To reduce the risk of personal injury, attach the fan directly to the support structure of
the building according to these instructions, and use only the hardware supplied.
To avoid possible electrical shock, before installing your fan, disconnect the power by
turning off the circuit breakers to the outlet box and associated wall switch location.
All wiring must be in accordance with national and local electrical codes. If you are
unfamiliar with wiring, you should use a qualified electrician.
To reduce the risk of personal injury, do not bend the blade attachment the system when
installing, balancing or cleaning the fan. Never insert foreign objects between rotating fan
blades.
To reduce the risk of fire, electrical shock or motor damage, do not lift or carry the fan by
the lead wires.
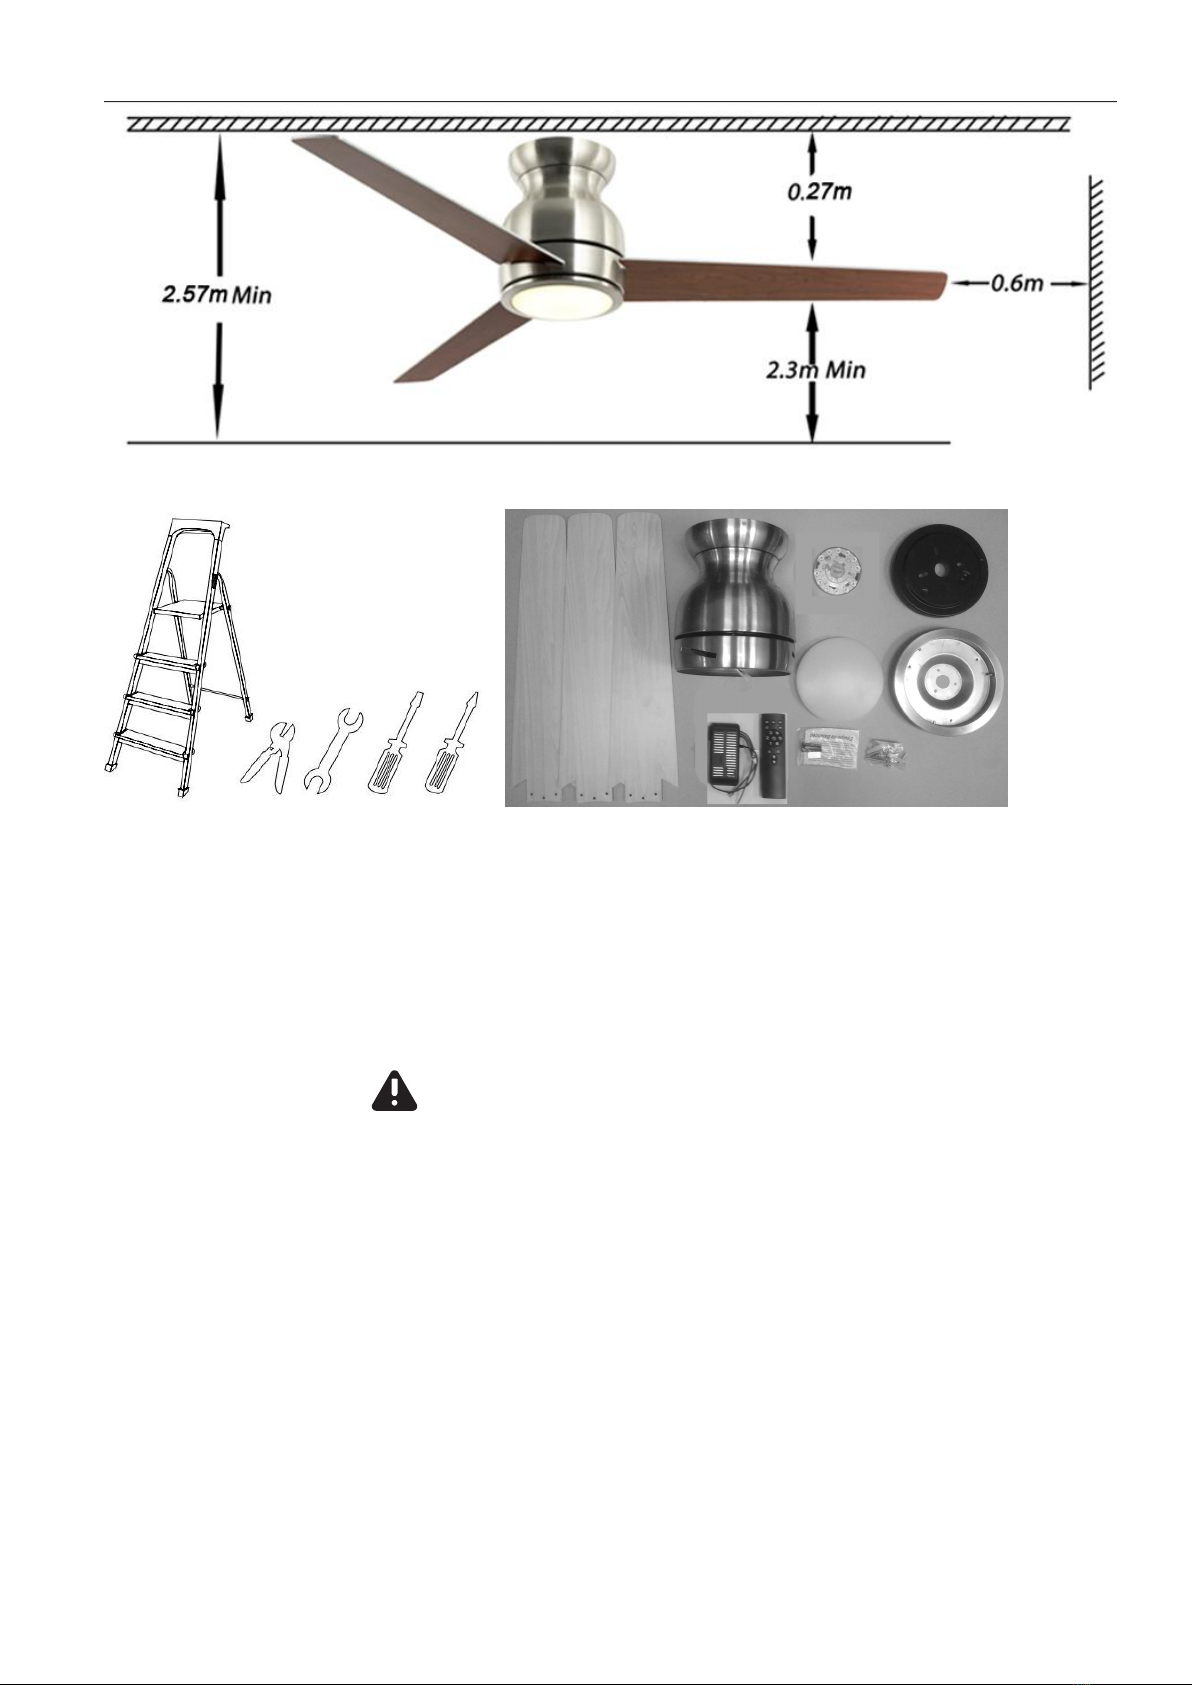
The fan blades cannot be installed lower than 2.3m from the floor.
The important precautions, safeguards and instructions appearing in this manual are not
meant to cover all possible conditions and situations that may occur. It must be understood
that common sense, caution and carefulness are factors which cannot be built into this
product. These factors must be supplied by the person(s) installing, caring for and operating
the unit.
1
specific work
Verify you have all parts before beginning the installation. Check foam insert closely for missing
parts.
Remove motor from packing. To avoid damage to finish, assemble motor on soft padded
surface or use the original foam inset in motor box. Do not lay fan on its side as this could
result in shifting of motor in decorative enclosure.
IMPORTANTE
Make sure
1- The screws are tightened.
2- The connections are correct. If you have doubts you should use a qualified electrician.
3- The connector is properly in place.
2
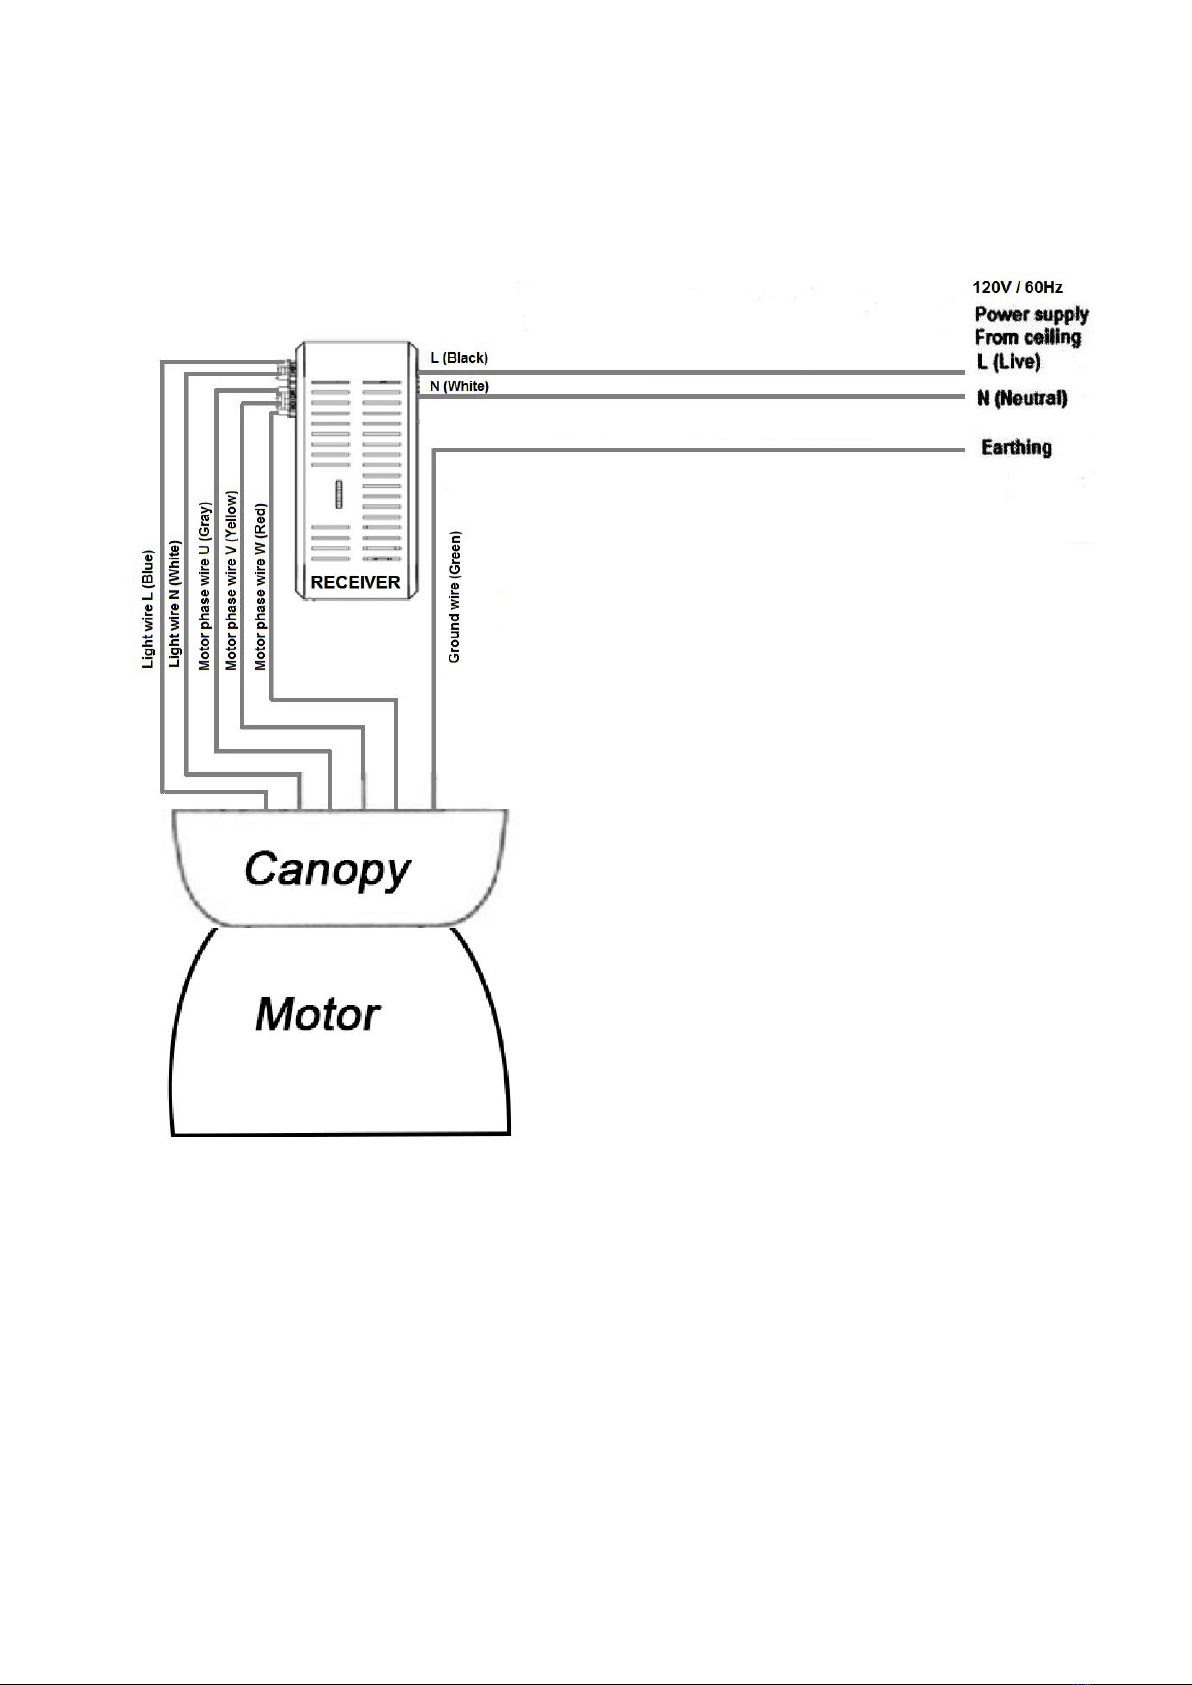
Remote control connection diagram
3
Installation
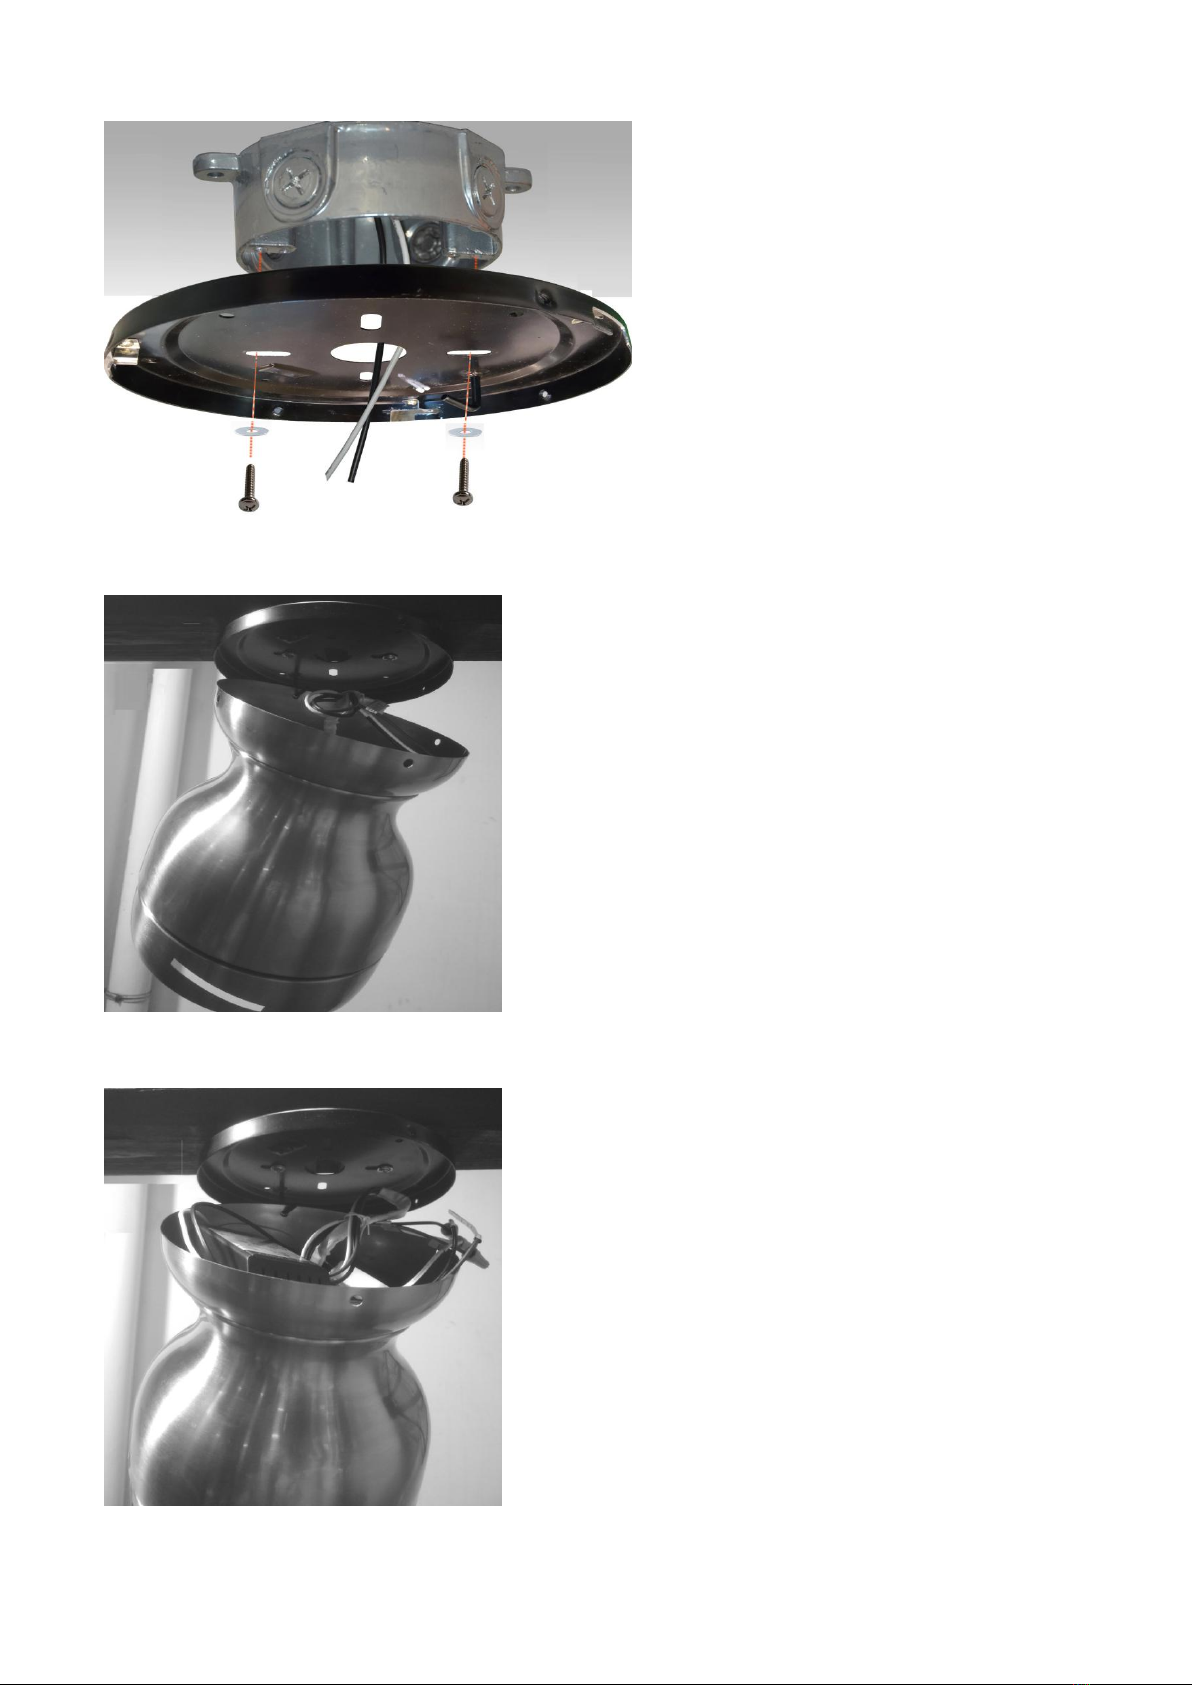
(1). Install mounting bracket on outet box.
(2). Put the motor assembly onto the mounting plate’s J hook.
(3) .Make sure the main power is off before installation.Place the receiver in the middle of the
installation. ( connect the control receiver according to the wiring instruction page 3.)
4

(4).Assemble the motor housing again with the mounting plate and tighten the motor
housing with screws to ensure that no wires are clamped.
(5).Assembly the fan blades. Make sure the screws are tightened.
(6).Install the light kit pan to the motor assembly by tighten the screws.
5

(7). Connect the wire from fan to LED disc.(blue to black,white to white).Attach the LED disc to
the center of the light box.
(8). Install the light cover on to the Light disc by turning clockwise to lock it into place.
6

MAINTENANCE
1-Check bracket bolts, hooks and fan blades for fixation at least twice a year.Make sure they're tight.
2- clean the fan to help maintain the new look for years.Don't wash with water, as it can damage
engines, wood, and even cause electric shocks.
3- only use a soft cloth when cleaning to avoid scratches.
4-There is no need to oil the fan.The engine has bearings permanently lubricated.
TROUBLE-SHOOTING GUIDE
The fan does not start
1- check the fuses/circuit breakers and switches of the main and secondary circuits.
2- check the connection on the terminal block.Warning: don't forget to turn off the power.
3- make sure the sliding switch is not in the middle position, as the fan will not work in this case.
4- ensure engine stability disc is removed
5- if the fan breaks down, call a qualified electrician.Do not repair internal electrical connections without
qualification.
THE FAN IS NOISY
1- make sure all engine bolts are tight
2- ensure that the bolts holding the blades to the engine are tightened.
3- ensure that the lighting system is bolted and glass secured.If the vibration persists, remove the glass
and install the rubber insulator on the narrower part of the glass.Put the glass back and tighten the
screws.
4- some engines are sensitive to solid state variable speed control signals.Do not use this control.
5-fan needs to be stable for 24 hours. By the end of that time, most of the noise associated with the new
fan was gone.
7

THE FAN OSCILLATES
The wood density and weight of the blades may vary, which may cause the fan to swing.The following
procedure should eliminate most of the oscillations. Review the situation after each of the next steps.
1- check that the paddle is firmly attached to the support.
2- check if the rowlock is fixed to the engine.
3- check whether the fan mounting bracket is fixed to the ceiling.
4- in general, oscillations are caused by a blade that does not cut off the air at the same point and
measure from the ceiling.Make sure that each shovel is at the same height on the roof (measure the
vertical distance from the roof to the shovel tip). If the adjustment is small, do it by hand.
A. Swap adjacent sets of OARS, or
B. Bend the spatula and bracket slightly.If large adjustments are required, insert a ring (not provided)
THE LIGHT ISN’T WORKING
1- check the terminal connections are tight.
2- check if the module is broken
3- If the lights is still not working contact an electrician.
8
Table of contents
Popular Fan manuals by other brands


Fanimation
Fanimation TRIAIRE MAD8515 Series manual

Sonnenkonig
Sonnenkonig DUBAI Operation manual

Sealey
Sealey SDF12H quick start guide

AERMEC
AERMEC GIUGIARO Omnia HL Technical and Installation Booklet

Helios
Helios KWL EC 300 Pro R Installation and operating instructions

Kichler Lighting
Kichler Lighting 300026 instruction manual


