Leadtek WinFast 6200MA User manual

PS/2 Mouse
USB1
USB2 VGA MIC
Line
In
Line
Out
Printer LPT1 Midi/Joystick
COM1
J
1
USB1 J3 J4
PS/2 Keyboard
ISA
CPU
CPU FAN
SYS FAN
WOL
IR1
JP2
JP1
FDD1
IDE1
PW1
IDE2
J2
C
O
M
1
V
G
A
G
a
m
e
P
o
rt LPT1
1
1
1
1
1
1
1
1
1
1
1
1
1
USB1
PS/2 Mouse
&
PS/2 Keyboard
Socket 370
SiS
5595
SiS
620
BATTERY
BIOS
Super
I/O
COM2
J5
J6
WinFast 6200MA
DIMM3
DIMM2
DIMM1
PCI 1
PCI 2
PCI 3
ESS
Solo1
ES 1938S
WinFast
®6200MA
User’s Manual
Version B
Web Site: www.leadtek.com.tw
E-Mail: service@leadtek.com.tw
Leadtek Research Inc.

WinFast®6200MA User’s Manual
i
Table of Contents
CHAPTER 1 QUICK REFERENCE AND INSTALLATION............1
WINFAST 6200MA MAINBOARD LAYOUT................................................1
READ ME FIRST..........................................................................................2
QUICK CPU AND SDRAM CLOCK FREQUENCY SELECTION.....................2
QUICK JUMPER/CONNECTOR DESCRIPTION...............................................3
QUICK JUMPER SETTINGS..........................................................................4
CHAPTER 2 FEATURES ......................................................................5
2-1 INTRODUCTION ...................................................................................5
2-2 WINFAST 6200MA PICTURE ..............................................................7
2-3 SPECIFICATIONS..................................................................................8
2-4 PACKAGE CONTENT............................................................................9
CHAPTER 3 HARDWARE INSTALLATION..................................10
3-1 CPU INSTALLATION..........................................................................10
3-2 MEMORY INSTALLATION ..................................................................12
3-3 CASE SIGNAL CONNECTOR: (JP2).....................................................13
3-4 DISK CONNECTOR ...........................................................................14
3-4-1 Hard Disk Connector (IDE1, IDE2).........................................14
3-4-2 Floppy Disk Connector (FDD1)...............................................14
3-5 USB CONNECTOR.............................................................................14
3-6 COOLING FANS (SYSFAN,CPUFAN)..............................................15
3-7 STEREO AUDIO IN CONNECTORS (J5, J6)..........................................15
3-8 POWER SUPPLY CONNECTOR (PW1).................................................15
3-9 SERIAL , PARALLEL AND VGA PORTS ..............................................15
3-10 IRDA-COMPLIANT INFRARED MODULE CONNECTOR (IR1).16
3-11 WAKE –UP ON LAN CONNECTOR (WOL)......................................16

Leadtek Research Inc.
ii
3-12 MIDI/JOYSTICK, MIC, LINE IN, LINE OUT...............................16
3-13 COM2 CONNECTOR........................................................................16
3-14 PS/2 KEYBOARD AND MOUSE CONNECTOR....................................17
CHAPTER 4 INTRODUCTION OF BIOS.........................................18
4-1 MAIN MENU .....................................................................................19
4-2 STANDARD CMOS SETUP MENU......................................................21
4-3 BIOS FEATURES SETUP MENU .........................................................24
4-4 CHIPSET FEATURES SETUP MENU.....................................................28
4-5 POWER MANAGEMENT SETUP MENU................................................31
4-6 PNP/PCI CONFIGURATION ...............................................................35
4-7 LOAD BASIC DEFAULTS..................................................................36
4-8 LOAD BEST DEFAULTS....................................................................36
4-9 INTEGRATED PERIPHERALS...............................................................37
4-10 SUPERVISOR PASSWORD .................................................................39
4-11 USER PASSWORD ............................................................................39
4-12 IDE HDD AUTO DETECTION..........................................................40
4-13 SAVE & EXIT SETUP .......................................................................41
4-14EXIT WITHOUT SAVING ...................................................................41
CHAPTER 5 VGA/AUDIO DRIVER INSTALLATION ..................42
5-1 INSTALLING DISPLAY DRIVER FOR WINDOWS 95/98 ........................42
5-1-1 Installation................................................................................42
5-1-2 Display Modes .........................................................................42
5-1-3 Gamma Correction...................................................................43
5-1-4 Video Setting ...........................................................................44
5-1-5 WinFast Information................................................................45
5-2 INSTALLING DISPLAY DRIVER FOR WINDOWS NT 4.0......................45
5-2-1 Install Windows NT 4.0 with the SiS620 onboard...................45

WinFast®6200MA User’s Manual
iii
5-2-2 Install Display Driver for Windows NT 4.0.............................45
5-3 INSTALLING AUDIO DRIVER FOR WINDOWS 95/98,WINDOWS NT 4.0 ........... 46
CHAPTER 6 TECHNICAL INFORMATION...................................47
6-1 POST MESSAGES .............................................................................47
6-2 POST BEEP ......................................................................................47
6-3 ERROR MESSAGES ............................................................................47
6-4 TIME & DMA CHANNELS MAP..................................................50
6-5 INTERRUPT MAP..........................................................................50
APPENDIX A TECHNICAL SUPPORT............................................................51
APPENDIX B DEBUG DIY..................................................................................52
APPENDIX C BIOS FLASH UTILITY..............................................................53
APPENDIX D COPYRIGHT, TRADEMARK, DISCLAIMER NOTES.........54

WinFast®6200MA User’s Manual
1
Quick Reference and
I
nstallation
Chapter 1
WinFast 6200MA Mainboard Layout
1
2
3
5
6
7
8
9
10
11
12
13
14
15
16
17
18
19
20
21
22
23
24
25
26
27
28
29
30 31
32
ISA
CPU
CPU FAN
SYS FAN
WOL
IR1
JP2
JP1
FDD1
IDE1
PW1
IDE2
J2
COM1
VGAGame Port LPT1
1
1
1
1
1
1
1
1
1
1
1
1
USB1
PS/2 Mouse
&
PS/2 Keyboard
Socket 370
SiS
5595
SiS
620
BATTERY
BIOS
Super
I/O
COM2
J5
J6
WinFast 6200MA
DIMM1
PCI 1
ESS
Solo1
ES 1938S
PCI 2
PCI 3
DIMM2
DIMM3
1. DIMM Sockets (DIMM1, DIMM2, DIMM3)
2. Enable/Disable Integrated VGA (J2)
3. ATX Power Connector (PW1)
4. Not available
5. Secondary IDE Connector (IDE 2)
6. Primary IDE Connector (IDE 1)
7. Clear CMOS Data jumper (JP1)
8. Floppy Disk Connector (FDD)
9. Wake On Lan Connector (WOL)
10. Case Signal Connectors (JP2)
11. Mainboard BIOS
12. Infrared Connector (IR1)
13. ISA Slot
14. PCI Slots (PCI 1, PCI 2, PCI 3)
15. CD-jack/Panasonic (J6)
16. Microphone Input Port (MIC)
17. Audio Sources Input Port (Line In)
18. Game (Midi/Joystick) Port
19. Audio Output Port (Line Out)
20. VGA Port
21. Printer Port Connector
22. COM1 Connector
23. USB 1, USB 2 Connectors
24. PS/2 Mouse (top), PS/2 Keyboard (bottom)
Connectors
25. CPU Fan Connector (CPUFAN)
26. CPU Socket 370
27. COM2 Connector
28. SiS 620 Chip
29. CD-jack/Sony/IDE (J5)
30. System Fan Connector (SYSFAN)
31. SiS 5595 Chip
32. Ess Solo-1 Audio Chip

Leadtek Research Inc.
2
Read me first
1. All default jumper settings are based on
Intel Celeron CPU 366 MHz together
with SDRAM module that should meet
PC-100 specifications.
2. Always insert the SDRAM card into
DIMM1 slot first and then into DIMM2
or DIMM3.
3. "LOAD BEST DEFAULTS"
in CMOS setup menu loads the system
best default data directly from the
flash ROM and initializes the
associated hardware properly. This is
the default setting for the mainboard.
4. If you experience power on
problem with wrong CMOS
settings, turn on your computer
with INSERT key being pressed,
this will force the POST (Power
On Self Test) run with default
CMOS settings. By this way, you
will be able to enter into CMOS
setup to correct your settings.
5. There is a basic requirement
that the" +5V SB" power of the
ATX power supply must be > =
0.2A (200mA) for KBPO
(KeyBoard Power On) to
operate correctly.
Quick CPU and SDRAM Clock Frequency Selection
In BIOS Setup, the CPU Host/SDRAM Clock item of Chipset Features Setup Menu
can set CPU and SDRAM combined clock frequencies. The choices are 133/133,
124/124, 112/112, 100/100, 105/105, 90/90, 95/95, 83/83, 75/75, 66/66, 83/55, 95/63,
66/100, 112/74, 124/82 and Default (66/66).
The BIOS has also been enhanced that it will intelligently judge the CPU Clock
Frequency you selected in BIOS Setup. If the selected CPU clock is not acceptable,
the system will hang up with black screen after exiting BIOS Setup. When reboot the
machine, the following messages will be shown on screen after finishing POST:
“Your previous attempt for setting CPU/SDRAM combined clock has
caused system hanging up. This rebooting has restored the CPU/SDRAM
to a 66/66 combination. Please press DEL key to re-enter BIOS SETUP or
any other key to accept the default.”
At this point, press “DEL” key to re-enter BIOS Setup to select
another CPU/SDRAM combination values or any other key to accept
the default.

WinFast®6200MA User’s Manual
3
Quick Jumper/Connector Description

Leadtek Research Inc.
4
Jumper Description
J2 Short for Disabling Internal VGA
JP1 Clear CMOS Data
Connector Description
JP2 PWRBTN, RESET, KEY LOCK, SPEAKER,
HDD_LED, POWER_LED, ACPI LED
IR1 IR Connector
CPUFAN CPU Fan
WOL1 Wake-On-LAN
J1 PS/2 Mouse (top), PS/2 Keyboard (bottom)
USB1 USB1, USB2
J3 Printer, COM1, VGA
J4 Midi/Joystick, Mic In, Line In 1, Line Out 1
SYSFAN System Fan
J5 Audio Connector 1
J6 Audio Connector 2
IDE 1 Hard Disk (Primary IDE)
IDE 2 Hard Disk (Secondary IDE)
PW1 ATX Power Connector
FDD1 Floppy Disk
COM2 COM2
Quick Jumper Settings
JP1: Clear CMOS data
1 2 3 Clear CMOS data
1 2 3 Normal
J2: Disable Internal VGA
Disable Internal VGA
Normal

WinFast®6200MA User’s Manual
5
Features Chapter 2
2-1 Introduction
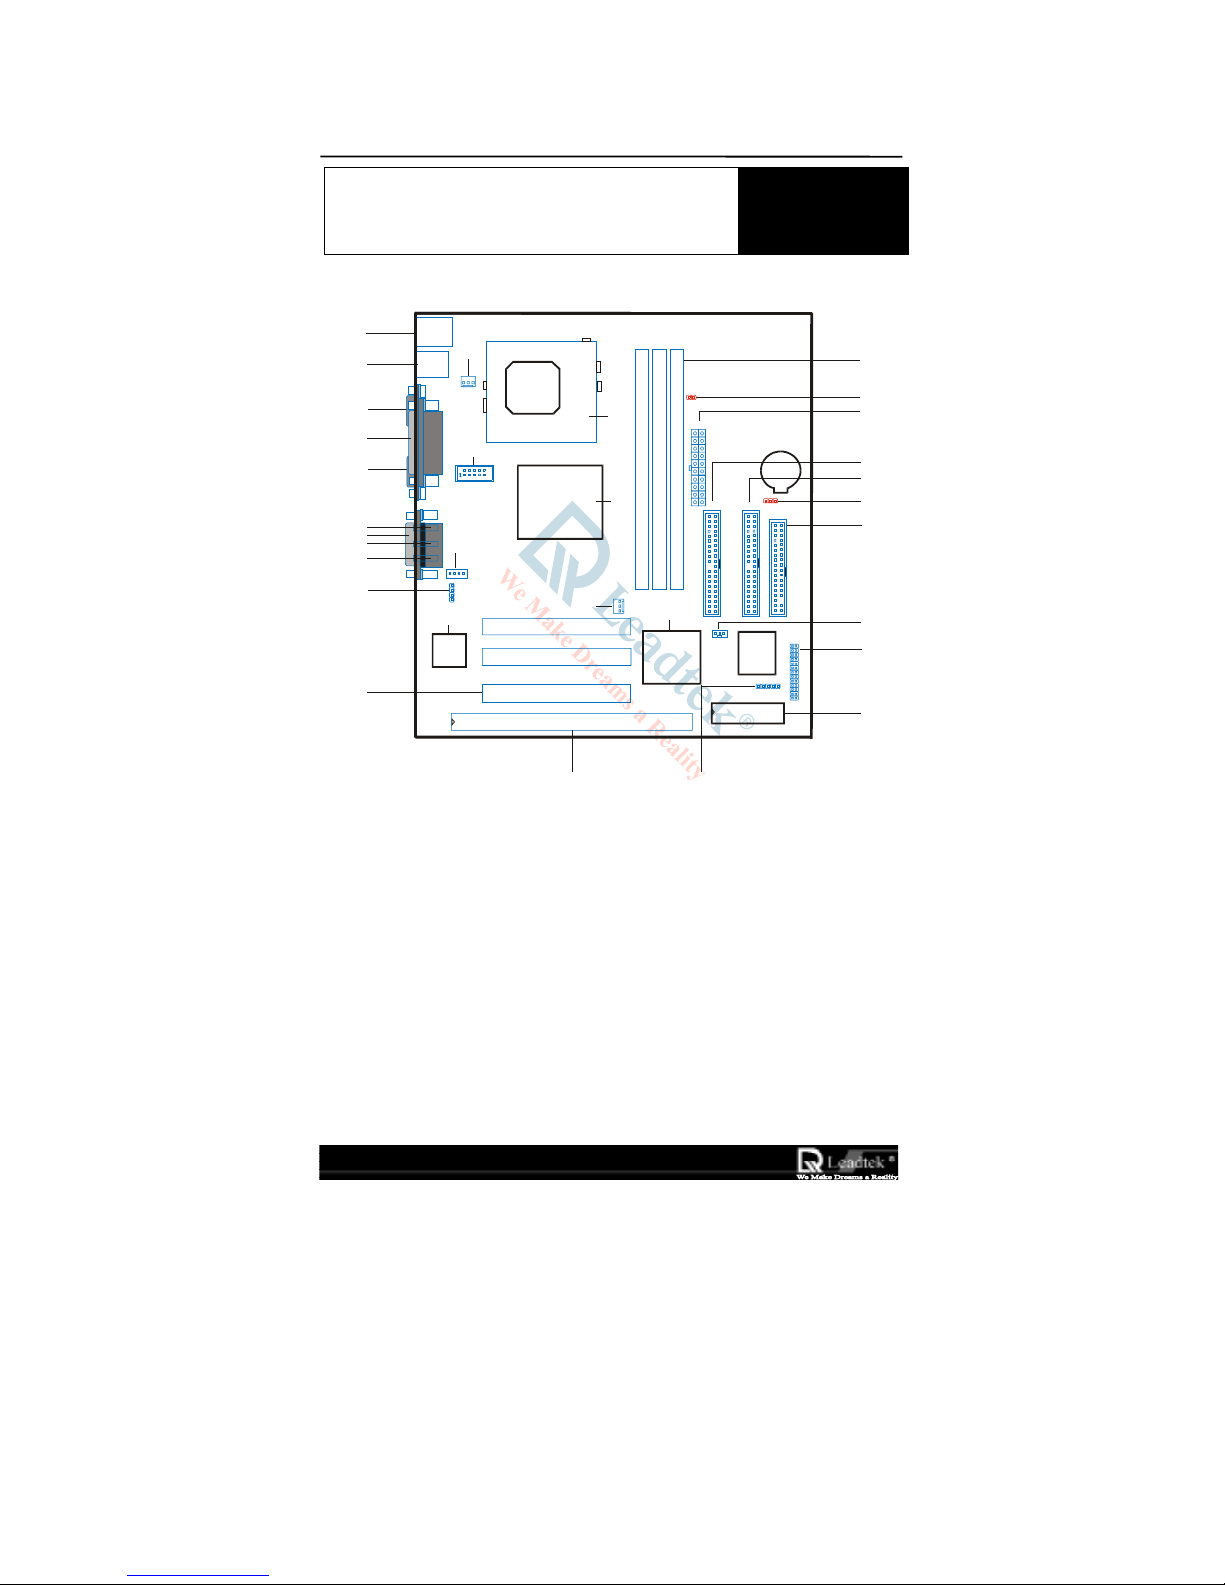
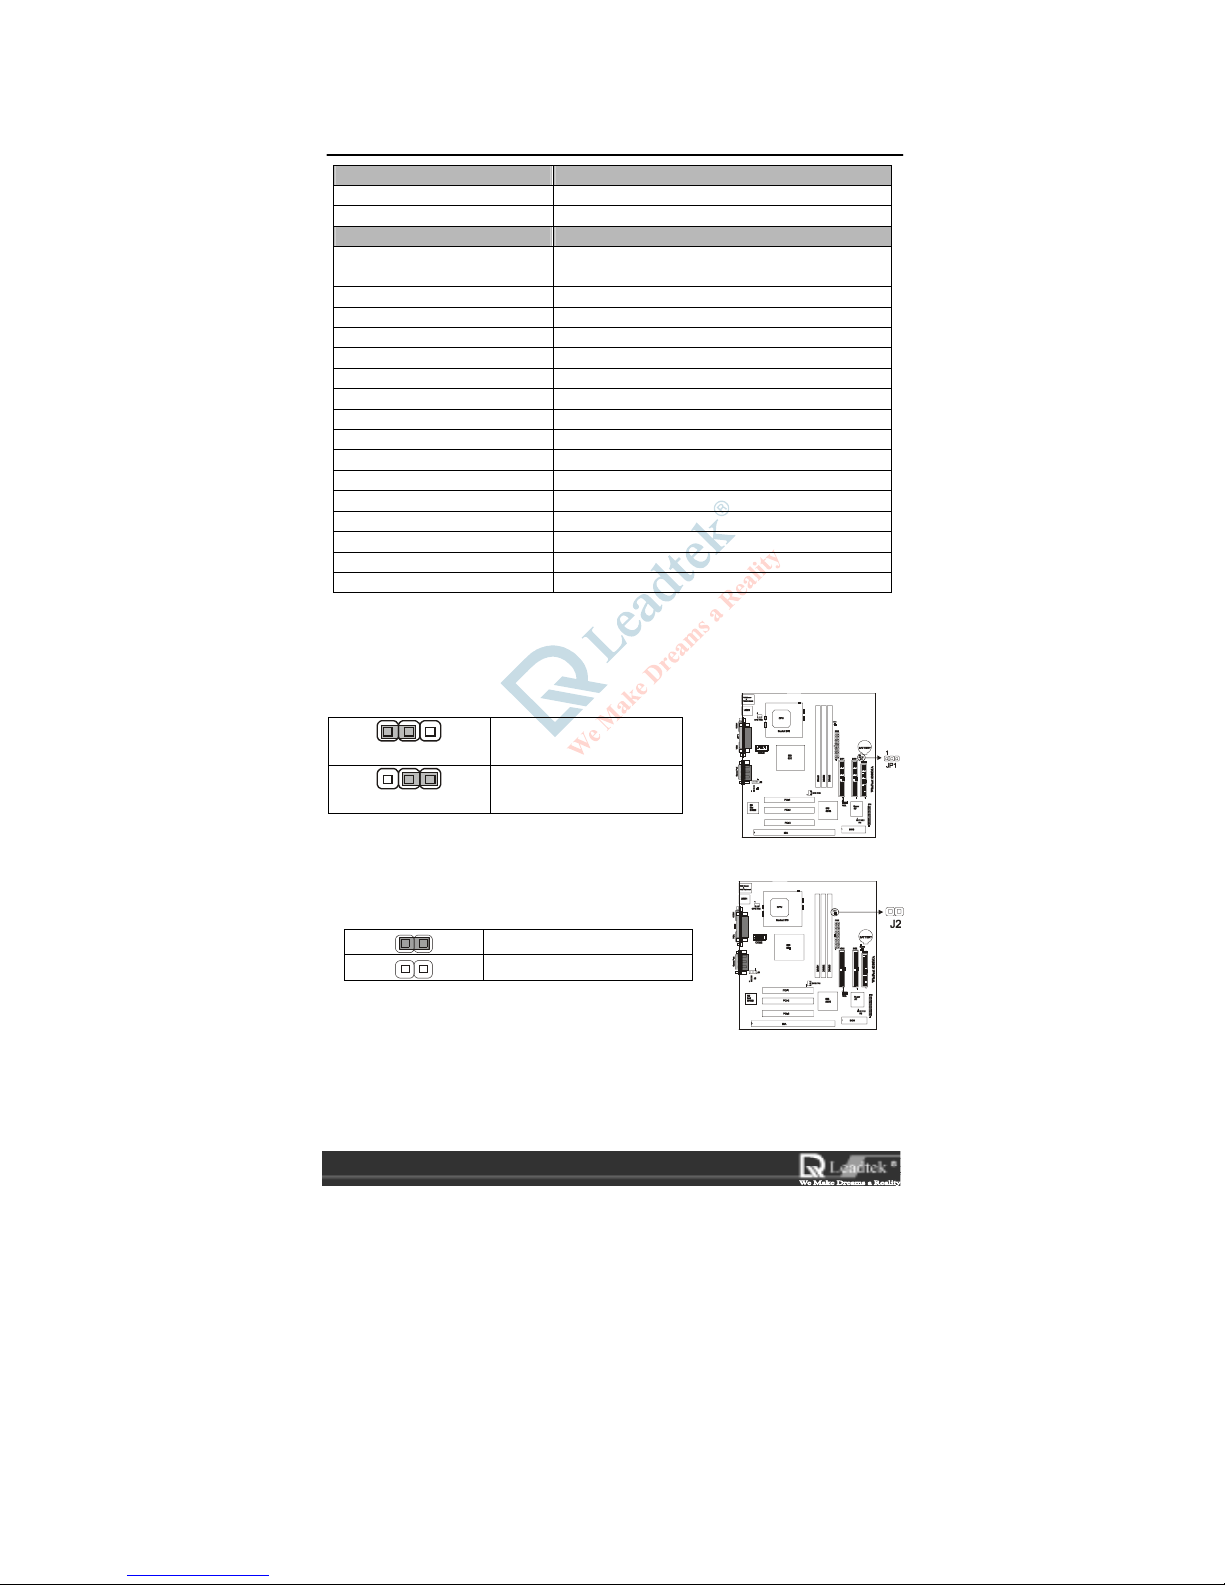
The WinFast 6200MA - a Socket 370 Processor based Micro ATX Mainboard,
integrating with onboard ESS Solo1 Audio and Super AGP VGA for Hardware
2D/3D Video/Graphics Accelerators, is a high performance/cost index Desktop
solution for Intel Socket 370 Celeron Series and other compatible CPUs.
The mainboard uses the integrated SiS 620/5595 chipset to support the high
performance host bus interface, the DRAM controller, the IDE controller, the PCI
interface, 2D/3D Graphics accelerator and video playback accelerator.
The built-in fast PCI IDE controller is ATA-3 compliant, supporting PIO mode
0/1/2/3/4, DMA multiword 0/1/2 and Ultra DMA 33/66 operations. The two IDE
channels are fully independent with dedicated 16 double-word FIFO built-in.
The DRAM controller supports 3-DIMM/6-Bank of 3.3V SDRAM. The maximum
memory size supported per bank is 256MB, with a total of 1.5GB system memory.
The memory clock frequency can be operated at up to 100MHz and can be in
synchronous or asynchronous modes with respect to host bus frequency. The
supported host/DRAM clock schemes include: 133/133、124/124、112/112、
100/100、105/105、90/90、95/95、83/83、75/75、66/66、83/55、95/63、66/100、
112/74、124/82 and 133/88. For power saving, the SDRAM can be put into suspend
mode.
The PCI interface is PCI2.2 compliant and supports up to 3 PCI masters. The built-in
PCI arbiter uses rotating priority arbitration scheme with guaranteed minimum access
time for PCI masters, providing fair access as well as low latency for each PCI
masters. The integrated 2D accelerator is a 64-bit BITBLT graphics engine. It
supports all 256 raster operations and DirectDraw. The accelerated primitives include:
BLT, Transparent BLT, Color expansion, Clipping, Multiple scanline, Polylines,
Patterns, Trapezoid Fills. Up to 8MB of frame buffer can be used with linear
addressing.
The integrated 3D graphics accelerator is composed of the triangle setup engine and
the rendering engine. The hardware acceleration features can be enabled by SiS driver
under Direct 3D and OpenGL. The supported 3D quality acceleration include:
Gouroud Shading, Z buffer, Alpha buffer, Perspective Correction, MipMaping,
Tri-linear Texture Filtering, Specular Lighting and Dithering.
The integrated graphics accelerator is compatible with AGP1.0 and PCI2.2
configurationWinFast 6200MA provides UMA mode for display memory allocation.
In UMA mode, the display memory is shared with system memory.
In UMA mode operation, the integrated graphics accelerator uses up to 8MB of
system memory as display memory, thereby saving the on-board DRAM cost for
building a PC system. To reduce the performance degradation inherent from the UMA

Leadtek Research Inc.
6
architecture, SiS620 has included the super-AGP architecture, which consists of dual
64bits data path. One data path is between VGA and host bus, the other is between
VGA and system memory. Both data paths are operating at 100MHz and provide
800MB/s bandwidth. The internal arbitration logic further allows concurrent
transactions to take place in different data paths. As a result, the overall system
performance can be maintained at a reasonable high level while maximum
cost-saving is achieved.
The SiS5595 PCI system I/O integrates the PCI-to-ISA bridge, KBC, USB, RTC,
SMBUS, ACPI/APM compatible PMU, system environment monitoring for thermal,
fan, voltage as well as comprehensive PCI audio support including DDMA, TDMA
and SB-Link.

WinFast®6200MA User’s Manual
7
2-2 WinFast 6200MA Picture

Leadtek Research Inc.
8
2-3 Specifications
CPU Support
Intel Socket 370 Celeron Series
and other Socket 370 CPUs
System BIOS (2 MB Flash ROM)
AWARD BIOS, supports PnP,
APM, Multi-Device booting
features (Floppy, LS120,
CD-ROM, IDE, SCSI, ZIP,
ATAPI
)
ACPI (Advanced Configuration
Power Interface)
Boot-u
p
anti-virus su
pp
ort
Main Memory
Su
pp
ort 3.3V SDRAM
Support three 3.3V unbuffered
DIMM sockets for max 1.5GB
memor
y
size
Super I/O chip on board
One Parallel (SPP/ECP/EPP)
Two Serial
(
16650A
)
com
p
liant
One flo
ppy
drive connecto
r
Power-on events
Keyboard password, WOL
(Wake-on-Lan) network card,
Modem rin
g
on, RTC alar
m
Software power-off control for
WIN95
Ove
r
-ride
p
ower button
Two Ultra DMA-33/66 IDE ports
Support up to PIO mode 4,
Multi-word DMA mode2 and
Ultra DMA33/66 MB/Sec
Bus master drivers for all well
known OS.
CPU/SDRAM/PCI clock
Support Synchronous
CPU/SDRAM (system clock)
66/75/83/90/95/100/105/112/124
/133 MHz
Chipset
SiS 620/5595 chi
p
sets
Onboard PCI Audio
Ess Solo-1 (ES1938S) audio chip
CD-quality, 16-bit stereo audio
controller
Programmable independent samplerate
from 4KHz to 48KHz for record and
playback
Onboard Su
p
er AGP VGA
Support hardware 2D/3D
Video/Graphics Accelerators
Shared System Memory Area 2MB,
4MB, 8MB
Expansion slots
3 PCI, 1 ISA slot, one PCI/ISA
shared.
Other feature support
Hardware monitorin
g
Two Fan speed monitor input
Fulfills Year 2000 BIOS
com
p
liance
Board Size: 244 mm x 230m
m

WinFast®6200MA User’s Manual
9
2-4 Package Content
Accessories
This Manual
IDE Cable x 1
FDD Cable x 1
COM2 Cable x 1
Optional Accessories
Ultra ATA 66 IDE Cable
WinFast Software Pack CD x 1
Award BIOS Flash Utility
On Board VGA/Audio Drivers
IDE bus master driver.
Hardware Monitor Utility.
Technical Support Request Form

Leadtek Research Inc.
10
H
ardware Installation Chapter 3
Static Precautions
Static-sensitive electrical discharge can damage electronic components. To prevent
damage to your system board, it is important to handle it very carefully. The following
measures are generally sufficient to protect your equipment from static discharge.
Precautions
Use a grounded wrist strap designed for static discharge.
Touch a grounded metal object before you remove the board from the anti-static
bag.
Handle the board by its edges only; do not touch its components, peripheral
chips, memory modules, or gold contacts.
When handling chips or modules, avoid touching their pins.
Put the system board and peripherals back into their anti-static bags when not in
use.
For grounding purposes, be sure your computer system’s chassis provides
excellent conductive contact between its power supply, case, the mounting
fasteners, and the system board.
Unpacking
The system board is shipped in anti-static packaging to avoid static damage.
When unpacking the board, be sure the person handling the board is static-protected.
3-1 CPU installation
NOTE: When handling the processor package, avoid placing direct
pressure on the label area of the fan.
Heat Sink
Follow the instructions that came with your processor or heat sink to attach a heat
sink to the processor. Make sure that good contact is made between the CPU chip
and the heat sink.
Processor
You are now ready to install the processor. Your motherboard has a 370-pin, PPGA
type socket, which supports 370-pin (not SEPP type) Celeron processors. Lift the
lever on the PPGA socket and install with the notched corner of the processor
oriented with pin 1. Fully seat the processor into the socket and then close the lever.
See Figure on next page for views of the PPGA 370-pin socket before and after
processor installation.
You should install the processor to the motherboard first, then install the
motherboard in the chassis, then the memory and add-on cards, and finally the

WinFast®6200MA User’s Manual
11
cables and drivers. Following the installation procedures in the order they appear in
this chapter should eliminate the most common problems encountered when
installing a system.
NOTE: Always connect the power cord last and always remove it
before adding, removing or changing any hardware components.
Pin 1
Leve
r
Notche
d
Corner
Processo
r
(installed)

Leadtek Research Inc.
12
3-2 Memory Installation
1. The mainboard provides three 168-Pin DIMM (Double In-Line Memory Module)
sockets. It supports a maximum of 1.5 GB memory. You can use SDRAM from 8MB,
16MB, 32MB, 64MB, 128MB, 256MB to 512MB per DIMM.
2. IF you use 100Mhz CPU Bus/SDRAM bus synchronous frequency , you must use the
qualify SDRAM which meets PC-100 Specifications.
The procedures:
1. Checking: The DIMM slot has two keys marked ”VOLT and DRAM” Thus, the
DIMM memory module can only fit in one direction.
2. Insert the DIMM memory module vertically into the DIMM socket then push it in.
3. The Plastic clip at the side of the DIMM socket will automatically close.
Note:Use only3.3V unbuffered DIMM

WinFast®6200MA User’s Manual
13
3-3 Case Signal Connector: (JP2)
Pins [1 & 2] Power Button – Allows to connect to a push button on system’s case.
Pins [4 & 5] Reset switch lead - Connects to the Reset Switch lead from the system’s case. The
reset switch is used to “cold-boot” the system without actually turning off the power, reducing
wear and tear on the power supply. Avoid rebooting the system when the HDD LED is blinking
Pins [7-10] Speaker connector - Connects to the Speaker lead from the system’s case.
Pins [12 & 13] and [25 & 26] Hard Drive LED – Pins 12 & 13 for IDE1 and pins 25 & 26 for
IDE2. Hard Disk LED shows the activity of hard disk drive.
Pins [14-16] Power Led – The power Led is always light while the system power is on.
Pins [17 & 18] Keyboard lock switch lead - Pins 17 & 18 connect to the case-mounted keylock
switch. Keylock allows you to disable the keyboard function for security purpose.
Pins [20-22] ACPI Led – Pin 20 to 22 for ACPI LED when ACPI is enabled.

Leadtek Research Inc.
0
3-4 DISK Connector
3-4-1 Hard Disk Connector (IDE1, IDE2)
The on-
b
oard Enhanced IDE controller can support up to (4) IDE hard drives or
other ATAPI devices, such as CD-ROMs. This controller, as with all Enhanced
IDE controllers, consists of both Primary (IDE 1) and Secondary (IDE 2) ports.
Each port has an associated connector and cable, which can support up to (2)
ATAPI devices each.
All IDE devices have jumpers, which allow the user to configure the device as
either “Master” or “Slave”. A Master device is one that is ALONE on the IDE
cable, whereas a Slave device is installed as a SECOND device on the same
cable. Keep in mind that the Master device will appear before the Slave device
in the CMOS Setup, as well as the Operating System software. *Refer to the
device documentation for jumper settings.
The Secondary IDE port can be used for up to (2) additional ATAPI devices.
N
ormally it’s recommended that you connect your first hard drive to the
Primary port, and the first CD-ROM to the Secondary.
Make sure to align the RED stripe on the ribbon cable with Pin-1 on the
mainboard IDE connector. On most hard drives and CD-ROMs, the RED stripe
should be oriented towards the power connector of the device.
When using Ultra ATA 66 IDE cable, both Master and Slave drive should be
Ultra ATA 66 drive. Do not connect CDROM to Ultra ATA 66 IDE cable, this
will reduce the efficiency. The black color connector on the cable is for Master
drive , grey color connector is for Slave drive and blue color connector is fo
r
connecting to IDE port onboard.
Uitra ATA66 Cable:
3-4-2 Floppy Disk Connector (FDD1)
The on-board floppy controller supports (2) floppy disk drives.
Make sure the RED stripe on the ribbon cable is oriented towards
Pin-1. Notice the “twist” between the sets of connectors on the
floppy cable. The floppy drive “A” position is at the END of the
cable, whereas floppy drive “B” is hooked to one of the connectors
on the other side of the twist.
3-5 USB Connector
This 8-
p
in connector permits connection of two USB peripheral devices directly to the system
without an external hub.
U
S
B
1
USB2

WinFast®6200MA User’s Manual
15
3-6 Cooling Fans (SYSFAN,CPUFAN)
SYSFAN,CPUFAN are small 3-
p
in Heade
r
Connectors that provide 12-Volt power fo
r
CPU and System cooling fans. Plug in the fa
n
cable to the connector.
3-7 Stereo Audio In Connectors (J5, J6)
J5, J6 allows you to receive stereo audio inpu
t
from an internal CDROM drive or othe
r
auxiliary audio source.
3-8 Power Supply Connector (PW1)
This mainboard features a
n
ATX-style Power Suppl
y
Connector. This connector is
keyed to prevent connection i
n
the wrong direction. Line up the
locking mechanism on the
connector from the Power Suppl
y
with the tab on the main
b
oar
d
connector. Press down until the
two connectors are locked.
3-9 Serial , Parallel and VGA Ports
A 25-pin D-Sub header is provided on the
back panel for a multi-mode bi-directional
parallel port.
One 9-pin D-Sub headers is provided on the
back panel for Serial port COM1.
One VGA port is also provided.

Leadtek Research Inc.
16
3-10 IrDA-Compliant Infrared Module Connector (IR1)
The IrDA connector bracket hooks directly to
this connector on the mainboard. This
connector provides support for the optiona
l
wireless transmitting and receiving infrare
d
module.
1 2 3 4 5
+5V IRRXF IRRX GND IRTX
3-11 Wake –up On LAN Connector (WOL)
The Wake-up On LAN function will allow the network to
wake up a Soft Power Down (Soft-Off) PC. However, if your
system is in the Suspend mode, you can wake-up the system
only through an IRQ or DMA interrupt. To use the Wake-up
On LAN function, you must enable the “Ring Power Up
Control” field in the Power Management Setup of the Award
BIOS. Connect the cable that comes with your LAN card to
location WOL on the system board. Refer to the add-i
n
card’s manual for details. Note: Your LAN card mus
t
support Magic Packet in order to use the Wake-up-On-LAN
function.
1 2 3
+5VSB GND RING
3-12 Midi/Joystick, MIC, Line In, Line Out
Midi/Joystick: Allow you to connect game joystick or game pad fo
r
playing games or connect Midi devices for playing or editing audio.
Mic: allows microphones to be connected for inputting voice.
Line In: allows tape players or other audio sources to be recorde
d
by your computer or played through the Line Out.
Line Out: can be connected to headphones or speakers wit
h
amplifier.
3-13 COM2 Connector
This connector is located on board for serial port
COM2.
Table of contents
Other Leadtek Motherboard manuals