leahua 1440RGB User manual

Add:A1 Building The Sixth Industrial Zone Zhu Gang Road Hongxing Shijing Town Baiyun
District Guangzhou China.
Tel:+86 020-66292177 Fax:+86 020-66292177
LED BAR STROBE 1440RGB
User Manual
This manual contains important information.
Please read before operating fixture.

www.leahualight.com 1
1 Before you begin
What’s included :
1. LED bar strobe 1440RGB
2. Power cable
3. DMX cable
4. Signal line
5. Quick lock bracket
6. Manual
Unpacking Instructions
Carefully unpack the product immediately and check the container to make sure all the
parts are in the package and are in good condition
Claims
If the box or the contents (the product and included accessories) appear damaged from
shipping, or show signs of mishandling, notify the carrier immediately, not LEAHUA.
Failure to report damage to the carrier immediately may invalidate your claim. In
addition, keep the box and contents for inspection.
For other issues, such as missing components or parts, damage not related to shipping,
or concealed damage, file a claim with LEAHUA within 7 days of delivery.
Text Conventions
Convention
Meaning
1–512
A range of values
50/60
A set of values of which only one can be chosen
Settings
A menu option not to be modified
Menu > Settings
A sequence of menu options to be followed
<ENTER>
A key to be pressed on the product’s control panel
ON
A value to be entered or selected

www.leahualight.com 2
Symbols
Symbol
Meaning
Critical installation, configuration, or operation information. Not following
these instructions may make the product not work, cause damage to the
product, or cause harm to the operator
Important installation or configuration information. The product may not
function correctly if this information is not used
Useful information
Product at a Glance
Safety Notes
These notes include important information about the mounting, usage, and
maintenance of this product; read before using the product.
Always connect the product to a grounded circuit to avoid the risk of
electrocution.
Always disconnect the product from power before cleaning or replacing the fuse.
Avoid direct eye exposure to the light source while the product is on.
Make sure the power cord is not crimped or damaged.
Never disconnect the product from power by pulling or tugging on the cord.’
If mounting the product overhead, always secure to a fastening device using a safety
cable.
Make sure there are no flammable materials close to the product when operating.
Do not touch the product’s housing when operating because it may be very hot.
Use on Dimmer
x
Auto Programs
Outdoor Use
x
Auto-ranging Power Supply
Sound-Activated
Replaceable Fuse
DMX
User-Serviceable
x
Master/Slave

www.leahualight.com 3
Always make sure that the voltage of the outlet to which you are
connecting the product is within the range stated on the decal or rear panel of the
product.
The product is for indoor use only! (IP20) To prevent risk of fire or shock, do not
expose the product to rain or moisture.
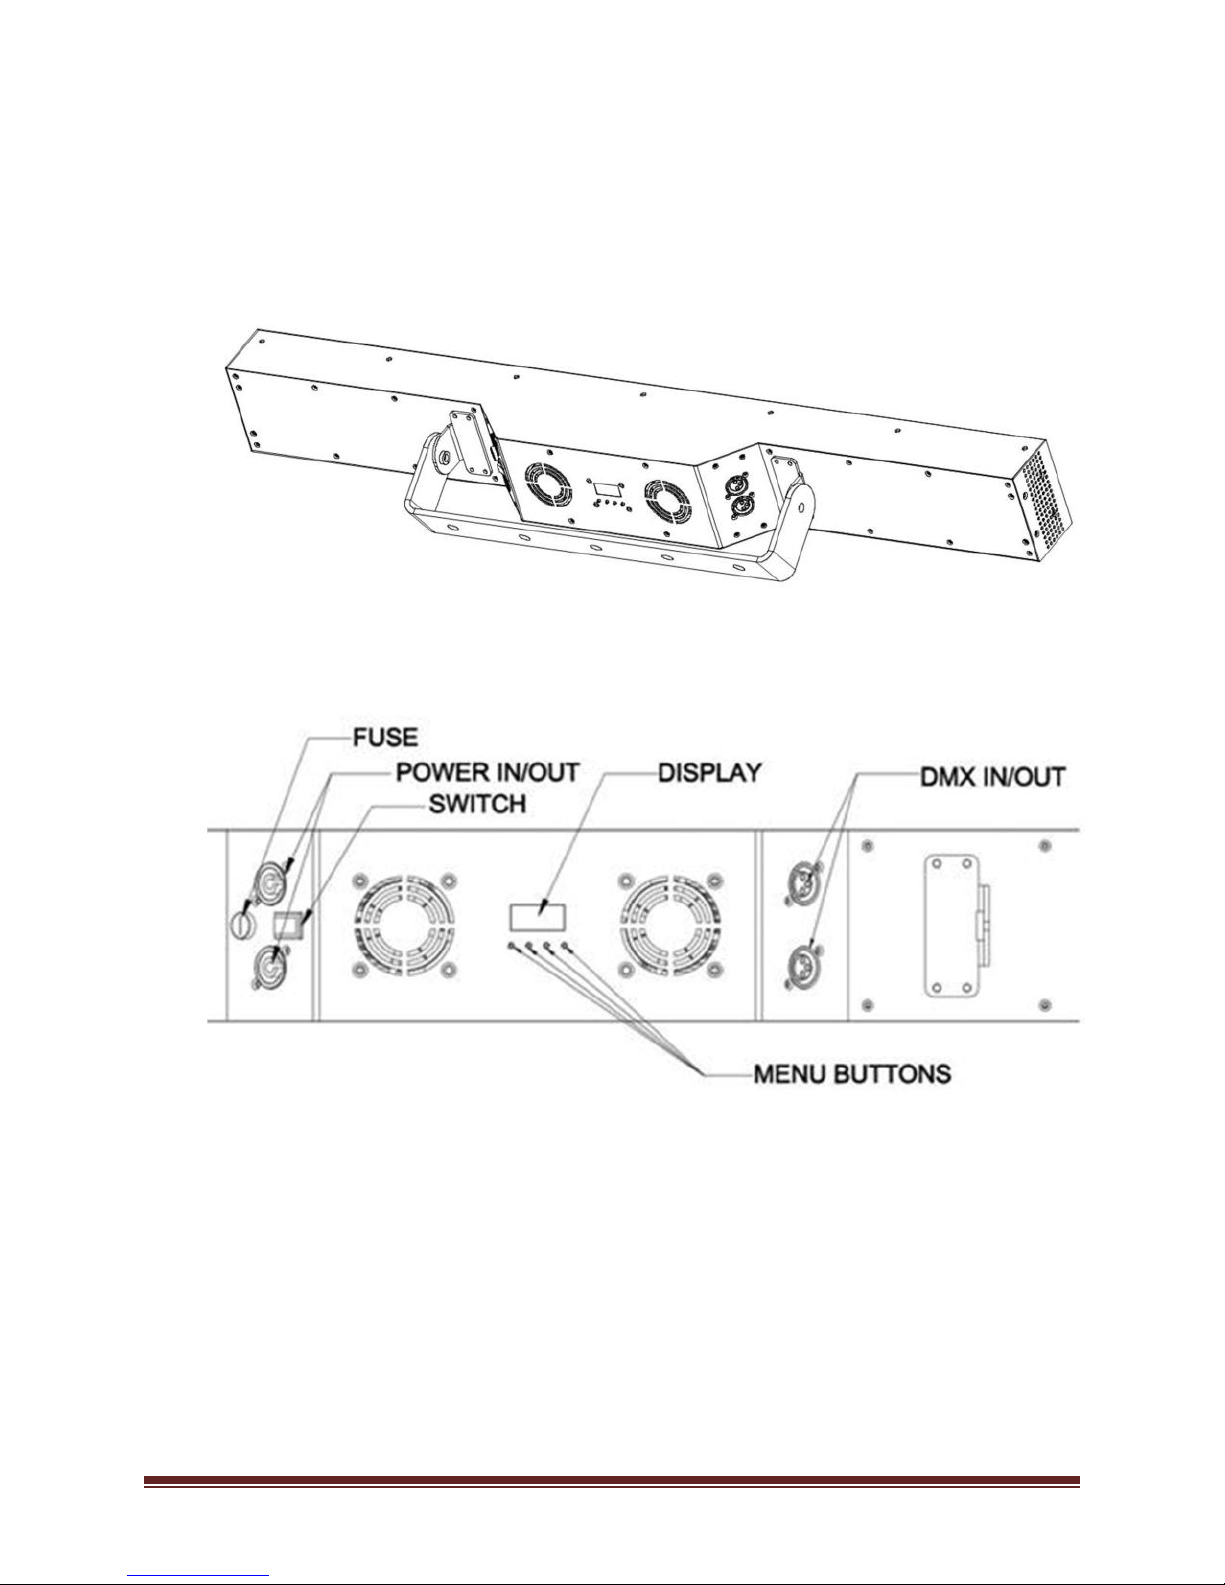
Always install the product in a location with adequate ventilation, at least 20 in
(50 cm) from adjacent surfaces.
Be sure that no ventilation slots on the product’s housing are blocked.
Never connect the product to a dimmer or rheostat.
Make sure to replace the fuse with another of the same type and rating.
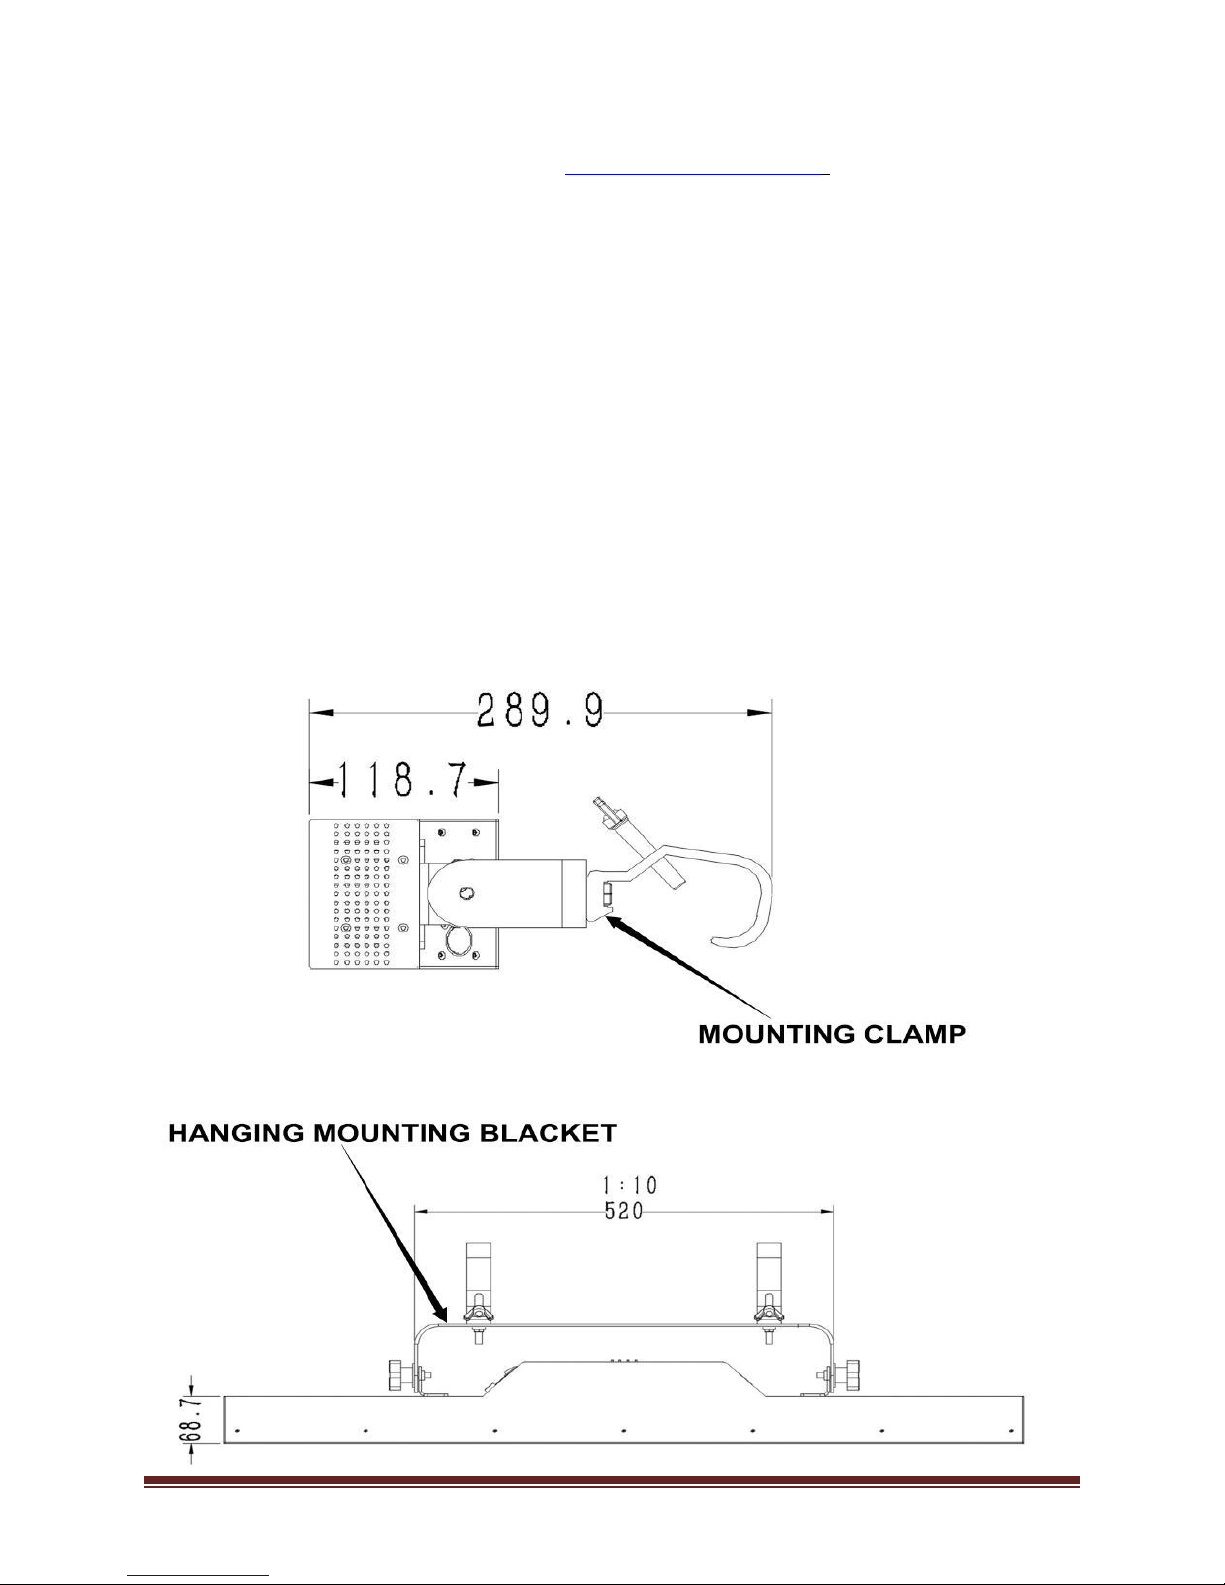
Never carry the product from the power cord or any moving part. Always use the
hanging/mounting bracket.
The maximum ambient temperature (Ta) is 104 °F (40 °C). Do not operate the
product at higher temperatures.
In the event of a serious operating problem, stop using the product immediately.
Never try to repair the product. Repairs carried out by unskilled people can lead to
damage or malfunction. Please contact the nearest authorized technical assistance
center.
To eliminate unnecessary wear and improve its lifespan, during periods of non-use
completely disconnect the product from power via breaker or by unplugging it.
Keep this User Manual for future use. If you sell the product, give this document
to the next owner

www.leahualight.com 4
Product overview :

www.leahualight.com 5
Product Dimensions :
SETUP
AC Power
The 290W LED has an auto-ranging power supply and it can work with an input voltage
range of 100 to 240 VAC, 50/60 Hz.
To determine the product’s power requirements (circuit breaker, power outlet, and
wiring), use the current value listed on the label affixed to the product’s back panel, or
refer to the product’s specifications chart. The listed current rating indicates the
product’s average current draw under normal conditions

www.leahualight.com 6
Always connect the product to a protected circuit (circuit breaker or fuse). Make
sure the product has an appropriate electrical ground to avoid the risk of electrocution
or fire.
To eliminate unnecessary wear and improve its lifespan, during periods of non-use
completely disconnect the product from power via breaker or by unplugging it
Never connect the product to a rheostat (variable resistor) or dimmer circuit,
even if the rheostat or dimmer channel serves only as a 0 to 100% switch
Fuse Replacement
1. Disconnect the product from power.
2. Using a flat-head screwdriver, unscrew the fuse holder cap from the housing.
3. Remove the blown fuse.
4. Replace with a fuse of the same type and rating.
Screw the fuse holder cap back in place and reconnect power.
· Disconnect the product from power before replacing the fuse.
Always replace a blown fuse with another of the same type and rating
Mounting
Before mounting the product, read and follow the safety recommendations indicated in
the Safety Notes
Orientation
The 290W LED Spot may be mounted in any position; however, make sure adequate
ventilation is provided around the product
Rigging
Before deciding on a location for the product, always make sure there is easy access to
the product for maintenance and programming purposes.

www.leahualight.com 7
Make sure that the structure or surface onto which you are mounting the product can
support the product’s weight. See the Technical Specifications for weight information.
The CLP-15 clamp from Chauvet is appropriate for this product.
When mounting the product overhead, always use a safety cable. Mount the product
securely to a rigging point, whether an elevated platform or a truss.
When rigging the product onto a truss, use a mounting clamp of appropriate weight
capacity.
When power linking multiple products, always consider the length of the power linking
cable and mount the products close enough for the cable to reach.
The rubber feet also serve as floor supports. When mounting the product on the floor,
make sure that the product and cables are away from people and vehicles
Mounting Diagram

www.leahualight.com 8
Menu Map
V1.00
D001
D(001-512)
AUTO
Au.01
S (01-16)
Au.02
…
Au.06
Au.07
Soud
Sod 1
SC-(1-9)
Sod 2
CH
CH03(3)
CH05 (5)
CH48 (48)
CH50 (50)
CH11 (11)
CH56 (56)
TEST
LED
Ver
V001

www.leahualight.com 9
DMX Assignments
3 Channel
CH
Function
DMX Value
Description
1
Red
0-255
0-100%
2
Green
0-255
0-100%
3
Blue
0-255
0-100%
5 Channel
5CH
Function
DMX Value
Description
1
Dimmer
0-255
0-100%
2
Strobe
0-19
No Effect
20-255
Strobe slow to fast
3
Red
0-255
0-100%
4
Green
0-255
0-100%
5
Blue
0-255
0-100%

www.leahualight.com 10
48 Channel
CH
Function
DMX Value
Description
1
Red1
0-255
0-100%
2
Green1
0-255
0-100%
3
Blue1
0-255
0-100%
4
Red2
0-255
0-100%
5
Green2
0-255
0-100%
6
Blue2
0-255
0-100%
7
Red3
0-255
0-100%
8
Green3
0-255
0-100%
9
Blue3
0-255
0-100%
10
Red4
0-255
0-100%
11
Green4
0-255
0-100%
12
Blue4
0-255
0-100%
Red5
0-255
0-100%
14
Green5
0-255
0-100%
15
Blue5
0-255
0-100%
16
Red6
0-255
0-100%
17
Green6
0-255
0-100%
18
Blue6
0-255
0-100%
19
Red7
0-255
0-100%
20
Green7
0-255
0-100%
21
Blue7
0-255
0-100%
22
Red8
0-255
0-100%
23
Green8
0-255
0-100%
24
Blue8
0-255
0-100%
25
Red9
0-255
0-100%
26
Green9
0-255
0-100%
27
Blue9
0-255
0-100%
28
Red10
0-255
0-100%
29
Green10
0-255
0-100%
30
Blue10
0-255
0-100%
31
Red11
0-255
0-100%
32
Green11
0-255
0-100%
33
Blue11
0-255
0-100%
34
Red12
0-255
0-100%
35
Green12
0-255
0-100%

www.leahualight.com 11
36
Blue12
0-255
0-100%
37
Red13
0-255
0-100%
38
Green13
0-255
0-100%
39
Blue13
0-255
0-100%
40
Red14
0-255
0-100%
41
Green14
0-255
0-100%
42
Blue14
0-255
0-100%
43
Red15
0-255
0-100%
44
Green15
0-255
0-100%
45
Blue15
0-255
0-100%
46
Red16
0-255
0-100%
47
Green16
0-255
0-100%
48
Blue16
0-255
0-100%
50Channel
CH
Function
DMX Value
Description
1
Dimmer
0-255
0-100%
2
Strobe
0-19
No Effect
20-255
Strobe slow to
fast
3
Red1
0-255
0-100%
4
Green1
0-255
0-100%
5
Blue1
0-255
0-100%
6
Red2
0-255
0-100%
7
Green2
0-255
0-100%
8
Blue2
0-255
0-100%
9
Red3
0-255
0-100%
10
Green3
0-255
0-100%
11
Blue3
0-255
0-100%
12
Red4
0-255
0-100%
13
Green4
0-255
0-100%
14
Blue4
0-255
0-100%
15
Red5
0-255
0-100%
16
Green5
0-255
0-100%
17
Blue5
0-255
0-100%
18
Red6
0-255
0-100%

www.leahualight.com 12
19
Green6
0-255
0-100%
20
Blue6
0-255
0-100%
21
Red7
0-255
0-100%
22
Green7
0-255
0-100%
23
Blue7
0-255
0-100%
24
Red8
0-255
0-100%
25
Green8
0-255
0-100%
26
Blue8
0-255
0-100%
27
Red9
0-255
0-100%
28
Green9
0-255
0-100%
29
Blue9
0-255
0-100%
30
Red10
0-255
0-100%
31
Green10
0-255
0-100%
32
Blue10
0-255
0-100%
33
Red11
0-255
0-100%
34
Green11
0-255
0-100%
35
Blue11
0-255
0-100%
36
Red12
0-255
0-100%
37
Green12
0-255
0-100%
38
Blue12
0-255
0-100%
39
Red13
0-255
0-100%
40
Green13
0-255
0-100%
41
Blue13
0-255
0-100%
42
Red14
0-255
0-100%
43
Green14
0-255
0-100%
44
Blue14
0-255
0-100%
45
Red15
0-255
0-100%
46
Green15
0-255
0-100%
47
Blue15
0-255
0-100%
48
Red16
0-255
0-100%
49
Green16
0-255
0-100%
50
Blue16
0-255
0-100%

www.leahualight.com 13
11Channel
CH
Function
DMX Value
Description
1
Dimmer
0-255
0-100%
2
Strobe
0-19
No Effect
20-255
Strobe slow to fast
3
Red
0-255
0-100%
4
Green
0-255
0-100%
5
Blue
0-255
0-100%
6
Color Macro
0-10
No Function
11-30
R 100%,G 50-100-50%,B
0
31-50
R 100%-0,G 100%, B,0
51-70
R 0,G 100%,B 0-100%
71-90
R 0,G 100%-0,B 100%
91-110
R 0-100%, G 0, B 100%
111-130
R 100%,G 0, B 100%-0
131-150
R 100% ,G 0-100% ,B
0-100%
151-170
R 100%-0 , G 100%-0 , B
100%
171-200
R 100%,G 100%, B 100%
201-205
Color 1
206-210
Color 2
211-215
Color 3
216-220
Color 4
221-225
Color 5
226-230
Color 6
231-235
Color 7
236-240
Color 8
241-245
Color 9
246-250
Color 10
251-255
Color 11
7
Foreground Dimmer
0-255
0-100%

www.leahualight.com 14
8
Background
0-10
No Function
11-255
Background Color
9
Background Dimmer
0-255
0-100%
10
Show
0-10
No Function
11-24
Show1
25-38
Show2
39-52
Show3
53-66
Show4
67-80
Show5
81-94
Show6
95-108
Show7
109-122
Show8
123-136
Show9
137-150
Show10
151-164
Show11
165-178
Show12
179-192
Show13
193-206
Show14
207-220
Show15
221-234
Show16
235-248
Show17
249-255
Show18
11
Show Speed
0-125
Fast Speed to slow
131-255
Slow to Fast
56Channel
CH
Function
DMX Value
Description
1
Dimmer
0-255
0-100%
2
Strobe
0-19
No Effect
20-255
Strobe slow to
fast
3
Red1
0-255
0-100%
4
Green1
0-255
0-100%
5
Blue1
0-255
0-100%

www.leahualight.com 15
6
Red2
0-255
0-100%
7
Green2
0-255
0-100%
8
Blue2
0-255
0-100%
9
Red3
0-255
0-100%
10
Green3
0-255
0-100%
11
Blue3
0-255
0-100%
12
Red4
0-255
0-100%
13
Green4
0-255
0-100%
14
Blue4
0-255
0-100%
15
Red5
0-255
0-100%
16
Green5
0-255
0-100%
17
Blue5
0-255
0-100%
18
Red6
0-255
0-100%
19
Green6
0-255
0-100%
20
Blue6
0-255
0-100%
21
Red7
0-255
0-100%
22
Green7
0-255
0-100%
23
Blue7
0-255
0-100%
24
Red8
0-255
0-100%
25
Green8
0-255
0-100%
26
Blue8
0-255
0-100%
27
Red9
0-255
0-100%
28
Green9
0-255
0-100%
29
Blue9
0-255
0-100%
30
Red10
0-255
0-100%
31
Green10
0-255
0-100%
32
Blue10
0-255
0-100%
33
Red11
0-255
0-100%
34
Green11
0-255
0-100%
35
Blue11
0-255
0-100%
36
Red12
0-255
0-100%
37
Green12
0-255
0-100%
38
Blue12
0-255
0-100%
39
Red13
0-255
0-100%
40
Green13
0-255
0-100%

www.leahualight.com 16
41
Blue13
0-255
0-100%
42
Red14
0-255
0-100%
43
Green14
0-255
0-100%
44
Blue14
0-255
0-100%
45
Red15
0-255
0-100%
46
Green15
0-255
0-100%
47
Blue15
0-255
0-100%
48
Red16
0-255
0-100%
49
Green16
0-255
0-100%
50
Blue16
0-255
0-100%
51
Color Macro
0-10
No Function
11-30
R 100%,G
50-100-50%,B
0
31-50
R 100%-0,G
100%, B,0
51-70
R 0,G 100%,B
0-100%
71-90
R 0,G
100%-0,B
100%
91-110
R 0-100%, G
0, B 100%
111-130
R 100%,G 0,
B 100%-0
131-150
R 100% ,G
0-100% ,B
0-100%
151-170
R 100%-0 , G
100%-0 , B
100%
171-200
R 100%,G
100%, B
100%
201-205
Color 1
206-210
Color 2
211-215
Color 3
216-220
Color 4
221-225
Color 5
226-230
Color 6

www.leahualight.com 17
231-235
Color 7
236-240
Color 8
241-245
Color 9
246-250
Color 10
251-255
Color 11
52
Foreground Dimmer
0-255
0-100%
53
Background
0-10
No Function
11-255
Background
Color
54
Background Dimmer
0-255
0-100%
55
Show
0-10
No Function
11-24
Show1
25-38
Show2
39-52
Show3
53-66
Show4
67-80
Show5
81-94
Show6
95-108
Show7
109-122
Show8
123-136
Show9
137-150
Show10
151-164
Show11
165-178
Show12
179-192
Show13
193-206
Show14
207-220
Show15
221-234
Show16
235-248
Show17
249-255
Show18
56
Show Speed
0-125
Fast Speed to
slow
56
Show Speed
131-255
Slow to Fast

www.leahualight.com 18
Configuration (DMX)
Set the product in DMX mode to control with a DMX controller.
1. Connect the product to a suitable power outlet.
2. Connect a DMX cable from the DMX output of the DMX controller to the DMX
input socket on the product.
Starting Address
When selecting a starting DMX address, always consider the number of DMX channels
the selected DMX mode uses. If you choose a starting address that is too high, you
could restrict the access to some of the product’s channels.
The 200W LED spot uses up to 16 DMX channels in its 16-channel DMX mode, which
defines the highest configurable address to 497.
To select the starting address, do the following:
1. Press <MENU>.
2. Use <UP> or <DOWN> to choose Address.
3. Press <ENTER>.
4. Use <UP> or <DOWN> to select the starting address.
Press <ENTER>
DMX Personalities
The 200W LED Spot has two DMX personalities, a 16-channel personality and a
10-channel personality.
To choose which DMX personality to use, follow the steps below:
1. Press <MENU>.
2. Use <UP> or <DOWN> to choose Run Mode.
3. Press <ENTER>.
4. Use <UP> or <DOWN> to select DMX.
5. Press <ENTER>.
6. Use <UP> or <DOWN> until either 16CH (to choose the 16-channel personality)
or 10CH (to choose the 10-channel personality) shows on the display.
Press <ENTER>

www.leahualight.com 19
Configuration(Standalone)
Set the product in one of the standalone modes to control without a DMX controller.
Connect the product to power
Never connect a product that is operating in any standalone mode (either
Automatic or Sound-Active) to a DMX string connected to a DMX controller. Products in
standalone mode may transmit DMX signals that could interfere with the DMX signals
from the controller
Sound-Active Mode
To enable the Sound-Active mode, do the following.
1. Press <MENU>.
2. Use <UP> or <DOWN> to choose Run Mode.
3. Press <ENTER>.
4. Use <UP> or <DOWN> to select Sound.
5. Press <ENTER>.
Automatic Mode
To enable the Automatic mode, follow the instructions below:
1. Press <MENU>.
2. Use <UP> or <DOWN> to choose Run Mode.
3. Press <ENTER>.
4. Use <UP> or <DOWN> to select Auto.
Press <ENTER>
Table of contents
Other leahua Dj Equipment manuals

leahua
leahua LED Focus 8 User manual

leahua
leahua LH-C070 User manual

leahua
leahua LH-A018 User manual

leahua
leahua LED COLONY LH-F064 User manual

leahua
leahua LH-C055 User manual

leahua
leahua LH-A002 User manual

leahua
leahua 24PCS Mounting instructions

leahua
leahua 10W Mini Beam Light User manual

leahua
leahua 90W COB PAR WW User manual

leahua
leahua LH-C014 User manual