Lechpol PIL1044 User manual

PL PL
UNIWESALNY PILOT DO TELEWIZORÓW SHARP
PIL1044
Należy zainstalować baterię i sprawdzić, czy pilot obsługuje telewizor
Pilot PIL1044 jest kompatybilny z większością telewizorów marki Sharp
Jeżeli pilot działa, nie ma potrzeby dalszej konfiguracji W przypadku
gdy telewizor nie będzie reagował na pilot, należy wybrać jedną z
poniższych metod kodowania pilota
A. WPROWADZANIE KODU
1 Należy nacisnąć i przytrzymać przyciski MUTE i
przycisk zasilania Po około 3 sekundach wskaźnik
LED zacznie świecić Można zwolnić przyciski
2 Należy wprowadzić trzycyfrowy kod Jeżeli kod jest
poprawny, wskaźnik LED zgaśnie Jeżeli kod jest
niepoprawny, wskaźnik LED będzie świecił dalej W
tym przypadku, należy ponownie wpisać kod
3 sek
3 sek
LISTA KODÓW:
001, 002, 003, 004, 005, 006, 007, 008, 009, 010,
011, 012, 013, 014, 015, 016, 017, 018, 019, 020, 021,
022, 023, 024
LED nie
miga
LED nie
miga
LED miga
5 razy
3 Jeżeli pilot dalej nie działa, należy wpisać kolejny kod z listy
Wskazówka: należy nacisnąć przycisk MUTE, aby wyjść z trybu
kodowania
B. SPRAWDZANIE KODU
1 Należy nacisnąć i przytrzymać przycisk MUTE, następnie nacisnąć
przycisk zasilania Po 3 sekundach wskaźnik LED się zaświeci Można
zwolnić przyciski
2 Nacisnąć kolejno przyciski 9, 9, 0 Wskaźnik LED zamiga dwa razy i
wyłączy się
3 Naciskać odpowiednio przyciski 1, 2, 3 Po naciśnięciu przycisku 1,
wskaźnik LED zacznie migać Liczba mignięć oznacza pierwszą cyfrę
kodu Jeżeli wskaźnik LED nie zamiga, oznacza to, że pierwszą cyfrą
kodu jest 0
Przykład: poprzedni kod pilota: 005
C. PRO RAMOWANIE FUNKCJI
Ten sposób kodowania jest kompatybilny tylko z pilotami na
podczerwień Nie jest kompatybilny z pilotami na Bluetooth i
bezprzewodowych
1 Nacisnąć i przytrzymać przyciski MUTE i VOL+ przez około 5 sekund
Gdy wskaźnik LED zaświeci się, można zwolnić przyciski
2 Ułożyć oryginalny pilot naprzeciwko pilota PIL1044 z czujnikami
skierowanymi do siebie w odległości 1-3 cm
3 Nacisnąć dowolny przycisk na oryginalnym pilocie Gdy po
otrzymaniu informacji, wskaźnik na pilocie PIL1044 zacznie migać,
zwolnić przycisk na oryginalnym pilocie Nacisnąć przycisk na pilocie
PIL1044, któremu ma zostać przypisana funkcja oryginalnego pilota
Wskaźnik dwukrotnie mignie i zaświeci się Należy powtórzyć
czynność dla każdego przycisku, który ma zostać przypisany
4 Po przypisaniu wszystkich przycisków należy najpierw nacisnąć i
przytrzymać przycisk MUTE, następnie nacisnąć przycisk VOL-;
wskaźnik LED wyłączy się Zmiany zostały zapisane
Uwaga: jeżeli podczas programowania, żaden przycisk nie zostanie
naciśnięty w przeciągu 25 sekund, proces programowania zakończy
się bez zapisywania
D. PRO RAMOWANIE FUNKCJI JEDNYM PRZYCISKIEM
Wskazówka: Piloty A i B są takie same
A: pilot, który został zaprogramowany
B: pilot, który ma zostać zaprogramowany
1 Ułożyć piloty naprzeciwko siebie z czujnikami skierowanymi do
siebie w odległości 1-3 cm Należy upewnić się, że piloty znajdują się w
spoczynku
2 Pilot B: Należy nacisnąć i przytrzymać przycisk MUTE oraz przycisk 3
przez około 3 sekundy Gdy wskaźnik LED zaświeci się, należy zwolnić
przyciski Pilot jest gotowy do programowania
3 Pilot A: Należy nacisnąć i przytrzymać przyciski MUTE i przycisk 1
przez około 3 sekundy Gdy wskaźnik LED zaświeci się, należy zwolnić
przyciski Kiedy wskaźniki LED migają na obu pilotach, funkcja
programowania jest włączona Gdy wskaźniki LED na obu pilotach
zamigają trzy razy po czym zgasną, oznacza to, że programowanie
zostało zakończone
Uwaga: Należy sprawdzić czy pilot B działa Jeżeli nie, należy
powtórzyć kroki od 1 do 3 Należy nacisnąć przyciski MUTE i VOL-, aby
wyjść z trybu kodowania

EN EN
UNIVERSAL SHARP TV REMOTE CONTROL
PIL1044
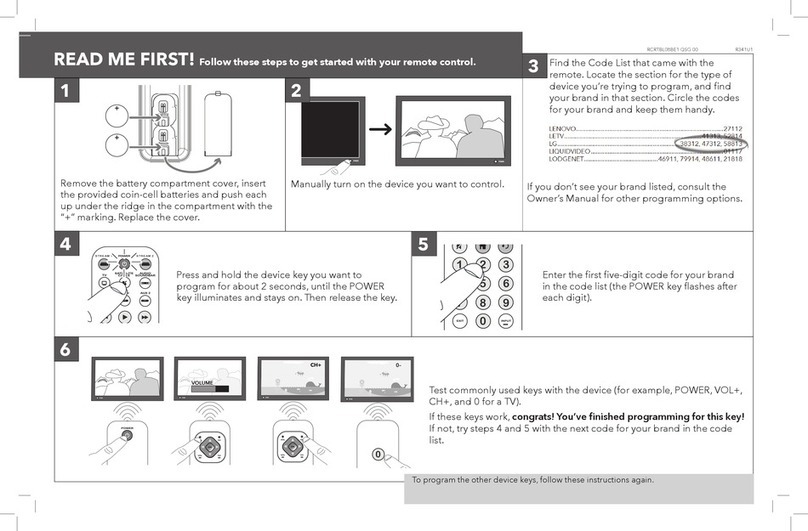
Please install the batteries and try it first PIL1044 remote control can
directly control most models of Sharp TVs If it works the first time,
there is no need to set If it does not work, please refer to the following
settings methods
A. INPUT CODE
1 Press and hold the MUTE and POWER buttons for 3
seconds, until the LED indicator starts to flash Release
the buttons
2 Enter the 3 digit code If the code is right, the LED
indicator will go o If the code is wrong, the LED
indicator will still be on If this happens, try to enter the
code again
3 sec
3 sec
CODE LIST:
001, 002, 003, 004, 005, 006, 007, 008, 009, 010,
011, 012, 013, 014, 015, 016, 017, 018, 019, 020, 021,
022, 023, 024
LED doesn’t
flash
LED doesn’t
flash
LED
flashes 5
times
3 If the remote still doesn’t work, please try another code from the list
Note: If you want to exit the pairing mode, press the MUTE button
B. CODE INQUIRY
1 Press and hold the MUTE button, then press the POWER button After
about 3 seconds, the LED indicator will light up Release the buttons
2 Input the numbers: 9, 9, 0 LED indicator will flash two times and then
go o
3 Input the numbers: 1, 2, 3 After pressing the 1 button, LED indicator
starts to flash The number of flashes is the code’s first number If the
code number is 0, LED indicator will not flash
Example: Previous remote control code: 005
C. LEARNIN FUNCTION
It is suitable for IR remote controls, not for Bluetooth or wireless
remote controls
1 Press and hold the MUTE and VOL+ buttons for about 5 seconds
Release the buttons when the LED indicator lights up
2 Point the original remote control to the PIL1044 remote The distance
between them should be within 1-3 cm
3 Press any button on the original remote control When LED indicator
flashes on the PIL1044 remote control after receiving the information,
release the button Then press the button on the PIL1044 remote
control LED indicator flashes two times and then keeps the light on
Repeat the above steps to continue learning other buttons
4 After learning the buttons press and hold the MUTE button, then
press the VOL- button The LED indicator will go o The learning will
be saved
Note: during the learning process if no button is pressed within 25
seconds, the learning will finish without saving
D. ONE-BUTTON LEARN FUNCTION
Note: A and B are identical learning remotes
A: the remote control has been fully learned
B: the remote control that has to be learned
1 Align the head of the remote control A with the head of remote
control B at a distance of 1-3 cm and do not shake
2 B remote control: Press and hold the MUTE and 3 buttons for more
than 3 seconds When the LED indicator lights up, release the buttons
The remote is ready for learning
3 A remote control: Press and hold the MUTE and 1 buttons for more
than 3 seconds When the LED indicator lights up, release the buttons
When the LED on both remote control flash, learning function is on
When the LED indicator on both remote controls flashes three times
slowly then goes o, it means that learning has finished
Note: Check if B remote control works If not, please repeat steps 1-3
Press the MUTE and VOL- buttons to exit
Table of contents
Languages:
