Leedarson Motion Sensor Pet Immunity Z-Wave 700 User manual

Bypass Door Window Sensor Z-WaveTM 700
7AA-SS-VE-C0
Bypass Door Window Sensor
Quick Start Guide

1. In The Box
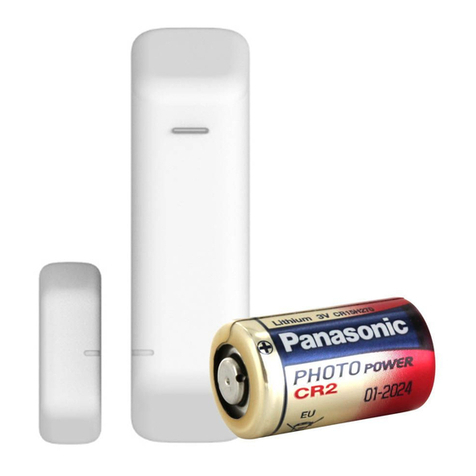
Door/Window sensor
2. APP Set Up
Remove the plastic sheet from battery cabinet. It’s power on now.
Add sensor
Sensor in pairing mode
Sensor is connected to gateway
3. Product Introduction
The Leedarson door window sensor is designed for use with scenes in home
automation and security systems, the door window sensor lets you know when door or
windows is opened and can trigger different actions in response to that open action (or
close action).
Detection Technology
Hall
Detective Range
20mm
Communication Protocol
Z-Wave
Radio Frequency
908.42MHz (US)
868.42MHz (EU)
Wireless Range
More than 200m outdoors
Approximately 30m indoors (depending
on building materials)
Power Source
3V, CR2 *1
Battery Life
3 years
Mounting
Screws or 3M Tape
Operating Temperature
0°C to 40°C
Operating Humidity
Up to 85% non-condensing
Certifications
CE/FCC, Z-Wave
OTA
Yes

Dimensions (mm):
68.4.(L)*24.4(W)*21.5(H) for Main Body
44.4(L)*15(W)*13(H) for Magnetic Part
4. Product Installation
This product can be mounted by screws or 3M adhesive tape, install it
according to the following step:
①Remove the plastic sheet for isolating battery from battery cabinet.
②Use a pin to reset the pinhole switch for 5 seconds to reset the sensor. The
sensor will be in pairing status.
③Stick the slim magnet and device onto the door/window, no further than 20
mm from the sensor, fix the device on the door/window by screw or 3M tape.
④The magnet and the main sensor must be less than 20 mm apart. Main
sensor must be affixed to the frame and the magnet must be affixed to the door
window.
⑤Should not be mounted on a metal frame.

5. Function of action
Trigger
Description
Power on
1. On the network: Send Battery Report , Sensor Multilevel Report. and Wake Up
Notification, LED keeps on 1 second.
Not On the network: LED slow blinks red 3 times and start SmartStart.
SmartStart Inclusion
Add the Door Sensor into the Z-Wave network via SmartStart:
1.
Add Door Sensor DSK into the primary controller SmartStartProvisioning List (If you
don’t know how to do this, refer to its manual, DSK usually print on the main body).
2.
Remove the battery from the Door Sensor. A few seconds later, reinsert battery in the DUT.
3.
The Door Sensor will send “Z-Wave protocol Command Class” frameto start
SmartStart Inclusion.
4.
LED will flash green during the inclusion, and then solid green for 2 seconds to indicate
that the inclusionis successful, otherwise the LED will solid red for 2 seconds in which
you need to repeat the process form step 2
Note: User should follow the procedure in the section below if the
controller does not support SmartStart inclusion.

Short press Z-Button
one time
Add the Door Sensor into the Z-Wave network:
1.
Power on your Door Sensor, set your Z-Wave controller into add/inclusion mode.
2.
Trigger this action
3.
LED will flash green during the inclusion, and then solid green for 2 seconds to indicate the
inclusionis successful, otherwise the LED will solid red for 2 seconds in which you need to
repeat the process form step 2
Remove Door Sensor from a Z-Wave network:
1. Power on your Door Sensor, and let the Z-Wave primarycontroller into remove/exclusion
mode.
2. Trigger this action.
3. LED will flash red during the exclusion, and then solid red for 2 seconds to indicate that the
exclusionis successful, otherwise the LED will solid green for 2 seconds in which you need
to repeat the process form step 2.
Short press Z-B utton
three times
On the network: Send Wake up notification, and LED will fast blink green during sending data.
Not on the network: NOP.
Press and hold Z-B
utton more than 5
seconds
Reset Door Sensor to factory default.
LED will blink red faster and faster within 5 seconds and then keep solid red until the button is
released. Device will reset itself to factory default by sending a “Device Reset Locally Notification”
to gateway when the button is released.
Short press the
Bypass-Button
Only on the network:
Door Sensor will enter Bypass mode for 5 minutes.
Bypass mode:
When the bypass button is pressed, the first “open door event” will not be triggered and the first
“close door event” will clear the bypass mode.
This product can be operated in any Z-Wave network with other Z-Wave certified devices from
other manufacturers. All mains operated nodes within the network will act as repeaters
regardless of vendor to increase reliability of the network.
6. Safety Information
Battery Safety Information:
•This product contains a coin/button cell battery. If the coin/button cell battery is swallowed, it
can cause severe internal burns in just 2 hours and can lead to death. Keep away from babies

and small children at all times.
•If battery is swallowed or placed inside any part of the body, immediately seek medical help.
•Risk of explosion if battery is replaced by an incorrect type.
•Dispose of used battery promptly.
IMPORTANT: Do not expose to rain. Install the product at least 3 ft. from the oor for
optimum performance.
This alarm contains small parts and is not suitable for children. Periodically check
the condition of the batteries.
Disposal and Recycling Information:
Correct Disposal of this product. This marking indicates that this product should not be
disposed with other household wastes throughout the EU. To prevent possible harm to the
environment or human health from uncontrolled waste disposal, recycle it responsibly to
promote the sustainable reuse of material resources. To return your used device, please use
the return and collection systems or contact the retailer where the product was purchased.
They can take this product for
environment safe recycling.
7. Maintenance
①If need to clean the sensor, please use a soft cloth with a little alcohol to
wipe it after you cut off the power.
②This product is just for indoor use only.
③Should be affixed indoors and away from sources of moisture.
④This product has low voltage detection reminder. When the battery voltage
is in low status, the sensor will give out low battery signal to gateway.
⑤Replace the battery timely on low battery warning to ensure the sensor
works properly. Please use battery model CR2 only.

Caution:
This device complies with Part 15 of the FCC rules. Operation is subject to the
following two conditions: (1) this device may not cause harmful interference, and (2)
this device must accept any interference received, including interference that may
cause undesired operation.
Changes or modifications not expressly approved by the party responsible for
compliance could void the user's authority to operate the equipment.
Hereby, Corporation declares that this device is in compliance with the essential
requirements and other relevant provisions of Directive 2014/53/EU
Special Rule Of Each Command Class
Z-Wave Plus Info Report Command Class
Parameter
Value
Z-Wave Plus Version
0x02
Role Type
0x06 (ZWAVEPLUS_INFO_REPORT_ROLE_TYPE_SLAVE_SLEEPING_REPOR TING)
Node Type
0x00 (ZWAVEPLUS_INFO_REPORT_NODE_TYPE_ZWAVEPLUS_NODE)
Installer Icon Type
0x0C06 (ICON_TYPE_SPECIFIC_SENSOR_NOTIFICATION_ACCESS_CONTROL)
User Icon Type
0x0C06 (ICON_TYPE_SPECIFIC_SENSOR_NOTIFICATION_ACCESS_CONTROL)

Association Command Class
Door Sensor supports 2 association groups and max 5 nodes for each group.
Grouping Identifier
Max Node
Send Commands
Group 1
0x05
2. Notification Report.
Sensor will send Notification Report when the
supported event is triggered.
3. Sensor Multilevel Report.
4. Sensor will send Sensor Multilevel Report in
the time set by configuration parameter
0x21/Power on will trigger Sensor Multilevel
Report.
5. Battery Report.
Power on or the battery level is low
6. Central Scene Notification.
Bypass Button is pressed
7. Device Reset Locally.
Z-Button is press and hold for more than 5
seconds
Group 2
0x05
1.Basic Set
Sensor will send Basic Set when the sensor body and
magnet removed or combined.
Association Group Info Command Class
Association Group Info
Grouping identifier
Group Name
Profile MS
Profile LS
01
Lifeline
0x00
0x01
02
On/Off control
0x71
0x06
Association Group Command List
Group 1
Command List Support
Command Class
COMMAND_CLASS_NOTIFICATION_V8(0x71)
Command
NOTIFICATION_REPORT_V8(0x05)
Command Class
COMMAND_CLASS_BATTERY(0x80)
Command
BATTERY_REPORT(0x03)
Command Class
COMMAND_CLASS_DEVICE_RESET_LOCALLY(0x5A)
Command
DEVICE_RESET_LOCALLY_NOTIFICATION(0x01)
Command Class
COMMAND_CLASS_SENSOR_MULTILEVEL_V5(0x31)

Command
SENSOR_MULTILEVEL_REPORT(0X05)
Command Class
COMMAND_CLASS_CENTRAL_SCENE_V3(0x5B)
Command
CENTRAL_SCENE_SUPPORTED_NOTIFICATION_V3(0x03)
Group 2
Command List Support
Command Class
COMMAND_CLASS_BASIC(0x20)
Command
BASIC_SET(0x01)
Notification Commands
Notification Type
Notification Event
HOME_SECURITY (0x07)
(0x00) Previous Events cleared
(0X03) TAMPERING_COVERING_REMOVED
ACCESS_CONTROL (0x06)
(0x16) WINDOW_DOOR_IS_OPEN
(0x17) WINDOW_DOOR_IS_CLOSE
POWER_MANAGEMENT (0x08)
(0x0A) REPLACE_BATTERY_SOON 10
(0x0B) REPLACE_BATTERY_NOW 11
(0x00) Previous Events cleared
SYSTEM (0x09)
(0x09) Digital input high state
How to trigger these different notifications;
Home Security:
Tampering_Covering_Removed (0x03): the tamper button back the main body is released.
Previous Events cleared (0x00): the tamper button back the main body is pressed.
Access Control:
Door is open (0x16): the separation of the main body and the magnet.
Door is closed (0x17): the combination of the main body and the magnet.
Power Management:
REPLACE_BATTERY_SOON (0x0A): When the Door Sensor first time detects the battery level is less than/equal the value set by
configuration parameter 0x0A.
REPLACE_BATTERY_NOW (0x0B): When the Door Sensor first time detects battery level is less than/equal 5%.
Previous Events cleared (0x00): When the battery is replaced by a new one.
SYSTEM:
Digital input high state: When a powerful magnet puts on the Door Sensor.
PS: This is used for notify the user that maybe a thief intends to destory the Intruder alarm system.

5.4
Wake Up Interval Capabilities Report CC
Parameter
Value
WAKEUP_PAR_DEFAULT_SLEEP_TIME
0x5460
WAKEUP_PAR_MAX_SLEEP_TIME
0x015180
WAKEUP_PAR_MIN_SLEEP_TIME
0x14
WAKEUP_PAR_SLEEP_STEP
0x14
5.5
Manufacturer Specific Report
Parameter
Value
Manufacturer ID 1
0x03
Manufacturer ID 2
0x00
Product Type ID 1
0x03
Product Type ID 2
0x00
Product ID 1
0x00
Product ID 2
0x41
5.6
Configuration Set Command Class
5.6.1
Command Format
7
6
5
4
3
2
1
0
Command Class = COMMAND_CLASS_CONFIGURATION
Command = CONFIGURATION_SET
Parameter Number
Default
Reserved
Size
Configuration Value 1(MSB)
Configuration Value 2
5.7
Central Scene (8 bit)
……
Configuration Value n(LSB)
Command
Key Attribute
number

5.9 Parameter Number Definitions (8 bit)
Central Scene( press central button )
0x00(press 1 time)
0x01
0x01(release)
0x01
0x02(held)
0x01
0x03(press 2 times)
0x01
Parameter
Number
Description
Default
Value(dec
)
Size
0x01
7210Range
Set the range about magnetic field
Range:
0-the range of parameter 0x02 is 0x00000001-0x00004B00, the range of parameter
0x03 is 0x00000001-0x00002300.
1- the range of parameter 0x02 is 0x00000001-0x0002EE00, the range of parameter
0x03 is 0x00000001-0x00015E00.
0
1
0x02
7210OP
Set the average magnetic field in ut
Range:
0x00000001-0x00004B00 or
0x00000001-0x0002EE00
640
4
0x03
7210PolHyst
Set the offset about magnetic field
Range:
0x00000001-0x00002300 or
0x00000001-0x00015E00
200
4
0x0A
LowBatPrecent
This parameter defines a battery level as the “low battery”.
Range:
0x05-0x32
10
1
0x0E
BasicEnable
Enable/Disable BASIC SET command
0 –Disable.
1 –Enable.
0
1
0x0F
BasicReverse
Door Sensor reverse its value of BASIC SET when the magnet is triggered.
0 -Send BASIC SET VALUE = 0xFF/0x00 to nodes associated with group 2 when door
is opened/closed.
1 –Send BASIC SET VALUE = 0/255 to nodes associated with group 2 when door is
opened/closed.
0
1
0x20
Bypass
Enable/Disable Bypass mode
0 –Enable.
1 –Disable.
0
1

Name
Info
Paramet
er
Number
Default
Value(de
c)
Max
Value(de
c)
Min
Value(dec)
Si
ze
ReadOnl
y
Format
Altering
capabilit
y
7210Range
7210RangeSet
0x01
0
1
0
1
No
read-onl
y
Unsigne
d
integer
true
7210OP
7210OPSet
0x02
640
19200
Or
192000
1
4
No
read-onl
y
Unsigne
d
integer
true
7210PolHyst
7210PolHystSe
t
0x03
200
8960
Or 89600
1
4
No
read-onl
y
Unsigne
d
integer
true
LowBatPrecen
t
LowBatAlarm
0x0A
10
50
5
1
No
read-onl
y
Unsigne
d
integer
true
BasicEnable
SendBasic
0x0E
0
1
0
1
No
read-onl
y
Unsigne
d
integer
true
BasicReverse
BasicValue
0x0F
0
1
0
1
No
read-onl
y
Unsigne
d
integer
true
Bypass
BypassSet
0x20
0
1
0
1
No
read-onl
y
Unsigne
d
integer
true
temp
TemperatureInf
o
0x21
15
255
15
1
No
read-onl
y
Unsigne
d
integer
true
LockConfig
LockConfigSet
0xFE
0
1
0
1
No
read-onl
y
Unsigne
d
integer
true
0x21
temp
The interval time the Door Sensor reports the Multilevel Sensor Report to association
group1 in minutes.
0x0F-0xFF
15
1
0xFE
LockConfig
Enable/Disable configuration set
0 –Enable.
1 –Disable.
0
1
Other manuals for Motion Sensor Pet Immunity Z-Wave 700
1
This manual suits for next models
1
Table of contents
Other Leedarson Security Sensor manuals
Popular Security Sensor manuals by other brands

Potter
Potter PAD300-RB Mounting instruction

EVERSPRING
EVERSPRING ST802 installation instructions

Samsung
Samsung ADT SmartThings F-ADT-WTR-1 Setup guide

Gianni
Gianni PRT62LT Quick user guide

Progress Lighting
Progress Lighting P6345 Series Assembly/installation instructions

Hydro
Hydro GA-180 Operation and maintenance manual