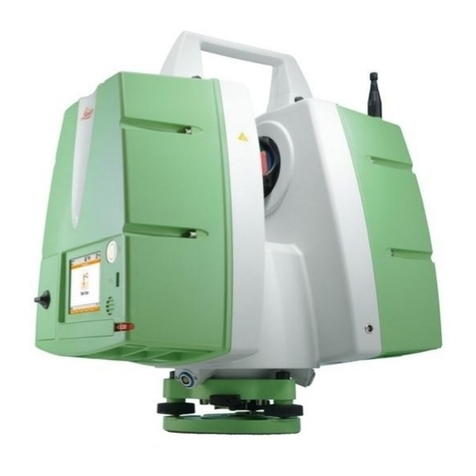
Leica Geosystems BLC ARC User manual

LEICA BLK ARC-UI
How to use v2.0.0
Copyright Leica Geosystems AG, Heerbrugg, Switzerland 2023.

LEICA BLK ARC-UI
AUTONOMOUS LASER SCANNING MODULE
Copyright Leica Geosystems AG, Heerbrugg, Switzerland 2023.
TABLE OF CONTENT
1. Introduction
a. General workflow for BLK ARC on Spot
2. Installation of BLK ARC-UI
a. General information
b. Spot version check
c. Portainer access and user account
d. Docker image import
e. Stack configuration
f. Containers check
g. De-installation of BLK ARC-UI
h. Payload authorization
3. Networking with Spot
a. General information
b. Tools
i. Spot’s Admin Console
ii. Cockpit
iii. Find the Default Gateway / Route
1. WiFi-Network on Windows
2. Ethernet-Network on Windows
c. Option 1: Setup Internet connectivity by using a WiFi USB-Dongle
d. Option 2: Setup Internet connectivity by using Spot’s WiFi
e. Option 3: Setup Internet connectivity by Spot’s Ethernet
4. Offline mission planning
a. General information
b. Overview on possible workflows - NEW
c. Create a project in Cyclone 3DR
d. BLK ARC Fiducial USC
i. Method 1: Three points (CAD /BIM)
ii. Method 2: Three planes (point cloud)
iii. Method 3: Active UCS
iv. Method 4: Docking station - NEW
e. BLK ARC Mission planner –mission without docking station
f. BLK ARC Mission planner –mission with docking station
g. Export 3D model (*.obj) for pose optimization
i. Export 3D model (*.obj) from BIM model (*.ifc)
ii. Export 3D model (*.obj) from mesh
h. Export 3D map (*.bytes) for visual initialization –COMING SOON
5. BLK ARC-UI Operational guide
a. How to access BLK ARC-UI
b. How to use BLK ARC-UI
6. Troubleshooting
7. Best practices - NEW

LEICA BLK ARC-UI
AUTONOMOUS LASER SCANNING MODULE
Copyright Leica Geosystems AG, Heerbrugg, Switzerland 2023.
INTRODUCTION
BLK ARC, where ARC stands for Autonomous Reality Capture, is the first autonomous laser
scanning module fully designed for integrations with robotic platforms. The autonomous journey of
the BLK ARC begins with capturing 3D data in any area where a robotic carrier can go, and at the
same time using this accurate laser scanning data for robot’s navigation.
The first robotic integration of BLK ARC is with the Boston Dynamics SPOT robot. Users
can simply plan automated scan path and BLK ARC will command the robot to scan whenever
and wherever needed. BLK ARC can be easily integrated across many industries and that is why
this device was designed for use on many different robotic platforms and carriers.
GENERAL WORKFLOW FOR BLK ARC ON SPOT
1. Required 3rd party components:
a. Spot robot from Boston Dynamics
b. Spot Core from Boston Dynamics
a. There are 3 methods described how to manage
networking with Spot and enable online
connection for upload to HxDR. It can be done
using 3rd party WiFi dongle plugged into Spot
CORE or existing WiFi network in reach of robot
and tablet with BLK ARC-UI or ethernet
connection with docking station. Please refer to
Networking with Spot chapter for more details.
2. Mount BLK ARC module on the Spot using dedicated accessories GAD126,
GAD127 and GAD128
3. Mount GA03 on the Spot using dedicated accessory GAD130 (only for outdoor
missions, see details in overview on possible workflows)
4. Install BLK ARC-UI on Spot Core using Portainer
5. Create an offline mission file in Cyclone 3DR software
6. Upload the mission file to BLK ARC-UI and complete the mission in the field
All required documentation can be downloaded from:
https://myworld.leica-geosystems.com
LEICA BLK ARC-UI
INSTALLATION OF BLK ARC-UI
Copyright Leica Geosystems AG, Heerbrugg, Switzerland 2023.
GENERAL INFORMATION
The installer can be downloaded from https://myworld.leica-geosystems.com
Before starting the installation, make sure you have BLK ARC mounted on the robotic carrier
properly.
For detailed instructions on how to mount BLK ARC on Spot robot check the Leica BLK ARC and
GAD126/GAD128 Installation Guides. For detailed instructions on how to mount GA03 on Spot
robot check the Leica GA03 and GAD130 Installation Guide. All documents are attached to
accessories or available to download from https://myworld.leica-geosystems.com. It is always
recommended to use the latest firmware of BLK ARC in a combination with the latest version of BLK
ARC-UI.
SPOT VERSION CHECK
Required 3rd party components are Boston Dynamics Spot robot and Spot CORE.
BLK ARC-UI is compatible with Spot v3.2.x. Make sure that your Spot, Spot CORE and Boston
Dynamics Spot App are upgraded to version 3.2.x and Portainer version 2.1.1 or newer, before
starting the installation of BLK ARC-UI.
Check in the Spot App
On the Boston Dynamics controller (Spot App) open the About section and check if robot and
tablet are running the same software versions compatible with BLK ARC-UI. Make sure that the
Spot CORE has also a compatible version installed.
Example:

Copyright Leica Geosystems AG, Heerbrugg, Switzerland 2023.
PORTAINER ACCESS AND USER ACCOUNT
1. Extract the folder with installer. You should now have the following two files:
•blkarc-ui_v2.0.0_xxx.tar
•blkarc-ui_v2.0.0_xxx.yml
2. Connect your computer to the carrier. The easiest way is to connect directly to the robot’s
Wi-Fi access-point.
More information about the network-setup can be found in the documentation of Spot
provided by Boston Dynamics.
3. Open your preferred browser and type this address:
•https://192.168.80.3:21900
4. A security risk warning might appear. If you get this warning, click Advanced… and Accept
the Risk and Continue
5. If you use Portainer for the first time, you will be asked to create an account. If so, create
your account.
Additionally, after logging in, a screen will show up asking to connect to an environment.
Select Local and confirm by selecting Connect
6. If you have used Portainer before, login with the account you have previously defined.

Copyright Leica Geosystems AG, Heerbrugg, Switzerland 2023.
DOCKER IMAGE IMPORT
1. After successfully logging in in the previous section, you should see the following screen.
Click on local marked on the image
2. On the next screen navigate to Images on the left side of the screen. In the screen which
appears now click on Import
3. Under Select file select the file blkarc-ui_v2.0.0_xxx.tar, which you downloaded previously
and click on Upload
IMPORTANT: Please note that the upload might take several minutes. Do not interrupt this
process by clicking anywhere else. A successful upload will be indicated by a small pop-up
and the progress wheel of the Upload button will go away.

Copyright Leica Geosystems AG, Heerbrugg, Switzerland 2023.
STACK CONFIGURATION
1. On the left side of the screen navigate to Stacks. In the screen which appears now click on
+Add stack
•Enter the name blkarc-ui (the name must consist of lowe case alphanumeric
characters, ‘-‘ or ‘_’)
•Then select Upload –Upload from your computer
•In the bottom press Select file and select the file blkarc-ui_v2.0.0_xxx.yml, which
was downloaded previously
•In the very bottom of the page, select Deploy the stack
2. All stacks of BLK ARC-UI should now appear in the Stack list on the Stacks page
3. Example:
IMPORTANT: In case the Stack cannot be deployed and Portainer gives you an error, open
Containers panel, select two containers below and Stop them:
•Fire_ext_detector
•Ncb_daq_plugin
It might also be required to delete the failed containers manually before trying again.

Copyright Leica Geosystems AG, Heerbrugg, Switzerland 2023.
CONTAINERS CHECK
Once the stack is properly configured, on the left side of the screen navigate to Containers and
check if the following containers are running, and at the same time the following containers are
stopped as in the picture:
DE-INSTALLATION OF BLK ARC-UI
1. To de-install BLK ARC-UI connect your computer to the carrier and access Portainer in the
same way as during installation
2. Navigate to local
3. On the left side of the screen go to Stacks. Select BLK ARC-UI and Delete
4. On the left side of the screen go to Images. Select blkarc-ui_v2.0.0_xxx.tar and Delete
DE-INSTALLATION OF BLK ARC-UI
1. In order to upgrade to new version of BLK ARC-UI please de-install the old one and follow
the steps on how to install new version starting with an empty setup.
PAYLOAD AUTHORIZATION
To properly register the payloads, after successful installation of BLK ARC-UI, it is recommended to
follow the steps below:

Copyright Leica Geosystems AG, Heerbrugg, Switzerland 2023.
1. Access Admin Console via https://192.168.80.3
2. Go to Payloads
3. Forget/Reject all existing payloads (including older payloads for BLK ARC or UAX Connect
or Spot CORE)
4. Restart Spot
5. After reboot, the latest payloads will appear. Access Admin console again, and Authorize
new payloads for BLK ARC and Spot CORE

Copyright Leica Geosystems AG, Heerbrugg, Switzerland 2023.

LEICA BLK ARC-UI
NETWORKING WITH SPOT
Copyright Leica Geosystems AG, Heerbrugg, Switzerland 2023.
GENERAL INFORMATION
This chapter will guide you through the required steps to manage networking with your Spot robot.
There are different options to connect Spot CORE to the internet, the following table should give
you a quick overview of the available options:
WiFi Dongle
Spot’s WiFi
Spot’s Ethernet
A USB-WiFi-Dongle is directly
inserted into Spot CORE. This Dongle
is used to connect to a pre-existing
WiFi-Network, which provides the
Internet-Access.
Controlling Spot doesn't depend on
an external network.
Spot still hosts its own WiFi, which
can be used to access BLK ARC-UI
through the well-known IP
192.168.80.3.
Network-Speed depends a lot on the
WiFi-Dongle and drivers used.
3rd party WiFi dongle is required.
Spot's own WiFi is configured in Client-
Mode, which means that it connects to
a pre-existing WiFi-Network on the
outside.
No additional 3rd party hardware is
necessary.
It is possible to control Spot using BLK
ARC-UI from wherever you have
access to this WiFi Network.
Knowledge of the WiFi-network
required, in order to setup the
connection correctly.
Depends on a stable external WiFi.
A new IP has to be used to connect to
BLK ARC-UI (and all other applications
on Spot (Cockpit, Portainer, ...)
Spot and the docking-station each
have an Ethernet-Port, which can
be used to connect Spot to a
preexisting network by cable.
Fastest possible upload-speeds.
Spot still hosts its own WiFi, which
can be used to access BLK ARC-UI
through the well-known IP
192.168.80.3.
Upload is only possible while Spot
is docked or while having an
ethernet cable plugged in. This
means no upload during operation.
Knowledge of Ethernet-Network
required in order to setup the
connection correctly.
TOOLS
There are several tools used throughout this guide to set-up the network correctly. This section
should give you a brief overview. Scroll up to this section whenever one of the tools is mentioned in
the sections below.
1. Spot’s Admin Console
This is a browser-based interface running on Spot (directly on Spot, not on Spot CORE). It provides
access to all necessary settings on Spot, handles Spot's networking, lets you download logs and
offers much more. In this guide we will use the Network Setup page.
More information on the Admin Console can be found in the documentation provided by Boston
Dynamics.

Copyright Leica Geosystems AG, Heerbrugg, Switzerland 2023.
Steps to reach the Network-Page of the Admin Console
1. You can reach the Admin Console by connecting your computer to Spot and entering the
corresponding IP-Address without any Port
a. If you are connected to Spot by using Spot's WiFi network (spot-BD-xxxxxxxx), this
IP should be https://192.168.80.3
b. In this guide you will learn about connecting Spot with different networks. Based on
these networks the IP used to access the Admin-Console will be different. Please
use the IP introduced by the section dealing with your current connection type
2. The first time you try to access the Admin Console it might be that the browser asks you if
you trust the page. Confirm the risk knowledge and proceed to the page
3. Login using the admin account of your Spot. The corresponding password was given to you
with the delivery of the robot. The default one is written in the battery-compartment of Spot.
4. Click on Network Setup

Copyright Leica Geosystems AG, Heerbrugg, Switzerland 2023.
2. Cockpit
This is a browser-based interface running on Spot CORE (not on Spot itself). It can be used to
change settings on Spot CORE, offers networking-options, Logs, and has a terminal to directly
access Spot CORE without SSH. In this guide we will use the Networking page.
More information on Cockpit can be found in the documentation provided by Boston Dynamics.
Steps to reach the Networking-Page on Cockpit
1. Make sure Spot is running and Spot CORE is connected and authenticated on the rear
payload-port of Spot
2. Reach Cockpit by connecting your computer to Spot and entering the corresponding IP-
Address on port 21443
a. When connected to Spot by using Spot's WiFi network (spot-BD-xxxxxxxx), this IP
should be https://192.168.80.3:21443
b. In this guide you will learn about connecting Spot with different networks. Based on
these networks the IP used to access the Admin Console will be different. Please
use the IP introduced by the section dealing with your current connection type
3. The first time you try to access Cockpit it might be that the browser asks you if you trust the
page. Confirm the risk knowledge and proceed to the page
4. Login using the credentials of your Spot CORE. Boston Dynamics provided these
credentials when you got your Spot CORE delivered

Copyright Leica Geosystems AG, Heerbrugg, Switzerland 2023.
Usually when you login for the first time or if you performed a Spot CORE's factory reset,
default credentials are:
Username: spot
Password: password
5. Click on Networking

Copyright Leica Geosystems AG, Heerbrugg, Switzerland 2023.
3. Find the Default Gateway / Route
To correctly route the internet traffic from Spot to the outside world, Spot needs to know about the
Default Gateway (Default Route) of the network. This is the IP of the device on the network which is
connected to the internet. For a WiFi-Network this would be the WiFi-Router's address. This section
provides you with an overview on how to get the Default Gateway for WiFi- and Ethernet-
Connections on Windows.
a. WiFi-Network on Windows
Instructions on how to find your WiFi-Network’s Default Gateway on Windows
1. Open the Settings (Windows icon →Settings)

Copyright Leica Geosystems AG, Heerbrugg, Switzerland 2023.
2. Go to Network & Internet page
3. Go to the WiFi page and open the Network and Sharing Center

Copyright Leica Geosystems AG, Heerbrugg, Switzerland 2023.
4. Select your WiFi-Connection
5. Click on Details...

Copyright Leica Geosystems AG, Heerbrugg, Switzerland 2023.
6. Find IPv4 Default Gateway
b. Ethernet-Network on Windows
Instructions on how to find your Ethernet-Network’s Default Gateway on Windows
1. Open the Settings (Windows →Settings)

Copyright Leica Geosystems AG, Heerbrugg, Switzerland 2023.
2. Go to Network & Internet page
3. Go to the Ethernet page and open the Network and Sharing Center

Copyright Leica Geosystems AG, Heerbrugg, Switzerland 2023.
4. Select your Ethernet-Connection
5. Click on Details...
Table of contents
Other Leica Geosystems Scanner manuals

Leica Geosystems
Leica Geosystems ScanStation P16 User guide

Leica Geosystems
Leica Geosystems T-Scan User manual

Leica Geosystems
Leica Geosystems Scan Station P16 Manual

Leica Geosystems
Leica Geosystems ScanStation P40 User manual

Leica Geosystems
Leica Geosystems ScanStation C10 User manual

Leica Geosystems
Leica Geosystems BLK360 How to use

Leica Geosystems
Leica Geosystems 3D Disto User manual