Leica CL User manual

DAS WESENTLICHE.
Leica Camera AG│Am Leitz-Park 5│35578 WETZLAR│DEUTSCHLAND
Telefon +49(0)6441-2080-0│Telefax +49(0)6441-2080-333│www.leica-camera.com
93 789 XI/17/LW/D
LEICA CL
INSTRUCTIONS

31a
31
32a32c
36
32b
33
36a
34
35
37
8
1012 1114 13
96 7 6
1
43 51
2
PLAY
FN
MENU
LEICA CAMERA WETZLAR GERMANY
PLAY
FN
MENU
LEICA CAMERA WETZLAR GERMANY
20 21
23
22
24
28 27
29 30
25
16
15
17
18
19
2626a

ENEN
Designation of parts
1
DESIGNATION OF PARTS
Front view
1Strap lugs
2Lens release button
3Self-timer LED / AF assist lamp
4Bayonet
5Contact strip
Top view
6Microphone
7Accessory shoe
8Main switch
9Shutter button
10 Setting wheel
11 Setting wheel button
12 Top display
13 Setting wheel
14 Setting wheel button
Rear view
15 Speaker
16 MENU button
17 FN button
18 PLAY button
19 Viewfinder
20 Eye sensor
21 Diopter adjusting dial
22 Direction pad
23 Center button
24 Status LED
25 Monitor
Bottom view
26 Door over battery compartment and memory card slot
aLock/unlock lever
27 Tripod thread
28 Battery locking latch
29 Battery compartment
30 Memory card slot
Lens
31 Lens hood
aIndex points
32 Front mount
aMale bayonet for lens hood
bIndex points for lens hood
cInternal thread for filters
33 Focus ring
34 Zoom ring
35 Index for focal length
36 Fixed ring
aRed alignment button
37 Contact strip

EN
2
FOREWORD
Dear Customer,
We hope you enjoy using your new Leica CL. Please read this
manual thoroughly so that you can get the most out of your
camera.
Use the Quick Start Guide for a fast introduction to your new Leica
camera.
SCOPE OF DELIVERY
Please check that you have all of the accessories before using your
Leica CL for the first time.
a. Lithium-ion battery Leica BP-DC12
b. Battery charger Leica BC-DC12 with cahngeable mains cord
c. Carrying strap
d. Camera bayonet cover
e. Accessory shoe cover
f. Registration card
ACCESSORY
Please visit the Leica Camera AG website for information on the
extensive range of LeicaCL accessories:
www.leica-camera.com
SPARE PARTS Order no.
Camera bayonet cover 16 060
Accessory shoe cover 423-116.001-013
Carrying strap 439-612.060-000
Lithium-ion battery Leica BP-DC12 19 500
Battery charger Leica BC-DC12 423-116.001-032
Disposal of electrical and electronic equipment
(Applies within the EU, and for other European coun-
tries with segregated waste collection systems.)
This device contains electrical and/or electronic components and
must therefore not be disposed of in general household waste!
Instead, it should be disposed of at a recycling collection point
provided by the local authority. This costs you nothing. If the device
contains standard or rechargeable batteries, these must be re-
moved first and also be disposed of in line with relevant regula-
tions.
Further information on the subject is available from your local
council, your local waste collection company, or in the store where
you purchased this device.
Subject to changes in design and production.

EN
3
Meaning of the different categories of information in this
manual
Note:
Additional information
Important:
Failure to observe the instructions may cause damage to the
camera, accessories or the photos
Attention:
Failure to observe the instructions may cause personal injury
The production date of your camera can be found on the stickers in
the Guarantee Card and/or on the packaging.
The format is year/month/day.
The specific approvals for this device can be found in the camera
menu.
▸ In the Main Menu (5th page), select Camera Information
▸ Im submenu Regulatory Information wählen
LEGAL INFORMATION
• Please ensure that you observe copyright laws. The recording
and publication of pre-recorded media such as tapes, CDs, or
other published or broadcast material may contravene copyright
laws.
• This also applies to all of the software supplied.
• With regard to videos created using this camera: This product is
licensed under the AVC Patent Portfolio license for the personal
use of a consumer. Other uses in which the consumer does not
receive remuneration to (i) encode video in compliance with the
AVC standard (“AVC video”) and/or (ii) decode AVC video that
was encoded by a consumer engaged in a personal activity
and/or was obtained from a video provider licensed to provide
AVC video, are also permitted. No license is granted or shall be
implied for any other use. Any other use, including but not lim-
ited to providing AVC video in exchange for remuneration, may
require a separate license agreement with MPEG LA, L.L.C. For
more information please visit the MPEG LA, L.L.C. website at:
www.mpegla.com
• The SD logo is a registered trademark.
• Other names, company and product names referred to in these
instructions are trademarks or registered trademarks of the
respective companies.

EN
4
Safety Notes
SAFETY NOTES
• Always store small parts (e.g. the accessory shoe cover) as fol-
lows:
– out of reach of children
– in a location where they will not get lost and will not be stolen
• Modern electronic components react sensitively to electrostatic
discharge. Since people can easily pick up charges of tens of
thousands of volts by walking on synthetic carpets, a discharge
can occur when you touch the camera, particularly if it is placed
on a conductive surface. If only the camera housing is affected,
this discharge is harmless to the electronics. However, despite
built-in safety circuits, outer contacts, such as those in the ac-
cessory shoe, should not be touched for safety reasons.
• When cleaning the contacts, do not use an optical micro-fiber
cloth (synthetic); use a cotton or linen cloth instead. Before
touching the contacts, you can make sure you discharge any
electrostatic charge by deliberately touching a heating or water
pipe (conductive, grounded material). Dirt deposits and oxidation
on the contacts can be avoided by storing your camera in a dry
location with the lens cap and flash shoe/viewfinder cap on.
• Use only the recommended accessories to prevent faults, short
circuits or electric shock.
• Do not attempt to remove parts of the housing (covers). Repairs
must be done at authorized service centers only.
• Do not use your camera in the immediate vicinity of devices with
powerful magnetic, electrostatic or electromagnetic fields (e.g.
induction ovens, microwave ovens, television sets or computer
monitors, video game consoles, cell phones, radio equipment).
• If you place the camera on or very close to a television set, or
use it near mobile phones, image recording may be disturbed.
• Strong magnetic fields, e.g. from speakers or large electric mo-
tors, can damage the stored image data.
• If the camera malfunctions due to the effects of electromagnetic
fields, turn it off, remove the battery, and then turn it on again.
Do not use the camera in the immediate vicinity of radio trans-
mitters or high-voltage power lines. Their magnetic fields can
also interfere with recordings.
• Protect the camera from contact with insect sprays and other
aggressive chemicals. Petroleum spirit, thinner and alcohol may
not be used for cleaning.Certain chemicals and liquids can
damage the camera’s housing or the surface finish.
• As rubber and plastics sometimes emit aggressive chemicals,
they should not remain in contact with the camera for a long
time.
• Ensure that sand and dust cannot get into the camera, e.g. on
the beach. This is the case especially when inserting and re-
moving the memory card. Sand and dust can damage both the
camera and the memory card.
• Ensure that water cannot get into the camera, e.g. when it is
snowing or raining and on the beach. Moisture can cause mal-
functions and even permanent damage to the camera and the
memory card.
• If salt water spray gets onto the camera, wet a soft cloth with tap
water, wring it out thoroughly and wipe the camera with it. Then
wipe down thoroughly with a dry cloth.
• If condensation has formed on or in the camera, you should turn
it off and leave it to stand at room temperature for approximately
an hour. Once the camera temperature has adjusted to room
temperature, the condensation will disappear by itself.
• Use carrying straps only for their intended purpose as a carrying
strap on a camera / on binoculars. Any other use carries the risk
of injury and may possibly result in damage to the carrying strap
and is therefore not permitted.

EN
5
Safety Notes
• Carrying straps are usually made of strong material. Keep the
carrying strap away from children. It is not a toy and poses the
potential risk of strangulation to children.
• For the same reason, carrying straps should not be used for
cameras/binoculars during sporting activities where there is a
high risk of getting caught by the carrying strap (e.g. climbing in
the mountains and similar outdoor sports).
Disclaimer
• Information including personal information may be altered or
vanish due to erroneous operation, effect of static electricity,
accident, malfunction, repair, or other handlings. Please note in
advance that Leica Camera AG is not liable in any way for any
direct or indirect damage from the alteration or vanishing of
information or personal information.
Important
• Use only the accessories specified and described in this instruc-
tion or by Leica Camera AG with the camera.
• Es darf ausschließlich das mitgelieferte Netzkabel verwendet
werden.
• Das Netzkabel darf ausschließlich an dem mitgelieferten Lade-
gerät verwendet werden und ist nicht zur Verwendung an an-
deren Geräte bestimmt.
General notes about the monitor
• If the camera is exposed to significant temperature fluctuations,
condensation can form on the monitor. Wipe it off carefully with
a soft dry cloth.
• If the camera is very cold when turned on, the monitor image will
initially be slightly darker than normal. As soon as the monitor
warms up, it will reach its normal level of brightness.
• Cosmic radiation (e.g. during flights) can cause pixel defects.
The monitor is manufactured in a highly precise process. This en-
sures that of the total of around 1,040,000 pixels more than
99.995% work correctly and only 0.005% remain dark or are always
bright. However, this is not a malfunction and it does not impair the
reproduction of a recording.

EN
6
Table of Contents
TABLE OF CONTENTS
DESIGNATION OF PARTS...................................................................... 1
FOREWORD ............................................................................................ 2
SCOPE OF DELIVERY .............................................................................. 2
ACCESSORY............................................................................................ 2
SPARE PARTS ......................................................................................... 2
LEGAL INFORMATION........................................................................... 3
SAFETY NOTES....................................................................................... 4
PREPARATIONS...................................................................................... 8
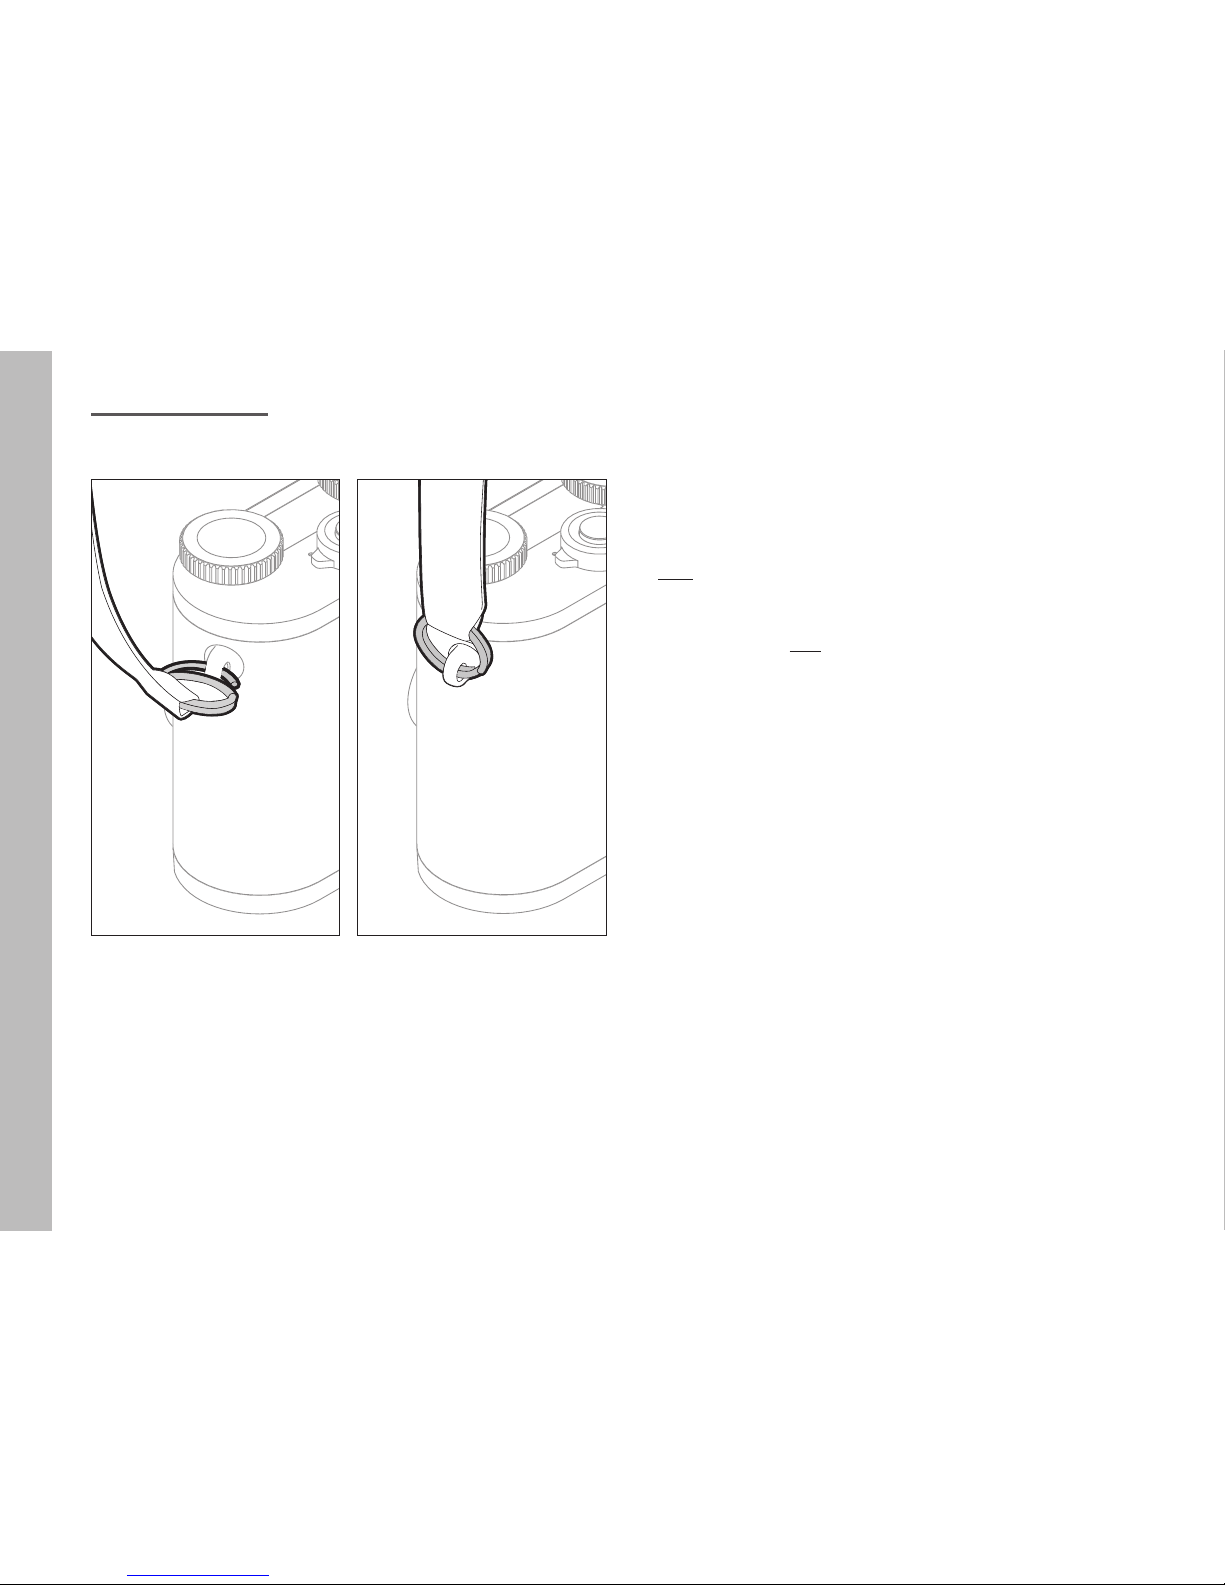
ATTACHING THE CARRYING STRAP......................................................... 8
CHARGING THE BATTERY........................................................................ 8
CHANGING THE BATTERY AND MEMORY CARD ................................... 11
CHANGING THE LENS........................................................................... 16
COMPATIBLE LENSES ......................................................................... 17
CAMERA OPERATION .......................................................................... 18
MAIN SWITCH ...................................................................................... 18
SHUTTER BUTTON................................................................................ 18
SETTING WHEELS /SETTING WHEEL BUTTON /
TOP DISPLAY ........................................................................................ 19
LOCKING/UNLOCKING THE SETTING WHEELS ................................... 19
MENU CONTROL .................................................................................. 20
Favorites menu ............................................................................... 23
Direct access to menu function .......................................................... 23
TOUCH CONTROL ................................................................................. 25
BASIC CAMERA SETTINGS .................................................................... 26
MENU LANGUAGE .............................................................................. 26
DATE/TIME........................................................................................ 26
AUTOMATIC CAMERA SHUTDOWN...................................................... 27
ACOUSTIC SIGNALS ........................................................................... 27
ADJUSTING THE VIEWFINDER EYEPIECE ............................................. 28
MONITOR/VIEWFINDER SETTINGS..................................................... 28
Monitor brightness............................................................................ 29
Top display ....................................................................................... 29
Auto power off of all the displays ........................................................ 29
Information displays .......................................................................... 29
Selection of further information and assisting displays .......................... 30
Grid (Grid)........................................................................................ 30
Level Gauge (Horizon)........................................................................ 30
Histogram ........................................................................................ 31
Clipping ........................................................................................... 31
BASIC PICTURE SETTINGS .................................................................. 32
File format ....................................................................................... 32
JPG Resolution.................................................................................. 32
White balance................................................................................... 32
ISO sensitivity................................................................................... 33
JPG image properties (Film Style)........................................................ 34
Using Leica M and R lenses................................................................ 35
Image stabilization ............................................................................ 35
Electronic Shutter ............................................................................. 36
Single/continuous mode ................................................................... 36
PICTURE MODE.................................................................................... 38
FOCUSING............................................................................................ 38
AUTOFOCUS......................................................................................... 38
LIMITING THE AUTOFOCUS SETTING RANGE....................................... 39
AF ASSIST LAMP ................................................................................ 40
AUTOFOCUS METERING METHODS/OPERATING MODES .................... 40
Spot-Spot/Field metering Field......................................................... 40
Subject tracking (Tracking) ................................................................ 41
Touch-controlled autofocus (Touch AF) ................................................ 41
Multiple field metering (Multi Point)..................................................... 42
Face detection.................................................................................. 42
Manual focusing ............................................................................... 43
ASSIST FUNCTION FOR MANUAL FOCUSING ...................................... 43
EXPOSURE METERING AND CONTROL.................................................. 45

EN
7
Table of Contents
EXPOSURE METERING METHODS ....................................................... 45
EXPOSURE CONTROL ......................................................................... 46
The setting wheel functions with the exposure control modes P, S, Aand M.... 47
Exposure simulation .......................................................................... 47
Automatic program - P...................................................................... 48
Scene modes ................................................................................... 49
Aperture priority mode - A................................................................. 52
Shutter priority mode - S................................................................... 53
Metering memory lock....................................................................... 53
Exposure compensation..................................................................... 54
Automatic bracketing......................................................................... 54
Manual setting - M............................................................................ 55
ADDITIONAL FUNCTIONS ..................................................................... 56
Interval shooting ............................................................................... 56
Self-Timer ........................................................................................ 58
FLASH PHOTOGRAPHY......................................................................... 59
COMPATIBLE FLASH UNITS ................................................................ 59
ATTACHING A FLASH UNIT.................................................................. 59
FLASH MODES ................................................................................... 60
FLASH RANGE.................................................................................... 61
SYNCHRONIZATION TIME POINT......................................................... 61
FLASH EXPOSURE COMPENSATION.................................................... 61
VIDEO RECORDING............................................................................... 62
REVIEW MODE ..................................................................................... 64
SELECTING/SCROLLING THROUGH RECORDINGS.............................. 65
ENLARGING PICTURES/SIMULTANEOUS DISPLAY OF SEVERAL
PICTURES .......................................................................................... 66
Magnification.................................................................................... 66
Simultaneous display of 12/30 pictures.............................................. 67
SELECTING AN IMAGE DETAIL ............................................................ 68
MARKING PICTURES/CANCELING MARKINGS.................................... 68
REVIEW MENU ................................................................................... 68
Calling up the Review menu................................................................ 68
Selecting /calling up menu items............................................. 68
Exit review menu............................................................................... 68
Deleting Pictures............................................................................... 69
Automatic review .............................................................................. 70
Starting playback .............................................................................. 71
Video playback ................................................................................. 71
Ending playback................................................................................ 73
Adjusting the volume......................................................................... 73
MISCELLANEOUS ................................................................................ 76
USER PROFILES ................................................................................. 76
CHANGING FILE NAMES..................................................................... 79
WIRELESS DATA TRANSMISSION AND REMOTE CONTROL OF THE
CAMERA USING A WLAN CONNECTION .............................................. 80
TRANSFERRING DATA TO A COMPUTER .............................................. 84
DATA STRUCTURE ON THE MEMORY CARD ......................................... 84
FORMATTING ..................................................................................... 84
USING RAW DATA (DNG)..................................................................... 84
INSTALLING FIRMWARE UPDATES....................................................... 85
CARE & USE INSTRUCTIONS.............................................................. 86
MENU LIST............................................................................................ 88
APPENDIX............................................................................................. 90
DISPLAYS IN THE MONITOR/VIEWFINDER .......................................... 90
Picture mode.................................................................................... 90
Review mode.................................................................................... 92
Displays in the Top Display ................................................................. 93
TECHNICAL DATA................................................................................. 94
LEICA SERVICE ADDRESSES.............................................................. 96

EN
8
Preparations
PREPARATIONS
ATTACHING THE CARRYING STRAP
CHARGING THE BATTERY
Your Leica CL is powered by a lithium-ion battery. The battery must
be removed from the camera before charging. The battery must be
removed from the camera before charging.
Attention
• Only the battery types specified and described in this manual
and/or specified and described by Leica Camera AG may be
used in this camera.
• This battery may only be used in the units for which it is de-
signed and may only be charged exactly as described. The use
of other chargers that are not approved by Leica Camera AG can
cause damage to the batteries and, in extreme cases, serious or
life-threatening injuries.batteries
• Using the battery contrary to these instructions and using bat-
tery types not specified in these instructions may result in an
explosion.
• The batteries must not be exposed to sunlight, heat, humidity or
condensation for extended periods. Batteries must not be
placed in a microwave oven or in a high-pressure vessel, as this
may cause an explosion.
• Never throw batteries into a fire as this can cause them to ex-
plode.
• Damp or wet batteries must not be charged or used in the
camera under any circumstances.
• Always ensure that the battery contacts are clean and freely
accessible.

EN
9
Preparations
• Whilst lithium-ion batteries are secured against short circuits,
they should still be protected against contact with metal objects
like paper clips or jewelry. A short-circuited battery can get very
hot and cause severe burns.
• If a battery is dropped, check the casing and the contacts imme-
diately for any damage. Using a damaged battery can damage
the camera.
• A battery must be removed from the camera or charger immedi-
ately and replaced if it produces noise, becomes discolored,
deformed, or overheated or if it shows any sign of leakage. Con-
tinued use of a damaged battery may cause overheating and a
risk of fire and/or explosion.
• If liquid leaks out or you smell burning, keep the batteries away
from heat sources, as leaked fluid can catch fire.
• The charger supplied should be used exclusively for charging this
battery type. Do not attempt to use it for other purposes.
• Ensure that the power socket used is freely accessible.
• Heat is generated during charging. Therefore batteries must not
be charged in small, enclosed or unventilated spaces.
• The battery and charger must not be opened. Repairs may only
be carried out by authorized service centers.
• Keep batteries out of the reach of children. Swallowing batteries
can cause suffocation.
Dispose of used batteries in line with the information provided
in this manual.
First Aid
• Battery fluid may cause blindness if it comes into contact
with the eyes. Immediately wash the eyes thoroughly with
clean water. Do not rub the eyes. Seek medical attention
immediately.
• If leaked fluid gets onto the skin or clothing, there is a risk of
injury. Wash the affected areas with clean water.
Notes
• Batteries must be charged before use. The battery is supplied
partially charged, but it should be fully charged before long pe-
riods of use.
• In order to charge the battery, it must have a temperature of
between 0°C and 35°C / 32°F and 95°F (otherwise the
charger may not turn on or may turn off again).
• Lithium-ion batteries can be charged at any time, regardless of
their current charge level. If a battery is only partly discharged
when charging starts, it is charged to full capacity faster.
• Lithium-ion batteries should only be stored partly charged, i.e.
not when fully discharged or fully charged. For very long storage
periods, batteries should be charged for around 15 minutes
twice a year to prevent total discharge.
• The batteries warm up during the charging process. This is
normal and not a malfunction.
• A new battery only reaches its full capacity after it has been fully
charged and – by use in the camera – discharged 2 or 3 times.
This discharge procedure should be repeated roughly every 25
cycles.

EN
10
Preparations
• Rechargeable lithium-ion batteries generate power through in-
ternal chemical reactions. This reaction is influenced by ambient
temperature and humidity. To maximize the life of the battery, it
should not be exposed to extremely high or low temperatures for
long periods (e.g. in a parked car in summer or winter).
• Even with optimum conditions of use, every battery has a limited
service life. After several hundred charging cycles, this becomes
noticeable as the operating times get significantly shorter.
• The replaceable battery supplies another back-up battery that is
built into the camera. This back-up battery ensures that the date
and time data entered is retained for up to 2 days. If this back-up
battery runs out it must be recharged by inserting a charged
main battery. Once the replaceable battery has been inserted,
the full capacity of the back-up battery is recovered after about
60 hours. This process does not require the camera to be turned
on. However, the date and time will have to be set again.
•
• Remove the battery if you will not be using the camera for a long
period of time. Turn the camera off using the main switch before
removing the battery. Otherwise, after several weeks the battery
could become totally discharged. In this case, the voltage is
sharply reduced as the camera still consumes a small amount of
current for saving your settings even when it is turned off.
• The date and time need to be reset after a battery that was left
in the camera has been exhausted, this is usually after a max-
imum of 3 months.

EN
11
Preparations
PREPARING THE CHARGER
The appropriate mains cord for the local sockets must be attached
to the charger.
Note
The charger automatically adjusts to the relevant mains voltage.
INSERTING THE BATTERY IN THE CHARGER
CHARGE STATUS DISPLAYS
A properly operating charging process is indicated by the status
LED lighting up in green. When it goes out, the battery is fully
charged.
CHANGING THE BATTERY AND MEMORY CARD
▸ Turn off the camera (see p. 18)
Open the door over the battery compartment /memory
card slot

EN
12
Preparations
Inserting the battery
"click"
Removing the battery
Important
Removing the battery with the camera turned on can result in your
settings being deleted, a loss of picture data, and damage to the
memory card.
Charge level displays
The battery charge level is indicated in the monitor.
(see p. 90 “Displays in the monitor/viewfinder”)

EN
13
Insert the memory card
SD, SDHC, or SDXC memory cards can be used in the Leica CL.
1
2
"click"
Removing the memory card
1
2
"click"
Preparations

EN
14
Preparations
Notes
• Do not touch the memory card contacts.
• If the memory card cannot be inserted, check that it is aligned
correctly.
• The range of SD/SDHC/SDXC cards is too large for Leica
Camera AG to be able to completely test all available types for
compatibility and quality. No damage to the camera or the card
is generally to be expected. As some "no name" cards may not
fully comply with the SD/SDHC/SDXC standards, Leica Camera
AG cannot provide any guarantee of function.
• Video recordings in particular require a high write speed.
• Do not open the door and do not remove the memory card or
the battery while the status LED is lit to indicate that the camera
is accessing the memory. Otherwise, the data on the card may
be destroyed and malfunctions can occur in the camera.
• Since electromagnetic fields, electrostatic charges, and defects
on the camera or the card can lead to damage or loss of the
data on the memory card, we recommend that you also transfer
the data to a comptuer and save it there.
• For the same reason, we suggest that you always store the
memory card in an antistatic case.
• Proper camera function cannot be guaranteed when using WLAN
memory cards.
• SD, SDHC, and SDXC memory cards have a write protection
slider, which can be used to prevent unintentional storage and
deletion of pictures. This slider is located on the non-beveled
side of the card; in the lower position, marked LOCK, the data is
protected.
Attention
• Keep memory cards out of the reach of children.
• Swallowing memory cards can cause suffocation.

EN
15
Preparations
Close the door over the battery compartment / memory
card slot

EN
16
Preparations
CHANGING THE LENS
Attaching the lens
1
2
▸ Turn off the camera
▸ Hold the lens at the fixed ring
▸ Align the red index button on the lens with the release button on
the camera body
▸ In this position, insert the lens straight
▸ Turn the lens in a clockwise direction until you hear and feel it
click into place
Detaching the lens
1
2
▸ Turn off the camera
▸ Hold the lens at the fixed ring
▸ Press down the release button on the camera body
▸ Turn the lens in a counter-clockwise direction until its red index
button is aligned with the release button
▸ Remove the lens
Notes
• To prevent dust from getting into the interior of the camera etc.,
it is necessary to always have a lens or a camera bayonet cover.
• For the same reason, when changing lenses work quickly in an
environment that is as dust-free as possible.
• Body cap or lens rear cover should not be stored in the pocket
of clothing, as they attract dust that can get into the camera
when they are fitted.

EN
17
Preparations
COMPATIBLE LENSES
All Leica TL lenses essentially have the same external construction:
they have an external bayonet fitting for the lens hood, an internal
thread for filters, a focus ring, a fixed ring with a red index button
for the changing lens, and a contact strip for transferring informa-
tion and control signals. Leica CL zoom lenses also have an addi-
tional zoom ring with its own index.
Leica SL lenses as well as Leica TL lenses can be attached to the
Leica CL with its L bayonet, making full use of all their functions. In
addition, Leica M and R lenses can be used in conjunction with the
Leica M/R adapters.
Depth of field
Since Leica SL and TL lenses do not have an aperture ring, there is
no depth of field scale. For the corresponding values, refer to the
tables on the Leica Camera AG website.
Exposure metering and control with Vario lens
Some Leica TL and SL zoom lenses have a variable speed, i.e. the
effective aperture opening depends on the focal length set. To
prevent inappropriate exposures, the desired focal length must be
determined before storing the measured value or changing the
combination of shutter speed and aperture. For further details,
refer to the sections under "Exposure metering and control"
starting on page 45. When using non-system compatible flash
units, the aperture setting on the flash unit must correspond to the
actual aperture.
Lens hood
Picture setting Transport setting
Leica CL lenses are supplied with optimized lens hoods. Thanks to
their symmetrical bayonet, they can be attached quickly and easily
including in reverse, for space-saving storage.
Lens hoods reduce stray light and reflection, as well as preventing
damage and dirt on the front lens.
Filters
Screw-on filters can be used on lenses for Leica CL. For the appro-
priate diameter, refer to the technical data in the relevant lens’
manuals.

EN
18
Camera operation
CAMERA OPERATION
8
13
12
10
11
14
9
MAIN SWITCH
The Leica CL is turned ON and OFF via the main switch 8:
– Red dot visible = Turned off
– Red dot not visible = Turned on
The monitor image appears when the camera is turned on.
Notes
• The first time you turn on the camera, or when you turn it on
after resetting all settings, a welcome video starts. The Language
submenu then appears, and when you have made the settings
the Date & Time submenu appears, and finally, once you have
made the settings here, the monitor screen of the picture mode
appears.
• In this manual, all references to the monitor image apply equally
to the viewfinder image since the respective displays are iden-
tical.
SHUTTER BUTTON
The shutter button 9works in two stages. Lightly pressing activates
both automatic focusing and exposure metering and control, and
stores the relevant settings/values. If the camera was previously in
standby mode, this reactivates it and the monitor image appears
again. Pressing the shutter button all the way down takes a picture.
Other manuals for CL
6
Table of contents
Other Leica Digital Camera manuals