Leister DRIVE User manual

DRIVE
Leister Technologies AG
Galileo-Strasse 10
CH-6056 Kaegiswil/Switzerland
Tel. +41-41662 74 74
Fax +41-41662 74 16
www.leister.com
CZ
NTR PL H
DGB FEINL
S

CZ
N
TR
PL
H
2
Deutsch Bedienungsanleitung 3
Englisch Operating Instructions 10
Français Instructions d’utilisation 17
Espanõl Instrucciones de funcionamiento 24
Italiano Istruzioni d’uso 31
Nederland Gebruiksaanwijzing 38
Svenska Bruksanvisning 45
Norsk Bruksanvisning 52
Česky Návod k obsluze 59
Türkçe Kullanım kılavuzu 66
Polski Instrukcja obsługi 73
Hungary Használati utasítás 80
D
GB
F
E
I
NL
S

Anwendung
Leister TRIAC DRIVE bestehend aus
– Antriebseinheit DRIVE
– Heissluft-Gebläse TRIAC AT oder TRIAC ST
– Stützträger
– Andrückrolle
– Überlappschweissdüse
– Handgriff
• Durch die Antriebseinheit DRIVE wird das Überlappschweissen mit dem Kompaktgerät TRIAC DRIVE speziell im
Dachbau und Tunnelbau vereinfacht.
• Halbautomatisches Überlapp-Schweissgerät TRIAC DRIVE ist für den vertikalen und horizontalen Einsatz geeignet.
• Schweissen von thermoplastischen Kunststoffen sowie auch einzelnen Elastoplasten In Form von:
– Dichtungsbahnen
– Folien
– Fugenbänder
– beschichteten Geweben
3
Leister DRIVE
Leister TRIAC DRIVE:
Bedienungsanleitung TRIAC AT oder TRIAC ST und
DRIVE vor Inbetriebnahme aufmerksam lesen und
zur weiteren Verfügung aufbewahren.
DRIVE
TRIAC AT
TRIAC ST
Bedienungsanleitung (Original-Bedienungsanleitung)
D

4
Lebensgefahr beim Öffnen des Gerätes da, spannungsführende Komponen-
ten und Anschlüsse freigelegt werden. Vor dem Öffnen des Gerätes Netzstecker
aus der Steckdose ziehen.
FI-Schalter beim Einsatz des Gerätes auf Baustellen ist für den Personen-
schutz dringend erforderlich.
Nennspannung,die auf dem Gerät angegeben ist, muss mit der Netzspannung
übereinstimmen.
Bei Netzausfall Heissluftgebläse ausfahren.
Gerät vor Feuchtigkeit und Nässe schützen.
FI
230
120
Warnung TRIAC DRIVE
Vorsicht TRIAC DRIVE
Feuer- und Explosionsgefahr bei unsachgemässem Gebrauch von Heissluftgeräten,
besonders in der Nähe von brennbaren Materialien und explosiven Gasen.
Verbrennungsgefahr! Überlappschweissdüse nicht in heissem Zustand berühren.
Gerät abkühlen lassen.
Heissluftstrahl nicht auf Personen oder Tiere richten.
Gerät an eine Steckdose mit Schutzleiter anschliessen. Jede Unterbrechung des
Schutzleiters innerhalb oder ausserhalb des Gerätes ist gefährlich!
Nur Verlängerungskabel mit Schutzleiter verwenden!
Gerät muss beobachtet betrieben werden.Wärme kann zu brennbaren Materiali-
en gelangen, die sich ausser Sichtweite befinden.
Gerät darf nur von ausgebildeten Fachleuten oder unter deren Aufsicht
benützt werden. Kindern ist die Benützung gänzlich untersagt.

5
Technische Daten
Konformität
Leister Technologies AG, Galileo-Strasse 10, CH-6056 Kaegiswil/Schweiz bestätigt, dass dieses Produkt in
der von uns in Verkehr gebrachten Ausführung die Anforderungen der folgenden EU-Richtlinien erfüllt.
Richtlinien: 2006/42
2014/30
2014/35
2011/65
Harmonisierte Normen: EN ISO 12100, EN 55014-1, EN 55014-2, EN 61000-6-2, EN 61000-3-2,
EN 61000-3-3, EN 62233, EN 60335-1, EN 60335-2-45, EN 50581
Kaegiswil, 03.11.2017
Bruno von Wyl, CTO Christoph Baumgartner, GM
Entsorgung
Elektrogeräte, Zubehör und Verpackungen sollen einer umweltgerechten Wiederverwertung
zugeführt werden. Nur für EU-Länder: Werfen Sie Elektrogeräte nicht in den Hausmüll!
Typ DRIVE
Spannung V~ 230 120
Leistung W 100 100
Frequenz Hz 50/60
Antrieb m/min. 0.5 – 3 stufenlos
Masse mm 250 × 165 × 88, Handgriff ø 63
Gewicht kg 2.3 mit 3m Kabel
Konformitätszeichen 2
Sicherheitszeichen 3
Schutzklasse I 1
Anschlussspannung nicht umschaltbar!
Technische Daten zu Heissluft-Gebläse siehe Bedienungs-Anleitung TRIAC AT oder TRIAC ST!
Technische Änderungen vorbehalten

6
Gerätebeschreibung Leister DRIVE
1Netzanschlussleitung Stecker
2Netzanschlussleitung Kupplung
3Netzschalter
4Potentiometer für
Schweissgeschwindigkeit
5Antriebseinheit
6Halterung für Heissluft-Gebläse
7Zwei Einstellschrauben für Halterung
8Stützträger zweifach
9Stützträger einfach
10 Vier Befestigungsschrauben für
Stützträger
11 Andrückrolle
12 Befestigungsschraube für
Andrückrolle
13 Heissluft-Gebläse TRIAC AT oder TRIAC ST
14 Befestigungsschraube für Heissluft-Gebläse
15 Handgriff
16 Überlappschweissdüse
17 Befestigungsschraube Überlappschweissdüse
18 Geräteablage
Gerätebeschreibung von Heissluft-Gebläse siehe Bedienungsanleitung TRIAC AT oder TRIAC ST
1
2
5
16
9
10
3
4
6
13
17
7
11
14
15
8
18
12

7
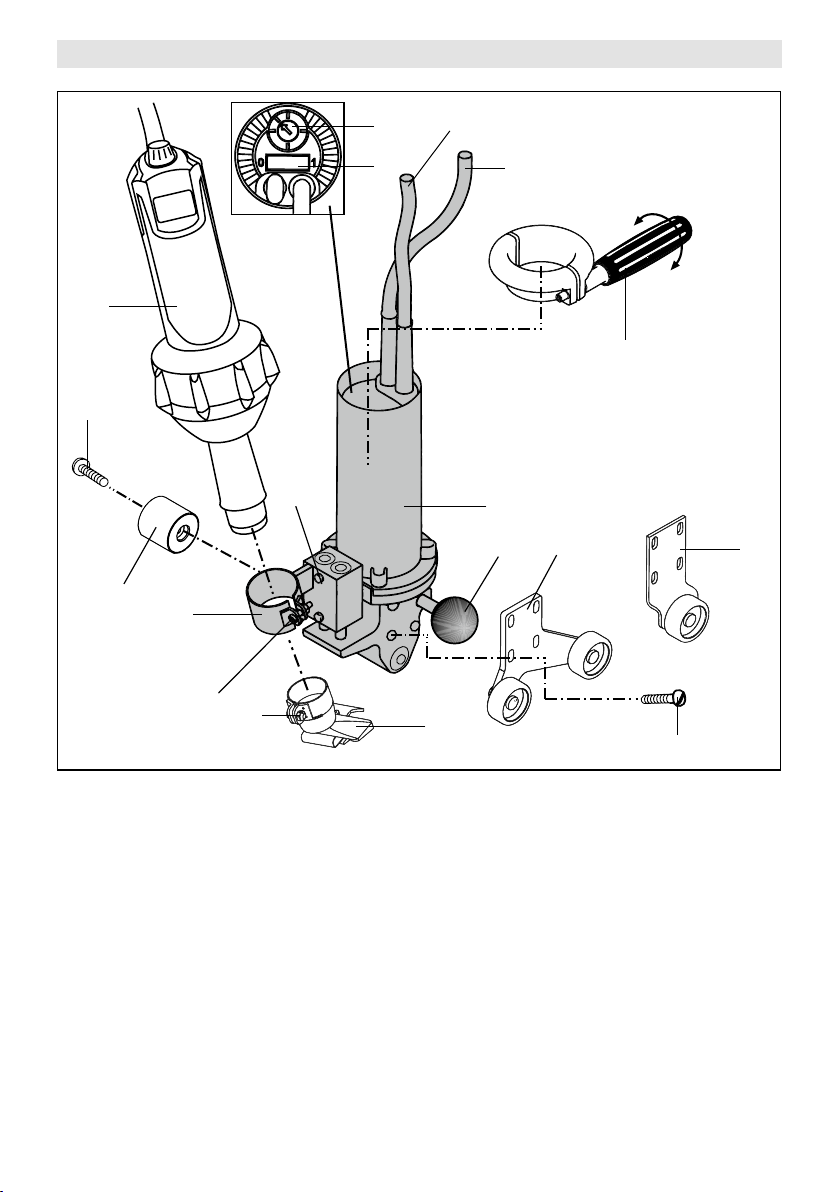
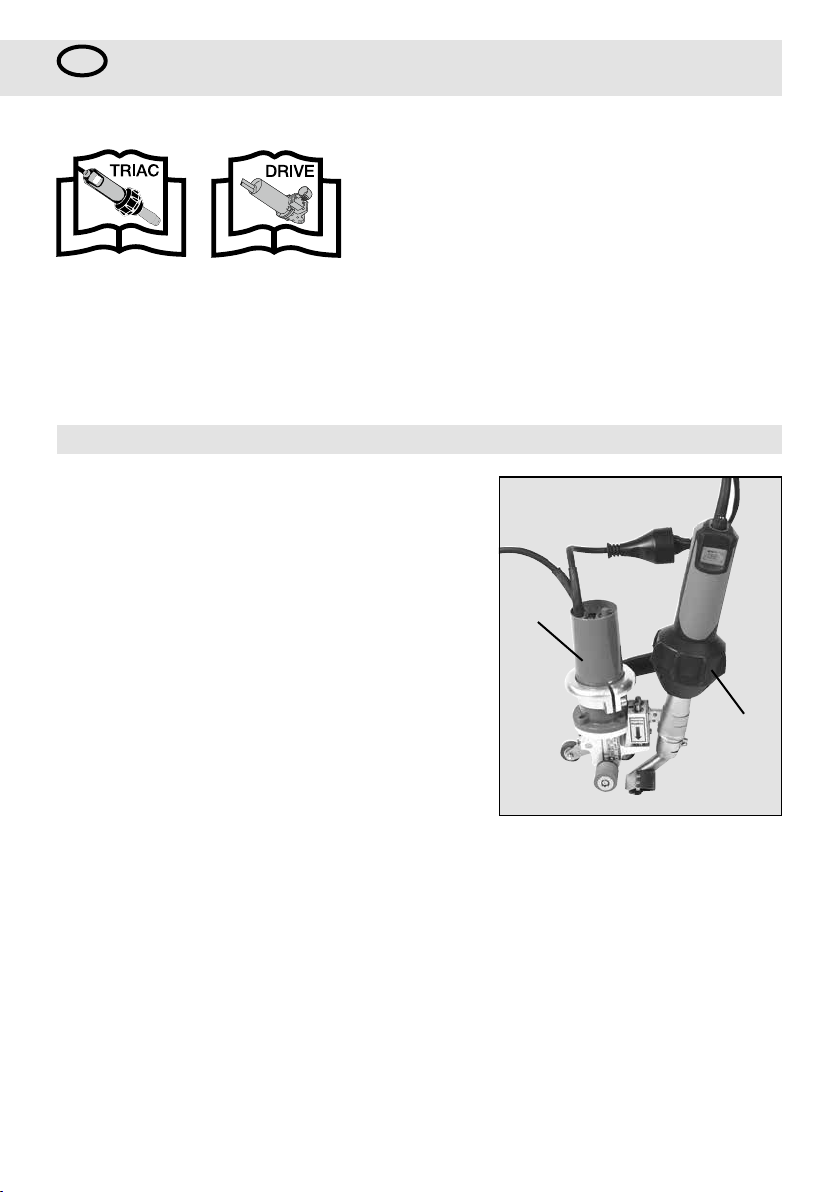
Betriebsbereitschaft Leister DRIVE
•
Vor Inbetriebnahme Netzanschlussleitung (1), Netzanschlussleitung Kupplung (2) und Stecker sowie Verlänge-
rungskabel auf elektrische und mechanische Beschädigung überprüfen
• Je nach Bedarf Andrückrolle, Düse, Handgriff und Stützrolle montieren.
• Montage von Zubehör
– Handgriff (15) auf Antriebseinheit (5) auf die gewünschte Stellung schieben.
Durch Drehen, Handgriff (15) im Uhrzeigersinn befestigen.
– Stützträger zweifach (8) oder Stützträger einfach (9) mit vier Befestigungsschrauben (10) an
Antriebseinheit (5) montieren.
– Andrückrolle (11) mit Befestigungsschraube (12) montieren.
– Heissluft-Gebläse TRIAC AT oder TRIAC ST (13) in die Halterung für Heissluft-Gebläse (6) einschie-
ben. Heissluft-Gebläse muss so eingeschoben werden, dass ein Abstand zwischen Schutzrohrkante und
Halterung für Heissluft-Gebläse (6) 10 mm beträgt (siehe Detail A).
– Befestigungsschraube (14) anziehen.
– Überlappschweissdüse (16) aufschieben.
• Einstellung Stützträger auf Materialstärke (Detail B).
– Vier Befestigungsschrauben Stützträger (10) lösen.
– Teilstück des Schweissmaterials zwischen Antriebseinheit (5) und Stützträger zweifach (8) oder
Stützträger einfach (9) einschieben.
– Stützträger zweifach (8) oder Stützträger einfach (9) bis zum Schweissmaterial schieben.
– Die vier Befestigungsschrauben (10) anziehen.
– Schweissmaterial entfernen.
– Kontrolle der vorgenommenen Einstellung siehe Detail C.
• Einstellung Überlappschweissdüse (Detail D).
– Überlappschweissdüse (16) parallel zur Andrückrolle (11) ausrichten .
– Befestigungsschraube Überlappschweissdüse (17) anziehen.
– Einstellschrauben für Halterung (7) lösen.
– Durch Bewegung des Heissluft-Gebläses (13), Überlappschweissdüse (16) parallel zum verschwei-
ssenden Material ausrichten (Detail F). Um Winkelfehler zu vermeiden, muss der Stützträger zweifach (8)
oder Stützträger einfach (9) und die Andrückrolle zusammen mit dem zu verschweissenden Material analog
Schweissablauf positioniert werden.
– Einstellschrauben für Halterung (7) anziehen.
6
14
10 mm
Schutzrohrkante
Detail A
811
10
5
Schweiss-
material
Detail B Detail D
1 mm
1116
Detail C
8 11
Schweissmaterial

8
Gerät an Nennspannung anschliessen. Nennspannung, die auf dem Gerät angegeben ist, muss mit
der Netzspannung übereinstimmen. Bei Netzausfall Heissluftgebläse ausfahren.
• Inbetriebnahme Heissluft-Gebläse Leister TRIAC AT oder TRIAC ST
(siehe separate Bedienungsanleitung):
– Einstellung Temperatur mit Potentiometer
– Netzschalter einschalten
– Aufheizzeit ca. 4 min.
• ACHTUNG: TRIAC DRIVE in Stand-by Position auf
ablage (18) legen (siehe Bild).
Feuerfeste Unterlage verwenden
• Netzschalter (3) EIN
– Je nach Folie oder Dichtungsbahn und Witterungseinflüssen die Schweissgeschwin-
digkeit mit Potentiometer (4) einstellen.
Probeschweissung Leister DRIVE
•
Überlapp-Schweissgerät Leister TRIAC DRIVE in das überlappgelegte
Schweissmaterial einfahren und durch
Handgriff (15) oder Antriebseinheit (5) gleichmässig andrücken. Schweissvorgang beginnt.
•
Schweissnaht kontrollieren: Schweisswulst/Fügeweg (Detail G). Bei Bedarf
Schweissgeschwindigkeit mit
Potentiometer (4) oder Schweisstemperatur (Potentiometer Heissluft-Gebläse) korrigieren.
Testschweissung gemäss Schweissanleitung des Materialherstellers und nationalen Normen
oder Richtlinien vornehmen. Testschweissung überprüfen.
Schweissablauf Leister DRIVE
• Vor dem Einfahren in die Dichtungsbahn oder Folie müssen Andrückrolle (11) und Überlappschweissdü-
se (16) sauber sein.
• Ü
berlappschweissdüse in die überlappgelegte Dichtungsbahn oder Folie einfahren und positionieren (Detail F).
• Das Gerät mit gleichmässigem Druck mittels Handgriff (15) und Antriebseinheit (5) führen. WICHTIG: Heiss-
luft-Gebläse (13) darf während dem Schweissvorgang nicht als Griff verwendet werden!
• Ende des Schweissvorganges, Gerät ausfahren.
• Überlappschweissdüse (16) mit Drahbürste reinigen.
• Heissluft-Gebläse abkühlen lassen.
• Gerät ausschalten und vom Netz trennen.
Detail F Detail G
16 11 Schweissmaterial
Schweisswulst Schweissmaterial
19
Überlappschweissdüse
Feuerfeste Unterlage
Schweissvorbereitung Leister DRIVE
120
230

9
Zubehör
Es darf nur Leister-Zubehör verwendet werden.
• Überlappschweissdüse
• Andrückrolle
• Stützträger einfach, Stützträger zweifach
• Handgriff
• Heissluft-Gebläse TRIAC AT
• Heissluft-Gebläse TRIAC ST
Schulung
Leister Technologies AG und deren autorisierte Service-Stellen bieten kostenlose Schweisskurse und Einschulun-
gen an.
Wartung
• Überlappschweissdüse (16) mit Drahtbürste reinigen.
•
Netzanschlussleitung (1), Netzanschlussleitung Kupplung (2) und Stecker sowie Verlängerungskabel auf elektri-
sche und mechanische Beschädigung überprüfen
Service und Reparatur
• Kohlenstand der Motoren nach ca. 1‘000 Betriebsstunden durch Ihre Service-Stelle kontrollieren lassen.
• Reparaturen sind ausschliesslich von autorisierten Leister-Service-Stellen ausführen zu lassen. Diese
gewährleisten innert 24 Stunden einen fachgerechten und zuverlässigen Reparatur-Service mit Original-Er-
satzteilen gemäss Schaltplänen und Ersatzteillisten.
Gewährleistung
• Für dieses Gerät gelten die vom direkten Vertriebspartner/Verkäufer gewährten Garantie- oder Gewährleistungs-
rechte ab Kaufdatum. Bei einem Garantie- oder Gewährleistungsanspruch (Nachweis durch Rechnung oder
Lieferschein) werden Herstellungs- oder Verarbeitungsfehler vom Vertriebspartner durch Ersatzlieferung oder
Reparatur beseitigt. Heizelemente sind von der Gewährleistung oder Garantie ausgeschlossen.
• Weitere Garantie- oder Gewährleistungsansprüche werden im Rahmen des zwingenden Rechts ausgeschlossen.
• Schäden, die auf natürliche Abnutzung, Überlastung oder unsachgemässe Behandlung zurückzuführen sind,
werden von der Gewährleistung ausgeschlossen.
• Keine Garantie- oder Gewährleistungsansprüche bestehen bei Geräten, die vom Käufer umgebaut oder verändert
wurden.

10
Operating Instructions
(Translation of the original operating instructions)
GB
Application
Leister TRIAC DRIVE consists of
– DRIVE unit
– Hot air blower, TRIAC AT or TRIAC ST
– Supporting carrier
– Pressure roller
– Overlap welding nozzle
– Guide handle
• With the drive unit, DRIVE, overlap welding using the compact TRIAC DRIVE tool is simplified, especially for roof
and tunnel construction.
• The semi-automatic overlap welding tool, TRIAC DRIVE, is suitable for vertical and horizontal use.
• Welding of thermoplastics as well as single ply elastoplasts in the form of:
– Geomembranes
– Foils
– Water bars
– Coated fabrics
Leister DRIVE
Leister TRIAC DRIVE: Read the TRIAC AT or TRIAC
ST and DRIVE operating instructions carefully befo-
re using and keep for future reference.
DRIVE
TRIAC AT
TRIAC ST

11
Danger to life when opening the device as live components and connections are
exposed. Unplug the line/mains plug from the plug socket before opening the device.
For personal protection, we strongly recommend the tool to be connected to an
RCCB (Residual Current Circuit Breaker) before using it on construction sites.
The rated voltage stated on the tool must correspond with the mains voltage.
Extract hot-air blower in case of power breakdown.
Protect the tool from damp and wet.
FI
230
120
Warning TRIAC DRIVE
Caution TRIAC DRIVE
Incorrect use of the hot air tool can present a fire and explosion hazard
especially near combustable materials and explosive gases.
Danger of getting burned! Do not touch the overlap welding nozzle when they are
hot. Let the tool cool down. Do not point the hot air flow in the direction of people
or animals.
Only connect the tool to a receptacle with protective earth conductor. Any dis-
connection of the protective earth conductor, in or outside the tool is dangerous!
Only use extension lead with protective earth conductor .
The tool must be operated under supervision.
Heat can ignite flammable materials which are not in view.
The device machine may only be used by qualified specialists or under their supervi-
sion. Children are not authorized to use this device.

12
Technical data
Conformity
Leister Technologies AG, Galileo-Strasse 10, CH-6056 Kaegiswil/Switzerland confirms that this product, in
the version as brought into circulation through us, fulfils the requirements of the following EC directives.
Directives: 2006/42
2014/30
2014/35
2011/65
Harmonised standards: EN ISO 12100, EN 55014-1, EN 55014-2, EN 61000-6-2, EN 61000-3-2,
EN 61000-3-3, EN 62233, EN 60335-1, EN 60335-2-45, EN 50581
Kaegiswil, 03.11.2017
Bruno von Wyl, CTO Christoph Baumgartner, GM
Disposal
Electrical equipment, accessories and packaging should be recycled in an environmentally friendly way.
For EU countries only: Do not dispose of electrical equipment with household refuse!
Type DRIVE
Voltage V~ 230 120
Power consumption W 100 100
Frequency Hz 50/60
Drive speed m/min. 0.5 – 3 stepless
Dimensions mm 250 × 165 × 88, handle ø 63
Weight kg 2.3 with 3 m power supply cord
Mark of conformity 2
Approval mark 3
Protection class I 1
Mains voltage cannot be switched over!
For hot air blower technical data, refer to the TRIAC AT or TRIAC ST operating instructions!
Technical data and specifications are subject to change without prior notice

13
Tool description Leister DRIVE
1Power supply cord plug
2Power supply cord coupling
3Mains switch
4Potentiometer for welding speed
5Drive unit
6Holder for hot air blower
7Two adjusting screws for holder
8Double supporting carrier
9Single supporting carrier
10 Four fixing screws for supporting carrier
11 Pressure roller
12 Fixing screw for pressure roller
13 Hot air blower, TRIAC AT or TRIAC ST
14 Fixing screw for hot air blower
15 Guide handle
16 Overlap welding nozzle
17 Fixing screw for overlap welding nozzle
18 Tool stowage bar
For tool description for hot air blower, refer to TRIAC AT or TRIAC ST operating instructions.
1
2
5
16
9
10
3
4
6
13
17
7
11
14
15
8
18
12

14
Operating condition Leister DRIVE
• Before putting into operation, check power supply cord (1), Power supply cord coupling (2) and
connector as well as extension cable for electrical and mechanical damage
• Assemble pressure roller, nozzle, handle and supporting carrier as required.
• Assembling accessories
– Push handle (15) onto drive unit (5) up to the required setting. Fix handle (15) by
turning clockwise.
– Assemble double supporting carrier (8) or single supporting carrier (9) onto drive unit (5) using the four
fixing screws for supporting carrier (10).
– Assemble pressure roller (11) using fixing screw (12).
– Push hot air blower, TRIAC AT or TRIAC ST (13) into holder for hot air blower (6). The hot air blower must
be pushed in so that the distance between the end of the protective tube and holder for hot air blower (6) is
10 mm (see Detail A).
– Tighten fixing screw (14).
– Push on overlap welding nozzle (16).
• Adjusting supporting carrier to the material thickness (Detail B).
– Loosen the four fixing screws for supporting carrier (10).
– Feed in a small section of the material to be welded between drive unit (5) and double supporting carrier (8)
or single supporting carrier (9).
– Move double supporting carrier (8) or single supporting carrier (9) up to the material to be welded.
– Tighten the four fixing screws for supporting carrier (10).
– Remove the material to be welded.
– Check the previous setting (see Detail C).
• Adjusting overlap welding nozzle (Detail D).
– Line up overlap welding nozzle (16) parallel to the pressure roller (11).
– Tighten fixing screw for overlap welding nozzle (17).
– Loosen the adjusting screws for holder (7).
– Line up the overlap welding nozzle (16) parallel to the material to be welded by moving the hot air blower
(13) (Detail F). In order to avoid welding problems, the double supporting carrier (8) or single supporting
carrier (9) and the pressure roller must be positioned together with the material being welded.
– Tighten adjusting screws for holder (7).
6
14
10 mm
Protection tube end
Detail A
811
10
5
Material to
be welded
Detail B Detail D
1 mm
1116
Detail C
8 11
Material to be welded

15
Connect tool to rated voltage.
Rated voltage stated on the device must correspond to line/mains voltage.
Extract hot-air blower in case of power breakdown.
•
Start up hot air blower Leister TRIAC AT or TRIAC ST (see separate operating
instructions):
– Adjust temperature by means of potentiometer
– Switch on mains switch
– Warm up time approx. 4 min.
• CAUTION: Place TRIAC DRIVE in standby position on tool stowage
bar (18) (see picture). Use fireproof base.
• Mains switch (3) ON
– Adjust the welding speed by means of potentiometer (4)
depending on the foil or membrane and weather conditions.
Test weld Leister DRIVE
• Position the overlap welding tool, Leister TRIAC DRIVE between the overlapped material to be welded and press
downwards evenly by means of handle (15) or drive unit (5). The welding process starts.
• Monitor the welding seam: welding bead/seam thickness reduction (Detail G). Adjust the welding speed by means
of potentiometer (4) or the welding temperature (by means of potentiometer hot air blower) as required.
Perform a test welding according to the welding instructions of the material manufacturer and the
national standards or guidelines.
Approve the test welding.
Welding procedure Leister DRIVE
• Pressure roller (11) and overlap welding nozzle (16) must be clean before positioning the tool between
the membrane or foil.
• Position the overlap welding nozzle between the overlapped membrane or foil (Detail F).
• Guide the tool at even pressure by means of the handle (15) and drive unit (5). IMPORTANT: the hot air blower
(13) is not to be used as a handle during the welding process!
• At the end of the welding process, take out the tool.
• Clean overlap welding nozzle (16) with a wire brush.
• Allow hot air blower to cool down.
• Switch off tool and disconnect from the mains.
Detail F Detail G
16 11 Material to be
welded
Welding bead Material to be welded
19
Overlap welding nozzle
Fireproof base
Welding preparation Leister DRIVE
120
230

16
Accessories
On ne doit utiliser que des accessoires Leister.
• Overlap welding nozzle
• Pressure roller
• Single supporting carrier, double supporting carrier
• Guide handle
• Hot air blower TRIAC AT
• Hot air blower TRIAC ST
Training
Leister Technologies AG and its authorised Service Centres offer free welding courses and training.
Informa-
tionen below www.leister.com.
Maintenance
• Clean the overlap welding nozzle (16) with a wire brush.
•
Check power supply cord (1), Power supply cord coupling (2) and connector as well as extension
cable for electrical and mechanical damage
Service and repair
• Have your Service Centre check the motor brushes after about 1,000 hours of operation.
• Repairs should only be carried out by authorised Leister Service Centres. They guarantee a correct and
reliable repair service within 24 hours, using original spare parts in accordance with the circuit diagrams
and spare parts lists.
Warranty
• For this tool, the guarantee or warranty rights granted by the relevant distributor/seller shall apply. In case of gu-
arantee or warranty claims any manufacturing or workmanship defects will either be repaired or replaced by the
distributor at its discretion. Warranty or guarantee rights have to be verified by an invoice or a delivery document.
Heating elements shall be excluded from warranty or guarantee.
• Additional guarantee or warranty claims shall be excluded, subject to mandatory provisions of law.
• Warranty or guarantee shall not apply to defects caused by normal wear and tear, overload or improper handling.
• Warranty or guarantee claims will be rejected for tools that have been altered or changed by the purchaser.

17
Applications
Leister TRIAC DRIVE comprend:
– L´unité motrice DRIVE
– Une soufflerie à air chaud
TRIAC AT ou TRIAC ST
– Un support
– Rouleau de pression
– Une buse de soudage par
recouvrement
– Une poignée
• L´unité motrice DRIVE facilite le soudage par recouvrement avec l´appareil compact TRIAC DRIVE, en particulier lors de
la construction de tunnel et de toitures.
• La soudeuse semi-automatique par recouvrement TRIAC DRIVE est utilisable en position horizontale ou verticale.
• Soudage des thermoplastes ainsi que de certains élastomères sous la forme de:
– geomembranes
– feuilles d´étanchéités
– bandes de dilatation
– tissus enduites
Leister DRIVE
Instructions
d‘utilisation
(Traduction de la notice d’utilisation originale)
F
Leister TRIAC DRIVE: Instructions d’utilisation à lire très
attentivement avant mise en marche du TRIAC AT ou
TRIAC ST et DRIVE et à conserver pour dispositions ultéri-
eures.
DRIVE
TRIAC AT
TRIAC ST

18
Danger mortel à l’ouverture de l’appareil, par le dégagement de composants et de
raccords conducteurs. Débrancher la fiche du secteur avant toute ouverture de l’ap-
pareil.
En cas d’emploi de l’appareil sur des chantiers, utiliser obligatoirement un inter-
rupteur FI pour garantir la sécurité des personnes.
La tension nominale indiquée sur l’étiquette mentionnant le type de l’ap-
pareil doit correspondre à la tension et à la fréquence du secteur.
En cas de panne de courant, ressortir la soufflerie à air chaud.
Protéger l’appareil de l’humidité.
FI
230
120
Avertissement TRIAC DRIVE
Precautions TRIAC DRIVE
Risque d’incendie et d’explosion en cas d’utilisation inappropriée des appareils à air
chaud, en particulier à proximité de matières inflammables et de gaz explosifs.
Risque de brûlure! Ne pas toucher à la buse de soudage par recouvrement si elle
est encore chaude. Laisser refroidir l’appareil.
Ne pas diriger le jet d’air chaud ni vers des personnes, ni vers des animaux.
Brancher l’appareil sur une prise pourvue d’une mise à la terre. Toute interruption du
contact à la terre ayant lieu dans l’appareil ou à l’extérieur peut s’avérer dangereuse!
En cas d’utilisation de rallonge, n’employer que des rallonges munies du contact
à la terre!
L’appareil doit faire l’objet d’une observation continuelle pendant son fonctionne-
ment.
La chaleur peut atteindre des matières inflammables situées hors de la visibilité.
La machine ne doit être utilisée que par des spécialistes qualifiés ou sous leur
surveillance. Les enfants ne sont pas autorisés d’utiliser cette machine.

19
Caracteristiques Techniques
Type DRIVE
Tension V~ 230 120
Puissance W 100 100
Fréquence Hz 50/60
Entraînement m/min. 0.5 – 3 en continu
Dimensions mm 250 × 165 × 88, Poignée ø 63
Poids kg 2.3, 3m de câble inclusl
Signe de conformité 2
Signe de protection 3
Classe de protection I 1
Tension de branchement non commutable!
Les données techniques de la soufflerie à air chaud se trouvent dans le mode d´emploi du
TRIAC AT ou TRIAC ST.
Sous réserve de modifications techniques
Conformité
Leister Technologies AG, Galileo-Strasse 10, CH-6056 Kaegiswil/Suisse confirme que ce produit correspond,
en ce qui concerne la conception et le modèle type dans la version commercialisée par notre entreprise, aux régle-
mentations figurant dans les directives européennes désignées ci-dessous.
Directives: 2006/42
2014/30
2014/35
2011/65
Normes harmonisées: EN ISO 12100, EN 55014-1, EN 55014-2, EN 61000-6-2, EN 61000-3-2,
EN 61000-3-3, EN 62233, EN 60335-1,EN 60335-2-45, EN 50581
Kaegiswil, 03.11.2017
Bruno von Wyl, CTO Christoph Baumgartner, GM
Elimination de déchets
Les appareils électroniques, les accessoires et les emballages doivent être recyclés en respectant
l’environnement. Pour les pays de l’UE uniquement: ne pas jeter les appareils électroniques avec
les déchets ménagers!

20
Description de l’appareil Leister DRIVE
1Prise et câble électrique
2Câble électrique, raccord
3Interrupteur principal
4Potentiomètre de vitesse de soudure
5Unité d´entraînement
6Dispositif de fixation pour la soufflerie à air chaud
7Deux vis de réglage pour le dispositif de fixation
8Support double
9Support simple
10 Quatre vis de fixation pour le support
11 Rouleau de pression
12 Vis de fixation pour le rouleau de pression
13 Soufflerie à air chaud TRIAC AT ou TRIAC ST
14 Vis de fixation pour la soufflerie à air chaud
15 Poignée
16 Buse de soudage par recouvrement
17 Vis de fixation pour la buse de soudage par
recouvrement
18 Reposoir
Les données techniques de la soufflerie à air chaud se trouvent dans le mode d´emploi du
TRIAC AT ou TRIAC ST
1
2
5
16
9
10
3
4
6
13
17
7
11
14
15
8
18
12
Other manuals for DRIVE
1
Table of contents
Languages: