manuals.online logo
Brands
  1. Home
  2. •
  3. Brands
  4. •
  5. Lejonklou
  6. •
  7. Control Unit
  8. •
  9. Lejonklou Kikkin 2.2 User manual

Lejonklou Kikkin 2.2 User manual

Popular Control Unit manuals by other brands

Seitz 14A80 user manual

Seitz

Seitz 14A80 user manual

Wilo RS485 Installation and operating instructions

Wilo

Wilo RS485 Installation and operating instructions

Becker CentralControl CC41 Commissioning Instruction

Becker

Becker CentralControl CC41 Commissioning Instruction

SICK CDB650 operating instructions

SICK

SICK CDB650 operating instructions

Panduit NetKey NKP5E88M Series installation instructions

Panduit

Panduit NetKey NKP5E88M Series installation instructions

MX Options Concentric Petite Fitting instructions

MX

MX Options Concentric Petite Fitting instructions

Clean Water Systems Fleck 2510 Installation & start?up guide

Clean Water Systems

Clean Water Systems Fleck 2510 Installation & start?up guide

Fairchild FSB44104A user guide

Fairchild

Fairchild FSB44104A user guide

LEGRAND Wattstopper LMIN-104 installation instructions

LEGRAND

LEGRAND Wattstopper LMIN-104 installation instructions

PMK ATT10BNCS instruction manual

PMK

PMK ATT10BNCS instruction manual

Tektronix TDS3FFT user manual

Tektronix

Tektronix TDS3FFT user manual

Woodward easYgen Technical manual

Woodward

Woodward easYgen Technical manual

Balluff BNI EIP-502-105-R015 user guide

Balluff

Balluff BNI EIP-502-105-R015 user guide

NXP Semiconductors TWR-LS1021A Getting started

NXP Semiconductors

NXP Semiconductors TWR-LS1021A Getting started

Advantech PCM-3117 Startup manual

Advantech

Advantech PCM-3117 Startup manual

Danfoss MCO 101 manual

Danfoss

Danfoss MCO 101 manual

Moons' Lin Engineering R701P user manual

Moons'

Moons' Lin Engineering R701P user manual

Aventics RV1 operating instructions

Aventics

Aventics RV1 operating instructions

manuals.online logo
manuals.online logoBrands
  • About & Mission
  • Contact us
  • Privacy Policy
  • Terms and Conditions

Copyright 2025 Manuals.Online. All Rights Reserved.

Technical specifications for Kikkin 2.2
Dimensions (WxHxD) 103x59x180 mm
Weight 950 g
Mains voltage 230 V~ 50 Hz
F se (inside the case) T1A (slow blow)
Freq ency range 2 Hz to 200 kHz
Vol me range -80 to +20 dB in 1dB steps
Inp t impedance/Level 12 kΩ/0 to 7,5V
O tp t impedance/Rec. load/Level 300 Ω/>1 kΩ/0 to 7,5V
Power cons mption Less than 5 W
Warning
Lethal voltages inside, do not open! No ser serviceable parts
inside. Refer servicing to q alified personnel. To red ce the risk of
fire or electric shock, do not expose this appliance to rain or
moist re. If the power cord needs replacing, please contact
Lejonklo or yo r retailer. Never se an appliance with a damaged
power cord, as there is risk of lethal shock.
The power cord is internally colo red as follows: Live=Brown,
Ne tral=Bl e, Gro nd=Green/Yellow.
This appliance m st be earthed.
CE Declaration of conformity:
This appliance follows the directives 73/23/EEC (LVD) and
89/336/EEC (EMC) by conforming to the following standards:
EN60065:2002 (Safety)
EN55013:2001 (Emissions)
EN55020:2002 (Imm nity)
Contact information
Firma Fredrik Lejonklo
Vänortsgatan 57
752 64 Uppsala
Sweden
Website: www.lejonklo .com
Email: info@lejonklo .com
Tel: +4670 558 0549
Thank you for buying Lejonklou Kikkin!
Please read this man al caref lly before sing yo r Kikkin.
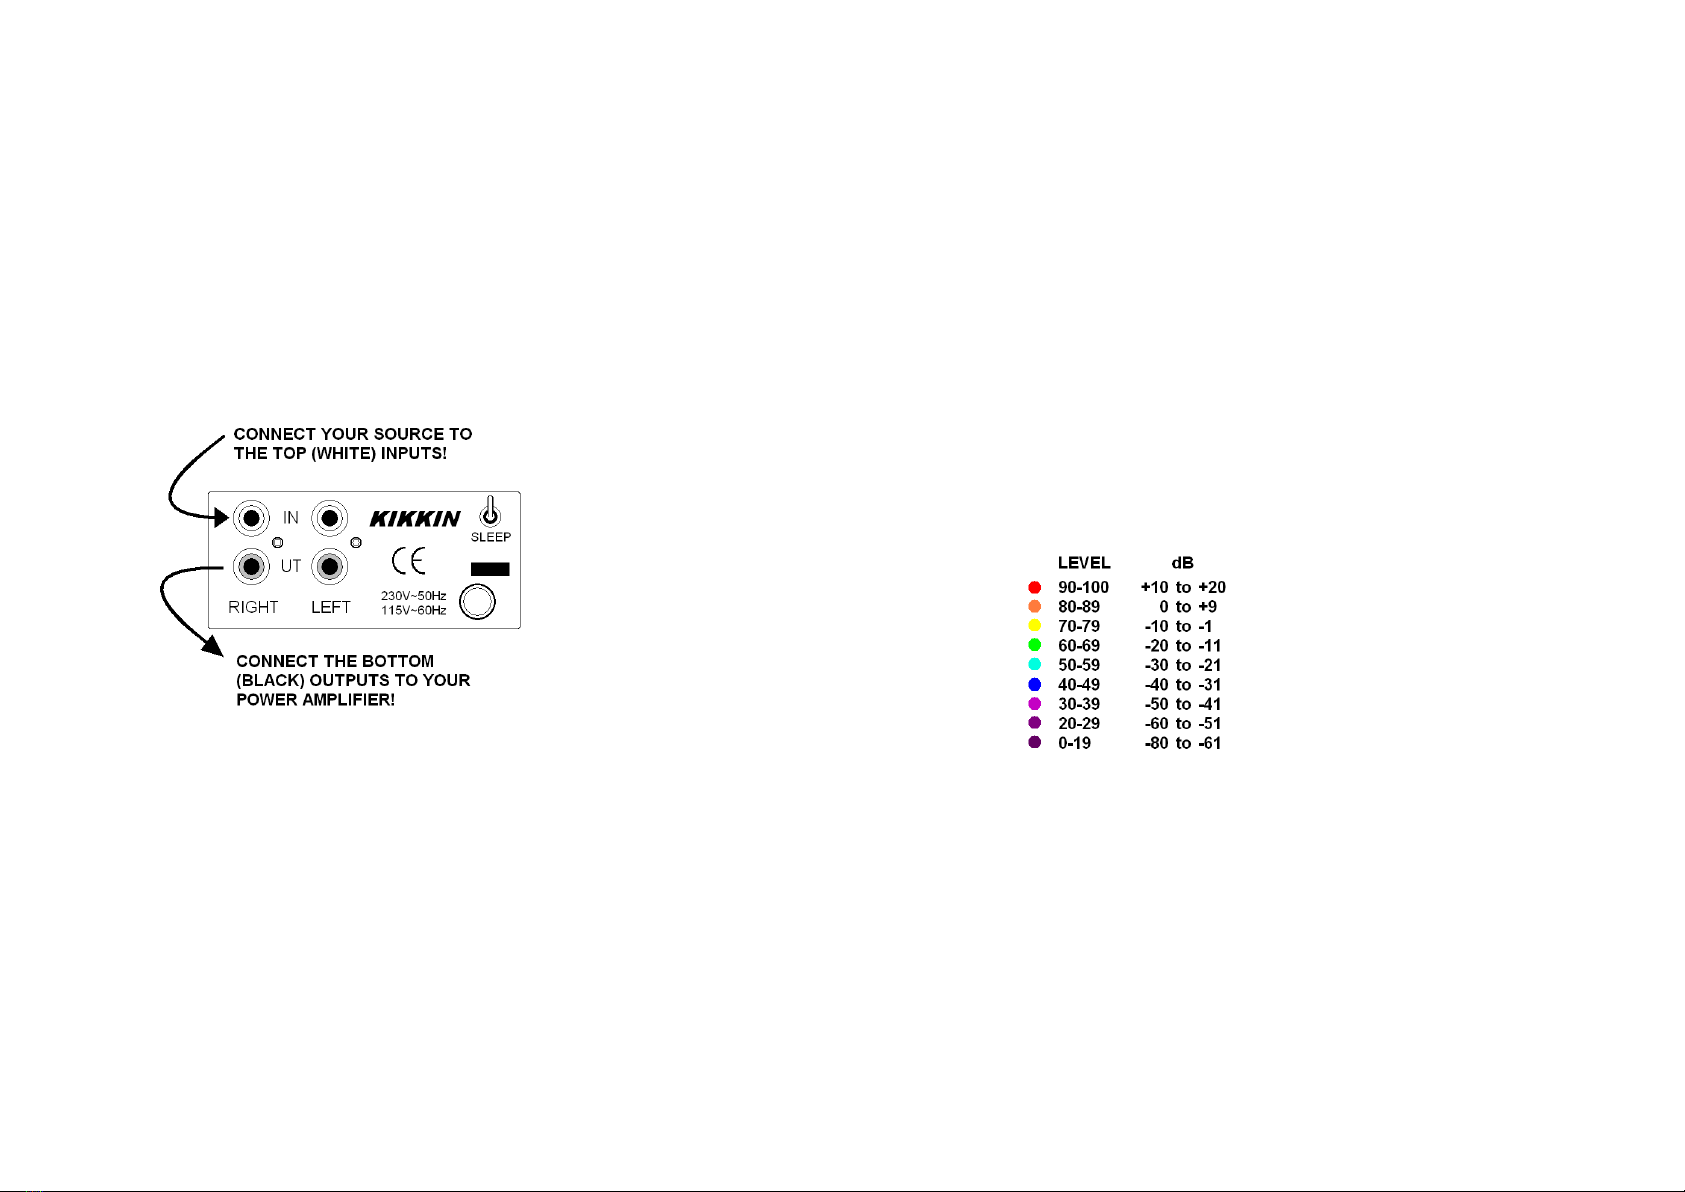
Connections
Kikkin is a stereo vol me control. Before connecting it, make
s re that all power amplifiers are switched off. Start by
connecting the left and right analog e line level o tp ts of
yo r so rce to the two top (white) inp ts of Kikkin.
The o tp ts (black) are below the inp ts and sho ld be
connected to yo r power amplifier(s). See ill stration below.
Please note that Kikkin inverts the phase to yo r power
amplifier. Therefore connect the positive o tp t (red) of the
power amplifier to the negative (black) lo dspeaker terminal,
and the negative o tp t to the positive lo dspeaker terminal.
Connect the power cord to switch Kikkin on. Make sure
that your power amplifier is always switche off when
Kikkin is connecte or isconnecte from the mains!
If the power cord pl g is of a type that can be reversed in
position, the so nd can be improved if the live phase of yo r
power socket is on the same side as the x in the name Volex
printed on the pin side of Kikkin’s power cord pl g.
How to use your Kikkin
Kikkin can only be controlled by a remote control (not
s pplied) that follows the Philips RC5 standard. Yo can
choose to let yo r Kikkin also accept RC5 commands for
TV sets. This option was added beca se there are many
simple remote controls available that are only for TV se. To
activate TV commands, change the position of the rear
SLEEP switch directly after Kikkin has been pl gged into
the mains. If the switch is not changed (either p or down)
d ring the start p seq ence when the vol me indicator
blinks red, Kikkin will only accept amplifier commands.
Kikkin is controlled with three b ttons: +VOL, -VOL and
MUTE. The vol me has 101 levels and each step is 1 dB.
The vol me indicator on the front tells yo which vol me
level Kikkin is c rrently at. See the table below.
The MUTE b tton has d al f nctions: Press q ick to lower
the vol me by 10 dB (fast blink). Press longer to m te the
vol me entirely (slow blink). Activating the SLEEP switch
will make the digital section of Kikkin pa se after 3 seconds.
This fades the vol me indicator and improves the so nd.
We hope you will enjoy your Kikkin!
Kikkin has a very low power cons mption and is designed to
be operating contin ally. We recommend, however, that yo
disconnect yo r Kikkin from the mains d ring th nder-
storms and when left n sed for longer periods of time.