LENCO SCD-26 User manual

STEREO FM RADIO WITH CD PLAYER
INSTRUCTION MANUAL
SCD-26
For information and support, www.lenco.com
REVISED DATE : 20 / 04 / 16 , MODEL : SR26NE / CD VERSION / ERP2 ( NEW )
LENCO / SCD-26 / ENGLISH FM ONLY , I/M , 230V~50Hz , TCD05C
NEW LAST PAGE

WARNING
CLASS 1 LASER PRODUCT
This product contains a low power laser device.
CLASS 1 LASER PRODUCT
APPAREIL Á LASER DE CLASSE 1
PRODUCTO LASER DE CLASE 1
CAUTION
INVISIBLE LASER RADIATION
WHEN OPEN AND INTERLOCKS
DEFEATED.
AVOID EXPOSURE TO BEAM
PRECAUTIONS
Follow the advice below for safe and appropriate operations.
ON PLACEMENT
• Donotusetheunitinplaceswhichareextremelyhot,cold,dusty,orhumid.
• Placetheunitonaatandevensurface.
• Donotrestricttheairowoftheunitbyplacingitinaplacewithpoorairow,bycoveringitwithacloth,orby
placingitonacarpet.
ON SAFETY
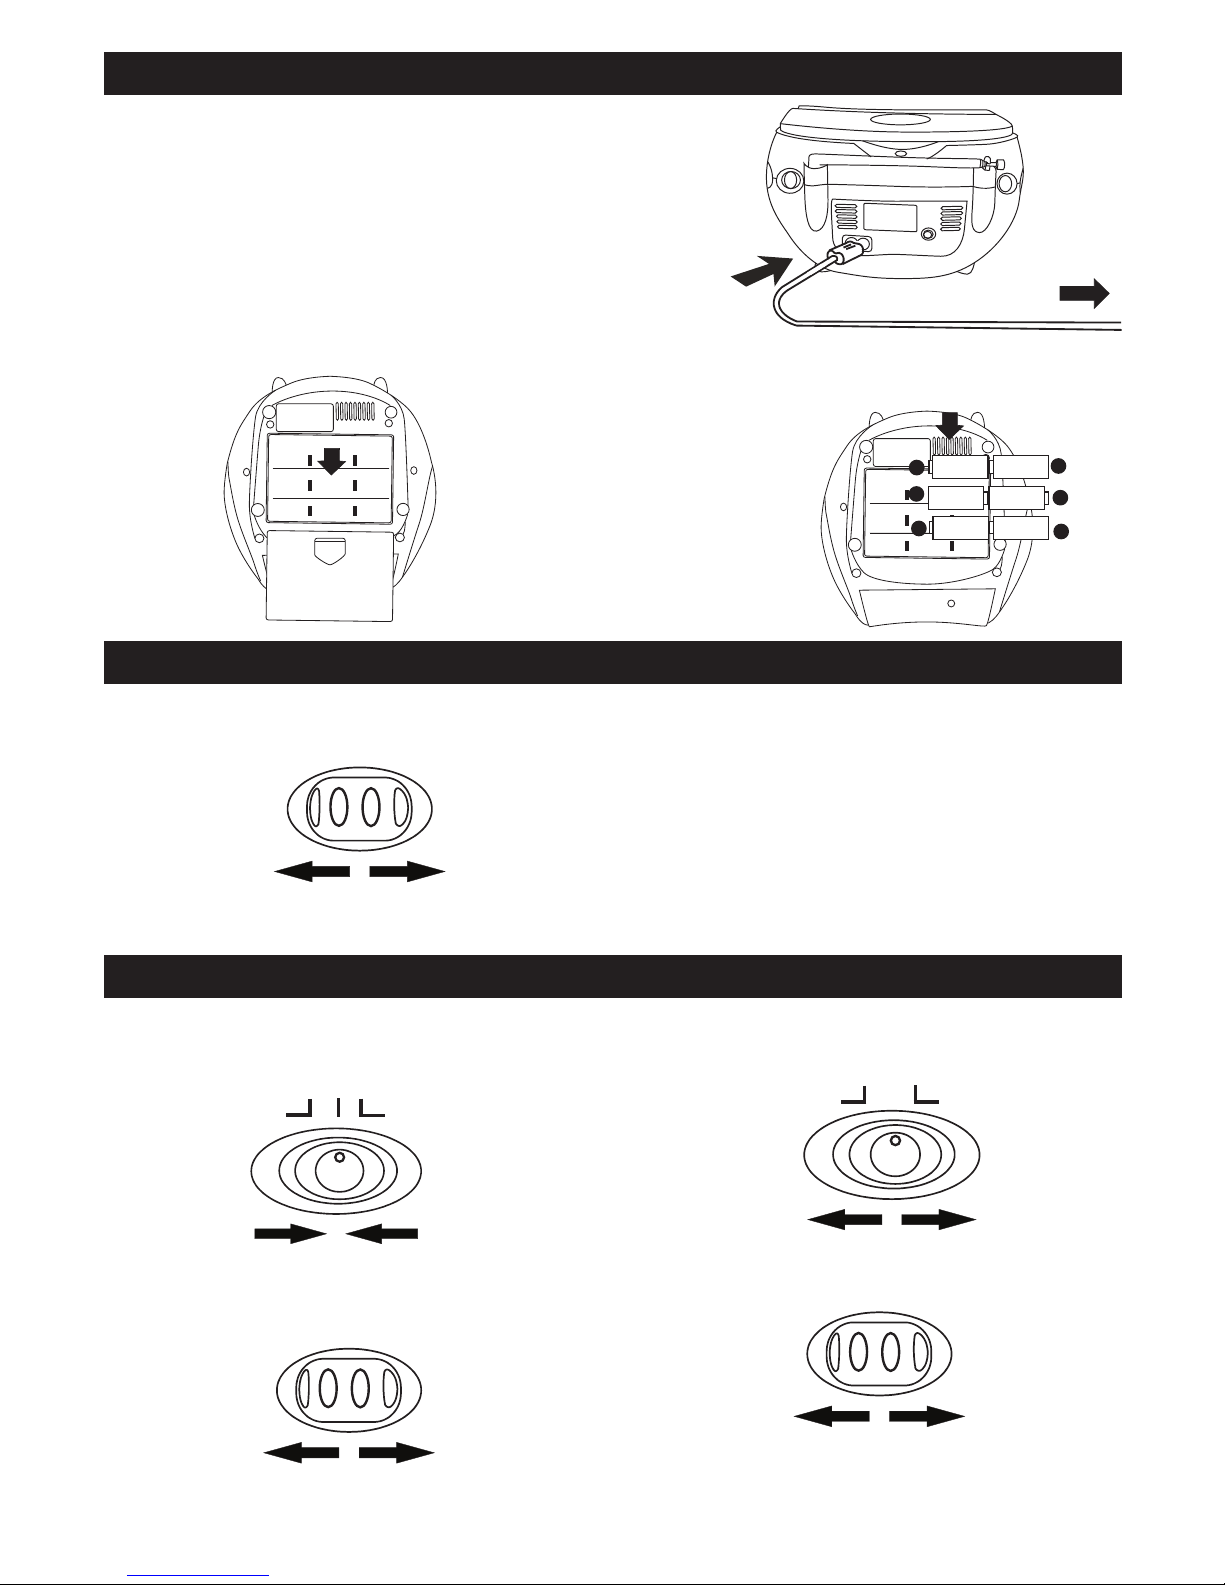
• WhenconnectinganddisconnectingtheACcord,griptheplugandnotthecorditself.Pullingthecordmay
damageitandcreatehazard.
• Whenyouarenotgoingtousetheunitforalongperiodoftime,disconnecttheACpowercord.
ON AC VOLTAGE
• Beforeuse,checkthattheratedvoltageofyourunitmatchesyourlocalvoltage.
ON CONDENSATION
• Whenleftinaheatedroomwhereitiswarmanddamp,waterdropletsorcondensationmayforminsidethe
CDplayer.
• Whenthereiscondensationinsidetheunit,theunitmaynotfunctionnormally.
• Letitstandfor1to2hoursbeforeturningthepoweron,orgraduallyheattheroomupanddrytheunitbeforeuse.
* Ensureaminimumdistanceof5cmaroundtheapparatusforsufcientventilation.
* Ensurethattheventilationisnotimpededbycoveringtheventilationopeningswithitems,suchasnewspapers,
table-cloths, curtains, etc..
* Donotplacenakedamesources,suchaslightedcandlesontheapparatus.
* Takeattentiontotheenvironmentalaspectsofbatterydisposal.
* Usetheapparatusonlyinmoderateclimates(notintropicalclimates).
* Donotexposetheapparatustodrippingorsplashing.
* Donotplaceobjectslledwithliquids,suchasvases,ontheapparatus.
* Batteryshallnotbeexposedtoexcessiveheatsuchassunshine,reorthelike.
* ThemainsplugofapparatusshouldnotbeobstructedORshouldbeeasilyaccessedduringintendeduse.
Should any trouble occur, disconnect the AC power cord and refer servicing to qualied personnel.
ATTENTION : To reduce the risk
of electric shock, do not remove the
cover. There are no user serviceable
partsinsidetheunit.Referallservicing
toqualiedpersonnel.
The exclamation point within
thetriangleisawarningsign
alertingtheuserofimportant
instructions accompanying
the product.
The lightening flash
with arrowhead symbol
within the triangle is a
warning sign alerting
the user of "dangerous
voltage" inside the unit.
Warning: Do not touch the lens.
DO NOT THROW BATTERIES IN FIRE !
CAUTION
RISK OF ELECTRIC SHOCK
DO NOT OPEN
Incaseofmalfunctionduetoelectrostaticdischarge,theapparatushastoberesetbydisconnectingitfrommainssupply.
THE MARKING PLATE IS LOCATED AT THE BACK OF ENCLOSURE OF THE APPARATUS.

GB 1
LOCATION OF CONTROLS
13. CD STOP BUTTON
14. FM STEREO INDICATOR
15. LCD DISPLAY
16. DIAL SCALE
17. MODE SWITCH
18. TUNING CONTROL
19. AC SOCKET
20. SPEAKER
21. BATTERYCOMPARTMENT
22. FUNCTIONSWITCH
23. VOLUMECONTROL
24. PHONESJACK
1. POWER INDICATOR
2. CDPLAY/PAUSEBUTTON
3. CD PROGRAM BUTTON
4. REPEAT BUTTON
5. BASS BOOST BUTTON
6. CD DOOR
7. CARRYING HANDLE
8. TELESCOPIC ANTENNA
9. OPEN/CLOSECDBUTTON
10. CDNEXTBUTTON
11. CD BACK BUTTON
12. MIXBUTTON

FM ST.FM MONO
ADJUSTING THE SOUND
LISTENING TO THE RADIO
POWER SUPPLY
1 . Set to RADIO
FUNCTION
3 . Tune in to a station.
TUNING
4 . Adjust the sound.
GB2
TO ADJUST THE VOLUME
2. SelectaMODE.
USING HOUSE CURRENT
Beforeuse,checkthattheratedvoltageofyourunitmatches
yourlocalvoltage.
Note: Mainsplugisusedasthedisconnectdevice.
Thedisconnectdeviceshallremainreadilyoperable.
USING BATTERIES
Disconnect the AC power cord from the AC inlet of the
unit.Batterypoweriscutautomaticallybythecordwhile
it is connected.
Insert6UM-2
(sizeC)batteries.
batterydoor
When the volume decrease, or the sound distorts, replace
all of the batteries with new ones.
MODE
+
+
+
_
_
_
RADIO
FOR PRIVATE LISTENING
Plug in headphones (ø3.5 mm stereo mini-plug) to the
PHONESjack.
Whenheadphonesarepluggedin,thespeakersare
automaticallydisconnected.
ToACsocket
To AC outlet
VOLUME
MAX. MIN.
VOLUME
VOLUME
MAX. MIN.
VOLUME

FOR BETTER RECEPTION
FM
COMPACT DISC PLAYBACK
GB 3
1 . Set to CD
2. OpentheCDdoorbypushing
CDDoorOpen/Closebutton.
3. Insertadiscwiththelabelsidefacingup.
4 . Close the CD door.
The disc will rotate and the total
tracksofthediscwillshowon
thedisplay.
TO SKIP TO THE BEGINNING OF A TRACK
• Presseitheroneoftheskipbuttonsaccordingtothedesiredskipdirection.
• Play/backresumesfromtheselectedtrack.
• Whenthebuttonispressedonceduringplay,theprevioustrackstartsagain.
• Whenthebuttonispressedonceduringplay,thenexttrackplays.
SEARCHING FOR A PASSAGE WITHIN A TRACK
• Keeptheorbuttonpressedduringplayback,
andreleasethebuttonassoonasyourecognisethedesired
passage.ThennormalCDplaybackwillresumefromthispoint.
TO STOP PLAYBACK
Press the STOP button and the display shows the total
tracksofthedisc.
NOTE : 1. FMstereoLEDindicatorlightsifreceiveFMstereobroardcastandtheMODEswitchseton"FMSTEREO".
2. WhentoomuchnoiseisheardduringFMSTEREOreception,setMODEswitchtoFMmono.
AFTER LISTENING
Set the FUNCTION selector to OFF.
FUNCTION
CD
5. PressthePlay/Pausebutton.
Tracknumber"01"&"PLAY"will
be shown.
TO INTERRUPT PLAYBACK
PressthePlay/Pausebuttonandthesymbol
"PLAY"willbeashed.
Pressthebuttonagaintoresumeplayback.
Unitwillbeautomaticallyoffwithin30minswithoutanyoperation(instopmode/CDdooropen).
Afterautooff,slidetheFUNCTIONselectortoOFFpositionandthenslidetoRADIO/CDpositionforlistening.
LCDdisplay
LCDdisplay

PROGRAMMED PLAYBACK
Programmedplaybackenablestracksonadisctobeplayedinthedesiredorder.Upto20trackscanbeprogrammed.
1. Press the " PROGRAM " button.
2. Pressthe"NEXT/FF"and"BACK/FB"buttonstoselectthedesiredtracknumber.
3. Press"PROGRAM"buttonagaintomemorizethetrack.
4. Repeatsteps2and3untilalldesiredtracksareprogrammed.
5. Pressthe"PLAY/PAUSE"buttontostart."PROGRAM"isashingontheCDdisplay.
6. Press"STOP"buttontostopprogrammedplayback.
7. Press"PLAY/PAUSE"buttonstoresumeprogrammedplayback.
8. OpentheCDdoororturnofftheCDplayertocleartheprogrammedmemory.
Note : Programmingcanonlybemadewhentheplayerisinstopmode.
To Erase the Memory(Program)
Tocleartheprogram,youmayhavetwoways:
1. Press STOP button when the disc is stopped, or
2. OpentheCDcompartmentlid,programwillbeerased.
" PROGRAM "
PROGRAM
REPEAT PLAYBACK
NoteonCD-R/RWdiscs
- Becauseofnon-standardizedformatdenition/productionofCD-R/RW,playbackqualityandperformancearenot
guaranteed.
- ManufacturerisnotresponsiblefortheplayabilityofCD-R/RWduetorecordingconditions,suchasPCperformance,
writingsoftware,mediaability,etc.
- DonotattachasealorlabeltoeithersideoftheCD-R/RWdisc.Itmaycauseamalfunction.
- ItisrecommendedtorecordonlyaudiolesonCD-R/RWdiscsforeasyreading.
BASS BOOST
ToenjoyaBASSBOOSTsoundeffect,
press BBS button.
Thisfunctionallowsasingletrackoralltracksonadisctobeplayedrepeatedly.
TO CANCEL REPEAT PLAYBACK FUNCTION
PresstheREPEATbuttonagainuntil"REPEAT"or
"REPEATALL"disappearsfromthedisplay.
TO REPEAT THE SAME TRACK
PresstheREPEATbuttononceduringplayback,
theCDdisplaywillindicate"REPEAT".
TO REPEAT THE WHOLE DISC
Press the REPEAT button twice until " REPEAT ALL"
displays.
GB 4
PROGRAM PLAYBACK
CDdisplay
REPEAT
PLAY
REPEAT
ALL
PLAY
MIX PLAY
MIX PLAY
1. Press"MIX"Buttonand"MIX"willbedisplayed.
2. CDTrackPlaysRandomly.
3. Press"STOP"buttonagaintoterminatethe"MIX"mode.
CDdisplay
CDdisplay
CDdisplay

GB 5
CLEANING THE UNIT
Donotusevolatilechemicalsonthisunit.Cleanbylightly
wipingwithasoftcloth.
IMPORTANT NOTE
Ifanabnormaldisplayindicationoranoperatingproblem
occurs, disconnect the AC power cord and remove the
batteries. Wait at least 5 seconds, then reconnect the AC
power cord or reinstall the batteries.
WARNING
ShouldtheCDdoorbeopenedbeforethereadingoftheCD
iscompleted,ajammingnoisemayoccur.Thisisresolved
byclosingtheCDdoor.
CLEANING A CD
IftheCDskipsorwillnotplay,thediscmayneedcleaning
.Beforeplaying,wipethediscfromthecentreoutwitha
cleaningcloth.Afterplaying,storethediscinitscase.
MAINTENANCE
CLEANING THE CD LENS
IftheCDlensisdusty,cleanitwithabrush-blower.Blow
several times on the lens and remove the dust with the
brush.Fingerprintsmayberemovedwithacottonswab
moistened with alcohol.
CD SECTION
Channels: 2channels
S/Nratio: 60dB
Wow&Flutter: undetectable
Samplingfrequency: 44.1kHz8xoversampling
Quantization: 1bitDAconverter
Pickuplightsource: Semi-conductorlaser
Pickupwavelength 790nm
RADIO SECTION
Tuningranges: FM87.5-108MHz
Antennas: FM Rod antenna
GENERAL
Outputpower: 1W+1W(RMS)
Power consumption: 13.5 W
Speaker: 3"8OHM
Phonesjack: 3.5MM
Powersource: AC:230V~50Hz
DC:9V(6x1.5VLR14/"C"/UM2)
Dimensions: 224(L)x234(D)x126(H)mm
Weight 1.4KGS
Duetocontinuingimprovement,thefeaturesandthedesignaresubjecttochangewithoutnotice.
SPECIFICATIONS

Guarantee
LencooffersserviceandwarrantyinaccordancewiththeEuropeanlaw,whichmeansthatincaseofrepairs(bothduring
andafterthewarrantyperiod)youshouldcontactyourlocaldealer.
Important note:ItisnotpossibletosendproductsthatneedrepairstoLencodirectly.
Important note:Ifthisunitisopenedoraccessedbyanon-ofcialservicecenterinanyway,thewarrantyexpires.
Thisdeviceisnotsuitableforprofessionaluse.Incaseofprofessionaluse,allwarrantyobligationsofthemanufacturer
will be voided.
Disclaimer
UpdatestoFirmwareand/orhardwarecomponentsaremaderegularly.Thereforesomeoftheinstruction,specications
andpicturesinthisdocumentationmaydifferslightlyfromyourparticularsituation.Allitemsdescribedinthisguideforil-
lustrationpurposesonlyandmaynotapplytoparticularsituation.Nolegalrightorentitlementsmaybeobtainedfromthe
description made in this manual.
Disposal of the Old Device
Thissymbolindicatesthattherelevantelectricalproductorbatteryshouldnotbedisposedofasgeneral
householdwasteinEurope.Toensurethecorrectwastetreatmentoftheproductandbattery,pleasedispose
theminaccordancetoanyapplicablelocallawsofrequirementfordisposalofelectricalequipmentorbatteries.
Insodoing,youwillhelptoconservenaturalresourcesandimprovestandardsofenvironmentalprotectionin
treatmentanddisposalofelectricalwaste(WasteElectricalandElectronicEquipmentDirective).
CE Marking
ProductswiththeCEmarkingcomplywiththeEMCDirective(2004/108/EC)andtheLowVoltageDirective
(2006/95/EC)issuedbytheCommissionoftheEuropeanCommunity.
Hereby,LencoBeneluxBV,Thermiekstraat1a,6361HBNuth,TheNetherlands,declaresthatthisproductisincompliance
withtheessentialrequirementsandotherrelevantprovisionsofDirective1999/5/EC.
Thedeclarationofconformitymaybeconsultedat[email protected]
WARNING:Prolongedexposuretoloudsoundsfrompersonalmusicplayersmayleadtotemporaryor
permanenthearingloss.
Where to place the item :
Today’sfurnitureiscoatedwithawidevarietyoflacquersandsynthetic-coatingsthataretreatedwithanextensiverange
ofcleaningproducts.Therefore,thepossibilitythatsomeofthesesubstancescontaincomponentsthatreactadverselyto
therubberfeetoftheitemandsoftenthem,cannotbecompletelyexcluded.Therubberfeetoftheappliancecancause
discoloringtofurnituresurfaces.Ifnecessary,placetheapplianceonanon-slidesurface.
®Allrightsreserved
Service
Formoreinformationandhelpdesksupport,pleasevisitwww.lenco.com
LencoBeneluxBV,Thermiekstraat1a,6361HB,Nuth,TheNetherlands
GB 6
Other manuals for SCD-26
1
Table of contents
Other LENCO CD Player manuals

LENCO
LENCO CD-214 User manual

LENCO
LENCO CR-3800CD User manual

LENCO
LENCO CD-010 User manual

LENCO
LENCO CD-214 User manual

LENCO
LENCO SCD-37 User manual

LENCO
LENCO MCi-215 User manual

LENCO
LENCO SCD-36 User manual

LENCO
LENCO SCD-650BU User manual

LENCO
LENCO SCD-37 USB User manual

LENCO
LENCO SCD-37 User manual

LENCO
LENCO CD-011 User manual

LENCO
LENCO CD-400GY User manual

LENCO
LENCO SCD-580SI User manual

LENCO
LENCO SCR-96 User manual

LENCO
LENCO SCD-38 USB User manual

LENCO
LENCO CD-500 User manual

LENCO
LENCO CD-012 User manual

LENCO
LENCO CD-300 User manual

LENCO
LENCO CD-215 MP3 User manual

LENCO
LENCO SCD-37 USB User manual