Lenovo ayden User manual

Ayden™
3.5” Digital Video Baby Monitor / Moniteur vidéo bébé numérique 3,5po /
Video Monitor Digital para Bebé 3.5”
User Manual, pg. 2 / Manuel de l’utilisateur, p. 20 / Manual del usuario, pg. 38
Strangulation
Hazard!
Children have
STRANGLED in
cords. Keep this
cord out of the
reach of children
(more than 3 ft
[0.9 m] away).
Risque de
Strangulation !
Enfants ont
étranglé dans les
cordons. Gardez
ce cordon
d'alimentation
hors de portée
des enfants (plus
de 3 pieds [0,9 m]
de distance).
Peligro de
Estrangulación !
Los niños tienen
ESTRANGULADO
en cuerdas.
Mantener este
cordón fuera del
alcance de niños
(más de 3 pies
[0,9 metros] de
distancia).
WARNING
•
MISE EN GARDE
•
ADVERTENCIA

SAFETY WARNINGS
CAUTION: Keep small parts away
from children.
Strangulation Hazard: Children can become
entangled in cords. Power cords should be
kept more than 3 feet away from the crib and
baby’s reach at all times. Baby monitors with
power cords should never be hung on or near
the crib.
This product is not a toy and should be kept
out of children’s reach.
This product contains small parts. Exercise
care when unpacking and assembling
the product.
Read and Keep Instructions: All the safety and
operating instructions should be read before
the baby monitor is operated.
This product cannot replace responsible adult
supervision.
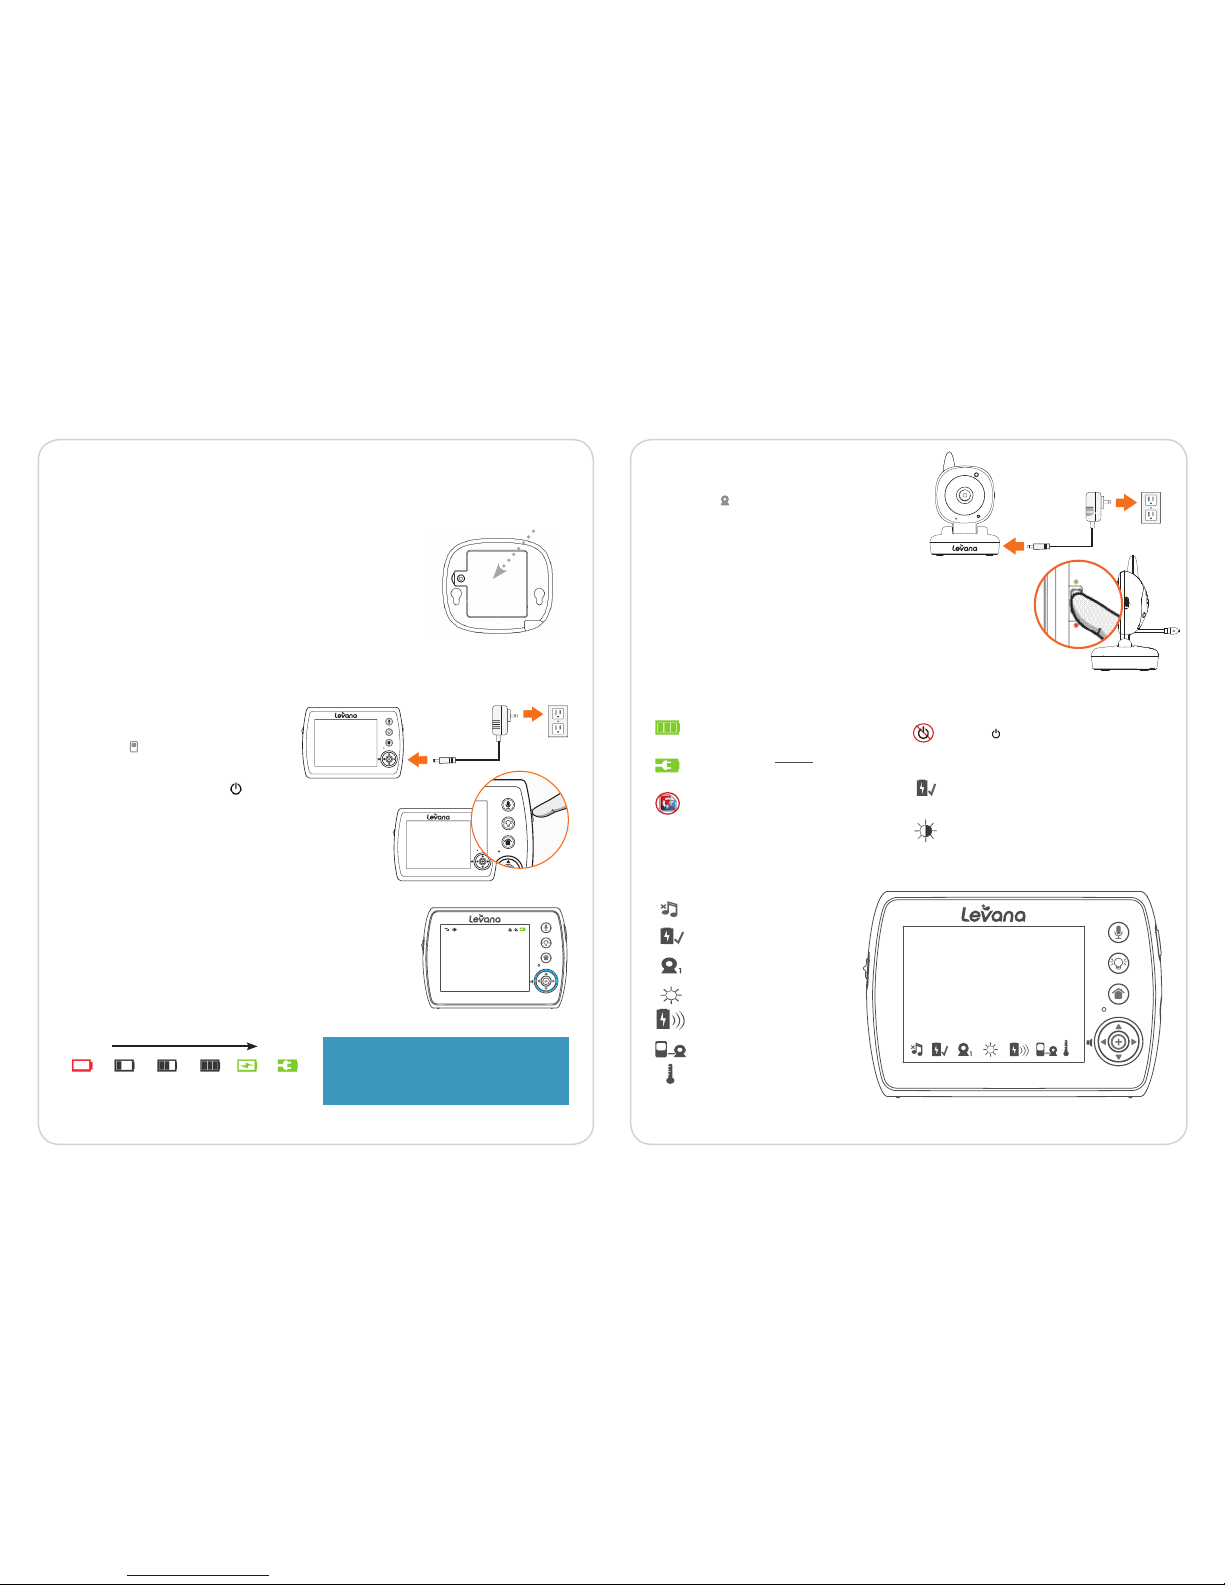
Use only with provided power supply.
The socket-outlet shall be installed near the
equipment and shall be easily accessible.
RISK OF EXPLOSION IF BATTERY IS
REPLACED BY AN INCORRECT TYPE!
Dispose of used batteries according to the
instructions.
Use only batteries/power supplies listed in the
user manual.
Water and Moisture: This product is designed for indoor use only. The unit should not be exposed to rain,
moisture, dripping or splashing. No objects filled with liquid should be placed on top of, or beside the
product, such as a glass or vase. This item should not be used near water.
Non-Use Periods: Always unplug the AC adapters from the wall outlets during long periods of non-use.
Ventilation: This baby monitor should not be used on a bed, sofa, rug or similar surface that may block the
ventilation openings, or be placed in an enclosed area, such as a bookcase or drawer that may impede
air flow.
Keep Away from Sources of Heat: This unit should not be exposed to direct heat sources such as a candle,
fireplace, radiator, heat register, stove or other appliance that emits heat. The unit should not be left in
direct sunlight.
Power Source: This unit should only be used with the power adapters included in this package
(rated 6V ~ 800mA)
Damage Requiring Service: This unit should be serviced by qualified personnel only when:
a. Objects have fallen or liquid has been spilled into the product
b. The units have been exposed to rain
c. The units do not appear to operate normally or exhibits a distinct change in performance
d. The units have been dropped or the enclosure damaged
IC STATEMENT / DÉCLARATION IC / CAN ICES-3 (B)/NMB-3(B):
Operation is subject to the following two conditions: (1) This device may not cause interference, and
(2) This device must accept any interference, including interference that may cause undesired
operation of the device.
Son fonctionnement est soumis aux deux conditions suivantes:
(1) Cet équipement ne doit pas causer d’interférences, et
(2) Cet équipement doit accepter toute interférence, y compris les interférences capables de
causer un mauvais fonctionnement de l’appareil
Changes or modifications not expressly approved by the party responsible for compliance could void the
user’s authority to operate the equipment.
This device complies with part 15 of the FCC Rules. Operation is subject to the
following two conditions:
(1) This device may not cause harmful interference.
(2) This device must accept any interference received, including interference that
may cause undesired operation.
FCC WARNING
This equipment has been tested and found to comply with the limits for a Class B digital device, pursuant
to Part 15 of the FCC Rules. These limits are designed to provide reasonable protection against harmful
interference in a residential installation.
This equipment generates, uses and can radiate radio frequency energy and, if not installed and used in
accordance with the instructions, may cause harmful inerference to radio communications. However,
there is no guarantee that interference will not occur in a particular installation. If this equipment does
cause harmful interference to radio or television reception, which can be determined by turning the
equipment o and on, the user is encouraged to try to correct the interference by one or more of the
following measures:
• Reorient or relocate the receiving antenna.
• Increase the separation between the equipment and the receiver.
• Connect the equipment into an outlet dierent from that to which the receiver is connected.
• Consult the dealer or an experienced radio/TV technician for help.
This marking indicates that this product should not be disposed with other household
wastes throughout North America. To prevent possible harm to the environment or
human health from uncontrolled waste disposal, recycle it responsibly to promote
the sustainable reuse of material resources. To return your used device, please use the
return and collection systems or contact the retailer where the product was purchased.
They can take this product for environmental safe recycling.
2 3
DISCLAIMERS
Strangulation Hazard: Children can become entangled in cords. Power cords should be kept more than 3 feet away
from the crib and baby’s reach at all times. Baby monitors/cameras with power cords should never be hung on or
near the crib. This product is not a toy.
This product contains small parts. Exercise care when unpacking and assembling the product.
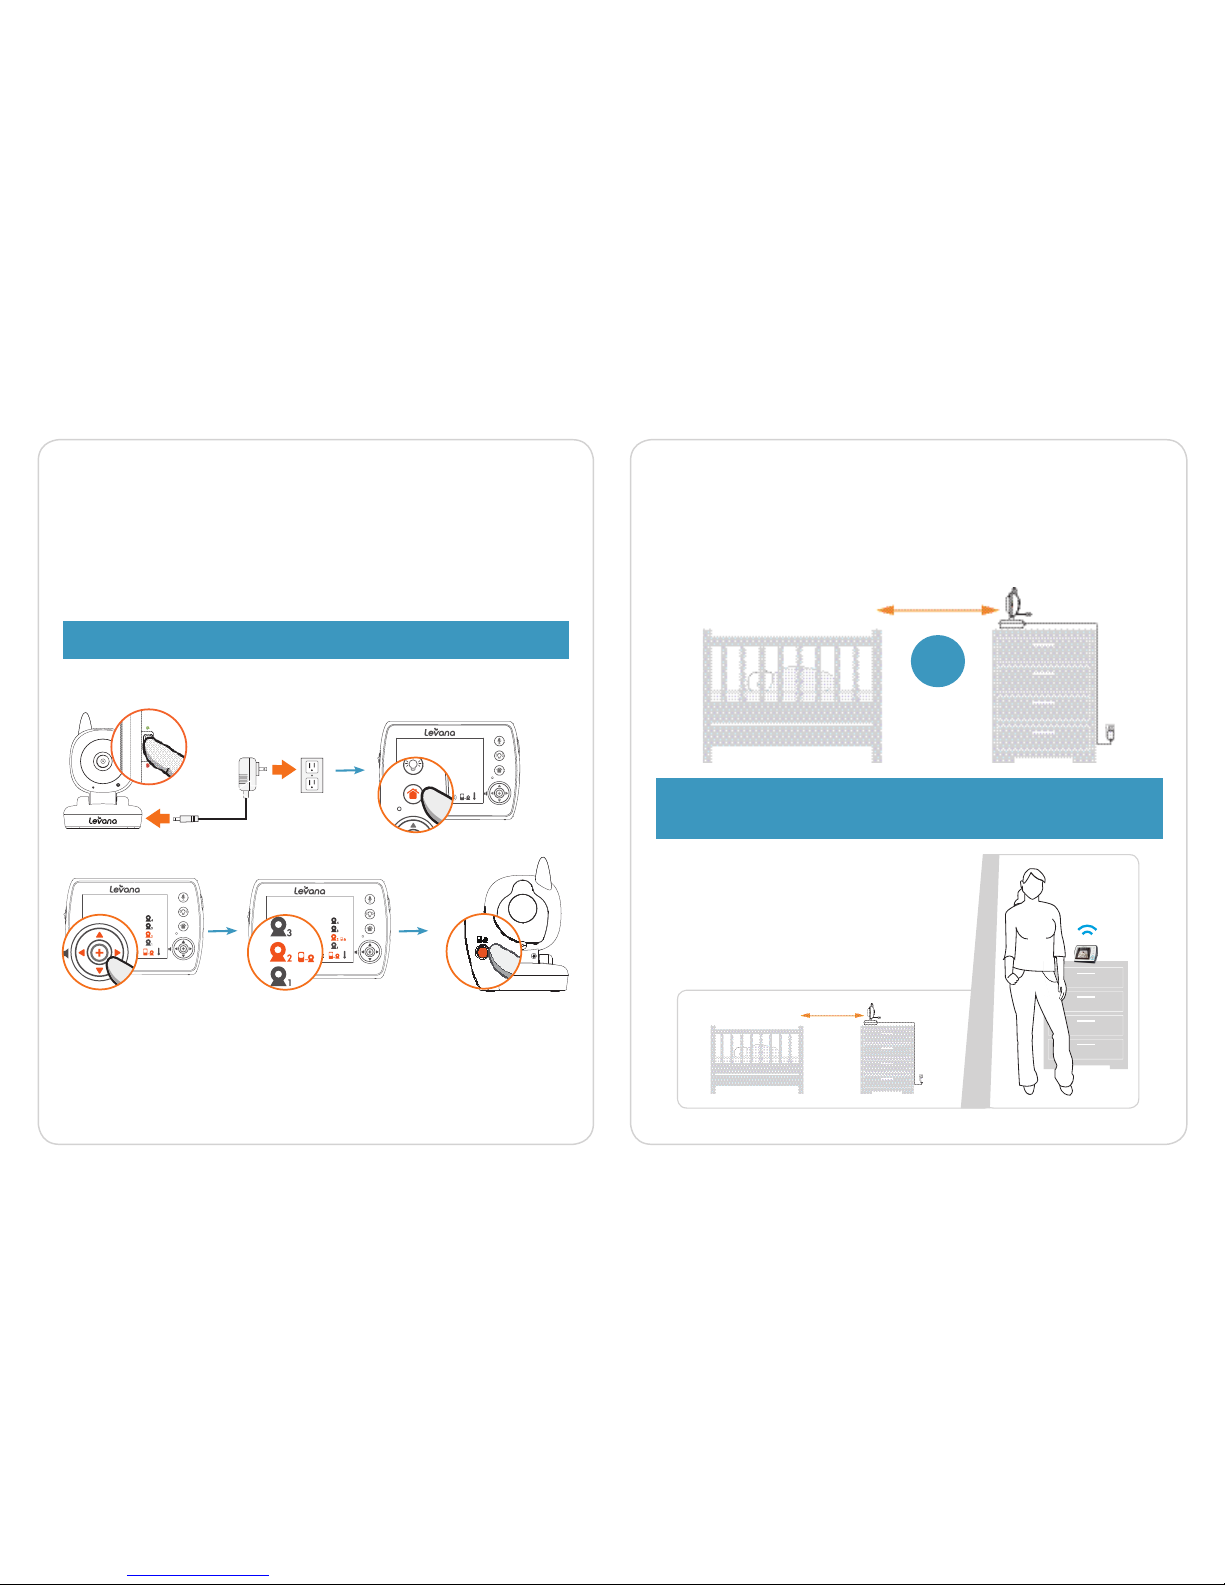
Optimum range is 200 feet when signal is passing through walls or floors. Microwave ovens (when in use) may
cause signal disruption at close range. Buildings with metal frames may also cause signal disruption. Maximum
transmission range is 750 feet.
Battery life of 48 hours based on 10 audio activations while in power save (PEEP) mode. Battery lasts an average of 8
hours with continuous audio/video usage.
Night vision range up to 15ft under ideal conditions. Objects at or beyond this range may be partially or completely
obscured, depending on the camera application.
This product does not replace responsible adult supervision. Check on your child at regular intervals and make sure

5
We take quality very seriously. This is why all of our products come with a one-year
warranty from the original purchase date against defects in workmanship and materials.
If you have warranty or support issues please contact us using any of the following
methods:
Web: www.mylevana.com Support: www.mylevana.com/support
LEVANA Canada LEVANA USA
4080 Montrose Road 60 Industrial Parkway #Z64
Niagara Falls, ON Cheektowaga NY
Canada L2H 1J9 USA 14227
Warranty Terms
1. LEVANA®products are guaranteed for a period of one year from the date of purchase
against defects in workmanship and materials. This warranty is limited to the repair,
replacement or refund of the purchase price at LEVANA’s option.
2. This warranty becomes void if the product shows evidence of having been misused,
mishandled or tampered with contrary to the applicable instruction manual.
3. Routine cleaning, normal cosmetic and mechanical wear and tear are not covered
under the terms of this warranty.
4. The warranty expressly provided for herein is the sole warranty provided in
connection with the product itself and no other warranty, expressed or implied is
provided. LEVANA assumes no responsibilities for any other claims not specifically
mentioned in this warranty.
5. This warranty does not cover the shipping cost, insurance or any other incidental
charges.
6. You MUST contact LEVANA at www.mylevana.com/support before sending any
product back for repair. You will be sent a Return Authorization form with return
instructions. When returning the product for warranty service, please pack it
carefully in the original box with all supplied accessories, and enclose your original
receipt or copy, and a brief explanation of the problem (include RA #).
7. This warranty is valid only in Canada and the continental U.S.
8. This warranty cannot be re-issued.
Please visit our website at www.mylevana.com for information about your
product’s warranty
WARRANTY
4
TABLE OF CONTENTS
Safety Warnings ................................................................................................................................ 2
FCC Statement.................................................................................................................................. 3
Disclaimers......................................................................................................................................... 3
Warranty............................................................................................................................................. 4
What’s Included ................................................................................................................................ 5
Buttons and Connections............................................................................................................... 6
Setup ................................................................................................................................................... 7
Battery installation - monitor............................................................................................. 7
Battery installation - camera (optional)............................................................................ 8
Connecting the Power Adapters ....................................................................................... 8
Charging the Monitor .......................................................................................................... 8
Get the Most Out of Your Rechargeable Battery............................................................ 9
Screen Icons .......................................................................................................................... 9
Pairing the Monitor and the Camera(s) .......................................................................... 10
Mounting the Camera on a Tabletop Safely ...................................................................11
Placement of the Monitor..................................................................................................11
Mounting the Camera on a Wall Safely .......................................................................... 12
Night Vision.......................................................................................................................... 12
Operation......................................................................................................................................... 13
Using the Zoom / Pan & Tilt functions ........................................................................... 13
Adjusting the volume ......................................................................................................... 13
Using the Talk to Baby™ Two-Way Intercom................................................................ 14
Turning the Nightlight On/OFF ........................................................................................ 14
Setting a Lullaby.................................................................................................................. 14
Using the PEEP Mode function ........................................................................................ 15
Changing the Camera View.............................................................................................. 15
Setting the Brightness........................................................................................................ 16
Sound Sensitivity Settings ................................................................................................. 16
Temperature Settings..........................................................................................................17
Troubleshooting...............................................................................................................................17
Specifications .................................................................................................................................. 18
WHAT’S INCLUDED
• Baby Video Monitor
• Night Vision Camera
• 2 Power Adapters
• Rechargeable Battery
• Quick Start Guide
• 1 year warranty
• Lifetime Customer Support

6 7
1 Lock / Unlock Button
Disables ALL function buttons in the LOCK position
2 LCD Screen
3 Talk To Baby™
Press and hold to talk, release to listen
4 Power & Screen ON/OFF
Press and hold to turn monitor ON/OFF; Press once to
turn screen ON/OFF
5 Nightlight
6 Menu & Exit-Close
7 Microphone
8 Navigation Buttons
9 Select
10 Volume - Down / Up
11 Antenna
12 Night Vision LEDs
13 Camera Lens
14 Microphone
15 Nightlight
16 Night Vision Light Sensor
17 On/OFF Button
18 Power LED
BUTTONS AND CONNECTIONS
3
4
6
5
1
7
8
9
10
2
15 16
11
12
13
14
17
18
BUTTONS AND CONNECTIONS
1 Battery Compartment
2 Table Stand
3 Antenna
4 Speaker
5 Speaker
6 Pairing Button
7 Antenna
8 Power Input
1 32 4
5
6
8
7
SETUP
Battery Installation - Monitor
1. Slide Battery Compartment Cover down
to remove.
2. Insert the included rechargeable battery.
Ensure the battery connectors on the battery
line up with the connectors inside the battery
compartment.
3. Slide the Battery Cover back into place.
4. Remove battery during periods of non-use.

8 9
SETUP
Battery Installation - Camera (optional)
The camera unit can be powered using 4 AAA batteries instead
of the included adapter.
1. Gently remove the Battery Compartment Cover on the
bottom of the camera base, using a small phillips (cross)
head screwdriver.
2. Insert 4 AAA batteries in the compartment (not included),
paying close attention to the labelled polarity markings.
3. Replace the battery compartment cover using the
small screwdriver.
4. The Power LED will flash when the battery charge is low.
Connecting the Power Adapters
1. Connect the Power Adapter marked
Monitor to the Power Input on the
side of the Monitor.
2. Press and hold the Power button
on the side of the monitor to turn
the monitor ON.
Charging the Monitor
There are two ways to determine the battery
power status:
1. The LED Ring on the front of the monitor
2. The icon in the top right corner of the main screen
EMPTY FULL SOLID BLUE = BATTERY FULLY CHARGED
QUICK FLASHING BLUE = BATTERY LOW
FLASHING PINK = PAIRING UNSUCCESSFUL
Battery
Compartment
cover
SETUP
Get the Most Out of Your Rechargeable Battery
Screen Icons
1. Connect the Power Adapter marked
Camera to the Power Input on the back
of the Camera.
2. Slide the ON/OFF switch on the side of
the camera to the ON position. Power
LED will be a solid red.
Fully charge your battery before
fi r s t u s e
Charge battery before battery is
fully drained.
Avoid extreme heat or cold as this
will aect the battery life.
Turn LCD screen OFF. Press
POWER button on side of
monitor ONCE.
PEEP Mode: After 1 minute of
inactivity, monitor enters standby/
sleep mode (when activated)
Adjustable Brightness: Decrease
screen brightness
Lullabies
Peep Mode
Camera
Brightness
Sound Sensitivity
Pairing
Temperature
Table of contents
Languages: