LEO JAYMZ ML User manual


DANGER!
Danger for children
Ensure that plastic bags, packaging, etc. are properly dispose
are not in the reach of babies andyoung children. Chokinghazard
Ensure that children do not detach any smallparts(e.g. knobs
like) fromthe product. Theycould swallow the pieces and choke
Never let childrenplay unattended with the product.
1
1
Safety instructions
Safety instructions
CAUTION!
Danger of cutson the hands
While assemblingand joiningindividual partstogether with scre
attention to sharpedges on tools,screwsand components.
ML electric guitar DIY Kit
1
Always wear safety glassesor goggles when operating equipment
glassesor reading glassesare not safety glasses.Be certain the sa
wear meet the appropriate standardsof the AmericanNational Standard
Institute (ANSI). Because there are various waysto cut andjoin w
makesubstitutionsfor the methodsstated in this manual. We try
easiest methodspossible.However, only you knowyour skillswit
machinery. Never compromiseyour safety by usinga cutting metho
you are not comfortable.Instead, find an alternative approachth
sameresult.
Theseinstructions assumethat you are familiar with the safe ope
wood workingmachinery andwoodworkingtools, andunderstand
usedto assemblethis project. If you donot qualify for both of the
buildingthis project for your own safety. Read andunderstandth
manualfor the machinery you intend to use, take a woodworking
your local library for moreinformation. Woodworkingmachinery
inherently dangerousbecausethey usesharpedgesthat can and
serious personalinjury includingamputation and death. Donot un
the ability of these toolsandmachineryto causeinjury. Never ope
without all guardsin place andalways wear approved safety glasses
own safety, please heed this warning.

2
2.1 All the components deliveried
2 Unboxing and Preparing Assembling
ML electric guitar DIY Kit
2.2 Assemble instruments preparing
Provide the following tools andmaterialsfor the assemblyof the guitar:
Screwdriver
Rubbermallet
Ring spanner
Pliers
Paint and accessories
Sandpaper
Guitar paint spray can

ML electric guitar DIY Kit
3
3Assembling
3 Assembling
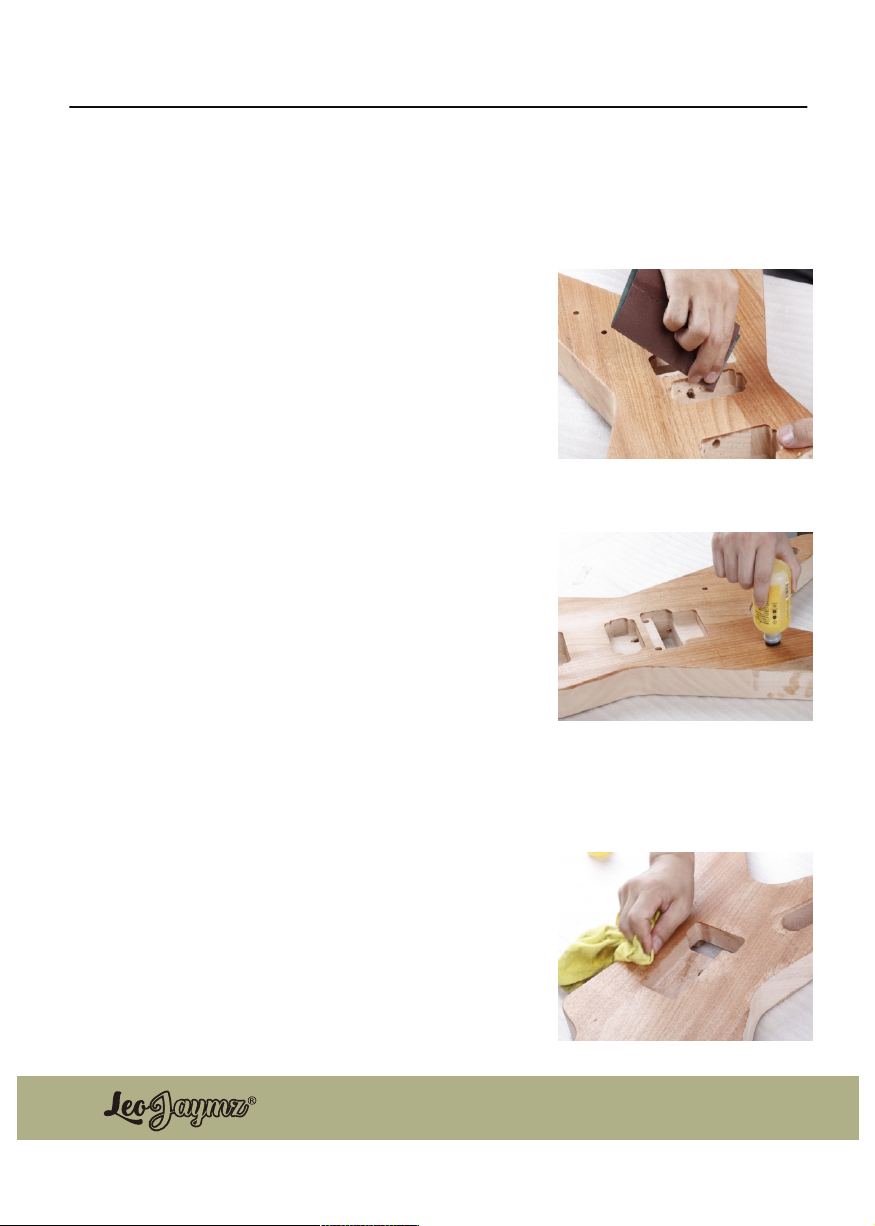
3.1 Sand the body and neck
3.1.2 Fillup the grain
Thebody of the BCguitar is madeof Solid mahogan,
and theneck is made of solid maple. Open grained woods
need to be filled before finishing in order to achieve a flat
surface.
WesuggestusingourNeutral Color Tonegrainfiller
following the instructions on the label. Three applications
are recommended to get a nice flat surface to build finish
coats over.The grainfiller can also be used to fill any gaps,
chips,or other imperfections in the wood.
Asa general rule, you should fillup the grainuseNeutral
Color Tone grainfiller until you can't seethe poresofthe
wood with the nakedeyes. Then we can start for the
precess below.
3.1.3 Paint your favorite color
Use a damp cloth for dip with your favorite color and
wipe on the body and neck as you like. Not only one
time may can not reach the exactly what you espected,
so sand with 320-grit and wipe again and again until
got your lovely color. Here we take the natural color as
example.
3.1.1 Sand the body and neck
It is a very thin maple veneer glue on the top of the
body. Using 320 or higher grade-gritsandpaper on a
foam sanding block, lightly sand the entire body working
only in the direction ofthe grain.
Aftera complete sanding,wipe the body with adamp
cloth to raise the grain,to reveal fibers that need more
sanding. Let thedampnessdry,then sandthe raisedgrain
againusing 320 or higher-gritsandpaper. Sand the
neckwith 220-grit followedby320-grit.

ML electric guitar DIY Kit
4
3Assembling
3.2 Mounting the tunning peg
3.2.1 Preparing a drill
3.2.2 Mounting the nuts
3.2.4 Screwing
Put the nut to the top of the tunning peg as the
illustration for fix the machine heads but do not tightly,
just let the tunning peg can not moveable.
Fix the screw for all the 6 tunning pegs into the holes
what you predrill in previous operation.
After you fix the screws on the rear side of the
headstock, flip the headstock to the top side, use the
span for tighten the nut of the tunning pegs.
3.2.5 Tighten the nut of tunning peg
The drill mustsame thick as the screw for rear side of the
machineheads, stringlocksand tape the drill on the position
of the length equal the half thickness of the headstock in
order to avoid drill through the headstock.
3.2.3 Predrill
First lay down the headstock to the REAR side, start insert
into the 6 holes of both side of the headstock and align
the each pair of both side of the tuners by a steel ruler as
the illustrated, then mark a spot through the screw hole to
the rear side of the headstock, then predrill a screw hole.

5
ML electric guitar DIY Kit
3Assembling
3.3 Joint the Neck to the body
3.3.1 Install the bridge
3.3.2 Joint the neck
3.3.3 Measure the scale
Press the bush to the hole of the bridge. And install the
bridge column.
Install the bridge for attach the column, just lay down it.
The starting position of the ruler have to fully contact the
bottom line of the nut like the right picture. The edge of
the ruler have to stay in the middle of the fingerboard
and perpendicular to the nut.
Press the neck to the neck pocket of the body, the
bottom line of the headstock have to align the top line of
the neck pickup cavity.
There are 6 saddles on the bridge for the strings that
didn't stay in the same level, you can choose the middle
range as the end line to align the length to 24.75"
(648mm) from the nut. In the case that the neck is
jointed in correct scale. Now use a pencil for mark
position for the bottom line of the neck in the bridge
cavity.

6
ML electric guitar DIY Kit
3Assembling
3.3 Joint the Neck to the body
3.3.4 Glue the neck
Remove off the neck from the body, and find a glue that
prefessional for the wooden, and smear the glue to both
the body and neck, every surface that can be attached each
have to smear with the glue.
Press down the neck into the pocket and let the bottom
align the line what you marked in previous process very
hardly.
cleanning the glue where sqeezed out of the gaps between
the neck and body, do not wait it become dry.
Clamp the neck and body in the joint position with some
rubber or soft plastic board or thicker plasitc paper, to
avoid any destroy on the guitar, especially the frets wire.
Leave it for at least 24 hours for waiting for the glue drying.
Then you can doing the following process.

7
ML electric guitar DIY Kit
3.4.1 Pre-drill all the hole for the hardwares.
3.4.2 Bridge claw.
3.4.3 Electronics installation
At least 24 hours of 2 days later, now can restart the
assembling for the guitar. Put the pickup into the pickup
cavity on the body. Check the position is in the central of
the pickup cavity then pre-drill the hole from the 4 holes
of pickup frame, and fix with screws.
Flip the body to the rear side, there is a cavity for install
the springs of the bridge, but first you have to screw the
claw into it. Pre-drill the screw hole of the claw in the top
side of the cavity like the illustration.
Screw the biggest screw in the DIY kit package to fix the
claw, please note that the both screws do not fully drive
into the body. Then Hung the 3 springs from the claw to
the rear side of the bridge. The ring side for hunging in the
claw, the hook side for hook the bridge in to the smal hole.
Put the output jack to the bottom hole of surface for all the
control petentionmeters, put the cable to pass the access to
the back cavity then fix the jack on the body by screws.
Install the 3 control petentionmeters in the hole from the
back cavity of the rear side. The top one is the volume
control and the bottom 2 are tone control. And fixed by the
nuts with the washers on the top side of the body.
(Tone controls are all welded a green capacitance)
3Assembling
3.4 Install the hardwares
Volume
Tone
Tone

8
ML electric guitar DIY Kit
3Assembling
3.4.4 Fix the components
Insert the toggle switch into the hole like the right
illustration. And fix the switch by the nut with washer.
Put all the wires go through the access to the back cavity
and connect each other. The wires all have to go under
the spring.
The small wire is the ground connecting and they are
metal quick connecter for the both ground wire. Insert
one to another so easily by your hand.
There are 2 wire cables from the Volume control
potentionmeter, the shoter one connect with the output
jack, and the longer one go through the access to pickup
cavity first and reach the toggle switch back cavity.
No work on both Tone Control potentionmeter needed at
all, because they already connected.
Put both pickups' cable wire go through the access to the
toggle switch back cavity, the position of each pickup
please check the right illustration.
Bridge Pickup Spot
Neck Pickup Spot
Volume Tone
This wire from
the Output jack
Tone

9
ML electric guitar DIY Kit
3Assembling
Neck
Ground
Bridge
Out
Bridge Pickup
Tone
Tone
Volume
Connecting with
bridge claw.
Output JACK
A500K
A500K
B500K
Neck Pickup
3.4.5 The connecting method
Toggle switch

10
3Assembling
3.4.6 Install strings to the tremolo bridge.
3.4.7 Rolling strings on the machine heads.
Use the allen wrench for loose the screw on the bottom of the tremolo bridge to
drive it open a little gap, and Cut the ball end of the string and insert to the gap and
tighten the bottom screw for crab the string tail.
Rolling the strings on the column of the tunning peg.
The position for each string as the illustration.
ML electric guitar DIY Kit
1E 2B
3G
4D5A
6E

11
ML electric guitar DIY Kit
4Setup
4.1 Setup the tremolo system
4.1.1 Setup the bridge system.
Adjust the column for raise up the height of the bridge, for keep the bridge stay in
same level of the body surface. Now can tighten all the strings for trying your best to
get the right intonation.
When you got the right intonation but the strings a re too tight cause the bridge
drawing down into the cavity, you can loose the screws of the bridge claw in the back
cavity. When you got the intonation but bridge raiseup higher then the body
surface, you can tighten the screws. Anyway the bridge keep flat as the body finally
you got the right intonation. Tunning and drive these screws same operation and
adjust little by little.

12
ML electric guitar DIY Kit
4Setup
4.2 How to tunning.

13
4Setup
4.3 Truss rod setup
The adjustable truss rod in the neck of your
Guitar has been shop adjusted and should not
require any change. If the neck should develop
a dip or hollow spot over time it can be remov-
ed by tightening the truss rod adjustment nut
that protrudes from the base of the headstock
just above the nut. A "back bow" or "hog-back"
can be removed by loosening the nut. Great
care should be taken with v rod adjustme-
nts where as little as 1/4 of a turn can vastly
alter the shape of a neck. A broken truss rod of course means a costly replacement.
1. Neutral Position - Slight forward bow
No Truss Rod adjustment needed.
2. Forward bow - Extreme U-Shaped Bow
Turn Truss Rod
counter clockwise
Buzzing near here Buzzing near here
3. Backward bow - Extreme N-Shaped Bow
Buzzing near here
Turn Truss Rod clockwise
Buzzing near here
ML electric guitar DIY Kit

14
ML electric guitar DIY Kit
4Setup
4.4 String action
4.4.1 Bridge adjustment
4.4.2 Pickup adjustment.
The bridge system called double way tremolo bridge
system. Tighten the screw of both side of the bridge
for adjust to lower string action, and loosen screw for
adjust to higher string action.
There are 6 screws for each pickup, 4 in the corn of the
fram for fix the pickup to the guitar body, and 2 in the
middle of the both side of the frame for adjust the
height of the pickups. Tighten the both screw clock
wise for adjust the pickup higher; loosen the both
screw counter clock wise for adjust the pickup lower.
Each pickup is adjustable on the bass and treble sides. Finding the best combination of
tone and volume will require some experimentation.
1. Bridge pickup:
1.1 Press the 1st string onto the last fret and hold;
1.2 Using a machinist ruler, measure the distance from the top of the pole to
the bottom of the 1st wire – note bass measurement;
1.3 Repeat #1 & #2 on the 6th wire – note the treble measurement;
2. Neck Pickup: repeat steps 1.1 through 1.3 (above) on the neck pickup, noting
measured heights.
Pickup Height Guide
Pickup 1st String 6th String
Bridge 2/64” 3/63”
Neck 3/64” 4/64”

15
ML electric guitar DIY Kit
4Setup
4.3 String intonation
Use the allen wrench for adjust the screw, loose it for let the saddle of the bridge
moveable that can be adjusted to compensate for the pitch modification that
occurs when the string is stretched as it is fretted.
Start by tuning your guitar and sounding a harmonic chime directly above the 12th
fret on the sixth string. Now fret the sixth string at the twelfth fret and compare that
pitch to the harmonic. If the fretted note is higher than the harmonic pitch move the
saddles to lengthen the string. If the fretted note is lower than the harmonic move
the saddles to shorten the string length. When the harmonic and the fretted note
sound the same note, thatmeanthe saddle is correct position. Repeat this procedure
for the other five strings.To set up intonation properly you can use an electronic
tuner.
From the first string (Thinest String) to 6th:
E, B, G, D, A, E
Use a Tuner for test the intonation of each strings, if the 0 and 12 stay in same tone
that mean the bridge setup is correct.

16
ML electric guitar DIY Kit
5 Finish Assembling
5.1 The end of the assembling
Pre-drill 2 holes from the 2 holes in the plastic
board for the CONTROL cavity. Use the bigger side
as the top for cover the cavity for keep small gap
between the body and the board. Then fix it with
screws.
Pre-drill 6 holes for the back cavity. This one use
the smaller side as the top for cover the bridge claw
cavity. Then fix it with screws.
Same method for fix the cover for the toggle switch
cavity.
Install the string lock.
Install the tremolo arm onto the bridge.

17
ML electric guitar DIY Kit
5 Finish Assembling
Install the Strap Knobs.
Install the cover for the truss-rod cover. Pre-drill is
necessary for drive the screw more easier.
Cut off the sharp string end to avoid any harmful for
your fingers.
Press the nut of the control knobs to the
potentionmeters.
When you got the right intonation and tunning
correctly, now you can tighten the screws by the
allen wrench for lock the strings. If there is any
string lose the tune, can adjust the Fine Tunning
screws on the top of the bridges.

18
ML electric guitar DIY Kit
6Others
6.1 Other hints
There are a few other things that you can do to optimize your tuning stability:
1. Each time you play your guitar, before you do your final tuning, play for a few
minutes to allow the strings to warm up. Metal expands when warm and contracts
when cool. After you've played a few riffs, you can then do your final tuning;
2. Wipe the strings, neck and bridge with a lint-free cloth after playing;
3. When transporting or storing your guitar, even for short periods, avoid leaving it
anyplace you wouldn't feel comfortable yourself.
Remember, guitars are tempered instruments! Re-tune, play and make further
adjustments as needed.
We hope you have enjoyed building your own favorite guitar! If you have any
questions along the way please email:
Company: info@hygent.com,
Robert: Robert@hygent.com
Or login the web as: www.leojaymz.com for download your required documents.

19
Table of contents
Other LEO JAYMZ Musical Instrument manuals