LFO expander LFO User manual

rev 1, 08-2010
Thank you for choosing the LFO-expander to expand the possibi ities of your
synthesizer.
Connections
A connections are made on the right side. For your convenience, the main out is
presented as a standard jack (6,3mm) and minijack (3,5 mm) output. P ease use
on y one of them.
Picture 1: Right-side view
1Peda -in or CV-in :jack
6,3mm (TS or TRS)
2Main out: mini-jack (TS)
3Main out: jack (TS)
4CV-in: mini-jack (TS)
5CV-out: mini-jack (TS)
6DC input (12V DC)
Note:
TS = Tip – S eeve
TRS = Tip – Ring - S eeve
CV = Contro Vo tage
Power Supply
The LFO-expander runs on 2 9V batteries (not inc uded) or on an externa DC-power
transformer (not inc uded). When using a DC transformer, the batteries wi be
automatica y disconnected. Use a 12V transformer, 250mA or more. GND on the
outside, +12V on the center. Inverting the power wi cause no harm. Connector
type: ø6,3mm x ø2,1mm
Foot pedal
The foot peda can be an active peda (containing a battery itse f) with TS-jack or the
peda can be a passive peda (adjustab e resistor) with TRS-jack. We recommend a
moog EP2 expression peda or any peda with the same specifications. A resistance of
50 k-Ohms works very we for the LFO-expander.

(Re)placing batteries
Picture 2: battery-rep acement
Unscrew the 2 bo ts as
indicated in picture 2. P ace
2 9V batteries inside the
battery-c amps and connect
each of them to one of the
eads. Be carefu : don’t pu
the eads. When rep acing
the battery-cover make
sure both batteries fit inside
the ho e of the housing.
Tighten the 2 screws.
When no batteries are
insta ed, connect both
connectors inside each
other so their meta parts
won’t cause short-circuit
inside the unit.
When batteries are running ow of power, LFO frequency wi decrease and the unit
wi perform not as it shou d be.

General description
The LFO-expander generates an LFO-signa , a sweep signa and can be used to
attenuate a CV-signa . The LFO-signa and sweep-signa can be modu ated by a foot-
peda , Contro Vo tage (say from a modu ar synth), or by hand.
A connections are made on the right side of the LFO-expander. Thanks to that, the
expander can be p aced just above the keyboard of a minimoog or ARP2600.
LFO
The LFO-circuit generates a rectangu ar or triang e shaped signa that can be used to
modu ate pitch (vibrato), fi ter (wah-wah), amp itude (tremo o) or other destinations
on your synth, depending on the possibi ities of your synth.
The LFO has an adjustab e depth and speed that can be set with the contro s on the
top-pane .
When app ying a signa to the PEDAL IN / CV IN input, or by manua y turning the
MANUAL knob, both the speed and depth of the LFO signa can be inf uenced at the
same time (!) at independent eve s.
Sweep
The sweep-circuit generates a positive or negative vo tage, depending on the
position of its contro -knob. This vo tage can be inf uenced by a signa coming from
the PEDAL IN / CV IN input or by manua y turning the MANUAL knob.
The range of the sweep-vo tage can be se ected and you can mix it with the LFO-
signa .
Additional CV
The additiona CV-function makes it possib e to connect any synth that has CV-in and
CV-out jacks (for contro ing the pitch of the synthesizer’s osci ators), and add a
rea -time contro ab e LFO or bend to that synthesizer.
Inside the LFO-expander there’s a trimmer to adjust the amount of key-CV when the
switch is in “mix” mode. Before shipping the unit this trimmer was set to a 1:1 ratio
whi e the unit was connected to an ARP2600. If your synth’s pitch doesn’t track 1:1
when it’s key-CV is processed by the LFO-expander you’ have to open the LFO-
expander by unscrewing a 7 knobs (a an key), remove the 4 screws that ho d the
housing and adjust the trimmer with a sma screwdriver for a 1:1 ratio.
The additiona CV-circuit is a so handy to process a CV from your modu ar synth with
a knob that’s just in front of you. Set the switch to the right to activate this function.

Description o controls
Picture 3: description of contro s
1power-switch. Led above switch wi ight when on.
2speed range switch. Switches from ow-speed to high speed. LED above
switch wi f ash indicating LFO-speed.
3Waveform switch. Switches between rectangu ar and triang e wave shape
for LFO signa .
4Initia depth of LFO. This knob contro s the portion of the depth of the LFO
that wi not be inf uenced by the signa from the peda -in jack or manua
knob (12).
5Contro ab e depth of LFO. This knob determines how much effect the
signa from the peda -in jack or manua button has on the depth of the
LFO.
6Initia speed of LFO. This knob contro s the portion of the speed of the LFO
that wi not be inf uenced by the signa from the peda -in jack or manua
knob (12).
7Contro ab e speed of LFO. This knob determines how much effect the
signa from the peda -in jack or manua button has on the speed of the
LFO.
8Sweep. This knob contro s the amount of CV that wi be generated when
you contro the foot-peda or manua button (12). The CV can be negative
(counter c ockwise) or positive (c ockwise).
9This button changes the output of the sweep. Usua y, set to ow for pitch-
contro , set to high for fi ter-contro .
10 Sweep-mix. When turned off, the sweep CV wi not be fed to the main
out. When set to mix the sweep-CV wi be added to the LFO-signa .
11 Manua /peda switch. This switch determines whether the manua -knob
(12) or foot-peda wi contro the LFO and sweep signa s.
12 Manua knob. When button 11 is set to “manua ”, this knob contro s the
contro ab e portion of the LFO-depth and speed and contro s the sweep-
signa .
13 CV-mix. This button determines whether a signa app ied to the CV-in wi
be routed to the CV-knob (14) or wi be mixed 1:1 with the LFO- and
Sweep signa s.
14 CV knob. This knobs contro s the attenuation of the CV-signa when button
13 is set to right. The CV-signa wi then be routed to the independent CV
out.
Connection examples
The next diagrams offer some examp es for connecting the LFO-expander to
synthesizers. In genera , the LFO-expander can be used on a most every ana og
synthesizer having CV IN and CV OUT. In genera , the CV-IN jack of a synthesizer is
interna y connected to it’s CV OUT. By inserting a jack into the CV IN, this interna
connection wi be broken. Now, when you feed the synths’s CV OUT to the LFO-
expander, it wi come back to the synth inc uding the LFO or sweep (bend) signa s.
On many synthesizers, the CV IN is routed to the fi ter-circuit as we (just ike the
synth’s interna keyboard CV is) so the fi ter cut-off frequency is inf uenced by the
output of the LFO-expander as we . On some synths, this key tracking can be set on
or off.
Some additiona information:
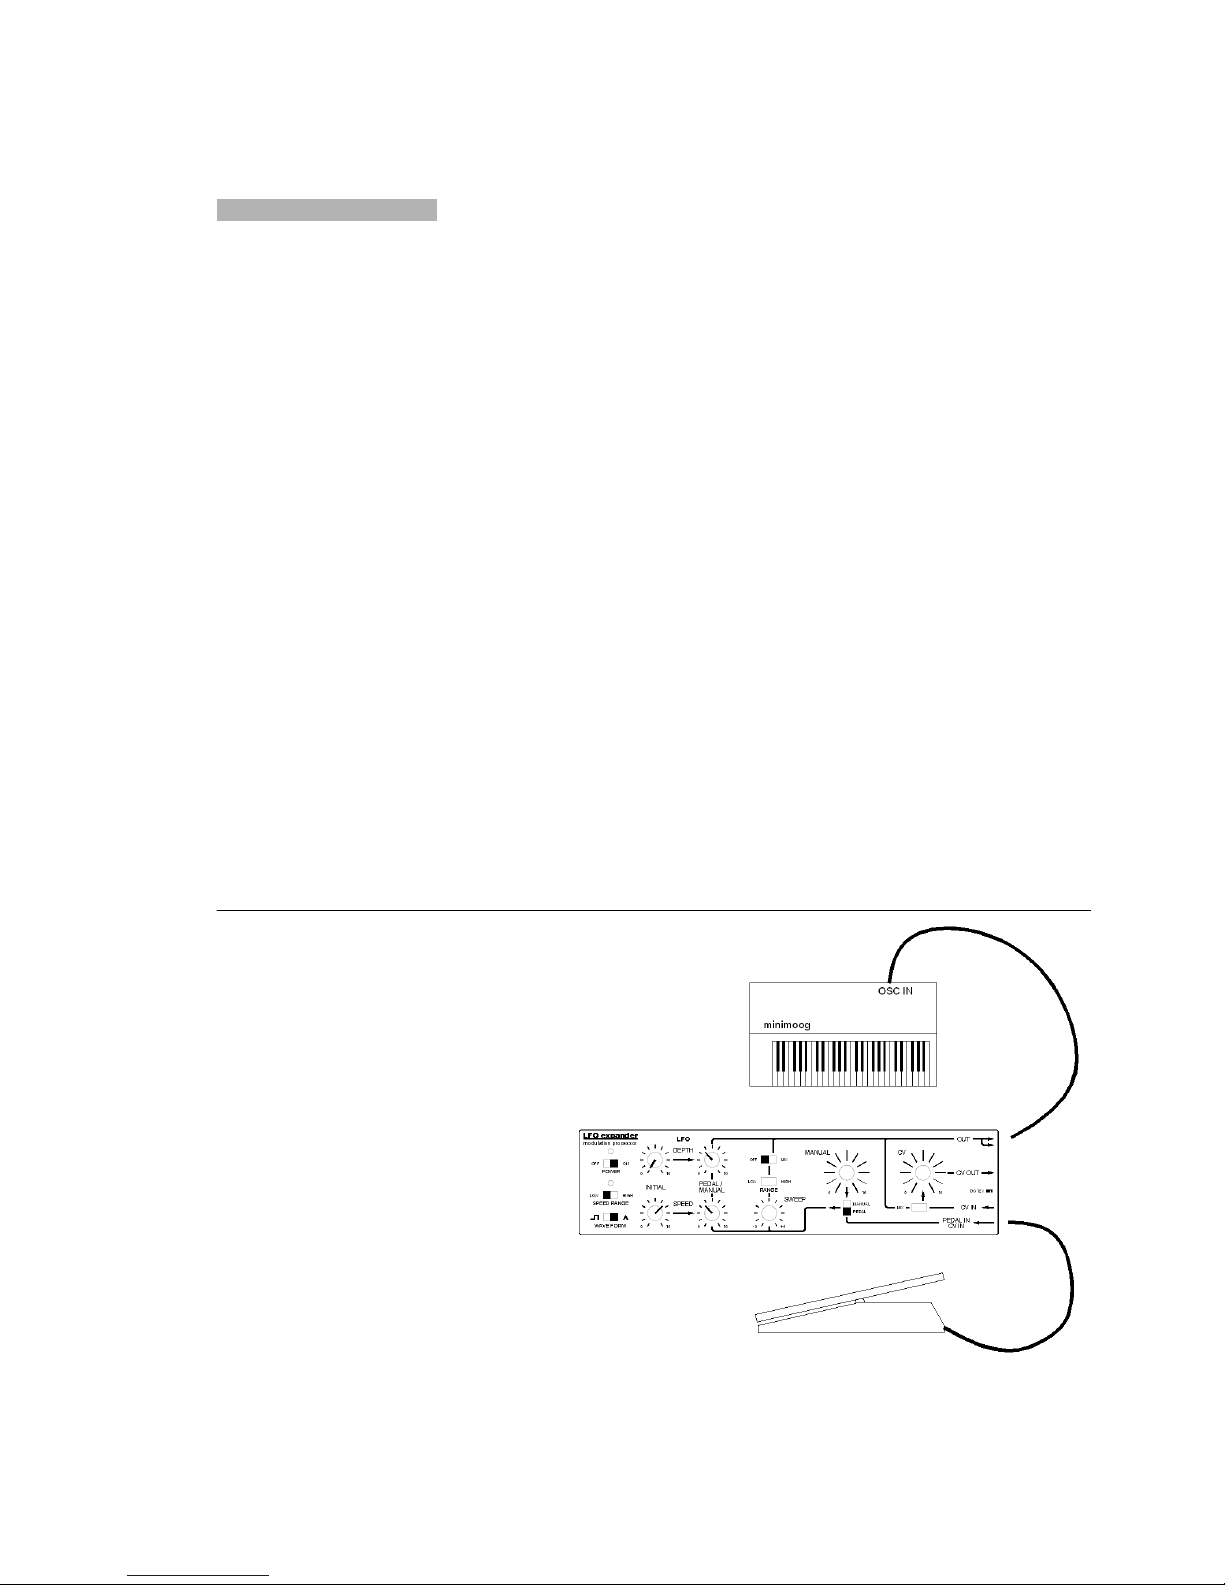
On the Moog mode D minimoog, there is no CV out. However, there is
an “OSC IN” jack. Externa signa s routed to this “OSC IN” jack are
mixed with the minimoog’s own keyboard CV.
On the Yamaha CS80, externa signa s are reversed in po arity. So set
the sweep-knob to the eft (negative side) to bend the pitch higher or
the fi ter brighter.
On the Yamaha CS50 and CS60, direct currents are fi tered out from
the externa signa . This means pitch bending and very s ow LFO’s
app ied to the CS50 or CS60 wi ead to unexpected resu ts. Norma
LFO-frequencies wi not be a prob em.
Examp e 1: Vibrato on mode D minimoog.
Connect the foot peda and
minimoog as shown in the
diagram. Set the contro s as
shown. P ay the keyboard of the
minimoog and use the foot peda to
contro LFO speed and depth.

Examp e 2: Vibrato on monosynth with CV-in / CV-out
Connect the foot peda as shown.
Connect the synth’s KEY CV OUT to
the CV IN of the LFO-expander.
Connect the main OUT to the
synth’s CV IN. P ay the keyboard of
your synth and use the foot peda
to contro LFO speed and depth.
Examp e 3: Pitch-bends on monosynth with CV-in / CV-out
Connections are ike
examp e 2. Turn the LFO-
contro s fu y counter
c ockwise and set SWEEP
switch to “mix”. The SWEEP
knob and RANGE switch can
be set to determine the
range of the sweep.
Remember, the SWEEP
knob can be set to positive
(upward) or negative
(downward) bends.
Note:
Make the connections as
shown in examp e 1 and set
the contro s as shown over
here to make pitch bends
on the minimoog.

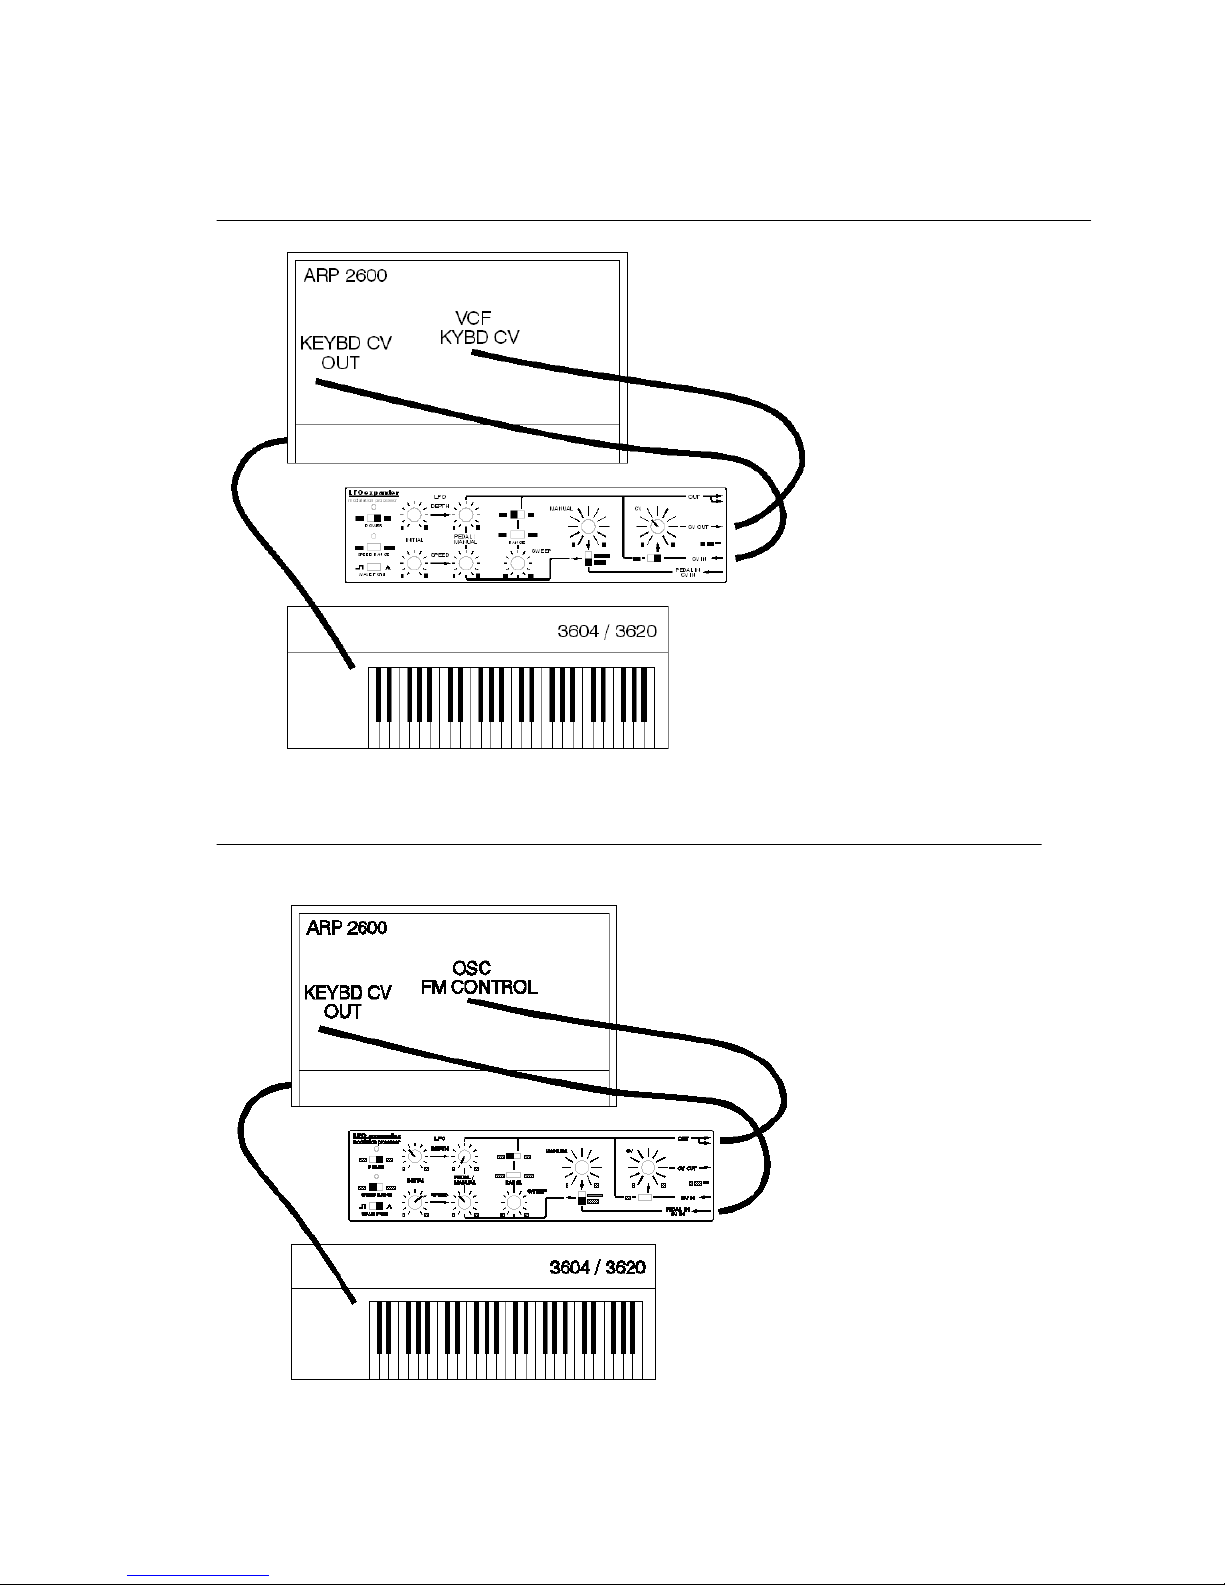
Examp e 4: Fi ter cut-off frequency contro on ARP 2600
Connect patch
cords as shown.
Use invert output
of vo tage
processor 1 and
move that s ider
fu y to the right.
P ay the keyboard
of the ARP 2600
and turn the CV-
knob to create
fi ter sweeps.
Examp e 5: ARP2600 fi ter cut-off contro ed by passive foot peda
Connect patch
cords as shown.
P ay the keyboard
of the ARP 2600
and use the
passive foot peda
to sweep the fi ter
cut-off frequency.
Or:
Switch to “manua ”
and use the
“manua ” knob
instead of the foot
peda
Examp e 6: Variab e fi ter cut-off keyboard tracking on ARP 2600
Connect patch
cords as shown.
P ay the keyboard
of the ARP 2600
and turn the CV-
knob to contro the
amount of fi ter
keyboard tracking.
Examp e 7: LFO speed keyboard-tracking on ARP 2600
Connect patch cords
as shown. Do not
use osci ators KYBD
CV but one of the
other osc inputs.
P ay the keyboard of
the ARP 2600 and
notice LFO speed wi
increase when
p aying higher keys.
Note: use the 2600’s
mu tip es to contro 2
or 3 osci ators at the
same time.

Examp e 8: Vibrato on Yamaha CS80
Connect the foot peda as shown. Connect LFO-expander’s main out to “externa in”
of CS80. Set “externa eve ” ha fway. Set CS80’s Sub Osci ator function to “EXT.”
and adjust VCO s ider as shown in detai . Use the foot peda to contro vibrato.
Now, you can app y vibrato (and change it’s speed) by foot-peda whi e
independent y app ying other effects (such as VCF-contro ) by using the keyboards
po y-aftertouch. Besides the action of the foot peda , po y aftertouch can sti contro
the depth for the modu ation of vco’s, fi ter and amp ification.
You can a so use the “SWEEP” function to make pitch bends or fi tersweeps.
Since the CS80’s interna LFO (named sub osci ator) is disconnected from the
interna signa source (because the function- ever is set to “ext”), the two “speed”
evers just above the keyboard are not functioning anymore. However, the “touch
contro ” evers for bri iance and eve on both voice-channe s ( and memory-banks)
are sti active and can be used to create effects with po y-aftertouch.
Note:
the range of vibrato and pitch bends is imited by the CS80. Maximum is about 3 to 4
semitones up and down. When app ying higher eve s to the CS, the signa wi be
c ipped, resu ting in strange, unnatura (but interesting) waveforms.
Note:
the signa app ied to the “EXTERNAL IN” of the CS80 is inverted. Set the SWEEP-
knob on the LFO-expander to negative va ues to create upward bends whi e pressing
the foot peda .
Note:
on the CS50 and CS60, pitch bends wi not work correct y because constant– eve or
s ow changing signa s are fi tered by the CS50 and CS60.
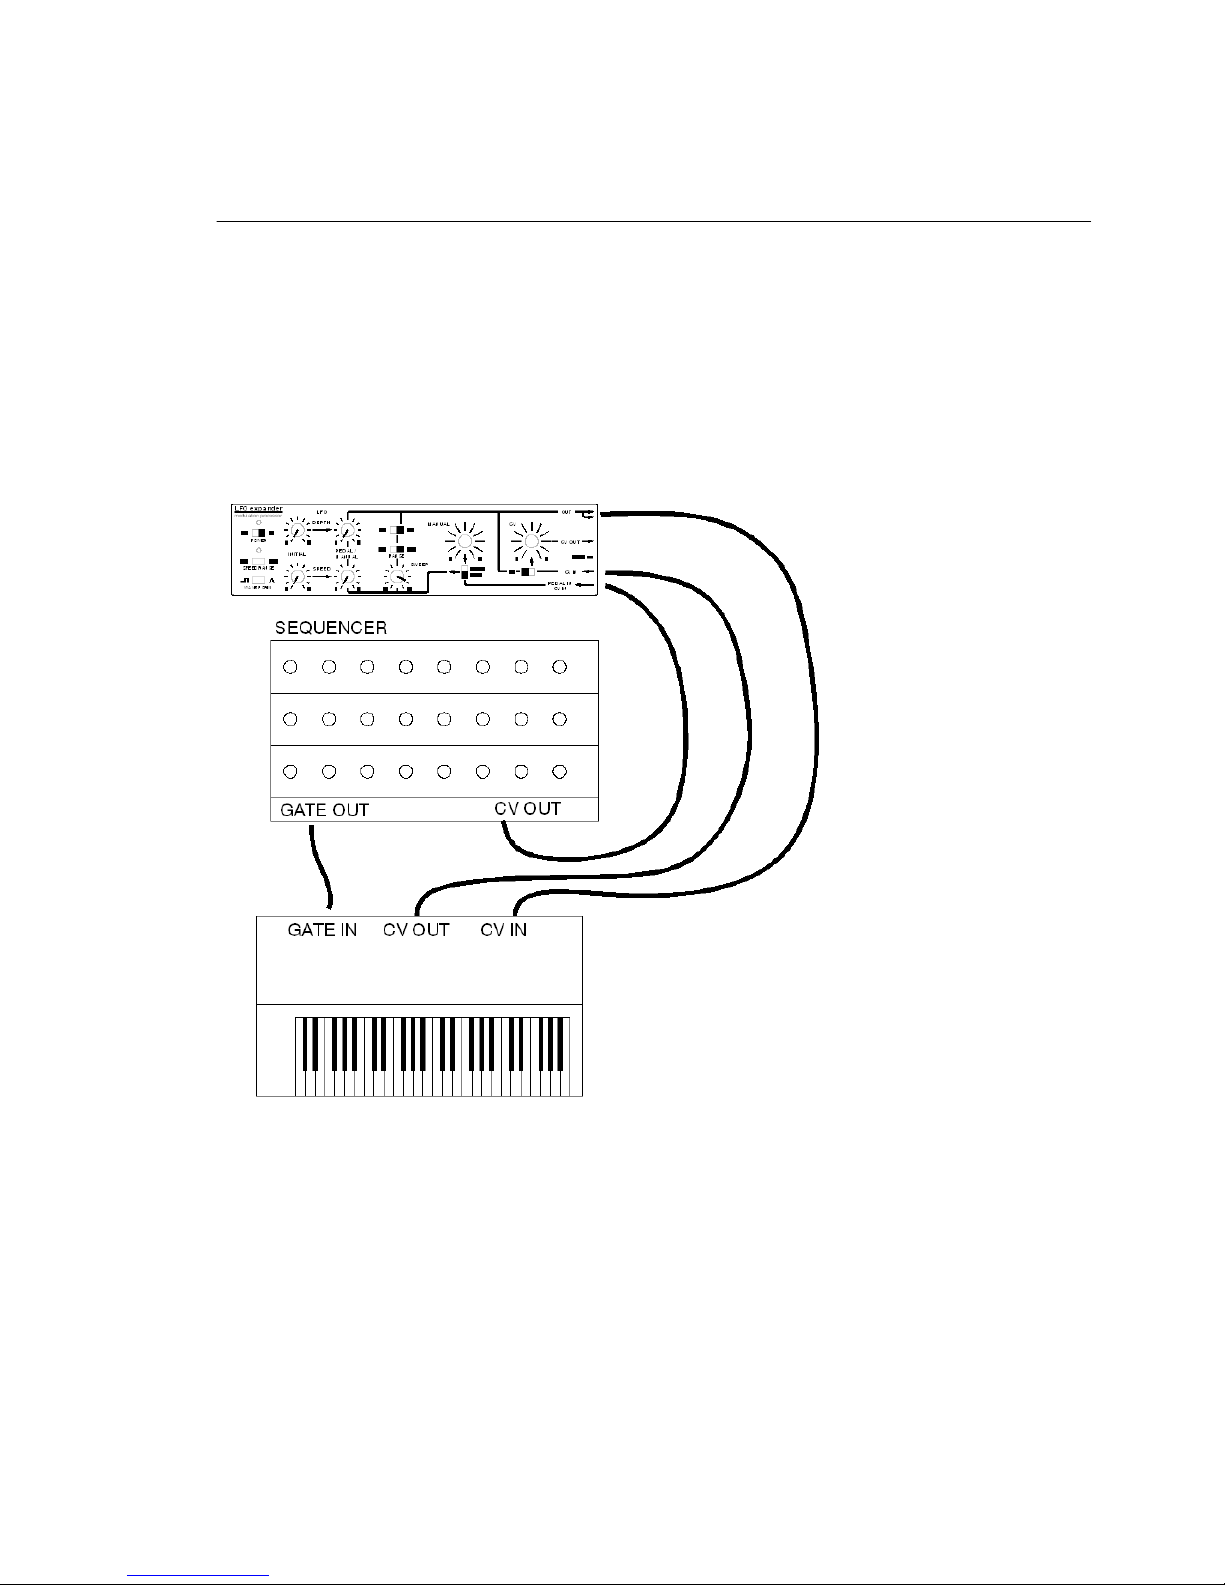
Examp e 9: Rea -time pitch-transposing of sequence
In this examp e, the LFO-expander’s functiona ity to mix 2 CV’s is demonstrated. By
adding a keyboard CV to a sequencer CV, rea -time transposing of the sequence is
possib e by pressing keys on the keyboard whi e the sequencer is running. In this
examp e, the synth’s keyboard CV OUT is routed to the LFO-expander’s 1:1 CV
circuit. De sequencer’s CV OUT is connected to the LFO-expander’s PEDAL IN / CV IN
and routed to the SWEEP-circuit. Now, carefu y adjust the SWEEP-knob to obtain a
1:1 amp ification of the sequencer’s CV out (set SWEEP RANGE to “high”).
Connect the main OUT of the LFO-expander to the CV IN of your synthesizer.
Connect the GATE OUT of the sequencer to the GATE IN of your synthesizer.
Note:
You can set the
LFO-contro s to
add vibrato to the
sequence and
free the interna
LFO of your synth
for other
purposes.


