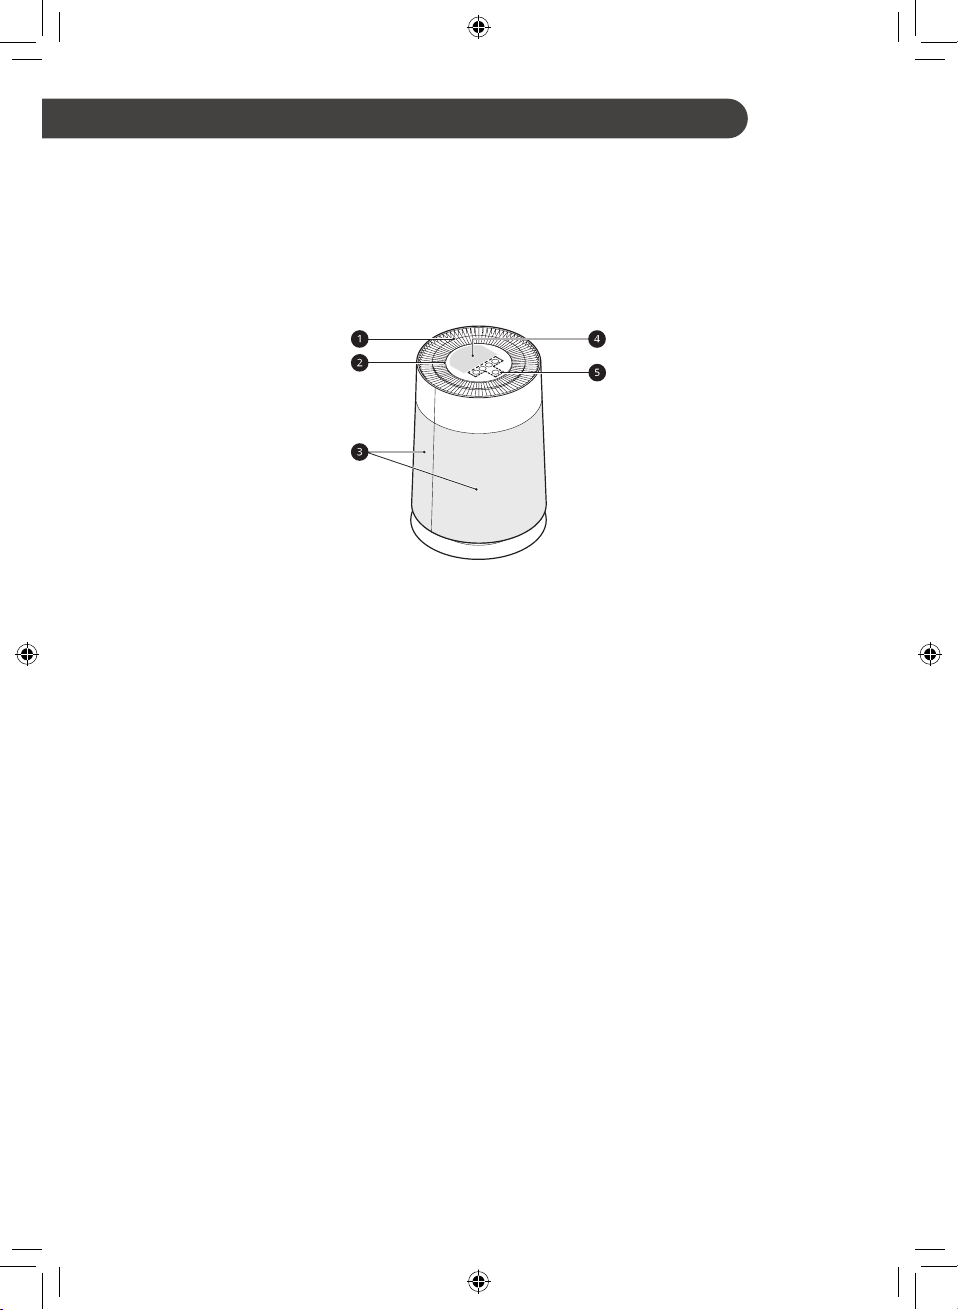
LG AS330DWQ0 User manual

www.lg.com
OWNER’S MANUAL
Copyright © 2021 LG Electronics Inc. All Rights Reserved
MFL70445435
Rev.03_033021
OWNER’S MANUAL
AIR PURIFIER
Read this owner’s manual thoroughly before operating the appliance and keep it
handy for reference at all times.
AS330DWQ0
EN ENGLISH

TABLE OF CONTENTS
This manual may contain images or content
different from the model you purchased.
This manual is subject to revision by the
manufacturer.
SAFETY INSTRUCTIONS ..............................................................3
IMPORTANT SAFETY INSTRUCTIONS ..........................................................3
INSTALLATION...............................................................................8
Parts and Specifications....................................................................................8
Unpacking the Appliance.................................................................................10
Installation Location Requirements.................................................................11
Transportation Requirements..........................................................................11
OPERATION .................................................................................12
Control Panel ..................................................................................................12
Getting Started................................................................................................14
Adjusting the Fan Speed.................................................................................14
Using Extra Functions.....................................................................................15
Checking Air Quality........................................................................................16
SMART FUNCTIONS....................................................................19
LG ThinQ Application ......................................................................................19
Smart Diagnosis..............................................................................................21
MAINTENANCE............................................................................23
Maintaining the Appliance ...............................................................................23
Cleaning the Appliance ...................................................................................24
Maintaining the Filter.......................................................................................25
TROUBLESHOOTING..................................................................26
Before Calling for Service ...............................................................................26
WARRANTY (USA).......................................................................29

3
EN
SAFETY INSTRUCTIONS
READ AND SAVE THESE INSTRUCTIONS
The following safety guidelines are intended to prevent unforeseen risks
or damage from unsafe or incorrect operation of the appliance.
The guidelines are separated into ‘WARNING’ and ‘CAUTION’ as
described below.
This symbol is displayed to indicate matters and operations
that can cause risk. Read the text marked with this symbol
carefully and follow the instructions in order to avoid risk.
WARNING
This indicates that failure to follow the instructions can cause
serious injury or death.
CAUTION
This indicates that failure to follow the instructions can cause minor
injury or damage to the product.
IMPORTANT SAFETY INSTRUCTIONS
WARNING
To reduce the risk of explosion, fire, death, electric shock,
injury or scalding to persons when using this product, follow
basic precautions, including the following:
Children in the Household
• This appliance is not intended for use by persons (including children)
with reduced physical, sensory or mental capabilities, or lack of
experience and knowledge, unless they have been given supervision
or instruction concerning use of the appliance by a person
responsible for their safety. Children should be supervised to ensure
that they do not play with the appliance.

4
EN
Installation
• Do not install the appliance on an uneven or inclined surface.
• Do not install the appliance in an area exposed to direct sunlight or
near heat-generating equipment.
• Do not install the product in a place where combustible gas may leak
or industrial oil or metallic particulates are present.
• Do not allow the appliance to push against the power cord or plug.
• Do not touch the power plug with wet hands.
• When unplugging the power cord, always pull it by the plug.
• Unplug the appliance during thunder or lightning storms or when not
in use for a long time.
• Do not bend the power cord excessively or place a heavy object on
top of it.
• Do not extend the length of the power cord or alter it.
• Do not use several devices on a multi-socket extension outlet.
• Make the connection securely so that screw in terminals will not be
loosened when the power cord is pulled.
• Make sure that the power cord cannot be be pulled out or damaged
during operation.
• If the power cord is damaged, it must be replaced by the
manufacturer, its service agent or similarly qualified person in order to
avoid a hazard.
• This appliance has a polarized plug (one blade is wider than the
other). To reduce the risk of electric shock, this plug is intended to
fit in a polarized outlet only one way. If the plug does not fit fully in
the outlet, reverse the plug. If it still does not fit, contact a qualified
electrician. Do not attempt to defeat this safety feature.

5
EN
Operation
• Iftheapplianceisimmersedinwater,stopusingitandcontactanLG
ElectronicsCustomerInformationCenter.
• Ifthereisagasleakage(isobutane,propane,LNG,etc.),donot
touchtheproductorpowerplugandventilatetheareaimmediately.
• Donotcleantheappliancewithbrushes,clothsorspongeswhichare
abrasiveormadeofmetal.
• Ifyoudetectanyabnormalnoise,odororsmoke,unplugtheproduct
immediatelyandcontactanLGElectronicsCustomerInformation
Center.
• Onlyanauthorizedrepairpersonshoulddisassemble,repair,or
modifytheappliance.
• Donotuseorstorefire,combustibles(ether,benzene,alcohol,
drugs,propane,butane,combustiblespray,insecticide,airfreshener,
cosmetics,etc.)orflammablematerials(candles,lamps,etc.)near
theproduct.
• Donotplacethepowercordunderrugs,carpetingormats.
• Donotallowanimalsorpetstochewonthepowercord.
• Donotmovetheappliancewhenitisinoperation.
• Donothittheappliance.
• Donotinserthandsormetalobjectsintotheairinletoroutlet.
• Donotinstallandusebrokenparts.
• Donotputflammablesintotheappliance.
• Donotallowchildrentoclimbonorplaywiththeappliance.
• Donotplaceanythingontopoftheappliance.
• Thefanisnotatoy.Itshouldnotbeplayedwithorplacedwhere
youngchildrencanreachit.

6
EN
Maintenance
• Dispose of the packing materials (vinyl, styrofoam, etc.) to keep them
out of reach of children.
• Take care not to injure or pinch yourself when you detach and
reattach parts of the appliance.
• Turn off and unplug the appliance before cleaning it or replacing the
filter.
CAUTION
To reduce the risk of minor injury to persons, malfunction, or
damage to the product or property when using this product,
follow basic precautions, including the following:
Installation
• Do not tilt the appliance to pull or push it when transporting.
• Do not install the appliance in a vehicle, RV, or marine vessel.
• Do not place the appliance near a TV or stereo equipment.
• Do not place the appliance under bright light.
• The appliance must be installed in accordance with national wiring
regulations.
• When moving or storing the appliance, wrap the power cord around
the base of the appliance to prevent personal injury, damage to the
cord or damage to floors.
• Do not place the appliance near curtains.
Operation
• Do not use the product for removal of toxic gas such as carbon
monoxide.
• Do not use the product for ventilation purposes.
• Do not use the appliance for a long time in a region with unstable
voltage.

7
EN
• Do not place obstacles around the air inlet or outlet.
• For safe use of the appliance, children or others with reduced
mental capabilities need to be closely monitored by a person who is
responsible for their safety.
• Do not use the product for special purposes such as preserving
plants, precision instruments, artworks, etc.
• Do not operate the appliance with wet hands.
• Do not let the moisture from a humidifier directly touch the appliance.
• Do not use the appliance while it is not in an upright position.
• Do not use the appliance near objects vulnerable to heat.
• Do not use detergents, cosmetics, chemicals, air fresheners, or
disinfectants in the appliance.
• Do not touch any internal parts while the unit is operating or
immediately after operation.
• Use the filter only for its intended purpose.
• The Deodorizing Care filter and True HEPA filter are assembled
together. Do not try to detach them from each other.
• Do not insert any objects into the Air outlet.
Maintenance
• Do not use strong detergents or solvents to clean the product. Use a
soft cloth to clean.
• Do not clean the appliance with an alkaline detergent.
• Do not wipe the appliance surface using sulfuric acid, hydrochloric
acid or organic solvents (thinner, kerosene etc.) or attach a sticker on
the appliance.
• Do not allow water inside the appliance.
• Do not wash the filter with water.
• Be careful not to damage the ultra-fine filter when cleaning it with a
vacuum cleaner.

8
EN
INSTALLATION
• The appearance or components of the appliance may differ depending on the model.
Parts and Specifications
Front View
aAir outlet
• Discharges purified air through the filter.
bAir quality light
• Uses colored light to indicate the overall air quality.
cAir inlet
• The front and rear covers can be removed separately.
dStatus display panel
• Indicates appliance settings and air quality.
eControl panel
• Set or adjust appliance functions.

9
EN
Rear View
aSmart Diagnosis speaker
• In the event of a malfunction or failure, you can use the Smart Diagnosis option to check the
appliance condition.
bPM1.0 (particles with a diameter between 1.0 and 2.5 micrometers) sensor
• Detects the concentration of particulates in the air.
cOdor (Gas) sensor
• Detects airborne odors.
dFilter
• Minimizes allergens, fine particulates, possible sources of sick house syndrome, smog, and
other odors.
Specifications
• Appearance and specifications may vary without notice to improve the quality of the appliance.
Model AS330DWQ0
Power 115 V~, 60 Hz
Exterior dimensions (a x b x c)13.5 x 20.2 x 13.5 in. (343 x 512 x 343 mm)

10
EN
Filter System
aDeodorizing Care filter
• Minimizes odors from the bathroom,
cigarettes, food and other common
sources.
bTrue HEPA filter
• Minimizes PM1.0 and cigarette smoke
from the air
cUltra-fine filter
• Minimizes large particles floating in the
air.
dFilter handle
• Helps when removing the filter from the
appliance.
Unpacking the Appliance
Unpack the appliance and remove any packing
tape or vinyl before using the appliance.
Removing the Filter Packaging
1 Remove the rear cover by gently pulling the
top of the cover at the sides until it separates
from the appliance. Lift the cover to remove it
from the base.
• The rear cover has “PM1.0 & GAS
SENSOR” printed on it.
2 Remove and dispose of the cardboard support
piece (a) located by the filter inlet.
3 Slide the filter out and remove it from its
packaging.

11
EN
4 Install the filter in the appliance.
• Make sure that the handle (a) is at the top
of the filter.
5 Insert the tabs at the bottom of the cover into
the slots in the base of the appliance and
close the cover.
NOTE
• Remove the support and packaging prior to use
to prevent product malfunction.
• Install the filter with the handle at the top to
avoid product malfunction or failure.
Installation Location
Requirements
Installation Location
Allow a 3 1/4 ft (1 m) clearance between the
appliance and surrounding surfaces or objects.
The air inlet needs space to function properly.
1 m
The performance of the appliance may differ
depending on the operating environment (such as
temperature and humidity).
• 40 % ~ 70 % of humidity is recommended for
optimal performance.
Transportation Requirements
Transporting the Appliance
When moving or storing the appliance, wrap the
power cord around the base of the appliance to
prevent personal injury, damage to the cord or
damage to floors.
Do not hold the outer cover when you carry the
appliance. The cover may open accidentally,
causing the appliance to drop. Dropping the
appliance may cause personal injury or appliance
malfunction.
• Single model : Hold the bottom of the product
with both hands to move the
product safely.

12
EN
• The appearance or components of the appliance may differ depending on the model.
Control Panel
Control Panel Features
aPower Button
bSpeed Button
Adjusts the fan speed.
• Press and hold the button for 3 seconds to activate the Wi-Fi connection mode.
• Wi-Fi function
−Before appliance connection: Press and hold the button for 3 seconds to activate the Wi-Fi
connection mode. (It will turn off automatically after 7 minutes.)
−After appliance connection: Press and hold the button for 3 seconds to control the appliance
from the LG ThinQ smartphone app.
−Wi-Fi function off: Press and hold the Power button and the Speed button at the same time for
3 seconds.
cIndicator Button
Shows the concentration of particulate matter by size of particulates.
dSleep Timer Button
Schedules an automatic turn off time for the appliance.
• Press and hold for 3 seconds to lock or unlock the control panel buttons.
eLight Button
Turns the air quality light on or off.
• Press and hold it for 3 seconds to lock or unlock the control panel buttons.
OPERATION

13
EN
Status Display Panel
aAir Quality Display
A Overall air quality (color)
B Particulate matter (color)
C Concentration of particulates or sleep
timer time
D Concentration of odor (color)
bFan Speed Display
cIcons
Icon Description
Lights up when it is time to
replace the filter.
Lights up when the Wi-Fi
function is activated.
Lights up when the sleep timer
function is activated.
Lights up when a schedule for
turning on/off the appliance is
set in the LG ThinQ application.
Lights up when the control panel
is locked.

14
EN
Getting Started
Turn the Appliance On/Off
Press the Power button to start the operation.
NOTE
• If you experience a power outage, when
power is restored the appliance starts in the
last operating mode set.
• After startup, the sensor ready display ( = )
appears for 30 seconds.
Adjusting the Fan Speed
Air Purifier Fan Speed
Press the Speed button during operation to
adjust the fan speed on the air purifier.
• Each time you press the button, the speed
changes in the following order:
Auto ~Low ~Medium ~High ~Turbo.
Displaying Fan Speed
The fan speed is displayed on the status display
panel. As you adjust the fan speed, the display
increases or decreases by 2 bars at a time.
[ Example of air purifier speed ‘Medium’ ]
NOTE
• When the appliance is first turned on, the fan
speed is set to Auto. Auto mode adjusts the fan
speed automatically based on the indoor air
quality.

15
EN
Using Extra Functions
Setting the Sleep Timer
Use this function to set an automatic stop time for
the appliance.
To use the function, press the Sleep Timer button
while the appliance is operating.
• Each time you press the button, the time until
the appliance automatically shuts off changes
in the following order: After 2hours→After
4hours→After8hours→After12hours→
Cancel.
• Once the sleep timer is set, the status display
panel displays only the sleep timer icon and a
few other icons.
NOTE
• The speed is set to Low by default for a certain
period of time. After the time passes, the speed
is controlled automatically depending on the air
quality.
• After the Sleep Timer is set, press the Speed
button to manually change the fan speed.
• To check the set time after setting the Sleep
Timer, press the Sleep Timer button.
• The sleep timer remains on even if the power
goes off or if there is a power outage.
Locking the Control Panel
Lock the control panel if you want to prevent
accidental operation or keep children from
changing the settings.
Press the Light button for at least 3 seconds while
the appliance is operating.
• k (Lock) is displayed on the status display
panel.
NOTE
• Turn the Lock function off in the same way you
turned it on.
• The control panel can be locked even when the
appliance is not operating.

16
EN
Checking Air Quality
The overall air quality is indicated by the color of the air quality light and in the status display panel.
Overview of the Air Quality
The overall air quality is calculated based on the concentrations of odors and particulates in the air and is
categorized into 4 levels depending on these concentrations.
Color
Overall Air
Quality Concentration of PM (μg/m3) Concentration of Odor
State
PM10
(coarse
particles)
PM2.5
(fine particles)
PM1.0
(particles with
a diameter
between 1.0
and2.5μm)
State Level
Red Poor 255 or more 56 or more 56 or more Very strong 4
Orange Unhealthy 155 ~ 254 36 ~ 55 36 ~ 55 Strong 3
Yellow Moderate 55 ~ 154 13 ~ 35 13 ~ 35 Normal 2
Green Good 54 or less 12 or less 12 or less Weak 1
NOTE
• The color of the air quality light is based on the worst level detected, whether odors or particulates.
• PM (particulate matter) concentration is displayed in increments of 1 unit, from 8 to 999. PM
concentration values are based on the data sheet provided by the sensor manufacturer.
• The PM concentration measurement was tested using LG Electronics’ standard test materials.
• Differences in PM concentration values may be the result of different methods of measuring or
differences in the actual PM concentration levels.
−If the PM concentration is high, there may be a larger difference between the displayed concentration
and the actual concentration.

17
EN
Air Quality Details on the Status
Display Panel
aOverall Air Quality
The overall air quality is indicated by the
color of the icon at the top of the status
display panel.
bOdor Concentration
The odor concentration is indicated by the
color of the Odor icon on the status display
panel.
cPM Concentration
The particulate matter (PM) concentration
is indicated in the PM concentration display
and by the color of the PM size indicator.
The number that appears in the display is
the worst level detected among the PM10,
PM2.5, and PM1.0 sensors.
dPM Size
This display shows whichever PM size has
the highest concentration. The color of the
display indicates the PM concentration level
only.
Turning Air Quality Light On/Off
1 The overall indoor air quality is indicated by
the color of the air quality light.
a Air quality light
2 Press the Light button to turn it on/off.
NOTE
• When the appliance is turned on, the air
quality light is white during the initial sensor
stabilization period (30 seconds). The odor
sensor takes 2 minutes to stabilize after the
appliance is turned on.

18
EN
Checking Particulate Levels
To check the particulate matter concentration by
particulate size, press the Indicator button while
the appliance is operating.
• Press the button repeatedly to see the PM
levels displayed in the following order:
PM10 ~PM2.5 ~PM1.0
• The concentration for the selected particulate
size is displayed for about 10 seconds.
NOTE
• The overall air quality level is a result of both
PM concentration and the odor level.
• Even two products placed in the same space
could measure the concentration of particles
differently due to air circulation.
• Unlike the odor level, the PM concentration
may take time to measure accurately due to the
slow diffusion rate.
• Due to the flow around the particle sensor,
the displayed PM concentration and actual
concentration may differ.
• The PM concentration measured may differ
from the actual PM concentration in the
following cases.
−The presence of sofas, beds, carpets,
vacuums, humidity, smoke, fragrances,
cosmetics, perfumes, insects, or pets
−If the appliance is located near a construction
site, road, factory, doorway, window, or vent
−If the appliance is located near cooking,
humidifiers, sprays or other products which
generate steam or fine particles.

19
EN
SMART FUNCTIONS
LG ThinQ Application
The LG ThinQ application allows you to
communicate with the appliance using a
smartphone.
LG ThinQ Application Features
Smart Diagnosis
If you experience a problem while using the
appliance, this smart diagnosis feature will help
you diagnose the problem.
Settings
Allows you to set various options on the appliance
and in the application.
NOTE
• If you change your wireless router, Internet
service provider, or password, delete the
connected appliance from the LG ThinQ
application and connect it again.
• The application is subject to change for
appliance improvement purposes without
notice to users.
• Functions may vary by model.
Before using LG ThinQ
Application
This feature is only available on models with Wi-Fi
function.
1 Check the distance between the appliance
and the wireless router (Wi-Fi network).
• If the appliance is too far from the wireless
router, the signal strength becomes weak.
It may take a long time to connect or
installation may fail.
2 Turn off the Mobile data or Cellular Data on
your smartphone.
3 Connect your smartphone to the wireless
router.
NOTE
• To verify the Wi-Fi connection, check that the
Wi-Fi ficon on the control panel is lit.
• The appliance supports 2.4 GHz Wi-Fi
networks only. To check your network
frequency, contact your Internet service
provider or refer to your wireless router manual.
• LG ThinQ is not responsible for any
network connection problems or any faults,
malfunctions, or errors caused by network
connection.
• If the appliance is having trouble connecting
to the Wi-Fi network, it may be too far from
the router. Purchase a Wi-Fi repeater (range
extender) to improve the Wi-Fi signal strength.
• The Wi-Fi connection may not connect or may
be interrupted because of the home network
environment.
• The network connection may not work properly
depending on the Internet service provider.
• The surrounding wireless environment can
make the wireless network service run slowly.
• If the appliance cannot be connected due to
problems with the wireless signal transmission,
unplug the appliance and wait about a minute
before trying it again.
• If the firewall on your wireless router is enabled,
disable the firewall or add an exception to it.

20
EN
• Thewirelessnetworkname(SSID)shouldbe
acombinationofEnglishlettersandnumbers.
(Donotusespecialcharacters.)
• Smartphoneuserinterface(UI)mayvary
dependingonthemobileoperatingsystem
(OS)andthemanufacturer.
• Ifthesecurityprotocoloftherouterissetto
WEP,thenetworksetupmayfail.Changethe
securityprotocol(WPA2isrecommended)and
connecttheproductagain.
Installing the LG ThinQ
Application
SearchfortheLGThinQapplicationfromthe
GooglePlayStoreorAppleAppStoreona
smartphone.Followinstructionstodownloadand
installtheapplication.
Wireless LAN Module Specifications
Frequency
Range 2412MHz-2462MHz
Output Power
(Max) <30dBm
FCC Notice
Thefollowingnoticecoversthetransmittermodule
containedinthisproduct.
Thisequipmenthasbeentestedandfoundto
complywiththelimitsforaClassBdigitaldevice,
pursuanttoPart15oftheFCCRules.Theselimits
aredesignedtoprovidereasonableprotection
againstharmfulinterferenceinaresidential
installation.Thisequipmentgenerates,uses,and
canradiateradiofrequencyenergyand,ifnot
installedandusedinaccordancewiththe
instructions,maycauseharmfulinterferenceto
radiocommunications.However,thereisno
guaranteethatinterferencewillnotoccurina
particularinstallation.Ifthisequipmentdoescause
harmfulinterferencetoradioortelevision
reception,whichcanbedeterminedbyturningthe
equipmentoffandon,theuserisencouragedto
trytocorrecttheinterferencebyoneormoreof
thefollowingmeasures:
−Reorientorrelocatethereceivingantenna.
−Increasetheseparationbetweentheequipment
andthereceiver.
−Connecttheequipmentintoanoutletona
circuitdifferentfromthattowhichthereceiveris
connected.
−Consultthedealeroranexperiencedradio/TV
technicianforhelp.
Thisdevicecomplieswithpart15oftheFCC
Rules.Operationissubjecttothefollowingtwo
conditions:
(1)
Thisdevicemaynotcauseharmfulinterferenceand
(2)Thisdevicemustacceptanyinterference
received,includinginterferencethatmaycause
undesiredoperation.
Anychangesormodificationsinconstructionof
thisdevicewhicharenotexpresslyapprovedby
thepartyresponsibleforcompliancecouldvoidthe
user’sauthoritytooperatetheequipment.
Table of contents
Languages:
Other LG Air Cleaner manuals