LG AS10GD Series User manual

Copyright © 2021 LG Electronics Inc. All rights reserved
MFL70445444
Rev.00_060421
OWNER’S MANUAL
AIR PURIFIER
For safe and easy use of the product please read the instruction
manual before use.
AS10GD Series
AS65GD Series
EN ENGLISH
www.lg.com

TABLE OF CONTENTS This instruction manual may contain images
or content different from the model you
purchased. This manual is subject to revision
by the manufacturer.
SAFETY INSTRUCTIONS .............................................................. 3
IMPORTANT SAFETY INSTRUCTIONS ..........................................................3
INSTALLATION.............................................................................10
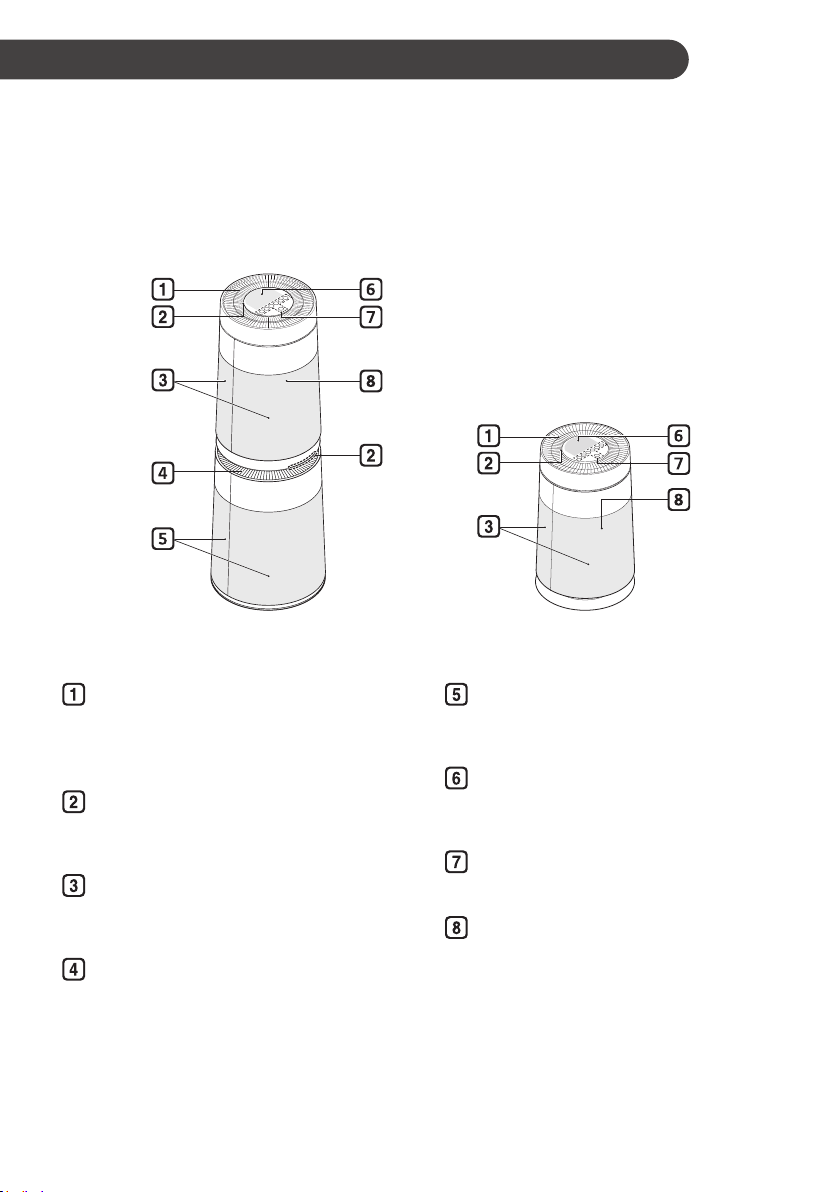
Appliance Overview ........................................................................................10
Unpacking the Appliance.................................................................................12
Installation Location Requirements.................................................................13
Transportation Requirements..........................................................................13
OPERATION .................................................................................14
Control Panel ..................................................................................................14
Status Display Panel.......................................................................................15
Remote controller............................................................................................16
Operation starting............................................................................................17
Using the Mode...............................................................................................17
Adjusting the Fan Speed.................................................................................18
Clean Booster Fan Speed...............................................................................18
Using the Extra Functions...............................................................................19
Checking the Air Quality..................................................................................20
SMART FUNCTIONS....................................................................23
LG ThinQ Application ......................................................................................23
Smart Diagnosis..............................................................................................24
MAINTENANCE............................................................................25
Maintaining the Product ..................................................................................25
Cleaning the Appliance ...................................................................................26
Maintaining the Filter.......................................................................................27
TROUBLESHOOTING..................................................................29
Before Calling for Service ...............................................................................29
APPLIANCE SPECIFICATIONS...................................................32
Item Factory/Distrib Address
Manufacture LGEKR LG Electronics Inc.
84, Wanam-ro, Seongsan-gu, Changwon-si, Gyeongsangnam-do, KOREA
Importer UAE
25

3
EN
SAFETY INSTRUCTIONS
READ AND SAVE THESE INSTRUCTIONS
The following safety guidelines are intended to prevent unforeseen risks
or damage from unsafe or incorrect operation of the appliance.
The guidelines are separated into ‘WARNING’ and ‘CAUTION’ as
described below.
This symbol is displayed to indicate matters and operations
that can cause risk. Read the text marked with this symbol
carefully and follow the instructions in order to avoid risk.
WARNING
This indicates that failure to follow the instructions can cause
serious injury or death.
CAUTION
This indicates that failure to follow the instructions can cause minor
injury or damage to the product.
IMPORTANT SAFETY INSTRUCTIONS
WARNING
To reduce the risk of explosion, fire, death, electric shock,
injury or scalding to persons when using this product, follow
basic precautions, including the following:
Children in the Household
•This appliance is not intended for use by persons (including children)
with reduced physical, sensory or mental capabilities, or lack of
experience and knowledge, unless they have been given supervision
or instruction concerning use of the appliance by a person
responsible for their safety. Children should be supervised to ensure
that they do not play with the appliance.

4
EN
Installation
•Do not install the appliance on an uneven or inclined surface.
•Do not install the appliance in an area exposed to direct sunlight or
near heat-generating equipment.
•Do not install the product in a place where combustible gas may leak
or industrial oil or metallic particulates are present.
•Do not allow the appliance to push against the power cord or plug.
•Do not touch the power plug with wet hands.
•When unplugging the power cord, always pull it by the plug.
•Unplug the appliance during thunder or lightning storms or when not
in use for a long time.
•Do not bend the power cable excessively or place a heavy object on
top of it.
•Do not extend the length of the power cable or alter it.
•Do not use several devices on a multi-socket extension outlet.
•Make the connection securely so that screw in terminals may not be
loosened when the cable is pulled.
•Make sure that the power cable cannot be be pulled out or damaged
during operation.
•If the supply cord is damaged, it must be replaced by the
manufacturer, its service agent or similarly qualified person in order to
avoid a hazard.

5
EN
Operation
•If the appliance is immersed in water, stop using it and contact an LG
Electronics Customer Information Center.
•If there is a gas leakage (isobutane, propane, LNG, etc.), do not
touch the product or power plug and ventilate the area immediately.
•Do not clean the appliance with brushes, cloths or sponges which are
abrasive or made of metal.
•If you detect any abnormal noise, odor or smoke, unplug the product
immediately and contact an LG Electronics Customer Information
Center.
•Only an authorized repair person should disassemble, repair, or
modify the appliance.
•Do not use or store fire, combustibles (ether, benzene, alcohol,
drugs, propane, butane, combustible spray, insecticide, air freshener,
cosmetics, etc.) or flammable materials (candles, lamps, etc.) near
the product.
•Do not place the power cord under rugs, carpeting or mats.
•Do not allow animals or pets to chew on the power cord.
•Do not move the appliance when it is in operation.
•Do not hit the appliance.
•Do not insert hands or metal objects into the air inlet or outlet.
•Do not install and use broken parts.
•Do not put flammables into the appliance.
•Do not move or operate the appliance while its cover is open.
•Do not allow children to climb on or play with the appliance.
•Do not place anything on top of the appliance.
•The fan is not a toy. It should not be played with or placed where
young children can reach it.

6
EN
Maintenance
•Dispose of the packing materials (vinyl, styrofoam, etc.) to keep them
out of reach of children.
•Take care not to injure or pinch yourself when you detach and
reattach parts of the appliance.
•Turn off and unplug the appliance before cleaning it or replacing the
filter.
Battery
•A button/coin-shaped battery is used in the remote controller of the
appliance. If you accidentally swallow the battery, consult a doctor
immediately for emergency treatment. If you fail to receive first aid
within 2 hours after you swallow the battery, you may experience
damage to your internal organs or death in severe cases.
•Do not swallow the battery.
•If the battery tray is not secured firmly, stop using the remote
immediately and keep it away from children.

7
EN
CAUTION
To reduce the risk of minor injury to persons, malfunction, or
damage to the product or property when using this product,
follow basic precautions, including the following:
Installation
•Do not tilt the appliance to pull or push it when transporting.
•Do not install the appliance in a vehicle, RV, or marine vessel.
•Do not place the appliance near a TV or stereo equipment.
•Do not place the appliance under bright light.
•The appliance must be installed in accordance with national wiring
regulations.
•When moving or storing the appliance, wrap the power cord around
the base of the appliance to prevent personal injury, damage to the
cord or damage to floors.
•Do not place the appliance near curtains.
Operation
•Do not use the product for removal of toxic gas such as carbon
monoxide.
•Do not use the product for ventilation purposes.
•Do not use the appliance for a long time in a region with unstable
voltage.
•Do not place obstacles around the air inlet or outlet.
•For safe use of the appliance, children or others with reduced
mental capabilities need to be closely monitored by a person who is
responsible for their safety.
•Do not use the product for special purposes such as preserving
plants, precision instruments, artworks, etc.
•Do not operate the appliance with wet hands.
•Do not let the moisture from a humidifier directly touch the appliance.

8
EN
•Do not use the appliance while it is not in an upright position.
•Do not use the appliance near objects vulnerable to heat.
•Do not use detergents, cosmetics, chemicals, air fresheners, or
disinfectants in the appliance.
•Do not touch any internal parts while the unit is operating or
immediately after operation.
•Use the filter only for its intended purpose.
•The Deodorizing Care filter and Safe Plus filter are assembled
together. Do not try to detach them from each other.
•Do not insert any objects into the clean booster.
•Do not operate the product while the clean booster cover and grille
are separated.
•Do not insert hands or metal objects into the moving parts of the
clean booster.
•Do not press multiple buttons at the same time on the remote
controller.
•Do not kick or step on the remote controller.
•Do not use the remote controller near water or in areas with high
humidity.
•Do not expose the remote controller to fire or high temperatures.
Maintenance
•Do not use strong detergents or solvents to clean the product. Use a
soft cloth to clean.
•Do not clean the appliance with an alkaline detergent.
•Do not wipe the appliance surface using sulfuric acid, hydrochloric
acid or organic solvents (thinner, kerosene etc.) or attach a sticker on
the appliance.
•Do not allow water inside the appliance.
•Do not wash the filter with water.
•Be careful not to damage the ultra-fine filter when cleaning it with a
vacuum cleaner.
•Do not disassemble the clean booster.

9
EN
Battery
•Do not modify the battery.
•An improperly installed battery may cause an explosion.
•Do not recharge or take apart the battery.
•Do not dispose of the battery by placing it in a fire, or expose it to
high temperatures.
•Remove and store the battery in a safe location if you don’t intend to
use the remote controller for a long time.

10
EN
•The exterior or components of the product may vary depending on the model.
Appliance Overview
Front View
Dual Model Single Model
INSTALLATION
Air outlet (top) / Clean booster
•Purified air from the filter is emitted.
•Allows you to adjust the direction of wind
emission.
Air quality light
•The current air quality is indicated by a
color.
Air inlet (top)
•Allows you to disassemble the front and
the rear covers separately.
Bottom air outlet
•Purified air is emitted from the bottom
filter.
Bottom air inlet
•Allows you to disassemble the front and
the rear covers separately.
Status Display Panel
•Use it to check the settings of the
appliance and the air quality.
Control Panel
•Use it to set the appliance functions.
Receiver for remote controller signal
(Only for models with remote controller)

11
EN
Rear View
Dual Model Single Model
Components
Remote controller/Battery (CR2025, 1EA) Owner’s manual
•The remote controller may not be provided depending on the model.
Smart Diagnosis Panel
•When the product malfunctions or
breaks down, the product status can be
checked through Smart Diagnosis.
PM1.0 (particles with a diameter between
1.0 and 2.5 micrometers) sensor
•It detects the concentration of particles.
Odor (Gas) sensor
•It detects a odor (gas).
Filter
•It eliminates fine particles, smog causing
materials, sickening home syndrome
materials, and domestic odor.

12
EN
Filter system
Deodorizing Care filter
•Minimizes smog causing materials
(SO2, NO2), sickening house syndrome
materials (toluene, formaldehyde),
domestic odor, and sulphur compounds.
Safe Plus Filter
•Minimizes PM1.0, allergen materials,
bacterial and viral from the air.
Ultra-fine filter
•Minimizes large particles floating in the
air.
Filter handle
•Allows you to separate the filter from the
product.
CAUTION
•Do not disassemble the filter forcefully when it
is connected each others.
Unpacking the Appliance
Unpack the appliance and remove all packing tape
and filter vinyl before using the appliance.
1 Hold the top of the rear cover of the product
and pull it slightly to achieve separation.
•‘PM1.0&GAS SENSOR SYSTEM’ is marked
on the rear cover of the product.
2 Remove the packing support from near the
filter inlet.
Support
3 Disassemble the filter and remove the vinyl.

13
EN
4 Install the filter in the appliance.
•Install it with the side where the handle is
attached facing up.
Handle
5 Insert the fixing part at the bottom of the cover
into the fixing grooves at the bottom of the
product and close the cover.
CAUTION
•In case of the dual model, remove the support
and the vinyl of the filter at the bottom of the air
purifier in the same way.
•Be sure to remove the filter packing support
and the vinyl before using the product. Failure
to do so may cause product malfunction.
•Pay attention to filter direction when installing
it. Failure to do so may cause product
malfunction and failure.
Installation Location
Requirements
Install the appliance 1m away from a wall.
•The air inlet needs sufficient space to function
properly.
1 m
The performance of the appliance may
vary depending on the service environment
(temperature, humidity, etc.).
•The appliance can provide the guaranteed
performance in an environment with humidity
ranging between 40% and 70%.
Transportation
Requirements
When you relocate or store the appliance, wind
the power cord onto the bottom of the product to
prevent it from dragging on the floor.
•Failure to do so may damage the power plug or
leave a scratch on the floor.
When carrying the product
•Do not carry the product by holding the
external cover. Doing so may allow the cover
to open and the product to drop. Dropping the
appliance may cause personal injury or product
malfunction.
Single
Model
Transport the product safely by
holding the bottom of the product with
both hands.
Dual
Model
Transport the product safely by having
two people hold the central part of the
product.

14
EN
OPERATION
•The exterior or components of the product may vary depending on the model.
•The remote controller may not be provided depending on the model.
Control Panel
Start/Stop Button
Mode Button
Use it to set the mode.
•Pressing it for 3 seconds or more will
turn on/off the air quality light.
Speed Button
Use it to adjust the fan speed of the air
purifier.
•Wi-Fi Function
−Before appliance connection: Press
and hold the button for 3 seconds to
activate the Wi-Fi connection mode.
−After appliance connection: Press and
hold the button for 3 seconds to control
the appliance from the LG ThinQ
smartphone app.
−Wi-Fi function off: Press and hold the
Start/Stop button and the Speed
button simultaneously for 3 seconds
or more.
Booster Speed Button
Use it to adjust the fan speed of the clean
booster.
•Press and hold it for 3 seconds or more
to turn on or off the ionizer. (See Using
the Air Ionizer.)
Swing Button
Turns the clean booster left or right.
Indicator Button
Allows you to check the concentration
of particles in the air by the size of dust
particles.
Sleep Timer Button
Allows you to use the Off Timer function.
•Pressing and holding it for 3 seconds or
more locks or unlocks the control panel
buttons.

15
EN
Status Display Panel
Dual Model Single Model
Display of air quality
Overall air quality (color)
The size of dust particles and the
concentration of particles (color)
The concentration of particles and sleep
timer
The concentration of odor (color)
Display operating mode
Display speed and booster speed
Speed: Displays the air purifier’s fan
speed.
Booster Speed: Displays the clean
booster’s fan speed.
Sleep Timer Display
Icons
Icon Description
It turns on when it is time to replace
the filter.
It turns on when it is time to replace
the top filter.
It turns on when it is time to replace
the bottom filter.
It turns on when the Wi-Fi function
is activated.
It turns of when the On/Off Timer is
set with the LG ThinQ application.
It turns on when the control panel
is locked.
It turns on when the ionizer turns
on.

16
EN
Remote controller
Start/Stop Button
Speed Button
Use it to adjust the fan speed of the air
purifier.
Sleep Timer Button
Schedules an automatic turn off time for
the appliance.
Booster Speed Button
Use it to adjust the fan speed of the clean
booster.
Light Button
Turns the air quality light on/off.
Mode Button
Sets the operating mode.
Swing Button
Allows you to adjust the rotation direction of
the clean booster to the left or the right.
WARNING
•This appliance, including the remote controller,
is equipped with a button/coin type battery
(CR2025).
•Swallowing the battery may cause serious
injury or death. If the battery is swallowed,
immediately go to a hospital emergency room
to see a doctor.
•Make sure to keep the battery out of children’s
reach.
•If the battery tray is not fixed firmly, stop using
it and put it out of children’s reach.
CAUTION
•Do not alter the battery arbitrarily. Doing so
may cause fire or a appliance failure.
•Inserting the battery incorrectly may cause
explosion.
•Do not charge or disassemble the battery.
Doing so may cause explosion.
•Do not discard the battery in a place with
flames or heat. Doing so may cause explosion.
•Do not press a number of buttons
simultaneously. Doing so may cause the
appliance to become inoperable or malfunction.
•Do not use it in a place with wet or moist
conditions. Doing so may cause fire or an
electric shock.
•Do not use it in a place with flames or heat.
Doing so may cause fire or deformation of the
appliance.
•If you do not use the remote controller for a
long time, store it after separating the battery.
Failure to do so may cause the battery fluid to
leak, resulting in malfunction.
NOTE
•If the remote controller does not operate
normally, replace the battery or check the
polarity of the battery (+, -).
•Position the transmitter for the remote
controller facing the receiver for the appliance
when using the remote controller.
•If you are away from the product (front) by more
than 7 m, the remote control may not work.

17
EN
Operation starting
Press the Start/Stop button to start the operation.
NOTE
•When the operation is started for the first time,
the appliance operates in Booster mode.
•The most recently used mode is memorized
if the power supply is cut off as a result of a
power failure.
•When the operation begins, the display
of sensor ready ( ) will appear for
approximately 30 seconds.
Using the Mode
•Each time you press the Mode button,
the mode changes in the following order:
Smart→Booster→Dual→Single.
−Dual: Only for the relevant product
Smart Mode
Operating mode and fan speed are adjusted
automatically according to overall air quality.
NOTE
•When the appliance is operated in Smart
mode, Speed, Booster Speed, and Swing
buttons are not operated.
Booster Mode
Clean Booster circulates the indoor air by quickly
sending purified air over an extended distance.
CAUTION
•Be careful not to allow your hands to be
pinched by the moving parts of the clean
booster.
NOTE
•When the power cord is unplugged before the
clean booster is completely closed, plug the
cord in again. The clean booster will rotate and
properly close.
Rotating the Clean Booster
Press the Swing button during the Booster mode
operation.

18
EN
Dual mode: Only for the relevant
product
The product operates air purifiers at the top and
bottom simultaneously to purify indoor air quickly.
Single Mode
Single
Model
As a basic operation mode for
air purification, air speed can be
adjusted.
Dual
Model
The air purifier at the bottom purifies
indoor air.
•The air purifier at the top operates
at a low speed.
Adjusting the Fan Speed
Adjust the fan speed of the air purifier.
Press the Speed button during the operation.
•Each time you press the button, the speed
changes in the following order: Auto → Low →
Middle → High → Turbo.
Fan Speed Display
When you adjust the speed, the speed will be
displayed on the status display panel. The Speed
increases by 2 columns each time when the level
is raised.
[Example of ‘Middle’ Display for Speed]
NOTE
•When the operation is started for the first time,
Auto is set as the Speed. In Auto mode, the
Speed is adjusted automatically according to
the contamination level of indoor air.
Clean Booster Fan Speed
Adjust the fan speed of the clean booster.
Press the Booster Speed button during the
Booster mode operation.
•Each time you press the button, the speed
changes in the following order: Auto → Low →
Middle → High → Turbo.
Booster Speed Display
When you adjust the Booster Speed, the Booster
Speed will be displayed on the status display
panel. The Booster Speed increases by 2 columns
each time the level is raised.
[Example of ‘Middle’ Display for Booster
Speed]
NOTE
•When the Auto mode is selected, clean
booster speed is automatically adjusted to the
same level as Speed.

19
EN
Using the Extra Functions
Using the Air Ionizer
To generate ions to minimize various bacteria from
the air.
Press the Booster Speed button for more than 3
seconds while operating.
•(Air ionizer) is displayed on the status
display.
NOTE
•When the operation is stopped, the air ionizer
function can not be used.
Setting the Sleep Timer
Stops the operation automatically after the
operation for the set time.
Press the Sleep Timer button during operation.
•Each time you press the button, the setting
changes in the following order:
After 2 hours → After 4 hours → After 8 hours
→ After 12 hours → Cancel.
•When the Sleep Timer is activated, only the
sleep timer icon is displayed on the status
display panel.
NOTE
•Speed is changed to the ‘Low’ level and
adjusted automatically at regular intervals
according to air quality.
•Fan speed can be adjusted by pressing the
Speed button while the sleep timer is activated.
•On the sleep timer setting, you can check the
set time by pressing the Sleep Timer button
again.
•The sleep timer setting will be maintained when
the appliance is turned off and then on again as
the result of a power failure.
Locking the Control Panel
You can lock the buttons on the control panel
to prevent the appliance from operating due to
unforeseen reasons, such as a child manipulating
the buttons.
Press the Sleep Timer button for 3 seconds or
longer during operation.
•(Lock) is displayed on the status display
panel.
NOTE
•You can turn off the lock function in the same
way as turning it on.
•You can use the remote controller in locked
status. (Only for models with remote controller)
•You can also lock or unlock when the operation
has stopped.

20
EN
Checking the Air Quality
The overall air quality can be checked through the air quality light and the status display panel.
Overview the Overall Air Quality
The overall air quality is calculated based on the particles and odor (gas) concentrations and is categorized
in 4 levels depending on the contamination of the air.
Color
Overall air
quality Concentration of PM (μg/㎥) Concentration of odor
State
PM10
(Coarse
particles)
PM2.5
(Fine
particles)
PM1.0
(Particles
with a
diameter
between 1.0
and 2.5 ㎛)
State Level
Red Poor 255 or more 56 or more 56 or more Very strong 4
Orange Unhealthy 155 ~ 254 36 ~ 55 36 ~ 55 Strong 3
Yellow Moderate 55 ~ 154 13 ~ 35 13 ~ 35 Normal 2
Green Good 54 or less 12 or less 12 or less Weak 1
NOTE
•The color of the overall air quality is based
on the worst level detected, whether odors or
particulates.
•PM (particulate matter) concentration is
displayed in increments of 1 unit, from 8 to 999.
PM concentration values are based on the data
sheet provided by the sensor manufacturer.
•The PM concentration measurement was
tested using LG Electronics’ standard test
materials.
•Differences in PM concentration values may
be the result of different methods of measuring
or differences in the actual PM concentration
levels.
−If the PM concentration is high, there may
be a larger difference between the displayed
concentration and the actual concentration.
Turning the air quality light On/
Off
1 Check the overall air quality through the air
quality light.
Lower air quality light
(Only available on
dual model)
Air quality light
This manual suits for next models
1
Table of contents
Other LG Air Cleaner manuals
Popular Air Cleaner manuals by other brands

Honeywell
Honeywell Quiet Clean TOWER quick start guide

Power Industries
Power Industries Vapor-Eze 5100 user manual

Levoit
Levoit Classic 300S user manual

FreshHome
FreshHome PlasmaWave WACP150 Use & care guide

Abatement Technologies
Abatement Technologies PREDATOR 1200 instruction manual

Heaven Fresh
Heaven Fresh NaturoPure HF 280 instruction manual