LG L1804R User manual

w_.lg_p_ees.com_,
S: L1804R

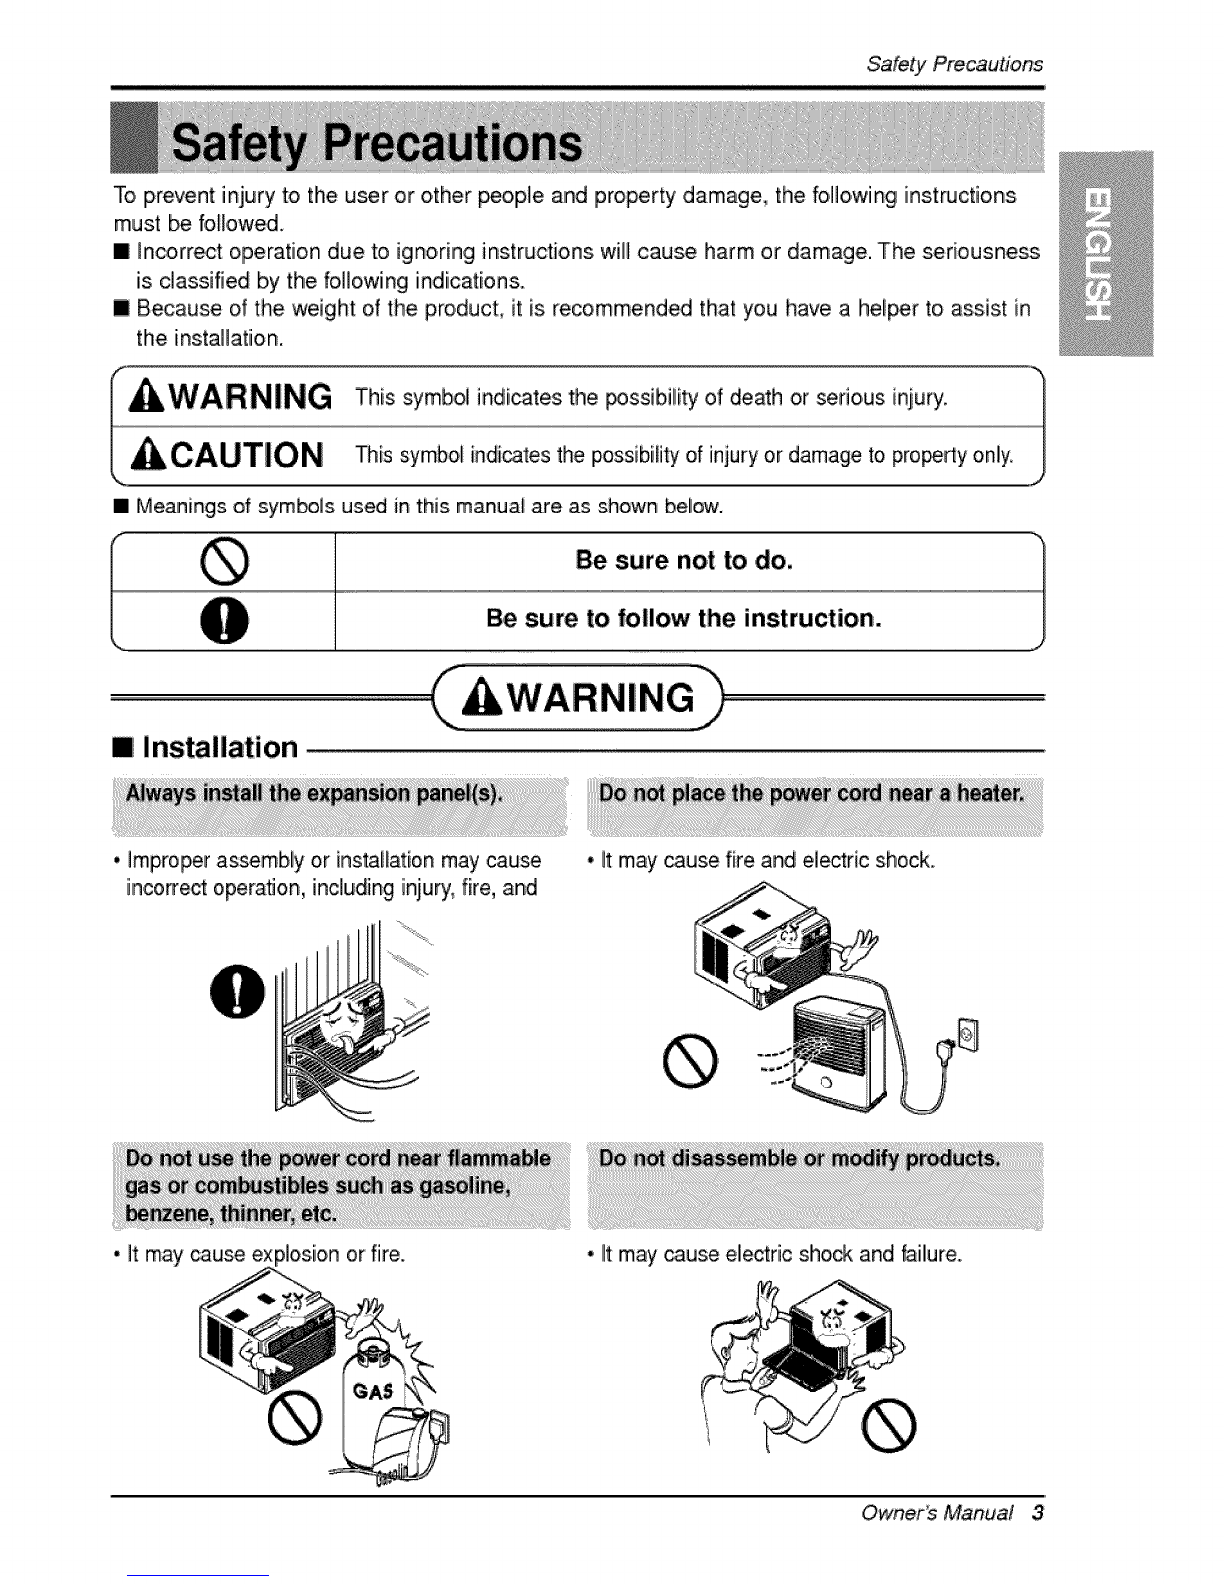
Sa_ P_a_s ...........................3
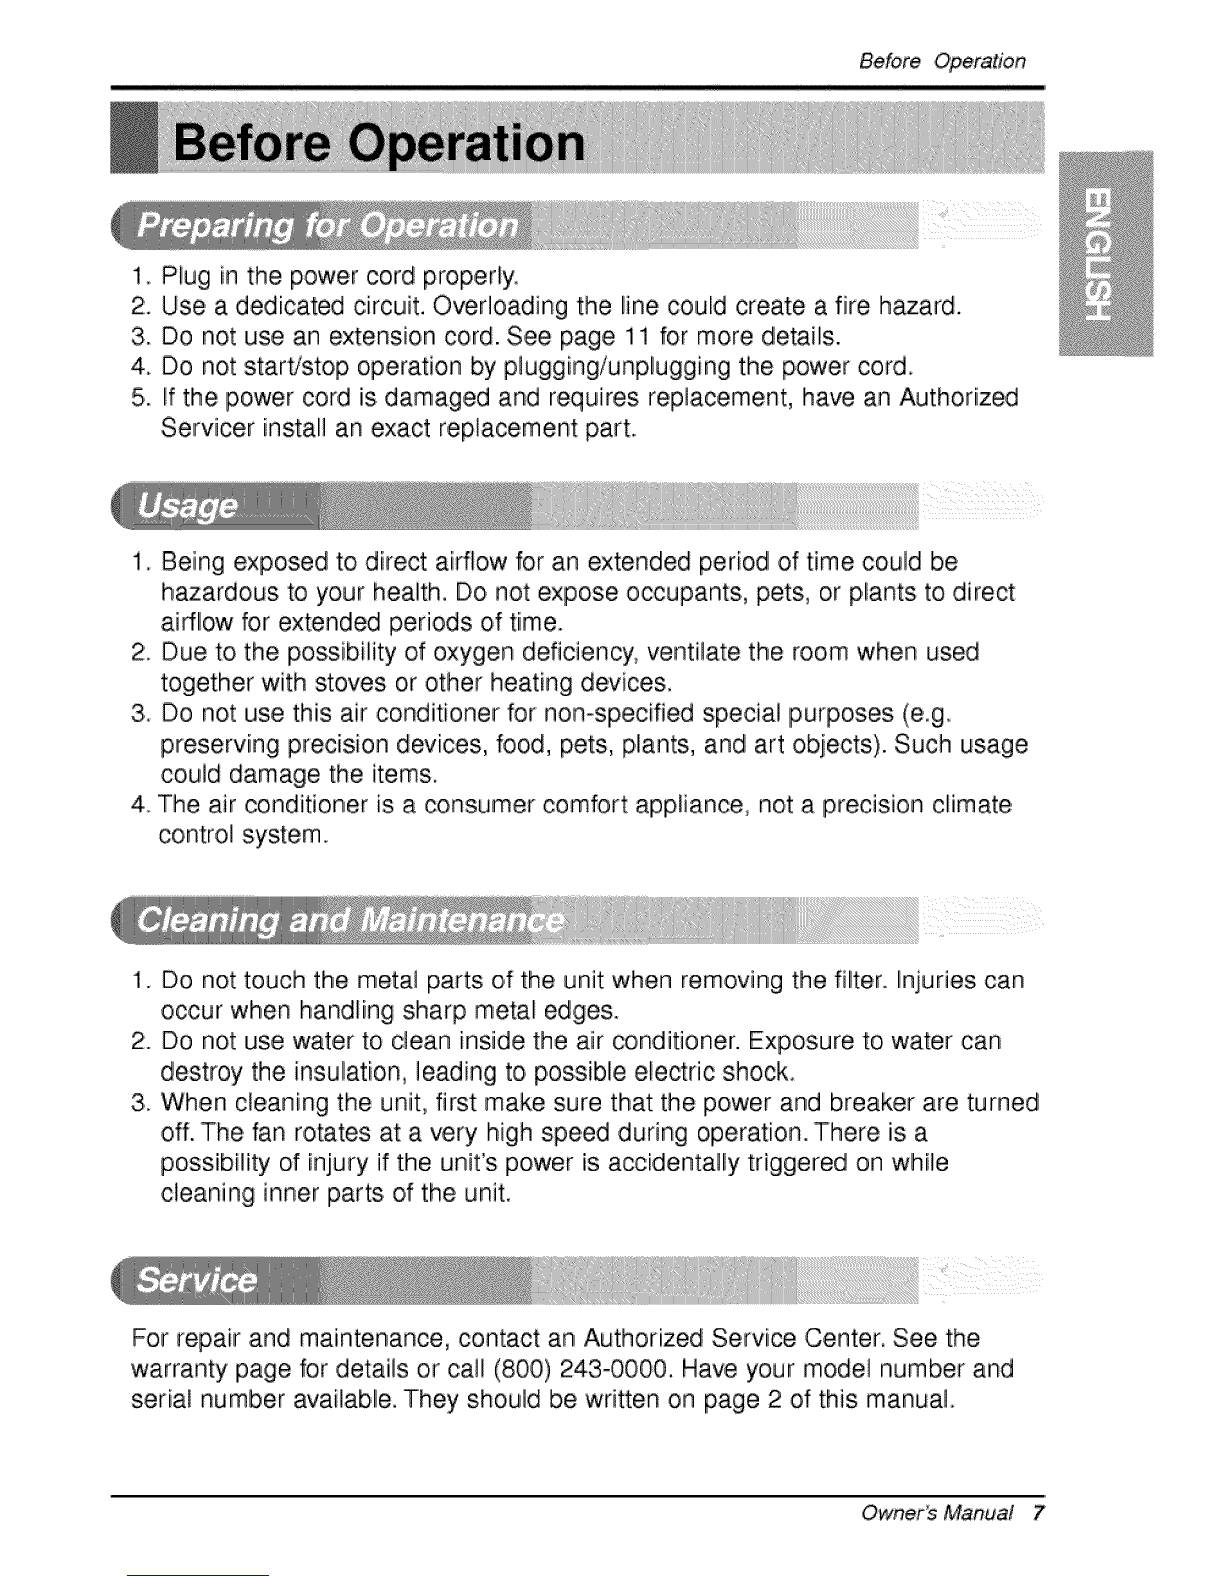
B_ O_ation ...............................7
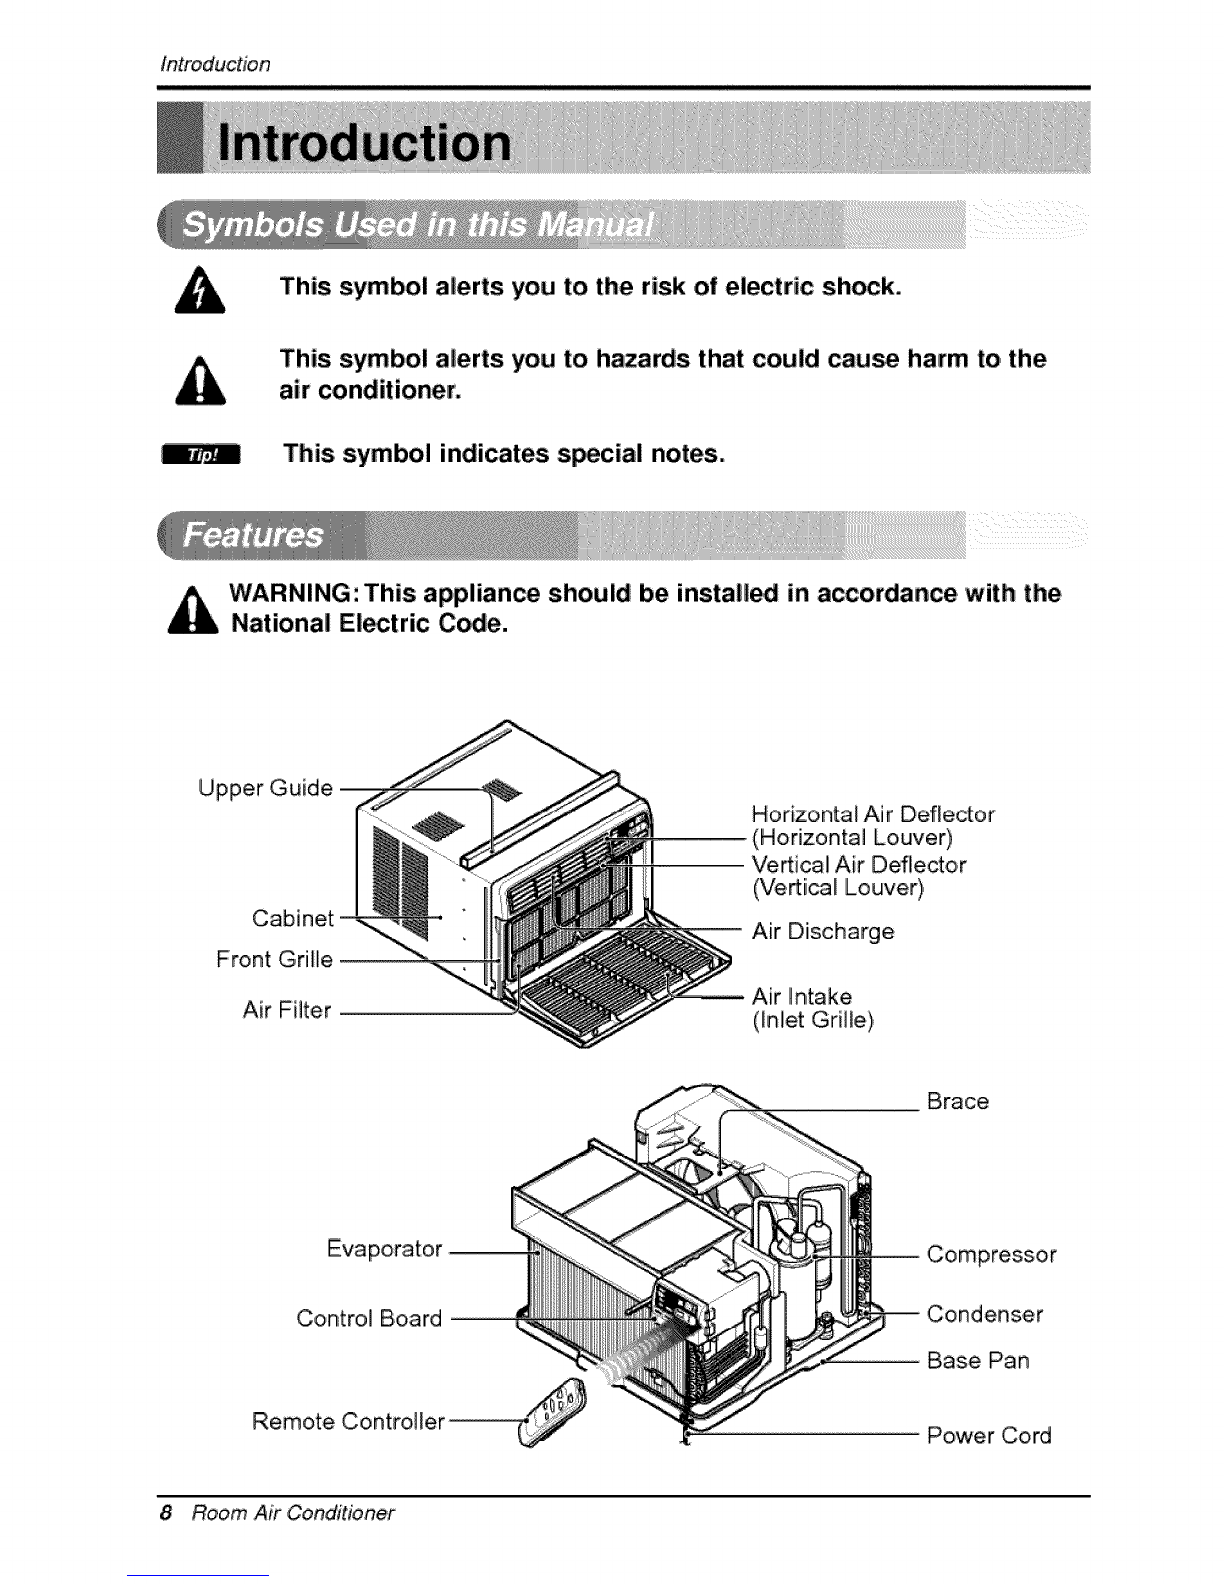
Inl_ucti_ .....................................8
Sym_ U_ in_is _ ........8
Electr_| | ................................9
T_r_ U_ of an
Adap_r .........................................11
T_po_ Use of an
_nsi_ Cord ..............................11
Ins_]_n ...................................12
H_ to In_] _unit....................12
Window R_ui_m ................12
Installa'__ .............13
_u_menLs .............................13
Cabinet Installati_ .......................14
|ti_ In=m_ ..................17
Re_ C_I O_ ........17
Re_ C_tmll_ ......................._B
Add_ona_F_res .......................19
AirDi_on ...............................19
VentCo_II ................................19
_in Pipe....................................20
RemovalfromWin_. ..............20
Main'm_ and _rvt_ .............2_
Air Finer ....................................2!
_ani_ the Nr Con_oner .....2_
How_Remove the
Grille .................................22
Comm_ Proteinsand
_!_ons .......................................
T_-ou_eting ..............................24
,o
FOR YOUR RECORDiS
Write_e m_ _ _da_ humors _m:
_#
SePmi#
_find_e num_ _ai_e! on the side_t_m
pr_
_/!_S P_me
Date _m_
mStaple_ur r_eipt tothis page,inthe _ _J n_ it
'toprovedateof purchaseor_r warra_tyIssu_.
READ,THIS MANUAL
Ir_ide _ _|1 find many h_l h_ _ Ihow_ u_ and
_i_ _ur air __r p_dy. Justai_ prev_tLve
cam on _ur p_ can,save you a g_ deaJlof tiimeand
_ _r theli_of_t _it_n_ner.
_l| findmanyan_m to _n _e_ in _ _a_
ofttou_h_ _If_ _'evi_ o_r ch_ of
Troubling Ti_ first,_m_ rli,_ _ to _ll _r
_r¢_e at a_L
. C__a_ an Au_o_ _ce C_ _repair m'
_lntenance of _ _dL _| 1__ to
ioca_ _e _ _C.
-'_is air _R_ is _i_d_ _ _ _ young
ch!i_ren or 1_1_ _ho_ super_.
• Young _illd_ _ouid _ su_rv_ _ _m th_
t_ do _p_y with t_ _|r co_r.
-If _p_ cm_ i_ui_e _acmm, have
_d_ed _cer i_l| an _ _aceme_ _rt.
• !_!la_ 'work must _ __ i_ ac__
wi_ _e Nat_nai E!_ C_ _q_flfl_ a_d
_hod_ __ on_.
\
2' R_m Air Conditioner

To prevent injury to the user or other _ople and property damage, the following instructions
must be foIFowed.
[] _n_rrect operation due to ignoring instructions wfl] cause harm or damage. The seriousness
is classified b,y the foi]]o,wing indications.
[] B_ause of the weight of the product, it is recommend_ that you have a hel_r to assist in
the instaHatiion.
• Meanings of sym_]s used in this manual are as shown bel_.
Be sure not to do.
Be sure to follow the instruction.
miinstallation
*Improperassembly or [nstalfat[onmay cause
inco_ect operation, includinginjury,fire, and • It may _use fire and electdc shock
•It may cause ex or fiire. • lit may _use electric slhock and failure.
Owner_ Manual 3

[] Operation
. ._he_ise, itwill cause
electric shock or fire
, _will _use electric shock or
fire.
, _herwise it will cause fire
and electric shock accident.
• It willlcause e_ectricshock or
fire.
• It will cause ele_ric sho_ or
fire.
• It may cause fire and electri.c
shock...
•litwiillcause ellectric shock or
fire.
• No grounding may _use
ele_ric sho_.
4 Room Air Conditioner
• It may cause electric shock.

* The air co,nd_ioner must be operated in a
enclosed area to _ most effective, *It may cause explosion, fire, and burn.
'i _t _I cause ele_ric sho_ or faillure of
machine..
[] Installation
*They are sharp and may
cause inju_.
* Water may enter the unit and degrade the
insulation. It may cause an electric shock..
C c,uT,o.h
, It may cause failure of
appliance or performance •IIfthe outer case is damaged,
must be repaired or
replaced immediately.
Leaving it damaged could
result in the air cond_ioner
falling out of the window,
creating a safety hazard.
Owner_ Manual 5

[] Operation
, It may cause injury. • It may cause electric shock
and damage. ., it will waste power
consumption in vain and it
may cause accident
, Since the fan rotates at high
sp.e_ during operation, it:may
cause injury.
. Operation without filters will
cause failure..
•This _.uld injury the _t or
plant. •It is an air _nditioner, not a
precision refrigeration system
• Tlhe ap_arance of the air
c:ond_i,oner may deteriorate,
change color, or develop
surface flaws.
.,It is not sanitary and coulld
cause illness or _r_nal
injury hazard.
6 Room Air Conditioner

Before, Operation
1. Plug in the power cord properly.
i ¸?
2. Use a dedicated circuit. Ovedoadiing the line could create a fire, Ihazard.
3. Do not use an extension cord. See page 11 for more details.
4. Do not start/stop operation by plugging/unplugging the power cord.
5. If the power co_d is damaged and requires replacement, Ihave an Authorized
Servicer install an exact replacement part.
ii _i_(i_i!_!_!_!_!__ I
i. Being exposed to direct aidlow for an extended p,eriodl of time could Ibe
hazardous to your health. Do not expose occupants, pets, or plants to direct
airflow for extended periods of tiime.
2. Due to the possibility of oxygen deficiency, ventilate the room when used
together with stoves or other heating devices,
3 Do not use this air conditioner for non-specified sp,ecia! purposes (e.g_
preserving precision devices, food, pets, plants, and art objects). Such usage
co,uid damage the items.
4 The air conditioner is a consumer comfort appliance, not a precision climate
control system.
1. Do not touch the metal parts of the unit when removing the filter. Injuries can
occur when handling sharp metal edges.
2. Do not use water to clean inside the air conditioner. Exposure to water can
destroy the insulation, leading to, p,ossible electric shock.
3. When cleaning the unit, first make sure that the power and breaker are turned
off. The fan rotates at a very high speed during operation. There iisa
possibility of injury if the unit's power is accidentally triggered on while
cleaning inner parts o,fthe unit.
For repair .and maintenance, contact an Authorized Service Center. See the
warranty page for details or cal! (800) 243-0000. Have your model number and
serial number available. They should be written on page 2 of this manual.
Owner_ Manual 7

/ntrodu'c#on
This symbol alerts you to the risk of electric shock.
This symbol alerts you to hazards that could cause harm to the
air conditioner.
This symbol indicates s_cial notes.
WARNING: This appliance should be install_ in accordance with the
National El_tric C_e.
Upper Guide
Cabinet
Front Grille
Air Filter
Horizontal Air Deflector
(Horizontal Louver)
Ve_ica! Air Deflector
(Vertical Louver),
Air Diischarge
Brace
Evaporator
Control Board
Remote Controi][er ...............................................
Compressor
Condenser
Base Pan
Power Cord
8 Room Air Conditioner

E/ect'rica/Safety,
115V~ 230V,~
Use Wall Re_ptac_e Power Supp,ly
Power coKJ may include a current
interrupter device. A test and reset button is
provided on the plug _se. The device
should be t_.ted on a _riodic basis b,yfirst.
pressing the TEST button and then Me
RESET button, if the TEST button does not
trip ,oirif the RESET button will not stay
engaged, disco,nfinue use d' the air
conditioner and _n_ct a qiualified servia
teclhnician.
Standard 125V ,3-wire grounding
re_eptacie rated t 5A_ i25V AC
St:anda_d 250V, 3-wire groundir_g
receptacle rat_ 15A, 25OV AC
Standard 250V, _wire groundi#g
recep,tac_e rat_ 20A, 250V AC
Use 15 AMP, time d_lay fu_, or 15, AMP,
ciircuilt breaker
Use 20 AMP, tJm,e _,_ay fuse or 20 AMP,
citer breaker
ELECTRICAL SAFETY
IMPO_ANT GROUNDING INSTRUC_ONS
Air _ndlitioner has a three-prong grounding p,_ugon its power supply _rd0 which must _ plumed into
properly gro,un_d three-prong wall receptacle for your proration against: t:_ssible shock ha_rd,
Owner's' Manual 9

WARNING: This appliance must be properly grounded.
The power cord of this appliance is equipped with a three-prong grounding plug.
To miinimize the risk of electric shock, use the plug with a standard three-slot
grounding wall power ,outlet. If the power ,outlet does not include a grounding slot,
have a qualified eiectrician replace the outlet before you use the room air
conditio, ner_
Changing the outlet without making the appropriate wiring
changes will create an unsafe condition that could result in fire o.r
el_trical shock, Refer all such work to a li.cens_ and qualified
Prefert_ meth_
exists _:ore u_
Do not cut or remove the grounding prong from the _wer
WARNING: Attaching the adapter ground terminal to the wall
receptacle cover _rew does not ground tlhe appliance unless the
cover screw is metal and not insulate, and the wall receptacle is
grounded through the house wiring.
WARNING: If you have any doubt whether the air conditioner is
properly ground_, have the wall r_eptacle and circuit checked by a
qualified el_trician.
10 Room Air Conditioner

We strongly discourage the use of an adapter due to potential :safety h_ards..
For temporary connections, use only a UL-fisted adapter, available from most
local hardware stores. Ensure that the, large slot in the adapter is aligned with
the large slot in the receptacle for a proper polarity connection.
To disconnect the power cord from the adapter, use one hand on each to avoid
damaging the ground terminal. Avoid frequently unplugging the p,ower cord as
this can lead to eventual ground terminal damage.
Tempomry meth_ ,_,(_ __..i, .i
A_p_e_ Rug
ReceptacleCover
"_Me,talScrew
Never use the ,appliance with a broken adapter,
115VOLT
We strongly di_urage tlheuse of an extension cord due to potential safety
h_ards For temporary situatmns,use o,nl'yCSA certified and UL limed 3-wire
ground_ extension cords,rat_ 15 A,125V.
AIi!wiring should be made in a_ordance with i_l electrical codes and regulations.
Aluminum house _ring may p_e special prob#ms Consul[ a quailed eledridan
230,208, and 230/2_ VOLT UNITS
These units a_ equipped willh a thr_-pmng grounding plug on the power supply core which
mus_be p,lugg_ into a matching properly grounded [hr.-prong wall re_ptacle _r your p,ro_ection
against p_s[b],e shock hazard. ]f such an outie!_is not present, one must be install_ by a ,qualffi_
e_edrician in ac_rdan_ with the 1'4ationaJEl_[ric:aJ Code and ]oca_codes and ordinances.
NOT USE AN EXTENSIION CORD on 23,0,,208_and 230,/_8 Volt units.
Owner_ Manud 11

tns,tdlation
T'oprevent vibration and noise° make sure the unit
is installed securely and fi_ly
Install the unitwhere,_e sun_igihtdoes not shine
directly on tiheunit,, Cooi_ air
The outside of the cabinet mustextend outward for
at least 12'°and there shouid be no obstacles, such
as a fence or wall, within 20'_from the back of the
cabinet becmJsei'twill prevent heat radial,on of the i
con_nser G
Restriction of outside air will gre_ty r_uce the _
cooling efficiency ofthe air _ndiloner,
Heat
radiation
Fence,
CAUTION: All side Jiouvers o| 'the cabinet must rerrmin expos_ to the outside of the
structure,
':_ In_al_the unit a li_le slanted so the back it s_ightlylower than the,front (about 1iZ)o
This will force con_,nsed water to flow to _e outsiide
Ins4al_the unit with the bosom about 30"_60 '' above the floor level,
"All supposing parts should be secur_ t:ofirm wood, masons, or metall,
*This unit is;designed for installation i_ standard double
hung windows with ao_a! opening widths from 2:9''
to 41"
•The top and _tt:om window sash must o_n sufficiently
t:oallow a ,ciearve_ical o_ning of 18,"from the bosom
of _e upper sash to _e win_w stool.
12 Room Air ConditJoRef

installa#on
NO, NAME '_ PARTS Q_
1 FRAME CURTAIN 2
2 SUPPORT BRACKET 2
3 SILL BRACKET :2
4 LOCK NUT 4
5SCREW (TYPE A) 14
6 SCREW (TYPE B/ 7
7 SCREW (TYPE C_ 5
8 sc#_,2,_Z,LT_A,#! 2
9 CARRIAGE BOLT 2
10 FOAM STRIP I
1 FOAMSEAl....
12 WINDOW L_KiNG BRACKET 1
13 DRAIN PIPE 1
i4 FOAM-IPE i
!5 FRAME GUIDE 2
I _REWDR|VER(Phi]i_ and Flatead), RULER, KN|FE, HAMMER, PENCIL, LEVEL
PREPARATION OF ,CHASSIS
®
@
®
@
Remove tildescrews which fasten the caNnet a't_th
s,[_s and at the _ck.
S]iidethe unit from tL_ cab[_t by gripping the base _n
handle and p,u]lingforward _lille _acing the cabinet,
Cut t_ widow _ash _ea[ to the _o_r length.
Peel off fl_e backing and a_ch fl"_ Foam-Seal @ to the
underside of the window _s,h.
Remove fl_ebacking from the top u_r guide, F_m-P'E
@a,nd a_ach it to the bottom of the Upper Guide,
Attach _e up_r guide o,n_,tl_ top of fl_ecabinet with 3
Type A screws G
hsed fl_ Frame Guides _ imo the botlom of tire
,cabinet.
I_,ed tt_ Frame Curtain O intothe U_er Guide and
Frame Guides @.
Fasten the curtains to,the unit with 10 Type
A _re_vs @
U_er guide
uide
('Type A}
Owner_ Manua,? 13

installation
Open the window. Mark a line on _e center of the
'_ndow s'too_b@een the side window stop
Loosely a_a,chthe si_lbracket to _e support
bracket using _e carria_ bo_ and the lock nut.
Attach the si{Ibracket to 2_ewin_w si_iusing the
screws (Type B}.
CareMly p!ace the cabinet on the window _ool
and align the center m_k on the bottom front wi_
the center line marked window stool,
Cabi_t _-,
Track _le
©
Machinescrew(T_eO)
I_k nut
sill
(Type iB)
Siii b_ack,el
Usin9 _e M-screw and the I_k nut, attach #_e
support bracket to the cabinet track hole Use the first
track hole after the sill bracket on the outer e_e of
the window sill Tighten tlhecarriage bolt and the lock
nut Be "_ure the cabinet _lants outward,
CA_ION: Do not drill ahole in the bottom
pan, '_e un_ is designed to operate with
approximately 1,__'oilwater in _om pan, Guide
;:_ Pull the bottom window sash down behind the Top
ret_ner bar untilthey meet.
Do not pull the windowsash down so tighly
that _e movement of Frame curtain is
restricted.
Attach the cabinet to the window stoo_by
driving _e screws (Type B)through the
cabinet inb window stool
2. The cabinet should be inst_led wif_a very
s_ighttilt downward tow:_d the outside
Windows_h
Foam
-Sea_@
Cabinet
Framecu_lain
pperGuide
14 Room Air Conditioner

tnstalta#on
Pul!each Frame cu_ain fully to each window sash
track, and puil the bosom win_w sash down behind
the Top retainer bar untl Rmeets, Sashtrack
ii_ A_ach each Frame curtain the window sash by using
screws (Type C,}
@ Screw(Ty_ B)
O(Ty c)
}@ Slide flse unit into the cabinet
CA_ION: For _curity purpose,
=reinsta!l scr_:s(Type A)
,_binet's sides,
Screw
Cut _e Foam-strip to the proper len_h and inse_
be_een thieupper window sash and _e bwer
windowsash.
Attach _e _ndow locking bracket'with a screw
(Type C.}
Owner_ Manual 15

in,stallation
A_ach the front gd!leto the cabinm by i!nse!_:ingthe
tabs on the grilie intothe tabs on the front ,ofthe
cabinet Pushthe gr'i_lein unN it snaps into place
Lift the inlet grille and secure it with a screw (Type A}
through the front grille,
Win_w in_allatiion of room air _nditioner is now
compie'ted,See ELECTRICAL DATA for attaching
power cord to electrical outlet,
16 Room Air Conditioner

Operating lns,truc#o,ns
The _ntrols I_k like this:
,:ii!_
Operation starts when this button is pressed and
stops when you press the bu_on again.
FAN SPEED SELECTOR
For increased _wer while _oling+ select a higher
_n speed.
3 steps: High --Lo,w-- Med
ON/OFF TIMER
The timer can be set b start and stop the unit in
hourly increments (up to 12 hours),
OPERATION MODE SELECTOR
Select c_ling mode to,cool the r_m.
Se+ectenergy saver mode br energy saving
Select fan mode for basic ventil!a_ng fan operation_
S:e+ectdry mode for dry operation.
TEMPERATURE CONTROL
The thermostat monitors room temperature to
maintain the desired temperature.,
The thermostat can be set between 60_F~86+F
(16"C~30°C).
The unit:takes an average of 3,0 minutes to adjust the
r_m temperature by I"E
REMOTE CONTROL SENSOR
,_,t!lgo]Itftt_lf,.ft_
J tric po,_,t; tl_ un# runs as p_v_us _#ing operat_irL
Owner_ Manua,I

Operating instruc#o_,s
CAUTION: The Remote Controller will not function properly if strong
light strikes the sensor window of the air conditioner or _there are,
obs_cles be_een the Remote Controller and the air conditioner.
Operation stads when this b,u_on is press_ and
stops when you press the button again,
'Temperature Control
The thermostat monitors ro,om temperature to,
maintain the desired temperature
The thermostat can be set between 60°F~86T
,(16°C~30°C),
The unit takes an average of 30 minutes to adjust the
room temperature by I°F.
Fan Speed
For increased power while coo_ing,,sel_t a higher
_n speed,
3 steps: High-Low-Meal
Ont_ Timer J
The timer can be set to sta_ and stop the unit in
houdy increments (up to,!2 hours),
V Temp A
Fan S_
Timer
Operation Mode Selector
Select _oiing mode to c_E the room
Select energy saver mode for energy saving
operation.
Select fan m_e for basic ventiiating fan operation,
SeFect d_ m_e for dry operation..
_wer
M_e
How t:o Inse_
1. Remove the cover from the ba_ dthe remote
controller
2, Inert two _tteries,
Be sure of the polarity when ins_lling the
Be sure, that both b,a_eries are new.
3. Re-attach the cover.
Do, not u_ reclhargeab_e
ba_eries. Such _efi_
differ from standard dry cells
in shape, dimensions, and
performance...
Remove the batteries from
the remote _ntro!_er if the air
conditioner Usnot going to be
used for an extended length
dtime_
18 Room Air Conditioner

Operating Instructions
,Air Direction
Airflow can be adjust_ by changing the direction of the
air ,conditioner's louvers. This can also increase the
_oling efficiency of the air _nditioiner.
Adjusting Horizontal Air Flow Direction
Adjusting the venial louvers lea and nght will
_ange horizontal ai_o,w.
Adjusting Vertical Air Flow Direction
Adjusting the horizon_t vane up and down wil!
_ange venial airflow, The vane can Ibeadjusted
by nudging the back oir up and down of the vane.
Recommendedorientation of louvers
Adjust louvers to,face upwards when cooling
to maximize _olingi efficiency.
Adjuring bonzo_al air flow
Adjesting vertical air flow
Vent Control
For maximum _oling e_ciency, CLOSE the venL rh_swill all_ internal air circulatio,m
OPEN the vent [o discharge stale air,
CLOSE_VEN!T-i-OPEN
Owner_ Manual 19

Operatinginstructions
ii i i i i i
Drain Pipe
In humid weather, excess water may
cause the Base Pan to overlie. To,
drain the water, remove the Drain Cap
and secure the Drain Pipe to the rear
hole of the Base Pan.
Press the drain pipe into the hole by
pushing down and away from the fins.
to avoid injury.
This air conditioner is equipped with a
slinger fan.. (See, drawing,, below.)
The fan has an outer ring that runs in
the water that collects in the base pan
if it gets ,deep, That ,condensate is then
picked up by the _n and expelled
through the _ndenser, making the air
_nditioner more efficient,
• Hang ® Push
Ring
CAUTION,: Be _reful when in, fling the drain pi_, Push away from
the sharp fin area to avoid slipping injuring you6elf.
Removal From Window
Turn the air _nditioner off, disconnect the power cord, remove the L bracket, the
screws and Support Bracket installed through the top and bottom dthe guide
panels, and save for reinstal]ation later. Close the guide panels.. Keeping a firm grip
on the air conditioner, raise the sash, and carefully tilt the air conditioner backward,
draining any condensate. Lift the air _nditioner from the window and remove the
sash seat from between the windows.
Be sure to drain ALL condensate from the air conditioner. Ifyou don't, it could run
out while you carry the unit, making a mess and creating a slipping Ihazard_ This
s[mp,le step wiiH save you much cleaning and make a safer work environment:.
20 Room Air Conditioner
Table of contents
Languages:
Other LG Air Conditioner manuals
Popular Air Conditioner manuals by other brands

flowair
flowair ELIS DUO-W-100 Operation manual

air choice
air choice WTF-40 user manual

Panasonic
Panasonic CW-C53GK Installation and operating instructions

Kooltronic
Kooltronic KNA4C3DP21L installation instructions

Haier
Haier AW094AAMAA Operation manual

Argo
Argo AFSI ECO 120HL User manual and installation guide