LG DZ9300 User manual

P/NO
:
3834RD0045B
Before
connecting,
operating
or
adjusting
this
product,
please
read
this
instruction
booklet
carefully
and
completely.
DVD
Player
OWNER'S
MANUAL
MODEL:
DZ9300
/
DZ9400
/
DZ9800

CAUTION:
THESE
SERVICING
INSTRUCTIONS
ARE FOR
USE
BY
QUALIFIED
SERVICE
PERSONNEL
ONLY.
TO
REDUCE
THE
RISK
OF
ELECTRIC
SHOCK
DO
NOTT
PERFORM
ANY
SERVICING
OTHER
THAN
THAT
CONTAINED
IN
THE
OPERATING
INSTRUCTIONS
UNLESS
YOU
ARE
QUALIFIED
TO
DO
SO.
Caution:
The
apparatus
should
not
be
exposed
to
water
(dripping
or
splashing)
and
no
objects
filled
with
liquids,
such
as
vases,
should
be
placed
on
the
apparatus.
CAUTION:
This
product
employs
a
Laser
System.
To
ensure
proper
use
of
this
product,
please
read
this
owner's
manual
carefully
and
retain
for
future reference.
Should
the
unit
require
maintenance,
contact
an
authorized
service
center.
Use
of
controls,
adjustments,
or
the
performance
of
procedures
other
than
those
specified
herein
may
result
in
hazardous
radiation
exposure.
To
prevent
direct
exposure
to
laser
beam,
do
not
try
to
open
the
enclosure.
Visible
laser
radiation
when
open.
DO
NOT
STARE
INTO
BEAM.
WARNING:
Do
not
install
this
equipment
in
a
confined
space
such
as
a
bookcase
or
similar
unit.
This
product
is
manufactured
to
comply
with
the
radio
interference
requirements
of
EEC
DIRECTIVE
89/336/EEC,
93/68/EEC
and
73/23/EEC.
CAUTION
concerning
the
Power
Cord
Most
appliances
recommend
they
be
placed
upon
a
dedicated
circuit;
That
is,
a
single
outlet
circuit
which
powers
only
that
appliance
and
has
no
additional
outlets
or
branch
circuits.
Check
the
specification
page
of
this
owner's
manual
to
be
certain.
Do
not
overload
wall
outlets.
Overloaded
wall
outlets,
loose
or
damaged
wall
outlets,
extension
cords,
frayed
power
cords,
or
damaged
or
cracked
wire
insulation
are
dangerous.
Any
of
these
conditions
could
result
in
electric
shock
or
fire.
Periodically
examine
the
cord
of
your
appliance,
and
if
its
appearance
indicates
damage
or
deterioration,
unplug
it,
discontinue
use
of
the
appliance,
and
have
the
cord
replaced
with
an
exact
replacement
part
by
an
authorized
servicer.
Protect
the
power
cord
from
physical
or
mechanical
abuse,
such
as
being
twisted,
kinked,
pinched,
closed
in
a
door,
or
walked
upon.
Pay
particular
attention
to
plugs,
wall
outlets,
and
the
point
where
the
cord
exits
the
appliance.
SERIAL
NUMBER:
The
serial
number
is
found
on
the
bottom
of
this
unit.
This
number
is
unique
to
this
unit
and
not
available
to
others.
You
should
record
requested
information
here
and
retain
this
guide
as
a
permanent
record
of
your
purchase.
Model
No.
___________________________________
Serial
No.
___________________________________
Safety
Precautions
2
CAUTION
RISK
OF
ELECTRIC
SHOCK
DO
NOT
OPEN

3
Introduction
Table
of
Contents
Introduction
SafetyPrecautions......................................................2
TableofContents.......................................................3
BeforeUse..........................................................4-5
SymbolusedinthisManual...........................................4
AbouttheSymbolDisplay.........................................4
NotesonDiscs.....................................................4
MaintenanceandService..............................................5
TypesofPlayableDiscs..............................................5
FrontPanel............................................................6
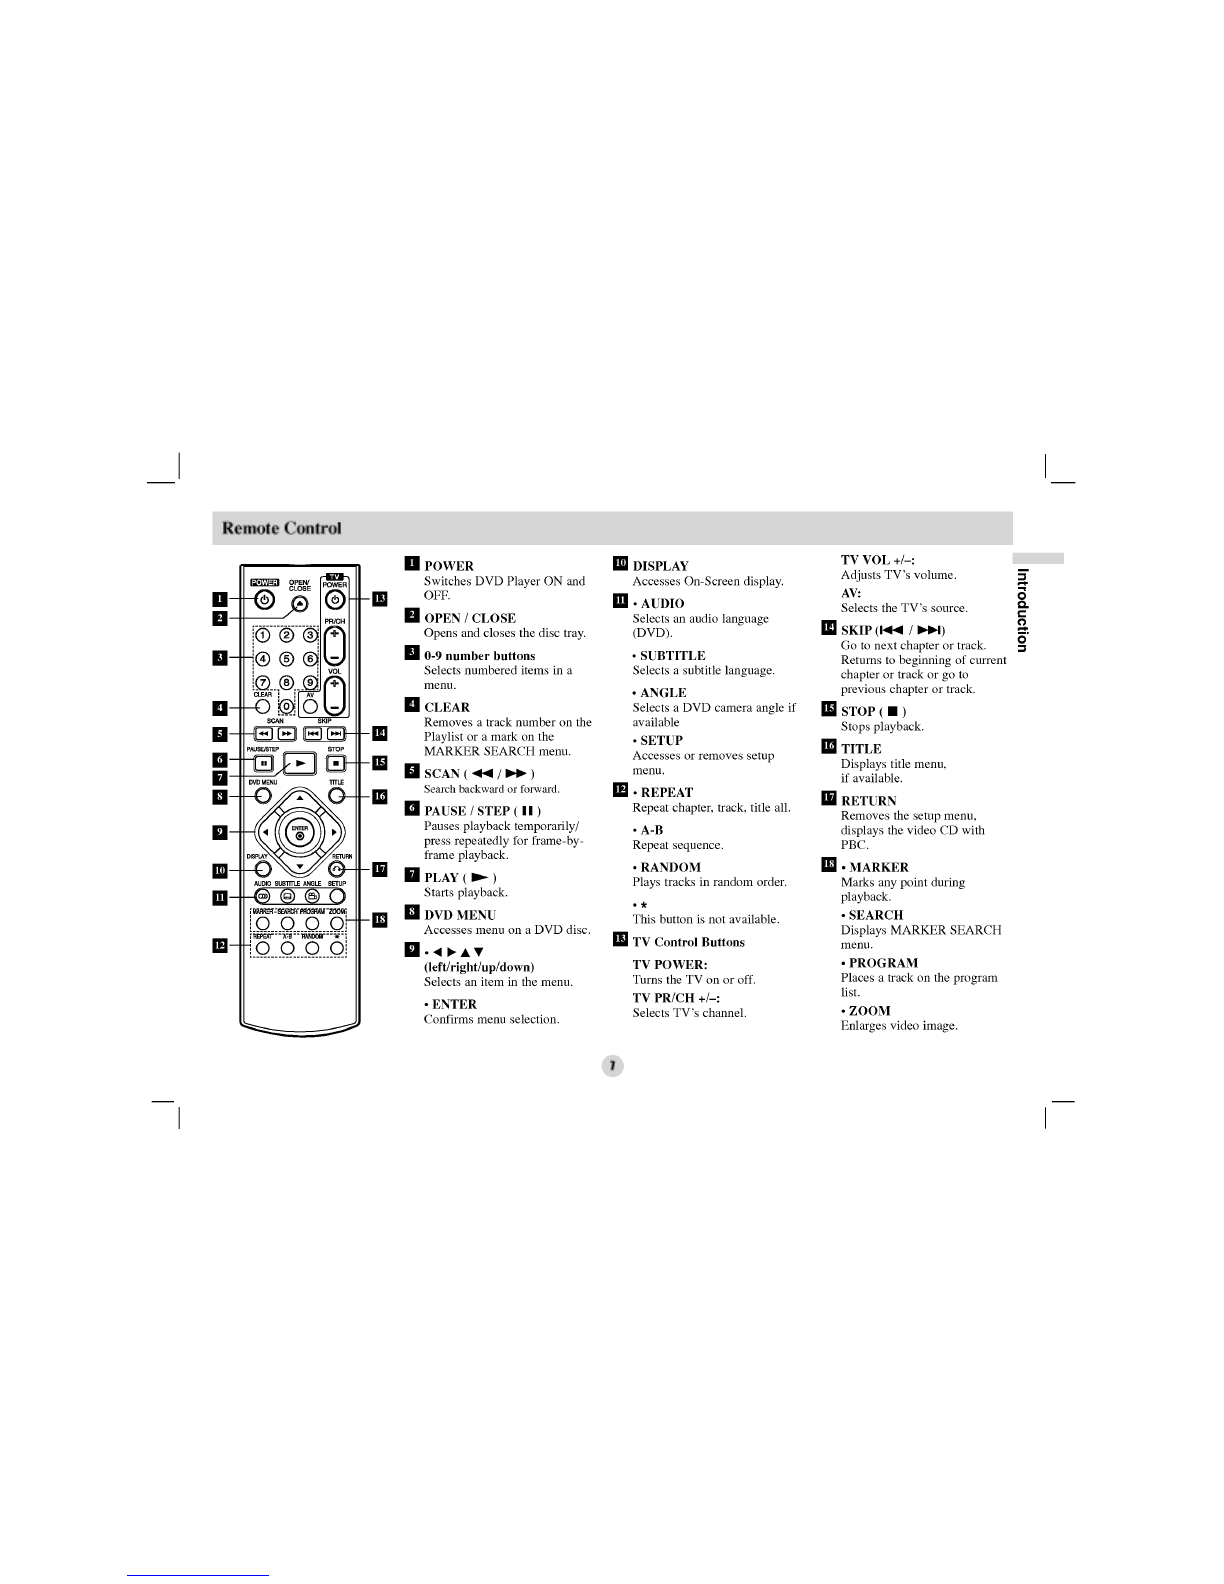
RemoteControl........................................................7
SettingupthePlayer...................................................8-9
DVDPlayerConnections..............................................8
AudioConnectiontoOptionalEquipment.................................9
Advanced
Operations
GeneralFeatures...................................................10-16
On-ScreenDisplay.................................................10
MovingtoanotherCHAPTER/TRACK.................................10
SlowMotion......................................................10
TitleMenu.......................................................10
DiscMenu.......................................................10
ChangingtheAudioLanguage........................................10
Search...........................................................10
StillPictureandFrame-by-FramePlayback...............................10
MarkerSearch.....................................................11
RepeatA-B.......................................................11
Repeat...........................................................11
Random..........................................................11
Zoom...........................................................12
CameraAngle.....................................................12
Subtitles.........................................................12
ChangingtheAudioChannel..........................................12
LastSceneMemory................................................12
ScreenSaver......................................................12
SystemSelect.....................................................12
PlayinganAudioCDandMP3/WMADisc..................................13
MP3/WMAdisc
compatibilitywiththisplayerislimitedasfollows
....... ...
.13
AudioCDandMP3/WMADiscFeatures................................13
?Pause........................................................14
?MovingtoanotherTrack.........................................14
?Random......................................................14
?RepeatTrack/All/Normal........................................14
?RepeatA-B...................................................14
?Search.......................................................14
ViewingaJPEGdisc...................................................15
?MovingtoanotherFile..........................................15
?Torotatepicture................................................15
?StillPicture...................................................15
?Zoom........................................................15
?JPEGdisccompatibilitywiththisplayerislimitedasfollows.
........ ...
.15
ProgrammedPlayback..................................................16
?ErasingaTrackfromprogramlist..................................16
Initial
Settings
InitialSettings................................................17-22
GeneralOperation..................................................17
LANGUAGE.....................................................17
DISPLAY........................................................18
AUDIO..........................................................19
LOCK(ParentalControl)..........................................20-21
OTHERS.........................................................22
Reference
AdditionalInformation..................................................23
ControllingotherTVswiththeremotecontrol................................23
Troubleshooting.......................................................24
LanguageCodes.......................................................25
AreaCodes...........................................................26
Specifications.........................................................27

Before
Use
4
To
ensure
proper
use
of
this
product,
please
read
this
owner
's
manual
carefully
and
retain
for
future
reference.
This
manual
provides
information
on
the
operation
and
maintenance
of
your
DVD
player.
Should
the
unit
require
service,
contact
an
authorized
service
location.
Symbol
Used
in
this
Manual
The
lightning
flash
symbol
alerts
you
to
the
presence
of
dangerous
voltage
within
the
product
enclosure
that
may
constitute
a
risk
of
electric
shock.
The
exclamation
point
alerts
you
to
the
presence
of
important
operating
and
maintenance
/
servicing
instructions.
Indicates
hazards
likely
to
cause
harm
to
the
unit
itself
or
other
material
damage.
DVD
and
finalized
DVD±R/RW
Video
CDs.
Audio
CDs.
MP3
discs.
WMA
discs.
JPEG
discs.
NOTE
Indicates
special
notes
and
operating
features.
TIP
Indicates
tips
and
hints
for
making
the
task
easier.
A
section
whose
title
has
one
of
the
following
symbols
is
applicable
only
to
the
disc
represented
by
the
symbol.
About
the
Symbol
Display
" "
may
appear
on
your
LCD
display
during
operation
and
indicates
that
the
function
explained
in
this
owner
's
manual
is
not
available
on
that
specific
DVD
video
disc.
Notes
on
Discs
Handling
Discs
Do
not
touch
the
playback
side
of
the
disc.
Hold
the disc
by
the
edges
so
that
fingerprints
do
not
get
on
the
surface.
Never
stick
paper
or
tape
on
the
disc.
Storing
Discs
After
playing,
store
the disc
in
its
case.
Do
not
expose
the disc
to
direct
sunlight
or
sources
of
heat
and
never
leave
it
in
a
parked
car
exposed
to
direct
sunlight.
Cleaning
Discs
Fingerprints
and
dust
on
the disc
can
cause
poor
picture
quality
and
sound
distortion.
Before
playing,
clean
the disc
with
a
clean
cloth.
Wipe
the
disc
from
the
center
out.
Do
not
use
strong
solvents
such
as
alcohol,
benzine,
thinner,
commercially
available
cleaners,
or
anti-static
spray
intended
for
older
vinyl
records.
Remote
Control
Battery
installation
Detach
the
battery
cover
on
the
rear
of
the
remote
control,
and
insert
two
batteries
(size
AAA)
with
and
aligned
correctly.

5
Introduction
Before
Use
(Continued)
Maintenance
and
Service
Refer
to
the
information
in
this
chapter
before
contacting
a
service
technician.
Handling
the
Unit
When
shipping
the
unit
Please
save
the
original
shipping
carton
and
packing
materials.
If
you
need
to
ship
the
unit,
for
maximum
protection,
re-pack
the
unit
as
it
was
originally
packed
at
the
factory.
Keeping
the
exterior
surfaces
clean
?
Do
not
use
volatile
liquids
such
as
insecticide
spray
near
the
unit.
?
Do
not
leave
rubber
or
plastic
products
in
contact
with
the
unit
for
a
long
period
of
time.
since
they
leave
marks
on
the
surface.
Cleaning
the
unit
To
clean
the
player,
use
a
soft,
dry
cloth.
If
the
surfaces
are
extremely
dirty,
use
a
soft
cloth
lightly
moistened
with
a
mild
detergent
solution.
Do
not
use
strong
solvents
such
as
alcohol,
benzine,
or
thinner,
as
these
might
damage
the
surface
of
the
unit.
Maintaining
the
Unit
The
DVD
player
is
a
high-tech,
precision
device.
If
the
optical
pick-up
lens
and
disc
drive
parts
are
dirty
or
worn,
the
picture
quality
could
be
diminished.
Depending
on
the
operating
environment,
regular
inspection
and
maintenance
are
recommended
after
every
1,000
hours
of
use.
For
details,
please
contact
your
nearest
authorized
service
center.
Types
of
Playable
Discs
This
unit
plays
DVD,
Video
CD,
Audio
CD,
DVD±R,
DVD±RW,
SVCD,
and
CD-R
or
CD-RW
that
contains
audio
titles,
MP3,
WMA
or
JPEG
files.
Manufactured
under
license
from
Dolby
Laboratories.
"Dolby",
"Pro
Logic",
and
the
double-D
symbol
are
trademarks
of
Dolby
Laboratories.
DTS
and
DTS
Digital
Out
are
trademarks
of
Digital
Theater
Systems,
Inc.
NOTES
?
Depending
on
the
conditions
of
the
recording
equipment
or
the
CD-R/RW
(or
DVD±R/±RW)
disc
itself,
some
CD-R/RW
(or
DVD±R/±RW)
discs
cannot
be
played
on
the
unit.
?
Do
not
attach
any
seal
or
label
to
either
side
(the
labeled
side
or
the
recorded
side)
of
a
disc.
?
Do
not
use
irregularly
shaped
CDs
(e.g.,
heart-shaped
or
octagonal).
It
may
result
in
malfunctions.
Notes
on
DVDs
and
Video
CDs
Some
playback
operations
of
DVDs
and
Video
CDs
may
be
intentionally
programmed
by
software
manufacturers.
This
unit
plays
DVDs
and
Video
CDs
according
to
disc
content
designed
by
the
software
manufacturer,
therefore
some
playback
features
may
not
be
available
or
other
functions
may
be
added.
Regional
code
This
DVD
player
is
designed
and
manufactured
for
playback
of
region
"2"
encoded
DVD
software.
This
unit
can
play
only
DVD
discs
labeled
"2"
or
"ALL".
If
you
try
to
play
a
DVD
with
a
different
region
code
from
your
player,
the
message
"Check
Regional
Code"
appears
on
the
screen.
2

6
Front
Panel
1.
POWER
Switches
the
player
ON
and
OFF.
2.
PLAY(N)
Starts
playback.
3.
STOP(x)
Stops
playback.
4.
Disc
Tray
Insert
a
disc
here.
5.
OPEN/CLOSE(Z)
Opens
or
closes
the
disc
tray.
6.
Display
window
Shows
the
current
status
of
the
player.
7.
Remote
Sensor
Point
the
DVD
Player
remote
control
here.
123
4 5 6
123
4 5 6
7
7
12
3 4
56
7

7
Introduction
Remote
Control
POWER
Switches
DVD
Player
ON
and
OFF.
OPEN
/
CLOSE
Opens
and
closes
the
disc
tray.
0-9
number
buttons
Selects
numbered
items
in
a
menu.
CLEAR
Removes
a
track
number
on
the
Playlist
or a
mark
on
the
MARKER
SEARCH
menu.
SCAN(m/M)
Search
backward
or
forward.
PAUSE/STEP(X)
Pauses
playback
temporarily/
press
repeatedly
for
frame-by-
frame
playback.
PLAY(N)
Starts
playback.
DVD
MENU
Accesses
menu
on
a
DVD
disc.
?
bBvV
(left/right/up/down)
Selects
an
item
in
the
menu.
?
ENTER
Confirms
menu
selection.
DISPLAY
Accesses
On-Screen
display.
?
AUDIO
Selects
an
audio
language
(DVD).
?
SUBTITLE
Selects
a
subtitle
language.
?
ANGLE
Selects
a
DVD
camera
angle
if
available
?
SETUP
Accesses
or
removes
setup
menu.
?
REPEAT
Repeat
chapter,
track,
title
all.
?
A-B
Repeat
sequence.
?
RANDOM
Plays
tracks
in
random
order.
?*
This
button
is
not
available.
TV
Control
Buttons
TV
POWER:
Turns
the
TV
on
or
off.
TV
PR/CH
+/--:
Selects
TV's
channel.
TV
VOL
+/--:
Adjusts
TV's
volume.
AV:
Selects
the
TV's
source.
SKIP(./>)
Go
to
next
chapter
or
track.
Returns
to
beginning
of
current
chapter
or
track
or
go
to
previous
chapter
or
track.
STOP(x)
Stops
playback.
TITLE
Displays
title
menu,
if
available.
RETURN
Removes
the
setup
menu,
displays
the
video
CD
with
PBC.
?
MARKER
Marks
any
point
during
playback.
?
SEARCH
Displays
MARKER
SEARCH
menu.
?
PROGRAM
Places
a
track
on
the
program
list.
?
ZOOM
Enlarges
video
image.

DVD
Player
Connections
Depending
on
your
TV
and
other
equipment
there
are
various
ways
you
can
connect
the
player.
Please
refer
to
the
manuals
of
your
TV,
stereo
system
or
other
devices
as
necessary
for
additional
connection
information.
Video
and
Audio
Connections
to
Your
TV
Make
sure
the
DVD
player
is
connected
directly
to
the
TV
and
not
to
a
VCR,
otherwise
the
DVD
image
could
be
distorted
by
the
copy
protection
system.
Video:
Connect
the
VIDEO
OUT
jack
on
the
DVD
player
to
the
video
in
jack
on
the
TV
using
the
video
cable
(V).
SCART
connection:
Connect
the
TO
TV
scart
jack
on
the
DVD
Player
to
the
corresponding
in
jacks
on
the
TV
using
the
scart
cable
(T).
Audio
Connection
to
Your
TV:
Connect
the
left
and
right
AUDIO
OUT
jacks
of
the
DVD
Player
to
the
audio
left
and
right
IN
jacks
on
the
TV
(A)
using
the
audio
cables.
Do
not
connect
the
DVD
Player's
AUDIO
OUT
jack
to
the
phone
in
jack
(record
deck)
of
your
audio
system.
Setting
up
the
Player
8
VIDEO
INPUT
SCART
INPUT
Rear
of
TV
Rear
of
DVD
player
V
T
AUDIO
INPUT
A

9
Introduction
Audio
Connection
to
Optional
Equipment
Connect
the
DVD
player
to
your
optional
equipment
for
audio
output.
Amplifier
equipped
with
2-channel
analog
stereo
or
Dolby
Pro
Logic
ll
/
Pro
Logic:
Connect
the
left
and
right
AUDIO
OUT
jacks
on
the
DVD
player
to
the
audio
left
and
right
IN
jacks
on
your
amplifier,
receiver,
or
stereo
system,
using
the
audio
cables
(A).
Amplifier
equipped
with
2-channel
digital
stereo
(PCM)
or
audio
/
video
receiver
equipped
with
a
multi-channel
decoder
(Dolby
DigitalTM,
MPEG
2,
or
DTS):
Connect
one
of
the
DVD
Player's
DIGITAL
AUDIO
OUT
jacks
(COAXIAL
X)
to
the
corresponding
in
jack
on
your
amplifier.
Use
an
optional
digital
(coaxial
X)
audio
cable.
Digital
Multi-channel
sound
A
digital
multi-channel
connection
provides
the
best
sound
quality.
For
this
you
need
a
multi-channel audio
/
video
receiver
that
supports
one
or
more
of
the
audio
formats
supported
by
your
DVD
player
such
as
MPEG
2,
Dolby
Digital
and
DTS.
Check
the
receiver
manual
and
the
logos
on
the
front
of
the
receiver.
NOTES
?
If
the
audio
format
of
the
digital
output
does
not
match
the
capabilities
of
your
receiver,
the
receiver
produces
a
strong,
distorted
sound
or
no
sound
at
all.
?
Six
Channel
Digital
Surround
Sound
via
a
digital
connection
can
only
be
obtained
if
your
receiver
is
equipped
with
a
Digital
Multi-channel
decoder.
?T
o
see
the
audio
format
of
the
current
DVD
in
the
on-screen
display,
press
AUDIO.
Setting
up
the
Player
(continued)
AUDIO
INPUT
DIGITAL
INPUT
COAXIAL
Amplifier
(Receiver)
Rear
of
DVD
player
A
X

On-Screen
Display
Some
items
can
be
changed
using
the
menu.
1.
Press
DISPLAY
during
playback.
2.
Press
b
/B
to
select
an
item.
The
selected
item
is
highlighted.
3.
Press
v
/V
to
change
the
setting.
Press
ENTER.
You
can
also
use
the
number
buttons
if
appropriate
(e.g.
inputting
the
title
number).
:
Title(Track)
Number,
:
Time
search
:
Chapter
Number
(DVD
disc
only)
Moving
to
another
CHAPTER/TRACK
When
a
title
on
a
disc
has
more
than
one
chapter
or
a
disc
has
more
than
one
track,
you
can
move
to
another
chapter/track
as
follows:
Press
SKIP
.
or
>
briefly
during
playback
to
select
the
next
chapter/track
or
to
return
to
the
beginning
of
the
current
chapter/track.
Press
SKIP
.
twice
briefly
to
step
back
to
the
previous
chapter/track.
Slow
Motion
1.
Press
PAUSE/STEP
(X)
during
playback.
The
player
will
now
go
into
PAUSE
mode.
2.
Use
the
SCAN
M
to
select
the
required
speed:
T
1/16,
T
1/8,
T
1/4,
or
T
1/2
(forward).
3.
To
exit
slow
motion
mode,
press
PLAY.
Title
Menu
Checking
the
contents
of
DVD
discs:
Menus
DVDs
may
offer
menus
that
allow
you
to
access
special
features.
To
use
the
disc
menu,
press
TITLE.
Input
the
corresponding
number
or
use
the
bBvVbuttons
to
highlight
your
selection.
Then
press
ENTER.
Disc
Menu
Press
DVD
MENU
and
the
disc
menu
is
displayed.
Press
DVD
MENU
again
to
exit.
Changing
the
Audio
Language
Press
AUDIO
repeatedly
during
playback
to
hear
a
different
audio
language
or
audio
track.
Search
1.
Press
SCAN
(m
or
M)
during
playback.
2.
Press
SCAN
(m
or
M)
repeatedly
to
select
the
required
speed.
DVD;
X2,
X4,
X16
or
X32
Video
CD;
X2,
X4
or
X8
3.
To
exit
Search
mode,
press
PLAY.
Still
Picture
and
Frame-by-Frame
Playback
Press
PAUSE/STEP
on
the
remote
control
during
playback.
Advance
the
picture
frame-by-frame
by
pressing
PAUSE/STEP
repeatedly.
Press
PLAY
to
exit
still
motion
mode.
02/04
0:08:20
02/04
General
Features
10

11
Advanced Operations
Marker
Search
To
enter
a
Marker
You
can
start
playback
from
up
to
nine
memorized
points.
To
enter
a
marker,
press
MARKER
at
the
desired
point
on
the
disc.
The
Marker
icon
appears
on
the
TV
screen
briefly.
Repeat
to
enter
up
to
nine
markers.
To
Recall
or
Clear
a
Marked
Scene
1.
During
disc
playback,
press
SEARCH.
The
marker
search
menu
appears
on
the
screen.
2.
Within
10
seconds,
press
b
/B
to
select
a
marker
number
that
you
want
to
recall
or
clear.
3.
Press
ENTER
and
playback
starts
from
the
marked
scene.
Or,
Press
CLEAR
and
the
marker
number
is
erased
from
the
list.
4.
You
can
play
any
marker
by
inputting
its
number
on
the
marker
search
menu.
Repeat
A-B
To
repeat
a
sequence.
1.
Press
A-B
at
your
chosen
starting
point.
"A
"
appears
briefly
on
the
screen.
2.
Press
A-B
again
at
your
chosen
end
point.
"A
B"
appears
briefly
on
the
screen
and
the
repeat
sequence
begins.
3.
Press
A-B
again
to
cancel.
Repeat
Press
REPEAT
during
playback
to
select
a
desired
repeat
mode.
DVD
Video
Discs
?
Chapter:
repeats
the
current
chapter.
?
Title:
repeats
the
current
title.
?
Off:
does
not
play
repeatedly.
Video
CDs
?
Track:
repeats
the
current
track
?
All:
repeats
all
the
tracks
on
a
disc.
?
Off:
does
not
play
repeatedly.
NOTES
?
On
a
Video
CD
with
PBC,
you
must
set
PBC
to
Off
on
the
setup
menu
to
use
the
repeat
function
(See
"PBC"
on
page
22).
?
If
you
press
SKIP
(>)
once
during
Repeat
Chapter
(Track)
playback,
the
repeat
playback
cancels.
Random
1.
Press
RANDOM
during
playback.
The
unit
automatically
begins
random
playback
and
Random
appears
on
the
screen.
2.
To
return
to
normal
playback,
press
RANDOM
repeatedly
until
Normal
appears
on
the
menu
screen.
TIP
?
By
pressing
SKIP
>
during
random
playback,
the
unit
selects
another
track
and
resumes
random
playback.
?O
n
a
Video
CD
with
PBC,
You
must
set
PBC
to
Off
on
the
setup
menu
to
use
the
random
function
(See
"PBC"
on
page
22).
General
Features
(continued)

General
Features
(continued)
12
Zoom
Use
zoom
to
enlarge
the
video
image.
1.
Press
ZOOM
during
playback
to
activate
the
Zoom
function.
2.
Each
press
of
the
ZOOM
button
changes
the
screen
in
the
sequence:
200%
→
300%
→
400%
→
Normal
(4
steps).
3
Use
the
b
B
vV
buttons
to
move
through
the
zoomed
picture.
4.
To
resume
normal
playback,
press
CLEAR.
NOTE
Zoom
may
not
work
on
some
DVDs.
Camera
Angle
If
the
disc
contains
scenes
recorded
at
different
camera
angles,
you
can
change
to
a
different
camera
angle
during
playback.
Press
ANGLE
repeatedly
during
playback
to
select
a
desired
angle.
Note
that
the
number
of
the
current
angle
appears
on
the
display.
Subtitles
Press
SUBTITLE
repeatedly
during
playback
to
display
the
different
subtitle
languages.
Changing
the
Audio
Channel
Press
AUDIO
repeatedly
during
playback
to
hear
a
different
audio
channel
(LEFT,
RIGHT
or
Stereo).
Last
Scene
Memory
This
player
memorizes
last
scene
from
the
last
disc
that
is
viewed.
The
last
scene
remains
in
memory
even
if
you
remove
the
disc
from
the
player
or
switch
off
the
player.
If
you
load
a
disc
that
has
the
scene
memorized,
the
scene
is
automatically
recalled.
NOTE
This
player
does
not
memorize
settings
of
a
disc
if
you
switch
off
the
player
before
commencing
to
play
it.
Screen
Saver
The
screen
saver
appears
when
you
leave
the
DVD
player
in
Stop
mode
for
about
five
minutes.
If
the
Screen
Saver
is
displayed
for
five
minutes,
the
DVD
Player
automatically
turns
itself
off.
System
Select
You
must
select
the
appropriate
system
mode
for
your
TV
system.
If
no
disc
appears
in
the
display
window,
press
and
hold
PAUSE/STEP
for
more
than
5
seconds
to
be
able
to
select
a
system
(PAL,
NTSC,
or
Auto).

13
Audio
CD
Once
you
insert
an
audio
CD
a
menu
appears
on
the
screen.
Press
v
/
V
to
select
a
track
then
press
PLAY
or
ENTER
to
playback
starts.
MP3
/
WMA
1.
Press
v
/
V
to
select
a
folder,
and
press
PLAY
or
ENTER
to
see
the
folder
contents.
2.
Press
v
/
V
to
select
a
track
then
press
PLAY
or
ENTER.
Playback
starts.
TIPS
?
If
you
are
in
a
file
list
on
the
MUSIC
menu
and
want
to
return
to
the
Folder
list,
use
the
v
/
V
to
highlight
and
press
PLAY
or
ENTER.
?
Press
DVD
MENU
to
move
to
the
next
page.
Press
TITLE
to
move
to
the
previous
page.
?
On
a
CD
with
MP3/WMA
and
JPEG
you
can
switch
MP3/WMA
and
JPEG.
Press
v
/
V
to
select
a
folder,
and
press
ENTER
to
see
the
folder
contents.
MP3
/
WMA
disc
compatibility
with
this
player
is
limited
as
follows:
?
Sampling
frequency:
within
8
-
48
kHz
(MP3),
within
32
-
48kHz
(WMA)
?
Bit
rate:
within
8
-
320kbps
(MP3),
32
-
192kbps
(WMA)
?
The
player
cannot
read
an
MP3/WMA
file
that
has
a
file
extension
other
than
".mp3"
/
".wma".
?
CD-R
physical
format
should
be
ISO
9660
?
If
you
record
MP3
/
WMA
files
using
software
that
cannot
create
a
file
system
(eg.
Direct-CD)
it
is
impossible
to
playback
MP3
/
WMA
files.
We
recommend
that
you
use
Easy-CD
Creator,
which
creates
an
ISO
9660
file
system.
?
File
names
should
have
a
maximum
of
8
letters
and
must
incorporate
an
.mp3
or
.wma
extension.
?
They
should
not
contain
special
letters
such
as
/
?
*
:
"
< >
l
etc.
?
The
total
number
of
files
on
the disc
should
be
less
than
648.
This
DVD
player
requires
discs
and
recordings
to
meet
certain
technical
standards
in
order
to
achieve
optimal
playback
quality.
Pre-recorded
DVDs
are
automatically
set
to
these
standards.
There
are
many
different
types
of
recordable
disc
formats
(including
CD-R
containing
MP3
or
WMA
files)
and
these
require
certain
pre-existing
conditions
(see
above)
to
ensure
compatible
playback.
Customers
should
note
that
permission
is
required
in
order
to
download
MP3
/
WMA
files
and
music
from
the
Internet.
Our
company
has
no
right
to
grant
such
permission.
Permission
should
always
be
sought
from
the
copyright
owner.
Playing
an
Audio
CD
or
MP3/WMA
Disc
TRACK
02
TRACK
03
TRACK
01
TRACK
04
TRACK
05
TRACK
06
Normal
CD
001
/
022
00:00
/00:00
Add
DISPLAY
PROGRAM
Program
List
Music
01
Music
02
Music
03
Music
04
Music
05
Normal
003
/
036
00:00
/00:00
Program
List
Add
DISPLAY
PROGRAM
Advanced Operations

Audio
CD
and
MP3
/
WMA
Disc
Features
Pause
1.
Press
PAUSE/STEP
during
playback.
2.
To
return
to
playback,
press
PLAY,
ENTER
or
press
PAUSE/STEP
again.
Moving
to
another
Track
1.
Press
SKIP
(.
or
>)
briefly
during
playback
to
go
to
the
next
track
or
to
return
to
the
beginning
of
the
current
track.
2.
Press
SKIP
.
twice
briefly
to
go
back
to
the
previous
track.
3.
You
can
play
any
track
by
inputting
its
number.
Random
1.
Press
RANDOM
during
playback.
Random
Playback
begins
immediately
and
RANDOM
appears
on
the
menu
screen.
2.
To
return
to
normal
playback,
press
RANDOM
repeatedly
until
Normal
appears
on
the
menu
screen.
TIP
By
pressing
SKIP
>
during
random
playback,
the
unit
selects
another
track
and
resumes
random
playback.
Repeat
Track/All/Normal
You
can
play
a
track/all
on
a
disc.
1.
Press
REPEAT
when
playing
a
disc.
The
repeat
icon
appears.
2.
Press
REPEAT
to
select
a
desired
repeat
mode.
?
Track:
repeats
the
current
track
?
All:
repeats
all
the
tracks
on
a
disc.
?
Normal:
does
not
play
repeatedly.
NOTE
If
you
press
SKIP
(>)
once
during
Repeat
Track
playback,
the
repeat
playback
cancels.
Repeat
A-B
1.
To
repeat
a
sequence
during
disc
playback
press
A-B
at
your
chosen
starting
point.
The
Repeat
icon
and
"A"
appear
on
the
menu
screen.
2.
Press
A-B
again
at
your
chosen
end
point.
The
Repeat
icon
and
"A
B"
appear
on
the
menu
screen,
and
the
sequence
begins
to
play
repeatedly.
3.
To
exit
the
sequence
and
return
to
normal
play,
press
A-B
again.
Search
1.
Press
SCAN
(m
or
M)
during
playback.
2.
Press
SCAN
(m
or
M)
repeatedly
to
select
the
required
speed.
2X,4Xor8X
3.
To
exit
Search
mode,
press
PLAY.
Playing
an
Audio
CD
or
MP3/WMA
Disc
(continued)
14

15
Advanced Operations
Using
this
DVD
Player
you
can
view
discs
with
JPEG
files.
1.
Insert
a
disc
and
close
the
tray.
The
PHOTO
menu
appears
on
the
screen.
2.
Press
v
/
V
to
select
a
folder,
and
press
ENTER
or
PLAY.
A
list
of
files
in
the
folder
appears.
If
you
are
in
a
file
list
and
want
to
return
to
the
previous
Folder
list,
use
the
v
/
V
buttons
on
the
remote
to
highlight
and
press
ENTER
or
PLAY.
3.
If
you
want
to
view
a
particular
file,
press
v
/
V
to
highlight
a
file
and
press
ENTER
or
PLAY.
Viewing
the
file
proceeding
starts.
While
viewing
a
picture,
you
can
press
STOP
to
move
to
the
previous
menu
(PHOTO
menu).
TIPS
?
Press
DVD
MENU
to
move
to
the
next
page.
Press
TITLE
to
move
to
the
previous
page.
?
On
a
CD
with
MP3/WMA
and
JPEG
you
can
switch
MP3/WMA
and
JPEG.
Press
v
/
V
to
select
a
folder,
and
press
ENTER
to
see
the
folder
contents.
Moving
to
another
File
Press
SKIP
(.
or
>)
once
while
viewing
a
picture
to
advance
to
the
next
or
previous
file.
To
r
otate
picture
Press
b
/
B
during
showing
a
picture
to
rotate
the
picture
clockwise
or
counter
clockwise.
Still
Picture
1.
Press
PAUSE/STEP
during
slide
show.
The
player
will
now
go
into
PAUSE
mode.
2.
To
return
to
the
slide
show,
press
PLAY,
ENTER
or
press
PAUSE/STEP
again.
Zoom
Use
zoom
to
enlarge
the
video
image.
1.
Press
ZOOM
during
playback
to
activate
the
Zoom
function.
2.
Each
press
of
the
ZOOM
button
changes
the
screen
in
the
sequence:
100%
→
150%
→
200%
→
100%
3
Use
the
b
B
vV
buttons
to
move
through
the
zoomed
picture.
4.
To
resume
normal
playback,
press
CLEAR
or
press
ZOOM
repeatedly
to
select
the
100%.
JPEG
disc
compatibility
with
this
player
is
limited
as
follows:
?
Depending
upon
the
size
and
number
of
JPEG
files,
it
could
take
a
long
time
for
the
DVD
player
to
read
the
disc's
contents.
If
you
don't
see
an
on-screen
display
after
several
minutes,
some
of
the
files
may
be
too
large
---
reduce
the
resolution
of
the
JPEG
files
to
less
than
2M
pixels
as
2760
x
2048
pixels
and
burn
another
disc.
?
The
total
number
of
files
and
folders
on
the disc
should
be
less
than
648.
?
Ensure
that
all
the selected
files
have
the
".jpg"
extensions
when
copying
into
the
CD
layout.
?
If
the
files
have
".jpe"
or
".jpeg"
extensions,
please
rename
them
as
".jpg"
file.
?
File
names
without
".jpg"
extension
will
not
be
able
to
be
read
by
this
DVD
player.
Even
though
the
files
are
shown
as
JPEG
image
files
in
Windows
Explorer.
JPEG
JPEG
JPEG
Viewing
a
JPEG
Disc
File
01
File
02
File
03
File
04
File
05
Normal
001
/
052
00:00
/00:00
Program
List
Add
DISPLAY
PROGRAM

The
program
function
enables
you
to
store
your
favorite
tracks
from
any
disc
in
the
player
memory.
A
program
can
contain
30
tracks
(Audio
CD,
MP3/WMA).
1.
Insert
a
disc.
(Audio
CD,
MP3
or
WMA.)
2.
Press
v
/
V
to
select
the
desired
file.
3.
Press
PROGRAM
during
playback
or
in
the
stop
mode.
Repeat
press
PROGRAM
to
place
additional
tracks
on
the
program
list.
4.
Press
DISPLAY.
Program
List
menu
appear.
Press
v
/
V
to
select
the
track
you
want
to
start
playing.
Press
DVD
MENU
to
move
to
the
next
page.
Press
TITLE
to
move
to
the
previous
page.
Audio
CD
Menu
MP3/WMA
Menu
5.
Press
PLAY
or
ENTER
to
start.
6.
To
resume
normal
playback
from
programmed
playback.
Press
DISPLAY
then
select
a
track
of
list
and
then
press
PLAY
or
ENTER.
Erasing
a
Track
from
program
list
1.
Use
v
/
V
to
select
the
track
that
you
wish
to
erase
from
the
program
list.
2.
Press
CLEAR.
Repeat
to
erase
additional
tracks
on
the
list.
For
details
on
each
operation
item,
refer
to
relevant
page.
Programmed
Playback
WMA
MP3
CD
16
TRACK
02
TRACK
03
TRACK
01
TRACK
04
TRACK
05
TRACK
06
Normal
CD
001
/
022
00:00
/00:00
DISPLAY
Return
Delete
CLEAR
Program
List
Music
02
Music
03
Music
04
Music
05
Music
06
Normal
003
/
036
00:00
/00:00
Return
Program
List
Delete
DISPLAY
CLEAR
Music
01

17
Initial Settings
By
using
the
Setup
menu,
you
can
make
various
adjustments
to
items
such
as
picture
and
sound.
You
can
also
set
a
language
for
the
subtitles
and
the
Setup
menu,
among
other
things.
For
details
on
each
Setup
menu
item,
see
pages
17
to
22.
To
display
and
exit
the
Menu:
Press
SETUP
to
display
the
menu.
A
second
press
of
SETUP
will
take
you
back
to
initial
screen.
To
go
to
the
next
level:
Press
B
on
the
remote
control.
To
go
back
to
the
previous
level:
Press
b
on
the
remote
control.
General
Operation
1.
Press
SETUP.
The
Setup
menu
appears.
2.
Use
b
/
B
to
select
the
desired
option
then
press
V
or
ENTER
to
move
to
the
second
level.
The
screen
shows
the
current
setting
for
the
selected
item,
as
well
as
alternate
setting(s).
3.
Use
v
/
V
to
select
the
second
desired
option
then
press
B
to
move
to
the
third
level.
4.
Use
v
/
V
to
select
the
desired
setting
then
press
ENTER
to
confirm
your
selection.
Some
items
require
additional
steps.
5.
Press
SETUP,
RETURN
or
PLAY
to
exit
the
Setup
menu.
LANGUAGE
Menu
Language
Select
a
language
for
the
Setup
menu
and
on-screen
display.
Disc
Audio
/
Subtitle
/
Menu
Select
the
language
you
prefer
for
the
audio
track
(disc
audio),
subtitles,
and
the
disc
menu.
Original:
Refers
to
the
original
language
in
which
the
disc
was
recorded.
Other:
To
select
another
language,
press
number
buttons
then
Press
ENTER
to
enter
the
corresponding
4-digit
number
according
to
the
language
code
list
in
the
reference
chapter.
If
you
enter
the
wrong
language
code,
press
CLEAR.
DVD
Initial
Settings
Menu
Language
English
Original
Off
Original
Disc
Audio
Disc
Subtitle
Disc
Menu
Move
Select
Exit
LANGUAGE

18
Initial
Settings
(continued)
DISPLAY
TV
Aspect
4:3:
Select
when
a
standard
4:3
TV
is
connected.
16:9:
Select
when
a
16:9
wide
TV
is
connected.
Display
Mode
Display
Mode
setting
works
only
when
the
TV
Aspect
mode
is
set
to
"4:3".
LetterBox:
Displays
a
wide
picture
with
bands
on
the
upper
and
lower
portions
of
the
screen.
Panscan:
Automatically
displays
the
wide
picture
on
the
entire
screen
and
cuts
off
the
portions
that
do
not
fit.
DVD
DVD
TV
Aspect
4:3
Letterbox
Display
Mode
DISPLAY
Move
Select
Exit

19
Initial Settings
AUDIO
Each
DVD
disc
has
a
variety
of
audio
output
options.
Set
the
player's
AUDIO
options
according
to
the
type
of
audio
system
you
use.
Dolby
Digital
/
DTS
/
MPEG
Bitstream:
Select
"Bitstream"
if
you
connect
the
DVD
Player's
DIGITAL
OUT
jack
to
an
amplifier
or
other
equipment
with
a
Dolby
Digital,
DTS
or
MPEG
decoder.
PCM
(for
Dolby
Digital
/
MPEG):
Select
when
connected
to
a
two-channel
digital
stereo
amplifier.
DVDs
encoded
in
Dolby
Digital
or
MPEG
will
be
automatically
downmixed
to
two-channel
PCM
audio.
Off
(for
DTS):
If
you
select
"Off",
the
DTS
signal
is
not
output
through
the
DIGITAL
OUT
jack.
Sample
Freq.
(Frequency)
If
your
receiver
or
amplifier
is
NOT
capable
of
handling
96
KHz
signals,
select
48
KHz.
When
this
choice
is
made,
this
unit
automatically
converts
any
96
KHz
signals
to
48
KHz
so
your
system
can
decode
them.
If
your
receiver
or
amplifier
is
capable
of
handling
96
KHz
signals,
select
96
KHz.
When
this
choice
is
made,
this
unit
passes
each
type
of
signal
through
without
any
further
processing.
Check
the
documentation
for
your
amplifier
to
verify
its
capabilities.
DRC
(Dynamic
Range
Control)
With
the
DVD
format,
you
can
hear
a
program's
soundtrack
in
the
most
accurate
and
realistic
presentation
possible,
thanks
to
digital
audio
technology.
However,
you
may
wish
to
compress
the
dynamic
range
of
the
audio
output
(the
difference
between
the
loudest
sounds
and
the
quietest
ones).
This
allows
you
to
listen
to
a
movie
at
a
lower
volume
without
losing
clarity
of
sound.
Set
DRC
to
On
for
this
effect.
DVD
DVD
DVD
Initial
Settings
(continued)
Dolby
Digital
Bitstream
Bitstream
PCM
Off
48KHz
DTS
MPEG
DRC
Sample
Freq.
AUDIO
Move
Select
Exit

Initial
Settings
(continued)
20
LOCK
(Parental
Control)
Rating
Some
movies
contain
scenes
that
may
not
be
suitable
for
children
to
view.
Many
of
these
discs
contain
parental
control
information
that
applies
to
the
complete
disc
or
to
certain
scenes
on
the
disc.
Movies
and
scenes
are
rated
from
1
to
8,
depending
on
the
country.
Some
discs
offer
more
suitable
scenes
as
an
alternative.
The
parental
control
feature
allows
you
to
block
access
to
scenes
below
the
rating
you
input,
thereby
preventing
your
children
from
being
able
to
view
material
you
believe
is
unsuitable.
Rating
1-8:
Rating
one
(1)
has
the
most
restrictions
and
rating
eight
(8)
is
the
least
restrictive.
Unlock:
If
you
select
unlock,
parental
control
is
not
active
and
the
disc
plays
in
full.
NOTE
If
you
set
a
rating
for
the
player,
all
disc
scenes
with
the
same
rating
or
lower
are
played.
Higher
rated
scenes
are
not
played
unless
an
alternate
scene
is
available
on
the
disc.
The
alternative
must
have
the
same
rating
or
a
lower
one.
If
no
suitable
alternative
is
found, playback
stops.
You
must
enter
the
4-digit
password
or
change
the
rating
level
in
order
to
play
the
disc.
1.
Select
Rating
on
the
LOCK
menu
then
press
B.
2.
Select
a
rating
from
1
to
8
using
the
v
/
V
buttons
and
press
ENTER.
The
password
widow
will
appear.
3.
If
you
have
not
entered
password
yet:
When
the
"New
Password"
section
is
highlighted,
enter
a
4-digit
password
using
the
numbered
buttons
then
press
ENTER.
Enter
the
4-digit
security
password
again
to
verify
when
the
"Confirm
Password"
section
is
highlighted.
The
"OK"
will
be
highlighted.
If
you
have
entered
password
already:
Enter
a
4-digit
password
you
have
entered
using
the
numbered
buttons.
The
"OK"
will
be
highlighted.
4.
Press
ENTER
to
confirm
your
rating
selection,
then
press
SETUP
to
exit
the
menu.
TIPS
?
If
you
make
a
mistake
before
pressing
ENTER
in
each
section,
press
CLEAR
to
enter
again
or
b
repeatedly
to
delete
password
numbers
one
by
one
then
correct
it.
?
If
you
enter
the
wrong
password,
you
can
not
proceed
to
the
next
step.
DVD
Rating
Unlock
Password
NEW
Area
code
LOCK
Move
Select
Exit
IT
This manual suits for next models
2
Table of contents
Languages:
Other LG DVD Player manuals