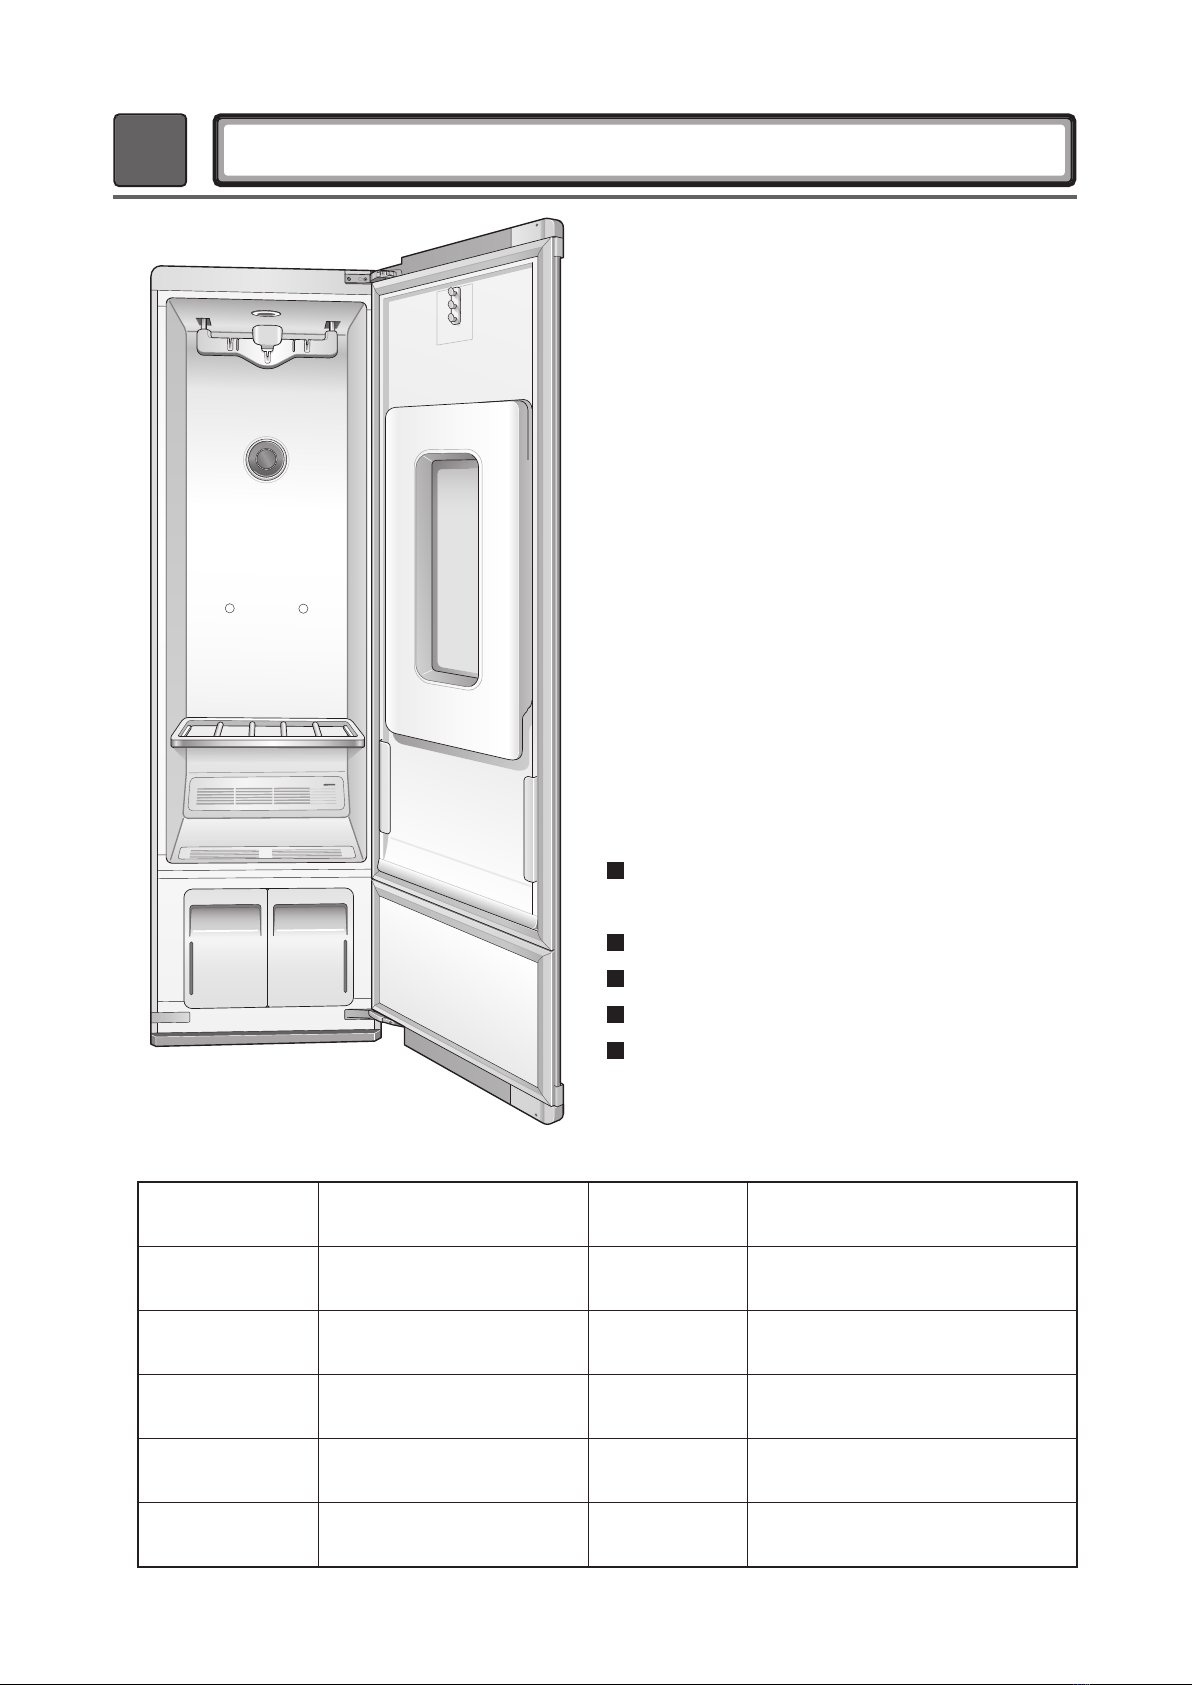
LG S3RERB Installation and operation manual

Model : S3RERB
LG Electronics,
Service Engineering Manual
Caution
Make sure that you read this Service Engineering Manual carefully for proper troubleshooting and
better service.
MFL66987013
http://www.lge.com
Styler

2
Safety Precautions
This service engineering manual is used for product repair. Repair work, even if it is minor,
may cause injury or re. Manufacturer or seller of this product is not responsible for the prob-
lem that occurs due to misassembly of the product.
!
Caution
Be sure to pull out the power cord before you service the product. If you need power sup-
ply for diagnosis or test, pull out the power cord immediately after performing the neces-
sary check.
Be sure to wear safety gloves and goggles when you repair the product in order to prevent
injury or accident.
Be sure to reconnect the ground wire if you disconnected it for product repair.
Reconnecting the Ground Wire
1. First, check if the short circuit has occurred in the main body.
2. When you are handling the electric parts, be sure to pull out the power cord before you
work on it.
3. If you need to test the product while power is being applied, be sure to wear rubber
gloves to prevent electric shock.
4. When you use gauges, be sure to check the rated current, voltage, and capacity.
5. Make sure that water does not get into electric parts around the machine room.
6. When you tilt the product to front or rear, remove the objects on top of the product to
prevent them from falling. Especially, be careful of thin objects (e.g. glass panel).
7. When the heat pump cycle is damaged, you should contact the LG repair shop.
(This is to prevent the refrigerant gas inside the cycle from contaminating the house.)
8. Be extra careful when you perform repair that may cause safety accidents to ensure the
safety of the customers.
Safety Precautions

3
Product Specifications ····················································································· 4
Name and Function of Parts ············································································ 6
Installation and Service Guide ······································································· 16
Styler Cycle and Usable Clothes ···································································· 17
Inspecting the Product ··················································································· 21
Heat Pump Cycle and Refrigerant ································································· 26
Function and Operating Principle of Cycle Components ······························ 36
Circuit Diagram ······························································································ 40
Things to Check before Servicing ·································································· 42
Diagnosis and Error Table ·············································································· 44
Product Flowchart and Cycle Characteristics ·············································· 46
Service Flow for Symptoms ·········································································· 51
Changing the Door Direction ········································································· 89
<Reversable Kit(SVC Loc : SVC01)> ··························································· 96
Disassembly ··································································································· 97
Exploded View and Service Part Number ···················································· 106
*Refrigerant - ······························································································· 111
Things to Check after Repair ······································································· 113
Contents

4
1Product Specifications
Product name: electronic machine for maintain-
ing clothes
Rated power: 120V/60Hz
Dimensions: 445(W)×585(D) ×1,850(H)
Capacity: 4 clothes (top: 3, bottom: 1)
Weight: 83Kg
Product specications may be changed by the manufacturer.
Model Name S3RERB Key Features Styling, sterilization, and drying
Capacity Top: 3, bottom: 1 (3.9 kg) Additional
Features
Download Courses
Smart Diagnosis, One-touch Styling
Rated Power 120V, 60Hz Sensor Type Micom electronic control
Product Weight 83Kg Water Supply Water supply cartridge + Pump
Drying and
Circulation
Condensation circulation
(Heat pump cycle) Water Drain Water drain cartridge + Pump
Dimensions 445(W)×585(D) ×1,850(H) Schedule
Function Available

5
PRODUCT OVERVIEW
PARTS
moving hanger
interior light
interior light
shelf holder
hot air
circulation vent
water
drain tank
water
supply tank
hooks for
Pants Crease Care
door*
steam nozzle
* The door swing can be reversed by the installer to fit the installation location.
Pants Crease Care
aroma filter
shelf
drip tray

6
ACCESSORIES
Included Accessories
NOTE
yContact the store where the product was purchased or LG customer service at 1-800-243-0000
(1-888-542-2623 in Canada) if any accessories are damaged or missing. Accessories can be
purchased separately online at http://www.lg.com/us
yFor your safety and for extended product life, use only authorized components. The
manufacturer is not responsible for product malfunction or accidents caused by the use of
separately purchased unauthorized components or parts.
yThe images in this guide may be different from the actual components and accessories, which
are subject to change by the manufacturer without prior notice for product improvement
purposes.
2 hangers*
AEE73149701
AEE73189601
pants hanger*
AEE73189701
shelf
MCK67970601
drip tray
AHT74073801
*An ordinary metal/plastic hanger can be used if the hook is less than 5/32 in. (4 mm) thick. The hook must fit in
the indentation in the moving hanger snugly. If the fit is too loose, it may result in vibration, noise, and damage
to clothing.
anti-tip kit
4 carpet install spikes
2 rear leveling feet
2 non-skid pads
MHK61866301
2 hinge covers
3550JA3143A
2 rear cap covers
MBL65818001
wrench

7
THE MOVING HANGER
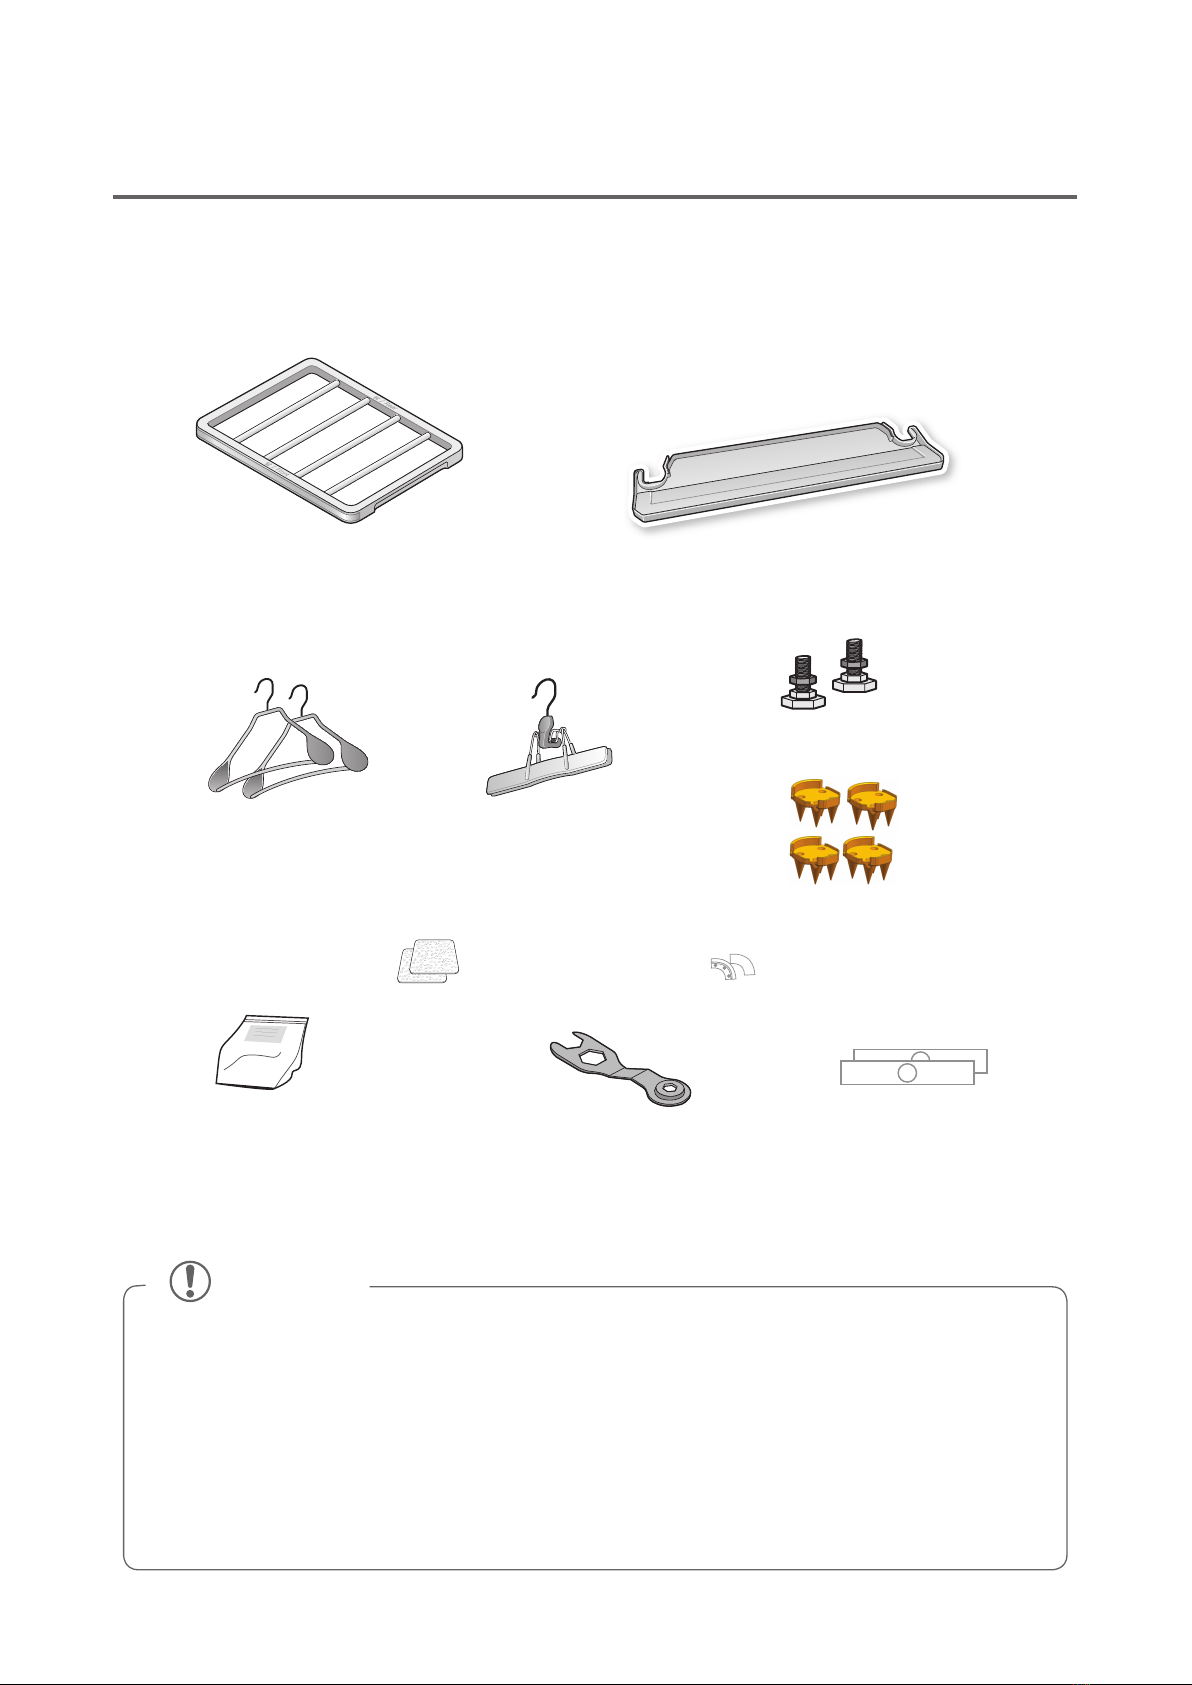
Hang clothes on the moving hanger using the
hangers provided with the Styler, or use any
plastic or metal hanger that hooks snugly into the
indentations in the moving hanger.
• Use the moving hanger for suits, coats,
jackets, blouses, dresses, skirts, and pants
that don’t require a crease. Use the Pants
Crease Care to crease pants.
• Anything that can be securely placed on
a hanger and steamed or dried without
retaining hanger marks or other damage can
be placed on the moving hanger.
• Dry sweaters or knits on the shelf to avoid
hanger marks.
• Clothing should be securely fastened, with
zippers and buttons closed, so that it does not
fall off the moving hanger during the cycle.
• Arrange clothing so it does not touch the sides
or rear of the cabinet, if possible. Condensation
may form on the interior surface of the cabinet,
and items in contact with the surface may
remain damp at the end of the cycle. Hang
larger items on the diagonal indentations on
the moving hanger.
THE PANTS CREASE CARE
Hang clothes in the Pants Crease Care using
the pants hanger provided with the Styler or any
pants hanger that fits into the hooks above the
door to the Pants Crease Care.
• Open the door to the Pants Crease Care by
pressing the icon on the front.
• The Pants Crease Care keeps pants legs
creased while removing wrinkles elsewhere.
• Pants can be pressed while refreshing other
items in the same cycle.
• For optimum results, use the Extra Pants
Care cycle which is designed for use with
the Pants Crease Care feature. This cycle can
be downloaded using the LG Smart Styler
app and used as the Downloaded cycle. For
instructions, see Downloading Styler Cycles, page 38.
CAUTION
yDo not lean on or hang heavy items on
the door of the Pants Crease Care. The
unit may tip, resulting in damage or injury.
yDo not allow children to play with or
hang onto the door of the Pants Crease
Care. The unit may tip, resulting in damage
or injury.
yKeep fingers out of pinch point areas
when closing the door of the Pants
Crease Care. Supervise nearby children
to prevent injuries.
CAUTION
yDo not lean or pull on the moving hanger. Do not allow
children play with or hang onto the moving hanger. The
unit could tip, resulting in damage or injury.

8
THE SHELF
Use the shelf when styling clothes or other items
that are difficult to hang or that may be damaged
by hang drying.
• Use the shelf for stuffed toys, pillows, hats,
and other accessories.
• Use the shelf for sweaters, knits, lingerie, or
delicate blouses that can show hanger marks,
stretching, or other damage if dried on a
hanger.
• For best drying performance, do not stack
items on the shelf. Dry single items or place
items side by side with space between.
• When not in use, store the shelf on the shelf
holder knobs in the back of the cabinet.
• For instructions on installing the shelf, see
Assembling the Shelf, page 29.
• Do not use the shelf for storing heavy items.
• Arrange items on the shelf so they do not
touch the sides or rear of the cabinet, if
possible. Condensation may form on the
interior surface of the cabinet, and items in
contact with the surface may remain damp at
the end of the cycle.
CHOOSING STYLER FEATURES
item how to style it
suit coat, blazer moving hanger
coat, jacket (short) moving hanger
coat (long) moving hanger
(remove shelf)
dress (short) moving hanger
dress (long) moving hanger
(remove shelf)
skirt moving hanger
lightweight blanket, throw moving hanger
baby blanket moving hanger
pants (not creased) moving hanger
shorts moving hanger
children’s clothes moving hanger
scarf moving hanger
or shelf
tie moving hanger
or shelf
shawl moving hanger
or shelf
lingerie
moving hanger
or shelf (if
delicate)
shirt, blouse
moving hanger
or shelf (if
delicate)
pants (creased) Pants Crease
Care
cap, hat shelf
stuffed toys shelf
pillow shelf
sweater shelf
knitwear shelf
infant clothes shelf
CAUTION
yDo not use the shelf to store heavy
items. The shelf may fall, resulting in
damage or injury.
yDo not step or sit on the shelf. The
shelf may fall or the unit may tip, resulting
in damage or injury.

9
INSTALLATION
INSTALLATION OVERVIEW
Please read the following installation instructions first after
purchasing this product or transporting it to another location.
PRODUCT SPECIFICATIONS
The appearance and specifications listed in this manual may vary due to constant product improvements.
steam clothing care S3RERB
description electric machine for maintaining clothing
electrical requirements please refer to the rating label regarding detailed information
dimensions
17 ½ in. (W) X 23 in. (D) X 72 7/8in. (H), 39 ¾ in. (D with door
open)
445 mm (W) X 585 mm (D) X 1850 mm (H), 1010 mm (D with door
open)
net weight 183 lb (83 kg)
maximum capacity 4 items
power consumption 1700 W
safety device double overheating safety device, thermal fuse, programming
Check and choose the
proper location
Level the Styler Reverse the door swing
(if needed)
Connect to grounded outlet
100–130V only
2 in.
2 in.
7
3
/
4
in. /

10
UNPACKING THE STYLER • Remove tape and any temporary labels
from the Styler before using.
Do not remove any warning labels, the model
and serial number label, or the Tech Sheet
that is located under the front of the Styler.
• To remove any remaining tape or glue, rub
the area briskly with your thumb.
Tape or glue residue can also be easily
removed by rubbing a small amount of liquid
dish soap over the adhesive with your fingers.
Wipe with warm water and dry.
• Do not use sharp instruments, rubbing
alcohol, flammable fluids, or abrasive
cleaners to remove tape or glue.
These products can damage the surface of
the Styler.
WARNING
yUse two or more people to move and
install the Styler. Failure to do so can result
in back injury or other injury.
yThe Styler is heavy. Use the wheels at the
bottom of the product to move it. Push
the Styler slowly from about halfway down
the front side.
yKeep the Styler upright when moving it. If
you lay the Styler on its side, refrigerant may
leak and cause the appliance to malfunction.
yKeep flammable materials and vapors,
such as gasoline, away from the Styler.
Failure to do so can result in fire, explosion,
or death.
CHOOSING THE PROPER LOCATION
Electricity Install where an outlet is easily accessible.
Use an individual, grounded outlet:120 Volts, 60 Hz, AC, 15 Amps minimum.
WARNING: Do not plug in multiple appliances in the same
outlet with the Styler. Overloading house wiring can cause a fire
hazard.
To reduce the risk of electric shock, do not install the Styler in a
wet or damp area.
Floor Floor must be level and solid enough to support 183 lb (83 kg).
Adjust the leveling legs to compensate for any unevenness in the floor.
Do not install on a platform or a weakly supported structure. If installing on
carpeting, see Installing on Carpeting, page 17.
Ambient temperature Temperature must be between 50°F (10°C) and 95°F (35°C).
If the ambient temperature is too low or high, performance may be affected.
Do not install in direct sunlight or where the temperature may fall below
32°F (0°C).
Clearances Allow at least 18 in. (46 cm) in front to open the door.
Allow at least 2 in. (5 cm) on both sides and between the back of the Styler
and the wall. Allow at least 7 3/4 in. (20 cm) between the top of the Styler and
any overhanging shelves or cabinets.
If the Styler is too close to adjacent items, performance may decrease and
electricity consumption may increase.

11
INSTALLATION LOCATION REQUIREMENTS
WARNING Read all installation instructions completely before installing and operating the
Styler. It is important to review this entire manual before installing and using the Styler.
Clearances
Recommended Installation Spacing
CAUTION
• The floor must be level, with a maximum slope of 1 inch (2.5 cm) under the Styler. If the
slope is greater than 1 inch (2.5 cm), the appliance cannot be leveled properly.
• Do not install the Styler on a hollow or flexible platform. Doing so may cause excessive
noise and vibration and result in damage or injury if the product tips over.
The installation requires:
yA grounded electrical outlet located within
2 ft. (61 cm) of either side of the appliance.
yA sturdy floor to support the total ap-
pliance weight of 183 lbs (83 kg). The
combined weight of any other laundry ap-
pliances should also be considered.
2
3
/
64
in.
(52 mm)
15
5
/
32
in (385 mm)
56½ in.
(1435 mm)
16
5
/
16
in.
(415 mm)
72
13
/
16
in.
(1850 mm)
23 in.
(585 mm)
WARNING
• Do not install or store the Styler in an area where it will be exposed to water and/or
weather. Failure to follow this warning could result in risk of electric shock, injury, or product
damage or malfunction.

12
yFor closet installation, with a door,
minimum ventilation openings in the
top and bottom of the door are required.
Louvered doors with equivalent ventilation
openings are acceptable.
Closet Ventilation Requirements
Closets with doors must have both an upper
and lower vent to prevent heat and moisture
buildup in the closet. One upper vent opening
with a minimum opening of 48 sq. in. (310 cm2)
must be installed no lower than 6 feet above the
floor. One lower vent opening with a minimum
opening of 24 sq. in. (155 cm2) must be installed
no more than one foot above the floor. One
example shown uses vent grilles in the door.
Installation Spacing for Recessed Area or Closet Installation
There should be at least a little space around the Styler (or any other appliance) to avoid contact with
walls, furniture, or other appliances during operation. Allow a minimum of 1 3/16 inch (3 cm) on all sides
of the Styler to avoid increased noise or damage.
48 sq. in.
(310 sq. cm)
24 sq. in.
(155 sq. cm)
3"
(7.6 cm)
3"
(7.6 cm)
Vent
Vent
in.
in.
closet door vent
requirements
7 3/4 in.
(20 cm)
2 in.
(5 cm) 2 in.
(5 cm)
18 in. (46 cm)
in front
25 ½ in.
(650mm)
18 in. (455mm)
10 in. (250mm)
Built-In Installation
Wall
Wall
①
②
2 in. (50 mm)
1 3/16 in. (30 mm)
1 in. (25 mm)
1 3/16 in. (30 mm)
Wall
Ceiling
The following clearances are recommended for
the Styler. Although the Styler has been tested
for clearances of 13/16 inch (3 cm) on the sides
and rear, recommended clearances should be
considered for the following reasons:
yAdditional space should be considered for
ease of installation and servicing.
yAdditional space might be required for
wall, door and floor moldings.
yAdditional space should be considered
on all sides of the Styler to reduce noise
transfer.
yAdditional laundry appliance spacing
should also be considered.
yMinimum vent opening for built-in
installation is 31 ½sq. in. (200 cm2).
74.4 in. (1,
890 mm)
19 in. (485 mm) 24.8 in. (630 mm)
73.8 in. (1,875 mm)
18 in. (455 mm)
1850mm
445mm 585mm
15.75 in. (400 mm)
2 in. (50 mm)

13
LEVELING THE STYLER
yThe appliance is heavy. Two or more
people are required when installing the
Styler. Failure to follow this warning can
cause serious injury or death.
yTo ensure that the Styler provides optimal
performance, it must be level. To minimize
vibration, noise, and unwanted movement, the
floor must be a perfectly level, solid surface.
1 PositiontheStylerinthenallocation.
Checktomakesureitislevel.Ifinstalling
oncarpet,seeInstalling on Carpetingrst.
yAll leveling feet must rest solidly on the
floor. Gently push on the corners of the
Styler to make sure that it does not rock
from corner to corner. Make sure there are
no gaps between the front leveling feet
and the floor.
2 Usethewrench(packagedwiththe
manual)toturnthelevelingfeet.
Unscrew the front feet to raise the Styler or
screw in the feet to lower it. If unable to level
the unit using only the front feet, install the two
rear leveling feet by tipping the unit. Do not lay
the unit down to install the leveling feet.
Raise or lower the unit using the leveling
feet until the Styler is level from side to side
and front to back.
3 WhentheStyleriscompletelystableand
alllevelingfeetarerestingsolidlyonthe
oor,tightenthelockingnuts.
NOTE
Adjust the leveling feet only as far as
necessary to level the Styler. Extending the
leveling feet more than necessary can cause
the Styler to vibrate.
locking
nut
WARNING
yTo reduce the risk of injury to persons,
adhere to all industry recommended safety
procedures including the use of long-sleeved gloves
and safety glasses. Failure to follow this warning can
cause serious injury or death.
WARNING
yThe Styler is heavy. Use two or more
people if installing the rear leveling
feet. Failure to do so can result in back
injury or other injury.
yKeep the Styler upright when moving
and installing it. If you lay the Styler on
its side, refrigerant may leak and cause
the appliance to malfunction.
CAUTION
Make sure that all leveling feet are in firm contact
with the floor. If the Styler is used without leveling, it
may fall, causing injury, damage, or product malfunc-
tion.

14
REVERSING THE DOOR
It is possible to reverse the direction of the door
swing. This should be done by the installer at the
time of installation, if desired.
INSTALLING ON CARPETING
If installing the Styler on carpeting, follow these
instructions.
1 Movetheunitintoitsnallocationusing
thebackrollers.
2 Installthetworearlevelingfeet.
Tip the unit, do not lay it down, to install the
leveling feet.
3 Leveltheunitfollowingtheinstructionsin
Leveling the Styler.
4 Installthefourcarpetspikes
ontheendsoftheleveling
feet,withtheshorter,
octagonalfacestowardthe
front.
5 Afterthespikeshavebeeninstalled,the
Stylermayneedtobeleveledagain.
If the carpet has very deep pile or padding,
the front feet may need to be extended
slightly to install the drip tray.
• Be sure to check and empty the drip tray
often.
• Do not open the unit during operation to avoid
condensation forming on carpet surface,
which may result in surface mold or mildew.
• Keep the bottom of the cabinet dry when
filling or emptying water tanks. Keep the
outside of the water tanks clean and dry to
discourage growth of mold or mildew.
USING NON-SKID PADS
(OPTIONAL)
Non-skid pads prevent the product from shaking
or shifting when opening or closing the door.
1 Clean the floor to attach the non-skid pads.
Use a dry rag to remove and clean foreign
objects or moisture. If moisture remains, the
non-skid pads may slip.
2 Adjust the level after placing the Styler in
the installation area.
WARNING
Do not attempt to reverse the door
swing yourself. If the direction of the
door swing needs to be changed after installation,
contact the LG Customer Information Center at
1-800-243-0000 (USA) or 1-888-542-2623 (Canada).
front
WARNING
yThe Styler is heavy. Use two or more
people to install the rear leveling feet and
carpet spikes. Failure to do so can result in
back injury or other injury.
yKeep the Styler upright when moving and installing it.
If you lay the Styler on its side, refrigerant may leak and
cause the appliance to malfunction.
WARNING
yTake care when handling the carpet
spikes. They are designed to pierce through
the carpet backing and pad and are very
sharp.
yKeep fingers and hands out from under
the spikes when setting the unit in place to
avoid personal injury or product damage.

15
3 Place the adhesive side of the non-skid
pad on the floor.
4 Recheck the Styler's levelness.
Push or rock the edges of the appliance
gently to make sure that the Styler does not
rock. If the Styler rocks, level the appliance
again.
• The pads may leave a sticky residue when
they are removed. The residue can be
removed with alcohol.
INSTALLING THE ANTI-TIP DE-
VICE
• Appliances can tip, resulting in damage or
injuries. Do not operate the unit without
the anti-tip device in place and engaged.
If an anti-tip device is not properly installed,
the appliance could be unexpectedly tipped
by a child or adult standing, sitting, leaning, or
placing excessive weight on an open door or
the interior parts.
• Install the anti-tip device packed with the
Styler to reduce the risk of tipping.
Refer to the instructions provided with the anti-
tip kit for proper anti-tip device installation.
• Check that the anti-tip device is properly
installed.
With the appliance in its final location, make
sure that the slide adjuster on the cord is
adjusted until there is about one inch of slack
in the cord.
• The use of the anti-tip device does not
preclude tipping of the appliance when it is
not properly installed.
ASSEMBLING THE DRIP TRAY
Before using the Styler, insert the drip tray onto
the bottom of the cabinet.
1 Holdthetraysothearrowandletteron
thefrontofthetrayfaceup.
2 Insertonesideofthetrayrst,then
theother.Pushthetrayuntilitslides
completelyin.
3 Todetach,pullonesideoutthentheother.
If the tray collects water, detach it and empty
the water. After emptying it, re-assemble the
tray.
• Do not operate the Styler without
installing the drip tray. Doing so could lead
to water damage caused by leaking.
INSTALLING CAP COVERS
1 Lineupthenubsonthecap
withtheholesinthetop
cornerofthecabinet.
2 Snapthecapintoplace.
Repeatwiththeremainingcap
ontheothercorner.
INSTALLING HINGE
COVERS
1 OpentheStylerdoor.
2 Snapthehingecoverwiththebentedge
ontothelowerhingeassembly.
3 Snaptheremaininghingecoverontothe
upperhingeassembly.
Remove
backing
This side up
Adhesive
side
Top Assembly
Lower Assembly

16
OPERATION
BEFORE USE
Clean the Styler.
Clean the Styler thoroughly and wipe off all dust that accumulated during
shipping. See Maintenance, page 37. Do not plug in or operate the appliance until
the interior and exterior have thoroughly dried.
Connect the power supply.
Check if the power supply is connected before use.
Wash dirty clothes if necessary before putting them in the
Styler.
The Styler does not have a washing function. Stains and loose dirt from
one item may transfer to others during a cycle. Wash or brush off dust
and dirt, or spot-clean items, to avoid setting stains or transferring dirt or
odors.
CAUTION
yDo not scratch the Styler with a sharp object or use a detergent that contains
alcohol, bleach, a flammable liquid or an abrasive when removing any tape or
adhesive from the Styler,.
yDo not peel off the model or serial number label or the technical information
on the rear surface of the Styler.
NOTE
Remove adhesive residue by wiping it off with your thumb or dish detergent.
Unpack accessories.
Unpack the shelf and hangers. For instructions on installing or using accessories,
see Loading the Styler, pages 25-28. Accessories can be purchased separately
from the LG Customer Information Center. Call 1-800-243-0000 (USA) or
1-888-542-2623 (Canada).
Assemble the drip tray.
Insert the drip tray at the bottom of the cabinet. See
Assembling the DripTray, page 18.

17
1PREPARE ITEMS
• Wash clothes first, if needed.
• No heat-sensitive items or items that can be damaged by exposure
to water. See Choosing Styler-Safe Clothing, page 21.
• Place items on hangers or the shelf.
• Fasten buttons and close zippers to keep items on moving hangers
and prevent damage.
2 CLEAN LINT FILTER, CHANGE SHEET IN AROMA FILTER
Lift out filter and remove lint from last load for faster and more efficient
performance. Reinstall filter, checking alignment when closing grill. Do
not operate the Styler without the lint filter in place. See Checking the
Lint Filter, page 24. If using a fabric softener sheet in the aroma filter,
change it after every use. See Changing the Aroma Sheet, page 24.
3CHECK WATER TANKS
Fill water supply tank if needed. Empty water drain tank if needed. Use
clean tap water in the supply tank for better product performance and
lifespan. Do not use distilled water or reuse water from the drain tank.
See Checking the WaterTanks, page 25.
4 LOAD STYLER
Pay attention to fabric care labels and cycle choice. If clothing is
not appropriate for the cycle selected, it may shrink or be seriously
damaged. See Loading the Styler, page 25.
Remove all empty hangers to avoid noise, friction, and damage to clothing.
5 TURN ON STYLER
Touch POWER to turn on the Styler.
6 SELECT CYCLE
Touch icons to select desired cycle and settings. See the Cycle
Guide, page 32.
7BEGIN CYCLE
Touch and hold START/PAUSE to begin cycle. Pause cycle at any time
by touching START/PAUSE again. Restart cycle within four minutes of
pausing it, or the Styler shuts off and settings are lost. Do not open door
during cycle. If steam or hot air escape from open door, condensation may
collect on floor or walls, resulting in damage or mold.
8 END OF CYCLE
Remove items when cycle finishes. Leave door open to let hot air
escape. Interior light shuts off after 4minutes if door is left open.
USING THE STYLER

18
SORTING LOADS
Fabric Care Labels
Most articles of clothing feature fabric care
labels that include instructions for proper care.
Below are some of the symbols that are relevant
to choosing appropriate items for the Styler.
fabriccarelabelsthatcanbeusedwiththe
category label meaning Styler
Fabric Care Labels
washing
labels
Fabric Care Labels
hand wash
Fabric Care Labels
machine wash,
normal cycle
Fabric Care Labels
perm press/wrinkle
resistant
Fabric Care Labels
gentle/delicate
Fabric Care Labels
do not wash *
drying
labels
normal
permanent press/
wrinkle resistant
gentle/delicate
do not tumble dry
do not dry NO
line/hang dry
drip dry
dry flat
dryer
heat setting
labels
high
medium
low
no heat/air dry NO
*Some items such as fur and leather which are labeled
as do not wash can be used with the Styler. See the
Fabric Care Guide on pages 23–24.
Grouping Similar Items
• For best fabric care results, always treat fabrics
with similar care requirements together.
• Different fabrics have different care
requirements, and some fabrics cannot be
treated in certain Styler cycles or should be
treated separately.
Choosing Styler-Safe Clothing
Some items are not appropriate for use with this
product.
• Do not put the following items in the Styler.
category non-Stylable items
clothes starched clothes, vinyl
bedding/
blankets
electric blankets, heavy blankets
(double layer or over 3.3 lb [1.5
kg])
other shoes, items made with sponge
rubber, items with adhesives
• Follow fabric care labels.
• Don’t put items that are sensitive to heat
or are not suitable for washing with water
in Styler cycles that use steam. Use the
Gentle Dry cycle only.
• Fur, leather, and silk items should only be
treated with the Air Fresh cycle. This cycle
is a downloadable cycle. See Downloading
Styler Cycles, page 38.
• Using the wrong cycle for items can result
in damage to fabrics.
• Wash heavily soiled or stained clothes
before putting them in the Styler. The
Styler does not have a washing function.
Loose soil or stains can be transferred
between garments during cycles.
• Treat items with an unpleasant odor in
a separate load. Odors can be transferred
between items during cycles.
• Some odors can be difficult to remove.
Odors from oily substances may be difficult for
the steam to penetrate. Odors from extended
storage may also be difficult to remove.
• Wrinkles may remain in some items.
Wrinkles caused by extended storage may
be difficult to remove. Wrinkles in cotton or
linen may not be removed completely.

19
FABRIC CARE GUIDE
fabric clothes
Refresh cycle Sanitary
cycle
Gentle
Dry
cycle comments
removing
wrinkles removing
odors
natural fibers
vegetable fibers
cotton
towels, socks,
underwear,
jeans,
sportswear,
t-shirts,
blankets
● ● ●
Wrinkles may
remain in 100%
cotton fabrics.
Iron after cycle, if
desired.
linen,
hemp,
ramie
summer
clothes,
tablecloths ● ● ●
Some wrinkles
may remain. Make
sure fabrics are
washable/hand
washable if using
Refresh/Sanitary
cycles. Lay clothes
on shelf if delicate.
Do not style
starched clothes.
animal fibers
alpaca,
camel
hair,
cashmere
coats, suits § § § ●Lay knits on the
shelf. Alpaca and
camel hair shrink
in hot water.
scarves,
knitwear §●
fur,
leather coats, scarves ●*
*Only use
downloaded Air
Fresh cycle (low
temperature
drying).
silk
silk neckties,
ribbons,
scarves,
blouses, silk
velvet/plush
●*
*Only use
downloaded Air
Fresh cycle (low
temperature
drying).
wool
sweaters,
knitwear §●Lay knits on shelf.
Some wool shrinks
when washed in
hot water. Make
sure fabrics are
washable/hand
washable if using
Refresh/Sanitary
cycles. Gentle Dry
cycle is safe for
most.
winter
coats, suits,
sportswear,
uniforms
● ● ● ●
= yes
§ = check label
*Control Lock
*Control Lock
*Control Lock

20
fabric clothes
Refresh cycle Sanitary
cycle
Gentle
Dry
cycle
comments
removing
wrinkles removing
odors
man-made fibers
acetate
suit lining,
blouses,
neckties,
pajamas
● ● ● ●
acrylic
thermal
underwear,
knitwear
● ● ● ● Lay clothes on
shelf
nylon
stockings,
lingerie ● ● ● ● Lay clothes on
shelf
sportswear,
curtains ● ● ● ●
polyure-
thane
stretchable
clothing
(containing
less than 5%)
● ● ● ●
If the item contains
more than 5%
polyurethane
(swimwear), check
label for care
rayon suit lining ● ● ● ●
• Fabrics come in a wide variety of weights and finishes and can have different care requirements
for each variety. It is difficult to cover them adequately in this manual. Before using the Styler with
any item, check the care label before proceeding. Do not put items that are not colorfast, are heat-
sensitive, or are not suitable for washing with water in the Refresh or Sanitary cycles. Do a water blot
test on a small, inconspicuous spot (an inside seam) to determine if the fabric is colorfast. For further
assistance, consult the clothing manufacturer, a dry cleaning professional, or a more detailed fabric
care guide.
• Using the Styler with items that are not colorfast may result in damage to the items and staining from
fabric dyes on the interior of the cabinet. These stains will not affect the operation of the Styler. Use
toothpaste to remove stains from interior of cabinet.
• The Styler does not have a washing function. Wash soiled items before use.
= yes
§ = check label
*Control Lock
*Control Lock
*Control Lock
FABRIC CARE GUIDE (CONTINUED)
Other manuals for S3RERB
3
Table of contents
Other LG Kitchen Appliance manuals