manuals.online logo
Brands
  1. Home
  2. •
  3. Brands
  4. •
  5. LG
  6. •
  7. Plasma TV
  8. •
  9. LG 42PX7DCV-UA User manual

LG 42PX7DCV-UA User manual

PLASMAW
lnual carefully and completely before
reference.
number of the TV in the
cover and relate this
uire service.
f
WARNING/CAU_ON
WARNING/CAUTION:
TO REDUCE THE R_SK OF ELECTRIC SHOCK DO NOT REMOVE COVER (OR BACK)_ NO USER
SERVICEABLE PARTS INSIDE. REFER TO QUALIFIED SERVICE PERSONNEL.
A he lightning flash with arrowhead symbol, within an equilateral triangle, is intended to alert the user to
the presence of uninsulated 'dangerous voltage" within the product's enclosure that may be of suffi-
cient magnitude to constitute a risk of electric shock to persons
The exclamation point within an equilateral tdangle is intended to alert the user to the presence of
important operating and maintenance (servicing) instructions in the literature accompanying the appiio
ante
WARNING/CAUTION:
TO PREVENT FIRE OR SHOCK HAZARDS, DO NOT EXPOSE THIS PRODUCT TO RAiN OR MOISTURE.
FCC NOTICE
A Class Bdigital device
This equipment has been tested and found to comply with the limits for a Class B digital device, pursuant to Part
15 of the FCC Rules. These timits are designed to provide reasonable protection against harmful interference in
a residential installation. This equipment generates, uses and can radiate radio frequency energy and, if not
installed and used in accordance with the instructions, may cause harmfuI interference to radio communications
However, there is no guarantee that interference wil! not occur in a par'dcular install_ion, ff this equipment does
cause harmful interference to radio or television reception, which can be determined by turning the equipment off
and on, the user is encouraged to try to correct the interference by one or more of the following measures:
- Reorient or relocate the receiving antenna
- lncre_e the separation between the equipment and receiver.
- Connect the equipment into an outlet on a drcuit different from that to which the receiver is connected.
- Consult the dealer on an experienced radio,q'v technician for help
• Any changes or mod;ifications not expressly approved by the party responsible for compli-
ance could void the user's authority to operate the equipment,
CAUTION:
Do not attempt to modify this product in any way w_out wr_en a_hodzatiee from LG E[_ron_s, Una_ho_zed mod-
ffic_on could void the user's authority to operate this product.
COMPLIANCE:
The respenaible pa_ for this product's compliance is:
LG El_ronics US.A., _nc
1000 Sy_an Avenue, Englewood Cliffs, NJ 07632
1-800-243-_
h t_ ://www J_ommer cial,com
WARNI NGICAUTION
TO REDUCE THE RISK OF FiRE AND ELECTRIC SHOCK, DO NOT EXPOSE THIS PRODUCT TO
RAiN OR MOISTURE.
J
2 Plasma TV
f
In mons
IMPORTANT SAFETY _NSTRUCTIONS
_mportant safety instructions shal_ be provided with each appar_us. This information sha41 be given in a separate booklet or
sheet or be _ocated _fore any operating instructions in an instruction for installation for use and supplied with the appara-
tus. This information shaIF be given in a _anguage acceptable to the country where the apparatus is intended to be used. The
important safety instructions shatl be entitled 'Important Safety Instructions _._e following safety instructions shall be includ-
ed where app}icab_e, and, when used shall be verbatim as fol_ows, Additional safety information may be included by adding
statements after the end of the following safety instruction list At the manufactt_rer's option, a picture or drawing that illus-
trates the intent of a specific safe_ instruction may be placed immediately adjacent to that safety instruction :
1. Read these instructions.
2. Keep these instructions.
3. Heed all warnings.
4. Follow all instructions.
5. DO not use this apparatus near water.
6. Clean only with dry cloth.
7. Do not block any ventilation openings. Install in accordance with the manufacturer's instructions.
8. DO not instati near any heat sources such as radiators, heat registers, stoves, or other apparatus (including ampii-
tiers)that produce heat.
9_ Do not defeat the safety purpose of the polarized or grounding4ype plug. A polarized plug has two blades with
one wider than the other. A grounding type plug has two blades and a third grounding prong, The wide blade or the
third prong are provided for your safety. If the provided plug does not fit into your outlet, consult an electrician for
replacement of the obsolete outlet.
10. Protect the power cord from being walked on or pinched particularly at plugs, convenience receptacles, and the
point where they exit from the apparatus.
11. Only use attachments/accessories s_cified by the manufacturer.
12. Use only with the cart, stand, tripod, bracket, or table specified by the manufacturer, or sold with the apparatus.
When a cart is used, use caution when moving the caWapparatus combination to avoid injury from tip-over.
PO(G'ABLE CAR'_ WAYCNING
Owner's Manual 3
Ions
F
13, Unplug this apparatus during lightning storms or when unused for long periods of time.
t4. Refer all servicing to qualified service _rsonneL Servicing is required when the apparatus has been damaged
in any way, such as power_supply cord or plug is damaged, liqatd has been spilled or objects have fallen into
the apparatus, the apparatus has exposed to _in or moisture, d;_s not operate normally, or has been dropped.
15. CAUTION concerning the Power Cord :
Most appliances recommend they _placed upon adedicated circuit; that
is, a s_ngle outlet circuit which powers only that appliance and has no
additional outlets or branch circuits. Check the specification page of
this owner's manual to be certain.
Do not overload wall outlets_ Overloaded wall outlets, loose or dam_ed
wag outlets, extension cords, frayed power cords, or damaged or
cracked wire insulation are dangerous. Any of then conditions could
result in electric shock or ffre_ Periodically examine the cord of your
appliance, and if its appearance indicates damge or deterioration,
unplug it, discontinue use of the appliance, and have the cord replaced
with an exact replacement pad by an authorized servicer.
Protect the power cord from physical or _chanical abuse, such as being
twisted, kinked, pinched, closed in adoor, or walked upon. Pay
parUcular attention to ptugs, wall outlats, and the point where the
cord exits the appliance.
16, Outdoor Use Marking :
WARNING =To Reduce The Risk Of Fke Or E_ectric Shock, Do Not Expose This Appliance To Rain Or Moisture.
17. Wet Location Marking :
Apparatus shall not _ exposed;to dripping or splashing and no objects _ed with Hquids, such as vans, shall
be ptaced on the apparatus_
4 Plasma TV
Warning/Caution ................................ 2
Safety instructions ............................. 3~4
Introduction
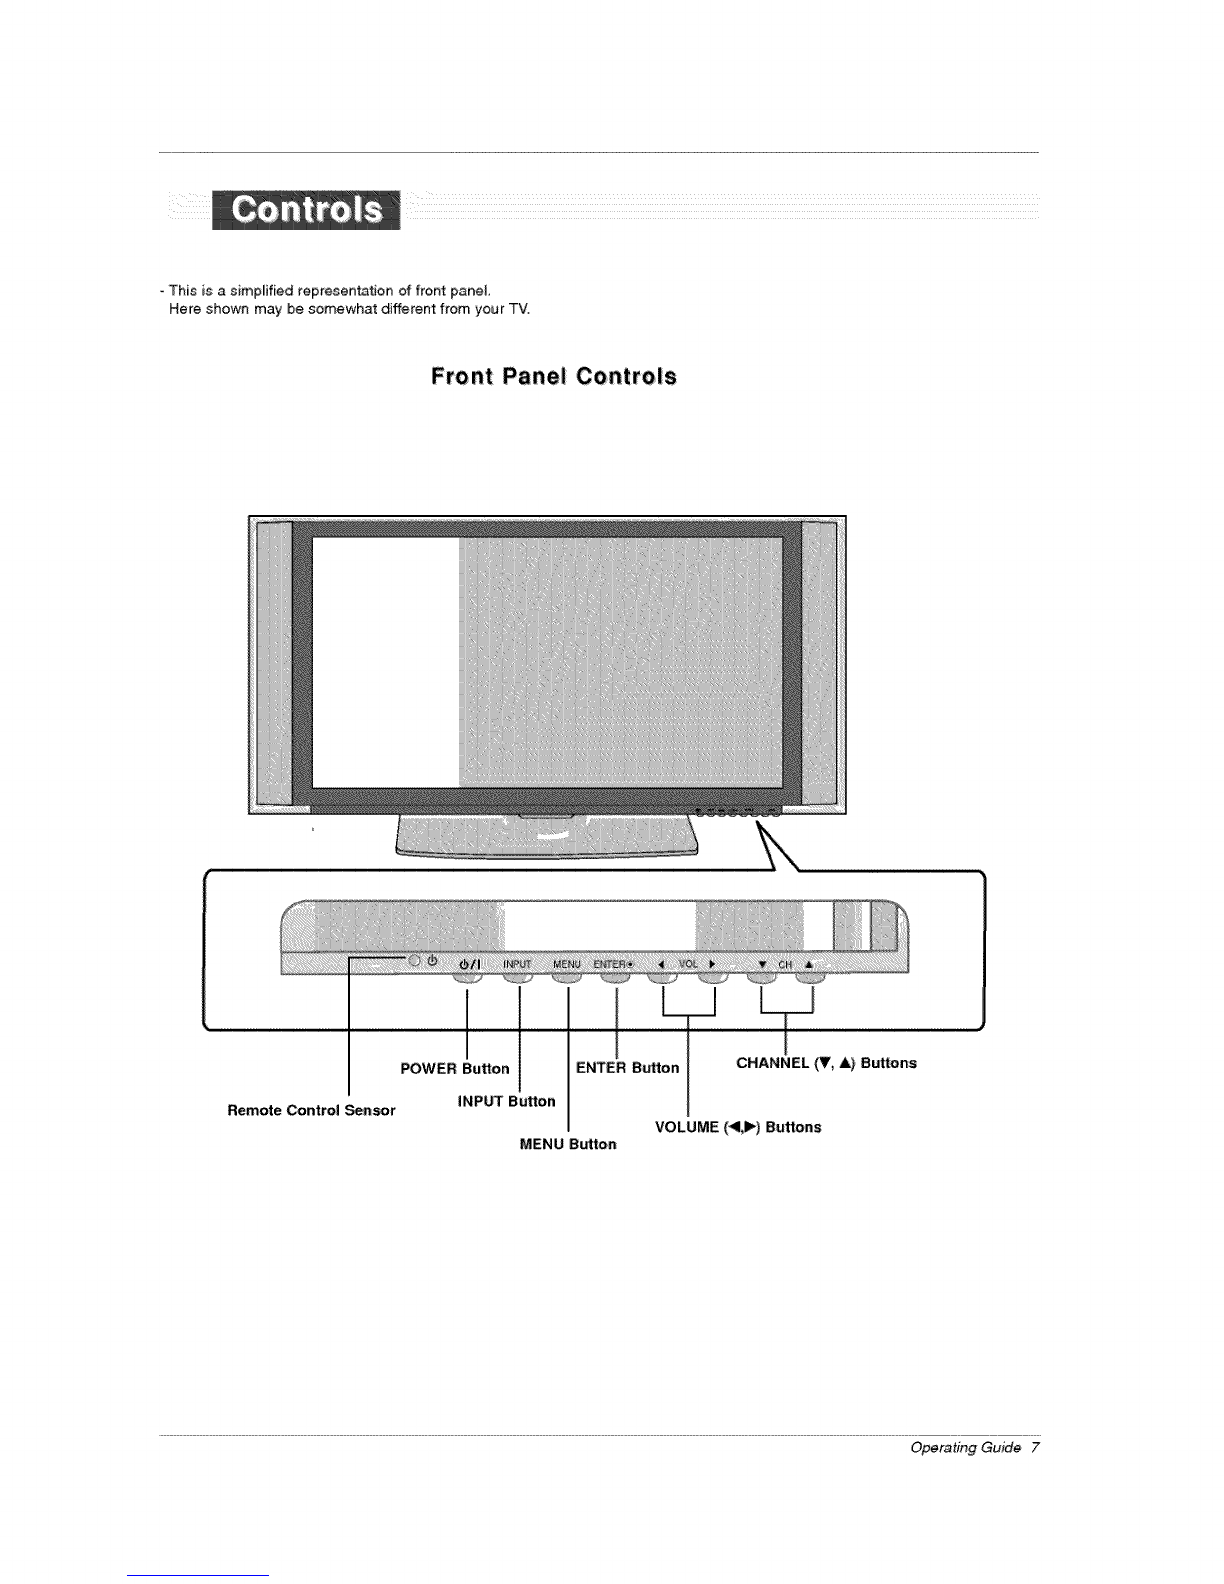
Controls ........................... 7
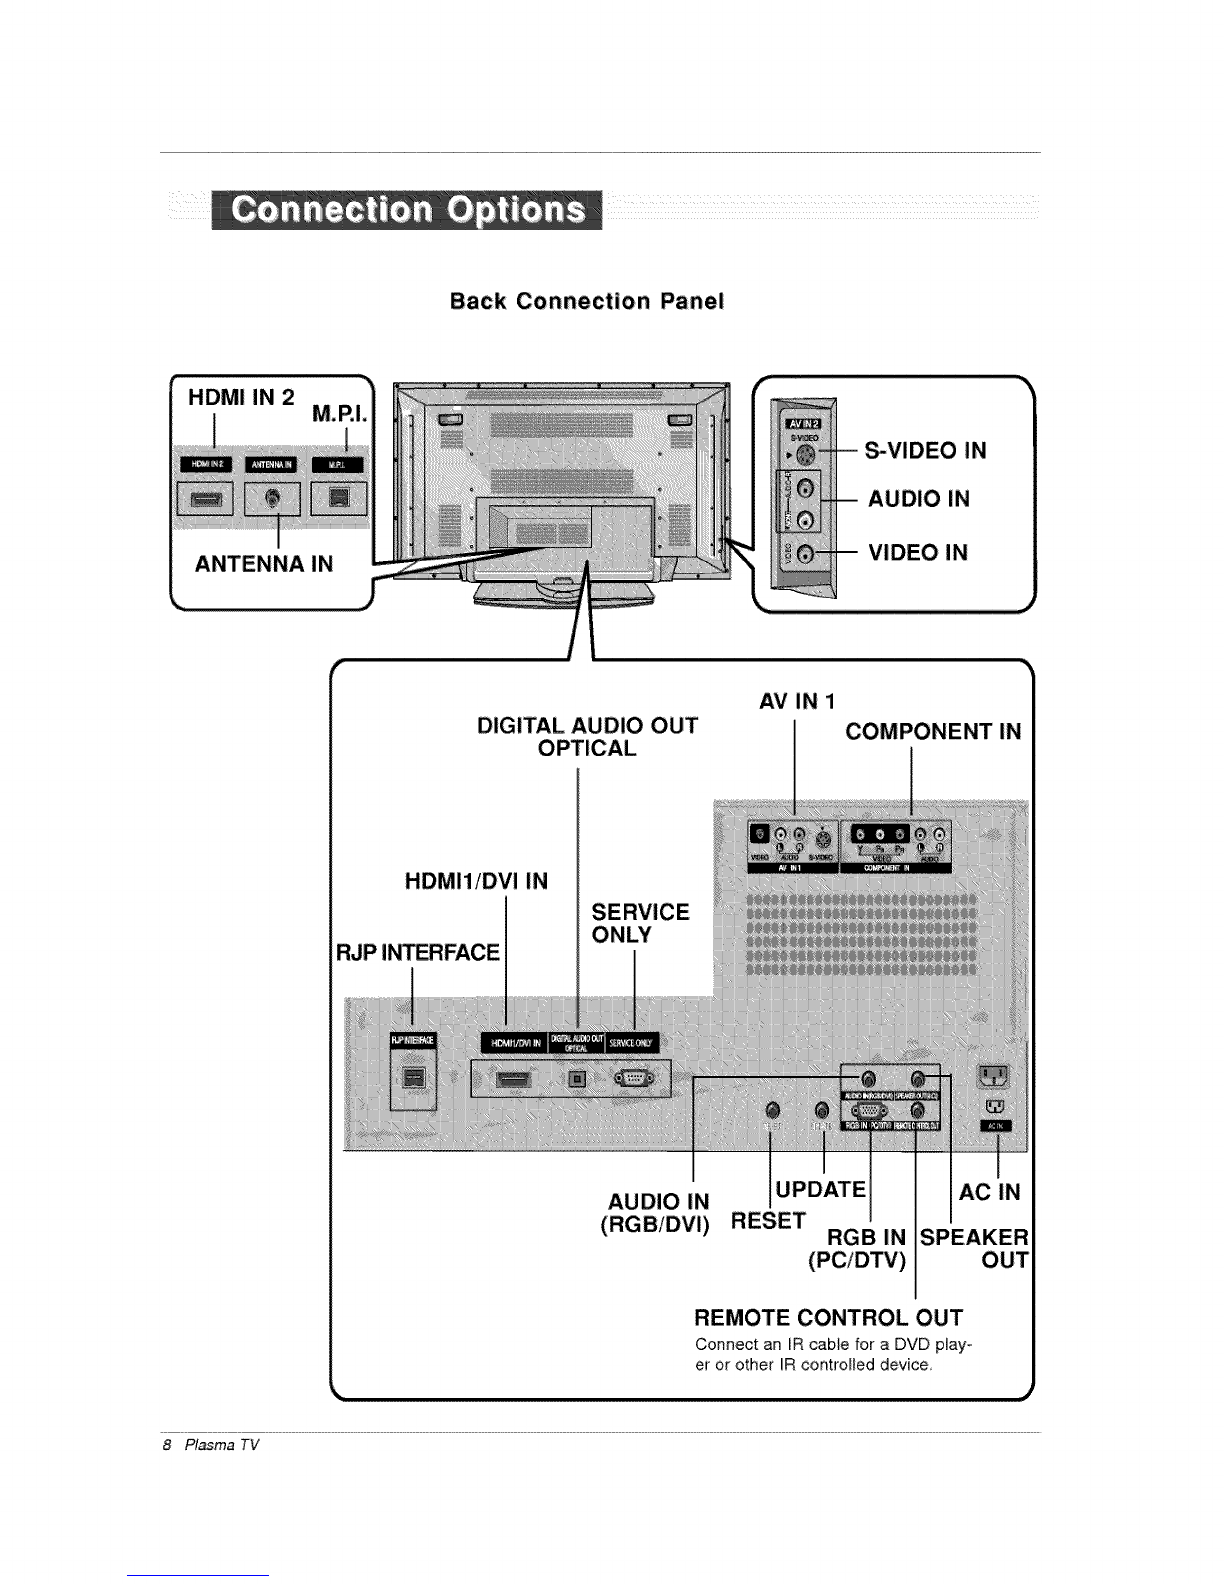
Connection Options ................... 8
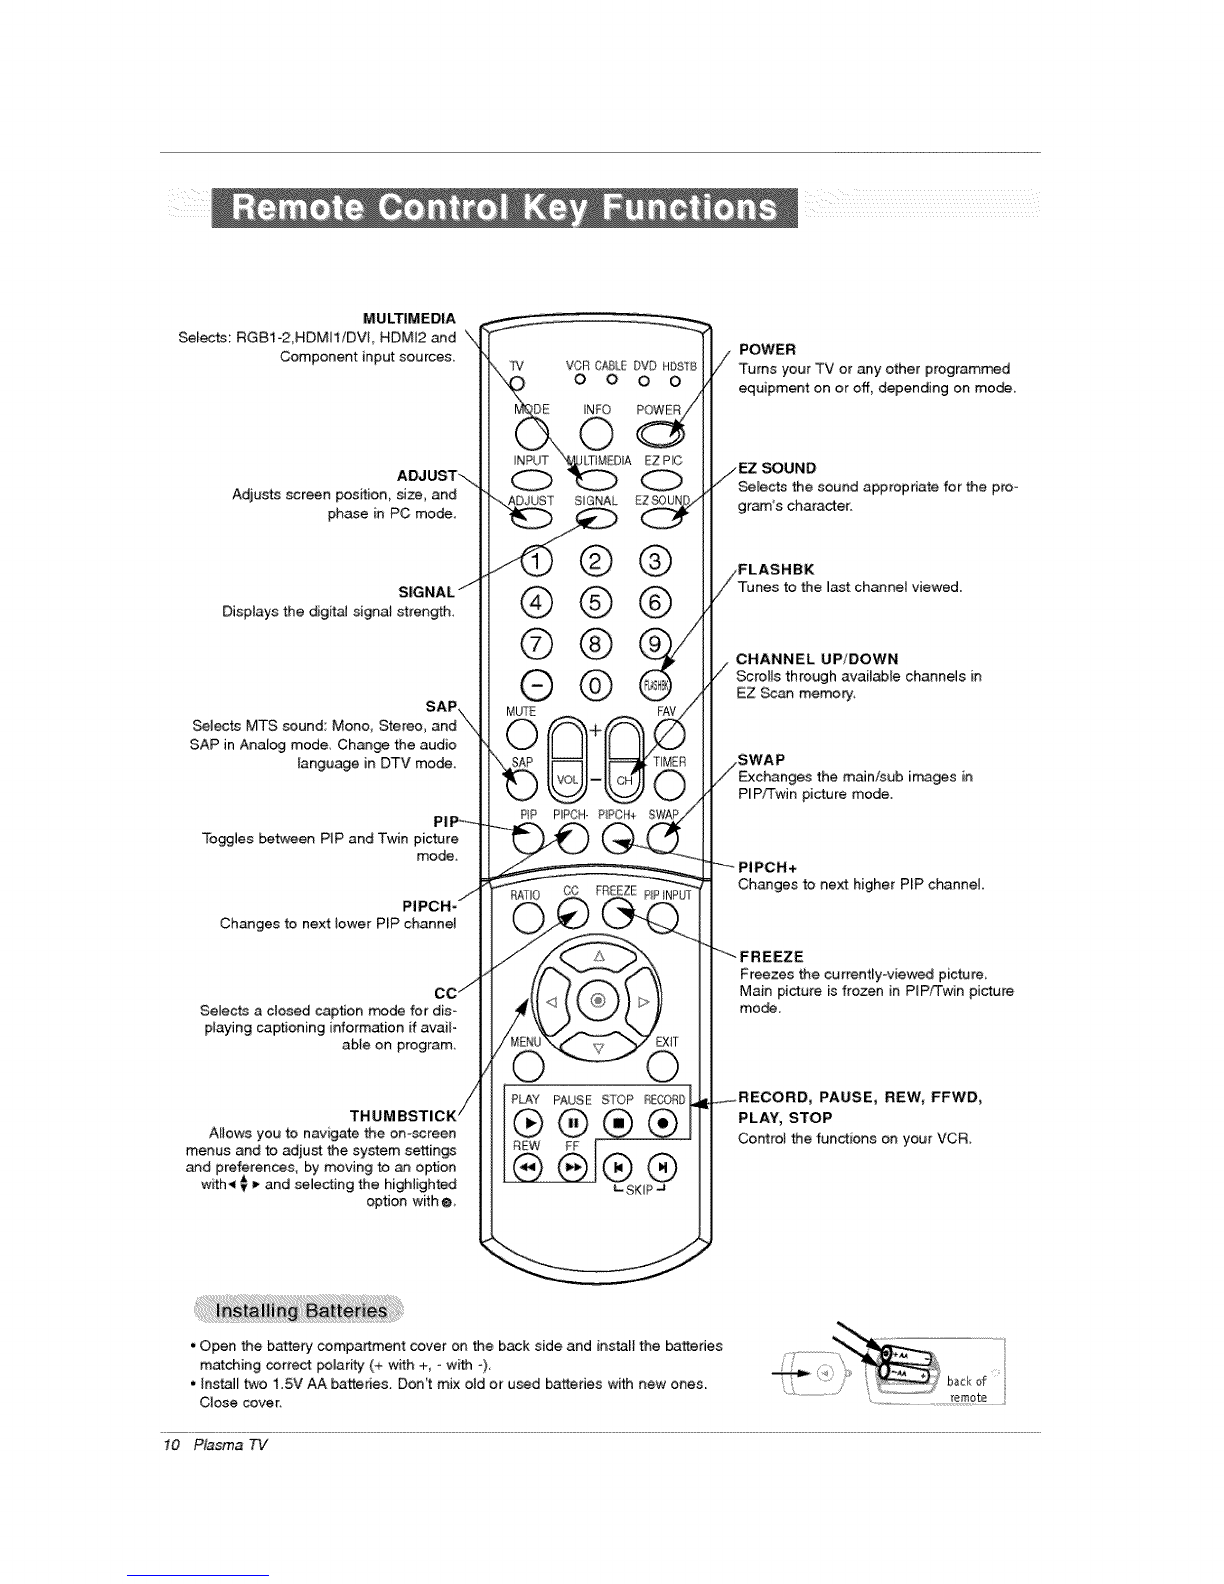
Remote Control Key Functions .......... 9~10
Installation
Accessories .............................. 11
Installation Instructions
Joining the T\J assembly to the wa_t to protect the set
tumbling ................................ 11
Desktop Pedes_l Ins_iation ................ 12
External Equiprr_nt Connections
Antenna Connection ..................... 13
VCR Setup ...................... 14
External AN Source Setup ................ 14
DVD Setup ............................. 15
HDSTB Setup ........................ 16
PC Setup ............................ 17~18
Digita_ Audio Output ...................... 19
Operation
Turning the TV On ........................ 20
On-screen Menus Language Selection .......... 20
Setup Menu Options
EZ Scan (Charmel Search} ................ 21
Manual Scan ...................... 21
Channel Edit ........................... 22
DTV Signai Strength ...................... 22
Channel _J Setup .................. 23
Main Input ...................... 23
Sub Input .............................. 24
Set ID ................................ 24
Video Menu Options
EZ Picture ............................ 25
Manual Picture Control (Custom Option} ...... 25
Color Temperature Control ................ 25
Video Recet ............................ 25
Audio Menu Options
Audio Language ........................ 26
EZ SoundRite /EZ Sound ................. 26
Manual Sound Control (Custom Option} ...... 26
Front Surround ......................... 27
TV Speakers On!Off Setup .............. 27
BBE ........................... 28
Stereo/SAP Broadcasts Setup ............ 28
Time Menu Options
Auto Clock Setup ......................... 29
Manual Clock Setup ...................... 29
On/Off Timer Setup ..................... 29
Sleep Timer /Auto Off ..................... 30
Option Menu Features
Aspect Ratio Control ..................... 31
Cinema 3:2 Mode Setup .................. 31
Caption ............................... 32
Caption /Text ........................ 32
Caption Option ....................... 33
tSM Method ............................ 33
Low Power ........................... 34
Lock Menu O_ions
Parental Lock Setup ..................... 36
Bdef hfo .............................. 37
Mute .................................. 38
Freeze, . ................................. 38
Screen Setup for PC mode ................... 39
Key Code ................................... 40
Programming the Remote ...................... 41
Programming Codes ....................... 42~43
Troubleshooting Checklist ...................... 44
Maintenance ................................. 45
Product Specifications ............................ 46
Warranty ................................. 47~48
After reading this manual, keep it handy for future reference,
Owner's Manual 5
What is a Plasma Display Panel (POP)?
Aplasma display panet is the latest display tachno_o_ and the best way to achieve flat panel displays with excellent image quality
and large screen sizes that are easity viewabte_ The PDP can be thought of as a descen_nt of the neon _ampand it can be also
be viewed as a series of fluorescent lamps.
How does it work?
PDP is an array of cells, known as pixels_ which are comprised of 3sub pixe_s, corresponding to _e colors red green, and blue_
Gas in a plasma state is used to react with phosphors ineach sub-pixel to produce colored _ight(red_ green, or Mue)_These phos-
phors are the same types used in Cathode Ray Tube (CRT) devices such as televisions and common computer monitors
You get the rich, dynamic colors that you expect, Each sub-pixel is individually controlled by advanced electronics to produce over
16 million different colors. Afi of these mean that you get perfect images that are easily viewaMe in a dispiay that is tess than 5
inches thick,
160 _ - Wide angle range of vision
Your fiat panel p[asrr_ascreen offers an exceptionally broad viewing _g[e -- over 160 degrees. This means that the dispfay is
clear and visible to viewers anywhere in the room who can see the screen.
Wide Screen
The screen of the Plasma Display is so wide that your viewing experience is as ff you are in a theater.
Multimedia
Connect your piasma display to a PC and you can use it for conferencing, games_ and lntemet browsing.
Versatile
The iight weight and thin size makes it easy to instal[ your plasma display in a vadety of locations where conventional TVs wi_ not
fit
The PDP Manufacturing Process: a few minute colored dots may be present on the POP _reen
The PDP (Plasma Display Panel), which is the display device of this product, is composed of 0.9 to 2.2 million ceils. A few ceil
defects wil_ normally occur in the PDP manufacturing process, Severa_ tiny, minut_ colored dots visible on the screen should be
acceptable. This _so occurs in other PDP manufacturers' products. The tiny dots appearing does not mean that this PDP is defec-
five. Thus a few cell defects are not sLffficient cause for the PDP to be exchanged or returned. Our production tecfhnology mini
mizes these ee_l defects during the manufacture and operat]ee of this product.
6 Plasma TV
-This is a simpEfied representation of front panel.
Here shown may be somewhat different from your TV.
Front Panel; Controls
POWER Button
iNPUT Button
Remote Control Sensor
ENTER Button
MENU Button
r
CHANNEL Of, A) Buttons
VOLUME (<UI_) Buttons
Operating Guide 7
Back Connection Pane|
HDMI IN 2 M.P.I
DIGITAL AUDIO OUT
_VIDEO IN
AUDIO IN
VIDEO IN
AV IN 1
COMPONENT IN
HDMI1/DVI IN
RJP IN_RFACE ONLY
AUDIO IN
RGB IN
(PC/DTV)
REMOTE CONTROL OUT
Connect an IR cable for a DVD play-
er or other IR controEled device,
OUT
8 Plasma TV
i
-When using the remote control, aim it at the remote control sensor on the TV.
MODE %
Select the remate oper ring mode'. TV, \\
VCR, Cable, DVD and Satellite, -\
INPUT.
_ternal input modes rotate in r_ular "\'-\
sequence: Tuner, AV1, AV2, Component,
RG81, RG82, HDMI1iDVland HDMI2
input sources.
(AVl AV2, Component input sources
are tinked automatically only if these are
connected )
NUMBER KEYPAD -_
For direct channel sol.ion and
programming functions.
MUTE ._._
Switches the sound on or off.(Refer to
p,38)
VOLUME UP/DOWN _I""
In_reasesidec_'easesthe sound _veL
RATIO _-...
Changes the screen format or aspect
ratio.
MEN@- .....
Brings up the main menu to the
screen,
SKIP\.
Playing CDs: Select° songs, \
Playing DVDs: Selects movie chapters,
V_ OABLEDVD,HDST
0000
NFO POWER
MULIlMEDA EZPIC
og
ADJUST S_GNAL,
0
@
-®@@
®@@
-
PIP PIPCH° PIPOH+ SWAP
0000
PLAY PAUSE STOP RECORD
®®®®
B@I®®
INDICATOR LIGHTS
/" Show active remote mode every time
any button is pressed,
_- INFO
Display infom_atJon t the top of the screen,
(Refer to p37)
PIC
Selects a factory preset picture mode
depending on the viewing environment,
/FAV
Scrolls the FavorRe channels.
TIMER
Lets you select the amount of time
before your TV turns iSelf off automati-
cally.
/PIP INPUT
_lects the input source for the sub
picture.
--ENTER
When in the menu system and other
on-screen displays, sel_ highlighted
options
"_"" EXIT
Clears all on-screen displays and returns
to TV viewing from any menu,
Owner's Manual 9
MULTIMEDIA
_Fects: RGBi-2,HDMHiDV[ HDM[2 and X
Component input sources.
ADJUST',
Adjus_ screen position, size, and
phase in PC mode,
SIGNAL /
Displays the digita_ signal strength.
SAP\.
Selects MTS sound Mono, Stereo, and
SAP in Analog mode, Change the audio
tanguage in DTV mode.
pIp,_
ToggJes between PIP and Twin picture
mode.
Changes to next lower PIP channei
Selects a closed caption rr#de for dis°
playing captioning information if avail-
abie on program,
AHows you to navigate the on-screen
menus and to adjust the system settings
and preferences, by' moving to an option
with-_ _ _,and selecting the higMighted
option w_h e,
®®
®
PiP PIPCH- P_PCI',_+
PLAY PAUSE STOP RECORD
_EW FF Q
L SKIP _J
POWER
Turns your TV or any other programmed
equipment on or off, depending on mode.
SOUND
Sele_ the sound appropriate for the pro-
gram's character.
FLASHBK
Tunes to the last channel viewed,
CHANNEL UP/DOWN
/Scrolls through avai{able channels in
EZ _an memory,
Exchanges the main/sub imams in
PiPfT'win picture mode.
Changes to next higher P_P channel
Freezes the currentLy-viewed picture
Main picture is frozen in PIP/Twin picture
mode.
PAUSE, REW, FFWD,
PLAY, STOP
Controt the functions en year VCR
•Open the battery compartment cover on the back side and it_s_I the batteries
matching correct _Jar_ (+ with +, °with -),
• Install two 1.5V AA batteries. Don't mix o_d or u_d batteries with new ones. .................../
Close cover.
10 P_smaTV
DVD
How to connect
1 Connect the DVD video outputs (Y, PB, PR) to the COMPO-
NENT (Y, P8 P_) _NPUT jacks on the TV and connect the
DVD audio outputs to the AUDIO 1NPUT jacks on the TV, as
shown in the figure,
2 if your DVD only has an S-Video output jack, connect this t_
the S-VIDEO input on the TV and connect the DVD audio out-
puts to the AUDIO UNPUT jacks on the TV, as shown in the
figure,
Note: ff your DVD player does not have component AV out, use
S-Video
How to use
1. Turn on the DVD p_ayer, insert a DVD.
2 Use the INPUT button on the remote contro_ to seem
Component. (ff connected to SW_DEO, select the AV1 or
AV2 external input source.)
3. Refer to the DVD p_ayer's manual for operating instructions.
* Component Input ports
To get _tter picture quality, connect a DVD pmayer to the compo-
nent input _rts as shown _ow,
Component port_
on the TV
i Video output ports
on DVD p_ayer
DVD
1, Connect the HDMI output of the DVD to the NDMI1/DVI
IN jack on the set.
2, Select HDMI1iDVI or HDMI2 input source with using the
INPUT button on the remote control
3. Refer to the DVD ptayer's manual for operating instruc-
tions,
* TV car receive the video and audio signal simuffa-
neously with using a HDMt cable,
. If the DVD supports Auto HDMI function the DVD
output resolution will be automatic_Hy set to
1280x720 p,
. If the DVD does not support Auto HDMI, you need
to set the output resoluSon appropriately. To get the
best picture quali_¢ adjust the o_put resol_ion of
the DVD to 1280x720p,
Owner's Manual 15
-This TV can receive Digitar Over4he-aidCable signaJs without an external digital set4op box. However, if you _ receive Digital
signals from a digitaJ set4op box or other digital external device, refer to the figure _ shown below.
This TV supports HDCP (High_bandwi¢_h Digital Contents Protection) protocol for Digital Contents (480p 720p,1080i).
How to connect
Use the TV's COMPONENT (y, P_, PR) INPUT,.. RGB or
HDMM/DW jack for video connections, depending on your
set-top box connector. Then, make the corresponding
audio connectJons,
How to use
1. Turn on the digit_ set-top box. (Refer to the owner's
_nual for the digitaJ set4op box.)
2. Use INPUT on the remote control to sele_ Component,
RGB-DTV, or HDMI1/DVI source.
4801 Yes No
480_ Yes Yes
720£ Yes Yes
10801 Yes Yes
Digital Set4op Box
1, Connect the DVI output of the d@tal set4op box to the
HDMI1/DVI IN or HDMI IN 2 iack on the set.
2, Connect the audio output ofthe digitalset4op box to the
AUDIO IN(RGBiDVI) jack on the set,
3. Turn on the digital set4op box. (Refer to the owner's
rr_anual for the digit_ set4op box.)
4, Sebct HDMI1/DVI or HDMI2 input source with using the
INPUT button on the remote control,
the digital set-top box has a DVI output and no
HDMi output, a separated audio connection is nec-
essary
• tf the digital set-top box supports Auto DVI fun_on,
the output resolu_Jon of the digita_ set4op _x wilt be
autotr_ticalfy set to 1280x720p.
• tf the digita_ set4op box does not support Auto DVl,
you need to set the output resolution appropriately.
To get the best picture quality, adjust the output res-
olution of the digital set4op box to 1280x720p,
16 P_smaTV
This TV provides P_ug and Ray capability; meaning that the PC adjusts automaticai_y to t_e TV's se_ngs
The TV perceives 640x480 60Hz as DTV 480p based on the PC graphic card, change the screen scanning rate for the graphic
card accordingly,
How to connect
1. To get the best picture quality; adjust the PC graphics card
to 1024x76& 60Hz,
2. Use the TVs RG8 INPUT or DW (Digi_ Visual Interface)
iNPUT pert for video connections, depending on your PC
connector.
,_fthe graphic card on the PC does not output analog and
digP_amRGB simuJtaneous_y connect only one of either
RGB INPUT or DV[ INPUT to display the PC on the TV.
,If the graphic card on the PC does output analog and digi-
t_J RGB simultaneously, set the TV to either RGB or DVI;
(the other mode is set to Plug and P_ay automatically by
the TV.)
3 Then make the corresponding audio connections. If using a
sound card, adjust the PC sound as required.
How to use
1, Turn on the PC and the TV.
2. Turn on the display by pressing the POWER button on the
TV"s remote control
3 Select RGB:I-2 input source in main input option of SETUP
menu. (Refer to P.23)
4 Check the image on your TV. There may be noise associat-
ed with the resolution, vertica_ pottern, contrast or brightness
in PC _de. ff noise is present, change the PC mode to
another resolution, change the refresh rate to another rate
or adjust the brightness and contrast on the menu unti_ the
picture is dear, ff the refresh rate of the PC graphic card
can not be changed, change the PC graphic card or consult
the manufacturer of the PC graphic card.
I_ Connect the DV[ output of the PC to the HDM[1/DVI IN iack
on the set.
2. Connect the PC audio output to the AUDIO IN(RGBiDVl)_ack
on the seL
& Turn on the PC and the set,
4. Select HDMI1/DVI input source with using the INPUT button
on the remote control,
1
•HDMI2 source does not support DV] source,
• If the PC has a DV[ output and no HDM[ output, a separat-
1
ed audio connection is necessary,
• tf the PC does not support Auto DVI_ you need to set the
output reseiution appropriately, To get the best picture quaFo
it,y,adjust the output reco[ution of PC graphiss _rd's output
resolutian to 1024x:768, 60Hz,
Owner's Manual 17
1. Depending on the graphics card, DOS mode may
not work if a HDMI to DVI Cabte is in use_
2. When Source Devices connected with HDMH/DVl
Input, output PC Resolution (VGA, SVGA, XGA),
Position and Size may not fit to Screen.Press the
ADJUST button to adjust the screen Position of TV
SET and contact an PC graphics card service cen-
ter
3 When Source Devices connected with HDMI1/DVl
Input, ou_ut TV SET Resolution (480p, 720p,
1080i) and TV SET Display fit EINCEA-861-B
Specification to Screen. If not, refer to the Manual
of HDMI1!DVl Source Devices or contact your ser-
vice centen
4. In case HDMH!DVl Source Devices is not con-
nected C_le or poor came connection, "NO SIG-
NAL" OSD display in HDMI1/DVl input. In case
that Video Resolution is not supported TV SET
output in HDMtliDVl Source Devices, "INVALID
FORMAT" OSD display: Refer to the Manuat of
HDMfl/DVl Source Devices or contact your set-
vice center.
5, Check the image on your TV. There may be noise
associated with the resolution, vertical pattern,
contrast or brightness in PC, HDMI1iDW mode, If
noise is present, change the PC or HDMI1/DVl
mode to another resolution, change the refresh
rate to another rate or adjust the brightness and
contrast on the menu until the picture is clear If the
refresh rate of the PC graphic card can not be
changed, change the PC graphic card or consult
the manufacturer of the PC graphic card.
6. Avoid keeping a fixed image on the TV's screen for
a long period of time. The fixed image may become
permanently imprinted on the screen,
7. The synchronization input form for Horizontal and
Vertical frequencies is separate,
Monitor Display Specifications (RGB1i2-PC)
Resolution Horizontal Vertical Herizon_l
640×350
640x480
31.469
31_469
37,86I
37.500
70.08
59.94
72.80
75 O0
800x_0
i0_4x768
35.156
37.879
48.077
4&875
48363
5&476
60023
Vertical
Frequency(Hz)
56.25
6031
7&18
75,00
60,00
7&06
7&02
Monitor Di_lay Specifications (HDMIltDVI-PC Mode)
Resolution
640x480
800x600
Horizontal
Frequency(KHz}
31,469
37,861
37.5_
35.156
37,879
4&077
4&875
Vedical
Frequency(H_
59,94
72.80
75,00
56,25
6&31
7&18
75.00
Resotu|ton:
1024x768
Horizontal
Frequency(KH_
48363
5&476
60.023
Ve_ical
Frequency(Hz)
6&00
7&06
75.02
18 Ptasma TV
Send the TV_s audio to external audio equipment (stereo system) via
the Digital Audio Out(Optica0 port
How to connect
1, Connect one end of an optical cable to the TV Digit[ Audio
(Op_ca0 Output port
2, Connect the other end of the optical cable to the digita_ audio (opti-
ca0 input on the audio equipment_
See the external audio equipment instwction manua_ for operation.
Note: When connecting with external audio equipments, such as
amp/ifers or speakers, please turn the TV speakers off, ('Refer to
p,28)
Caution: Do not took into the opticat output port
Looking at the laser beam may damage
your vision.
External Audio Equipment
Owner's Manual 19
peration
*in this manual, the OSD (On Screen Display) n'my be different from your TV's _use it is just an
exam_e to help you with the "PJ operation,
2,
3,
First, connect power cord correctly At this moment, the TV swffches to standby m_e.
tn standby mode to turn TV on, press the 0/I button on the TV or press the POWER button on the remote control.
Select the viewing source by using INPUT button on the remote control.
When finished using the TV, press the POWER button on the remote control. The TV reverts to standby m_e,
TV Setup
-The menus _n _ shown on the screen in the selected language. First select your language
I. Press the MENU button and then use &/V button to select the OPTION
men u
2. Press the I_ button and then use A /V button to select Language.
3. Press the Ilp button and then use A /y button to select your desired language
From this point on the on-screen m_nus will be shown in the sefected lan-
guage.
4, Press EXIT button to return to TV viewing or press MENU button to return to
the previous menu,
20 Ptasma TV

This manual suits for next models

2

Other LG Plasma TV manuals

LG 42V5 User manual

LG

LG 42V5 User manual

LG 50PN6500 User manual

LG

LG 50PN6500 User manual

LG DU-42PY10X User manual

LG

LG DU-42PY10X User manual

LG 50PM470T User manual

LG

LG 50PM470T User manual

LG 42PQ20D User manual

LG

LG 42PQ20D User manual

LG 50PB65 User manual

LG

LG 50PB65 User manual

LG RU-42PZ61 User manual

LG

LG RU-42PZ61 User manual

LG 60PN5700 Manual

LG

LG 60PN5700 Manual

LG 50PG20D User manual

LG

LG 50PG20D User manual

LG 32PC5 Series User manual

LG

LG 32PC5 Series User manual

LG PM47 series User manual

LG

LG PM47 series User manual

LG 50PJ350 User manual

LG

LG 50PJ350 User manual

LG SAC34173302 User manual

LG

LG SAC34173302 User manual

LG 42PG6900 User manual

LG

LG 42PG6900 User manual

LG 42PB2RR User manual

LG

LG 42PB2RR User manual

LG 42PG20R User manual

LG

LG 42PG20R User manual

LG 42PT81 User manual

LG

LG 42PT81 User manual

LG RZ-42PX10 User manual

LG

LG RZ-42PX10 User manual

LG 32PC5RV User manual

LG

LG 32PC5RV User manual

LG 60PA6500 User manual

LG

LG 60PA6500 User manual

LG RZ-50PY10 User manual

LG

LG RZ-50PY10 User manual

LG 60PS60 -  - 59.5" Plasma TV User manual

LG

LG 60PS60 - - 59.5" Plasma TV User manual

LG 50PX4D User manual

LG

LG 50PX4D User manual

LG 42PA4500 User manual

LG

LG 42PA4500 User manual

Popular Plasma TV manuals by other brands

Panasonic TH-37PW7BX operating instructions

Panasonic

Panasonic TH-37PW7BX operating instructions

Palsonic PDP4212HD instruction manual

Palsonic

Palsonic PDP4212HD instruction manual

Samsung PN42C430A1DXZA brochure

Samsung

Samsung PN42C430A1DXZA brochure

Hitachi P50S601 - 50" Plasma TV operating guide

Hitachi

Hitachi P50S601 - 50" Plasma TV operating guide

Philips Epic 50PF9966 Specifications

Philips

Philips Epic 50PF9966 Specifications

Samsung PN58C680 user guide

Samsung

Samsung PN58C680 user guide

Samsung PS63B680T6W Quick setup guide

Samsung

Samsung PS63B680T6W Quick setup guide

Panasonic Viera TX-P42S21B operating instructions

Panasonic

Panasonic Viera TX-P42S21B operating instructions

Panasonic Viera TH-P42ST30Z operating instructions

Panasonic

Panasonic Viera TH-P42ST30Z operating instructions

Samsung PS42P3SX Service manual

Samsung

Samsung PS42P3SX Service manual

Samsung PS-42S5S Owner's instructions

Samsung

Samsung PS-42S5S Owner's instructions

Samsung PS42B450 user manual

Samsung

Samsung PS42B450 user manual

Samsung PS50C550 user manual

Samsung

Samsung PS50C550 user manual

Samsung PN42A450P1D user manual

Samsung

Samsung PN42A450P1D user manual

Samsung PL43D490 user manual

Samsung

Samsung PL43D490 user manual

NEC 42XP10 - PlasmaSync - 42" Plasma Panel user manual

NEC

NEC 42XP10 - PlasmaSync - 42" Plasma Panel user manual

Bang & Olufsen BeoVision 4-85 installation guide

Bang & Olufsen

Bang & Olufsen BeoVision 4-85 installation guide

Polaroid PLA-4237 - 42" Plasma TV user manual

Polaroid

Polaroid PLA-4237 - 42" Plasma TV user manual

manuals.online logo
manuals.online logoBrands
  • About & Mission
  • Contact us
  • Privacy Policy
  • Terms and Conditions

Copyright 2025 Manuals.Online. All Rights Reserved.